SecureAuth MFA app user guide
App release update: September 19, 2024
Welcome to the rebranded SecureAuth MFA app!
The mobile app connects seamlessly with products in SecureAuth to provide multi-factor authentication (MFA) to make logins more secure. The SecureAuth MFA app generates login passcodes and sends you a push notification for one-tap authentication on your mobile device.
Authenticator apps by SecureAuth have two names in the app stores for different product deployments.
SecureAuth Authenticate – This app supports login requests coming from the SecureAuth® Identity Platform and its products.
The app icon name will appear as Authenticate.
SecureAuth MFA – This app formerly known as Arculix Mobile, supports login requests coming from Arculix and its products.
The app icon name will appear as SecureAuth MFA.
 |
Regardless of the name, your experience within the app will be tailored to your needs based on your login credentials.
For most of you, if you already have one or both of these apps installed, the app updates will be seamless for you. If you have any questions, reach out to a system administrator in your organization.
Task A: Download and install SecureAuth MFA
In the app store, search for SecureAuth MFA (formerly Arculix Mobile).
Android
Google Play link: SecureAuth MFA (formerly Arculix Mobile)
Apple
App Store link: SecureAuth MFA (formerly Arculix Mobile)
Task B: Connect your SecureAuth MFA app
Next, you will need to connect the SecureAuth MFA app to your user account.
Depending on the configurations set by your organization, you can connect your account in any of the following ways.
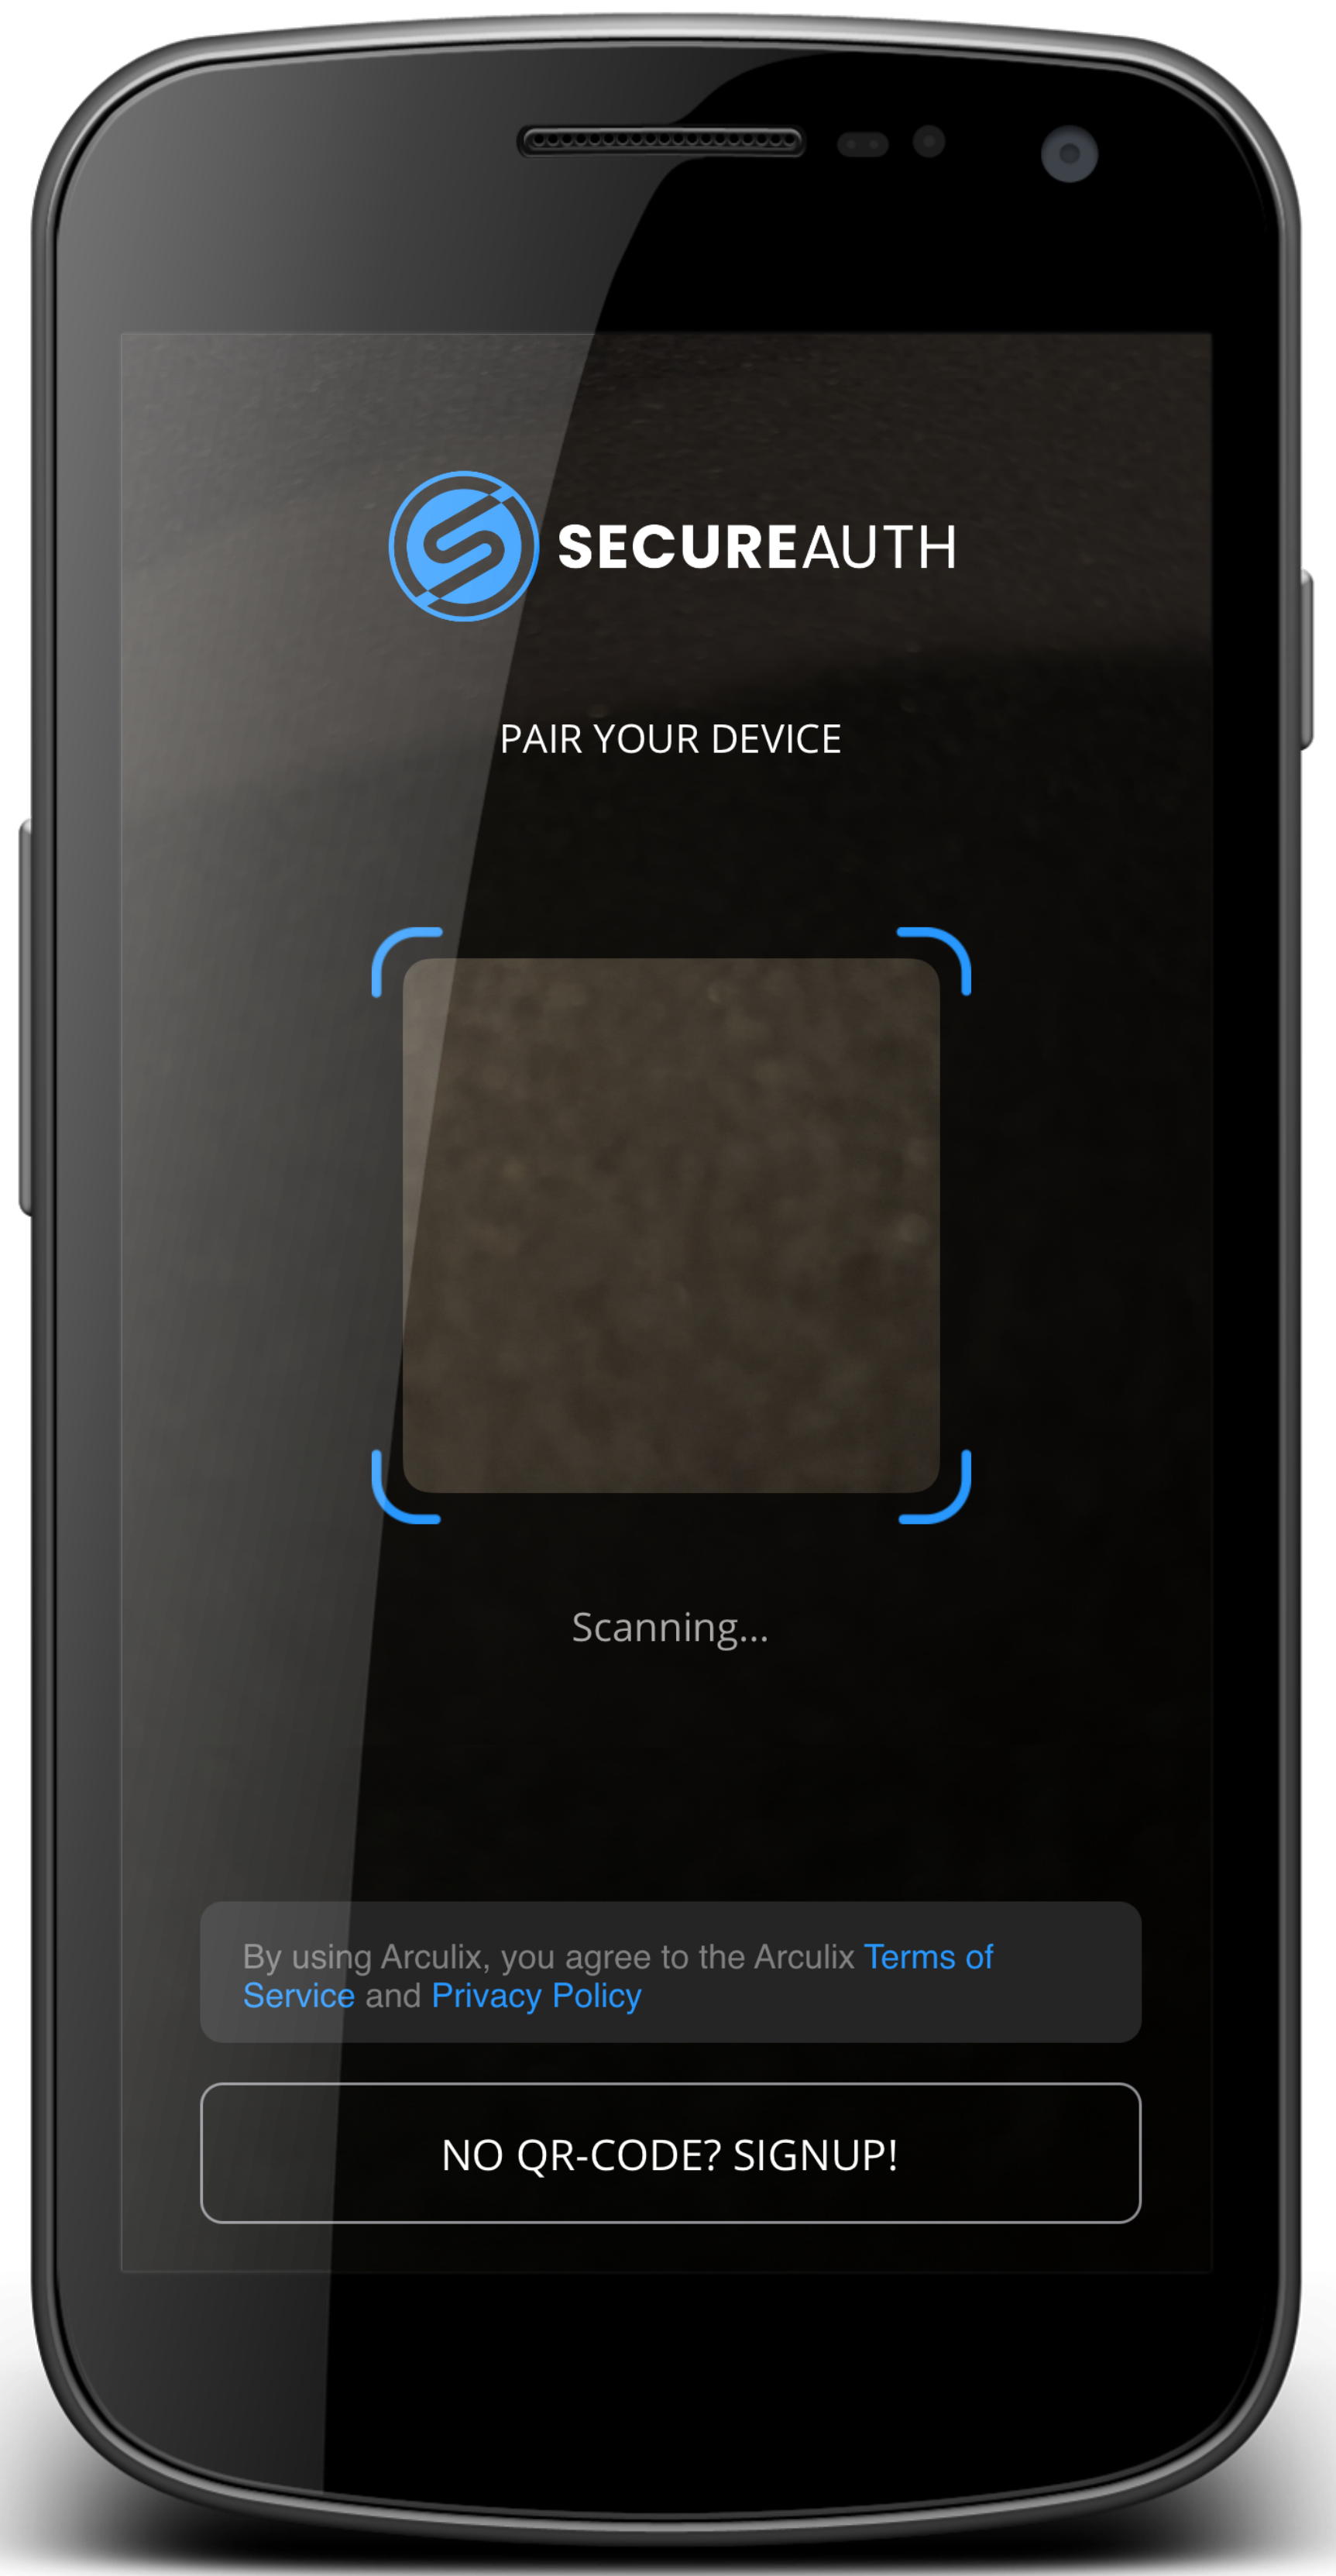
Use this method if your organization provides a QR code set up option.
Follow your organization's instructions to get the QR code to enroll your mobile device.
Open the SecureAuth MFA app. Then, scan the QR code in one of these ways:
Open QR scan. In the bottom row of icons, tap QR Scan.
Add Account. Tap Settings (gear icon) > scroll down to Add Account.
Tap Scan QR Code and scan the QR code displayed on your computer.
You might be prompted to verify your identity. This will depend on your organization's settings.
Use this method if your organization provides email pairing.
On your mobile device, open SecureAuth MFA app.
Tap No QR Code? Sign up!.
Tap No QR Code? Sign up!
Next, enter your organization email.
You will receive an email with instructions to pair.
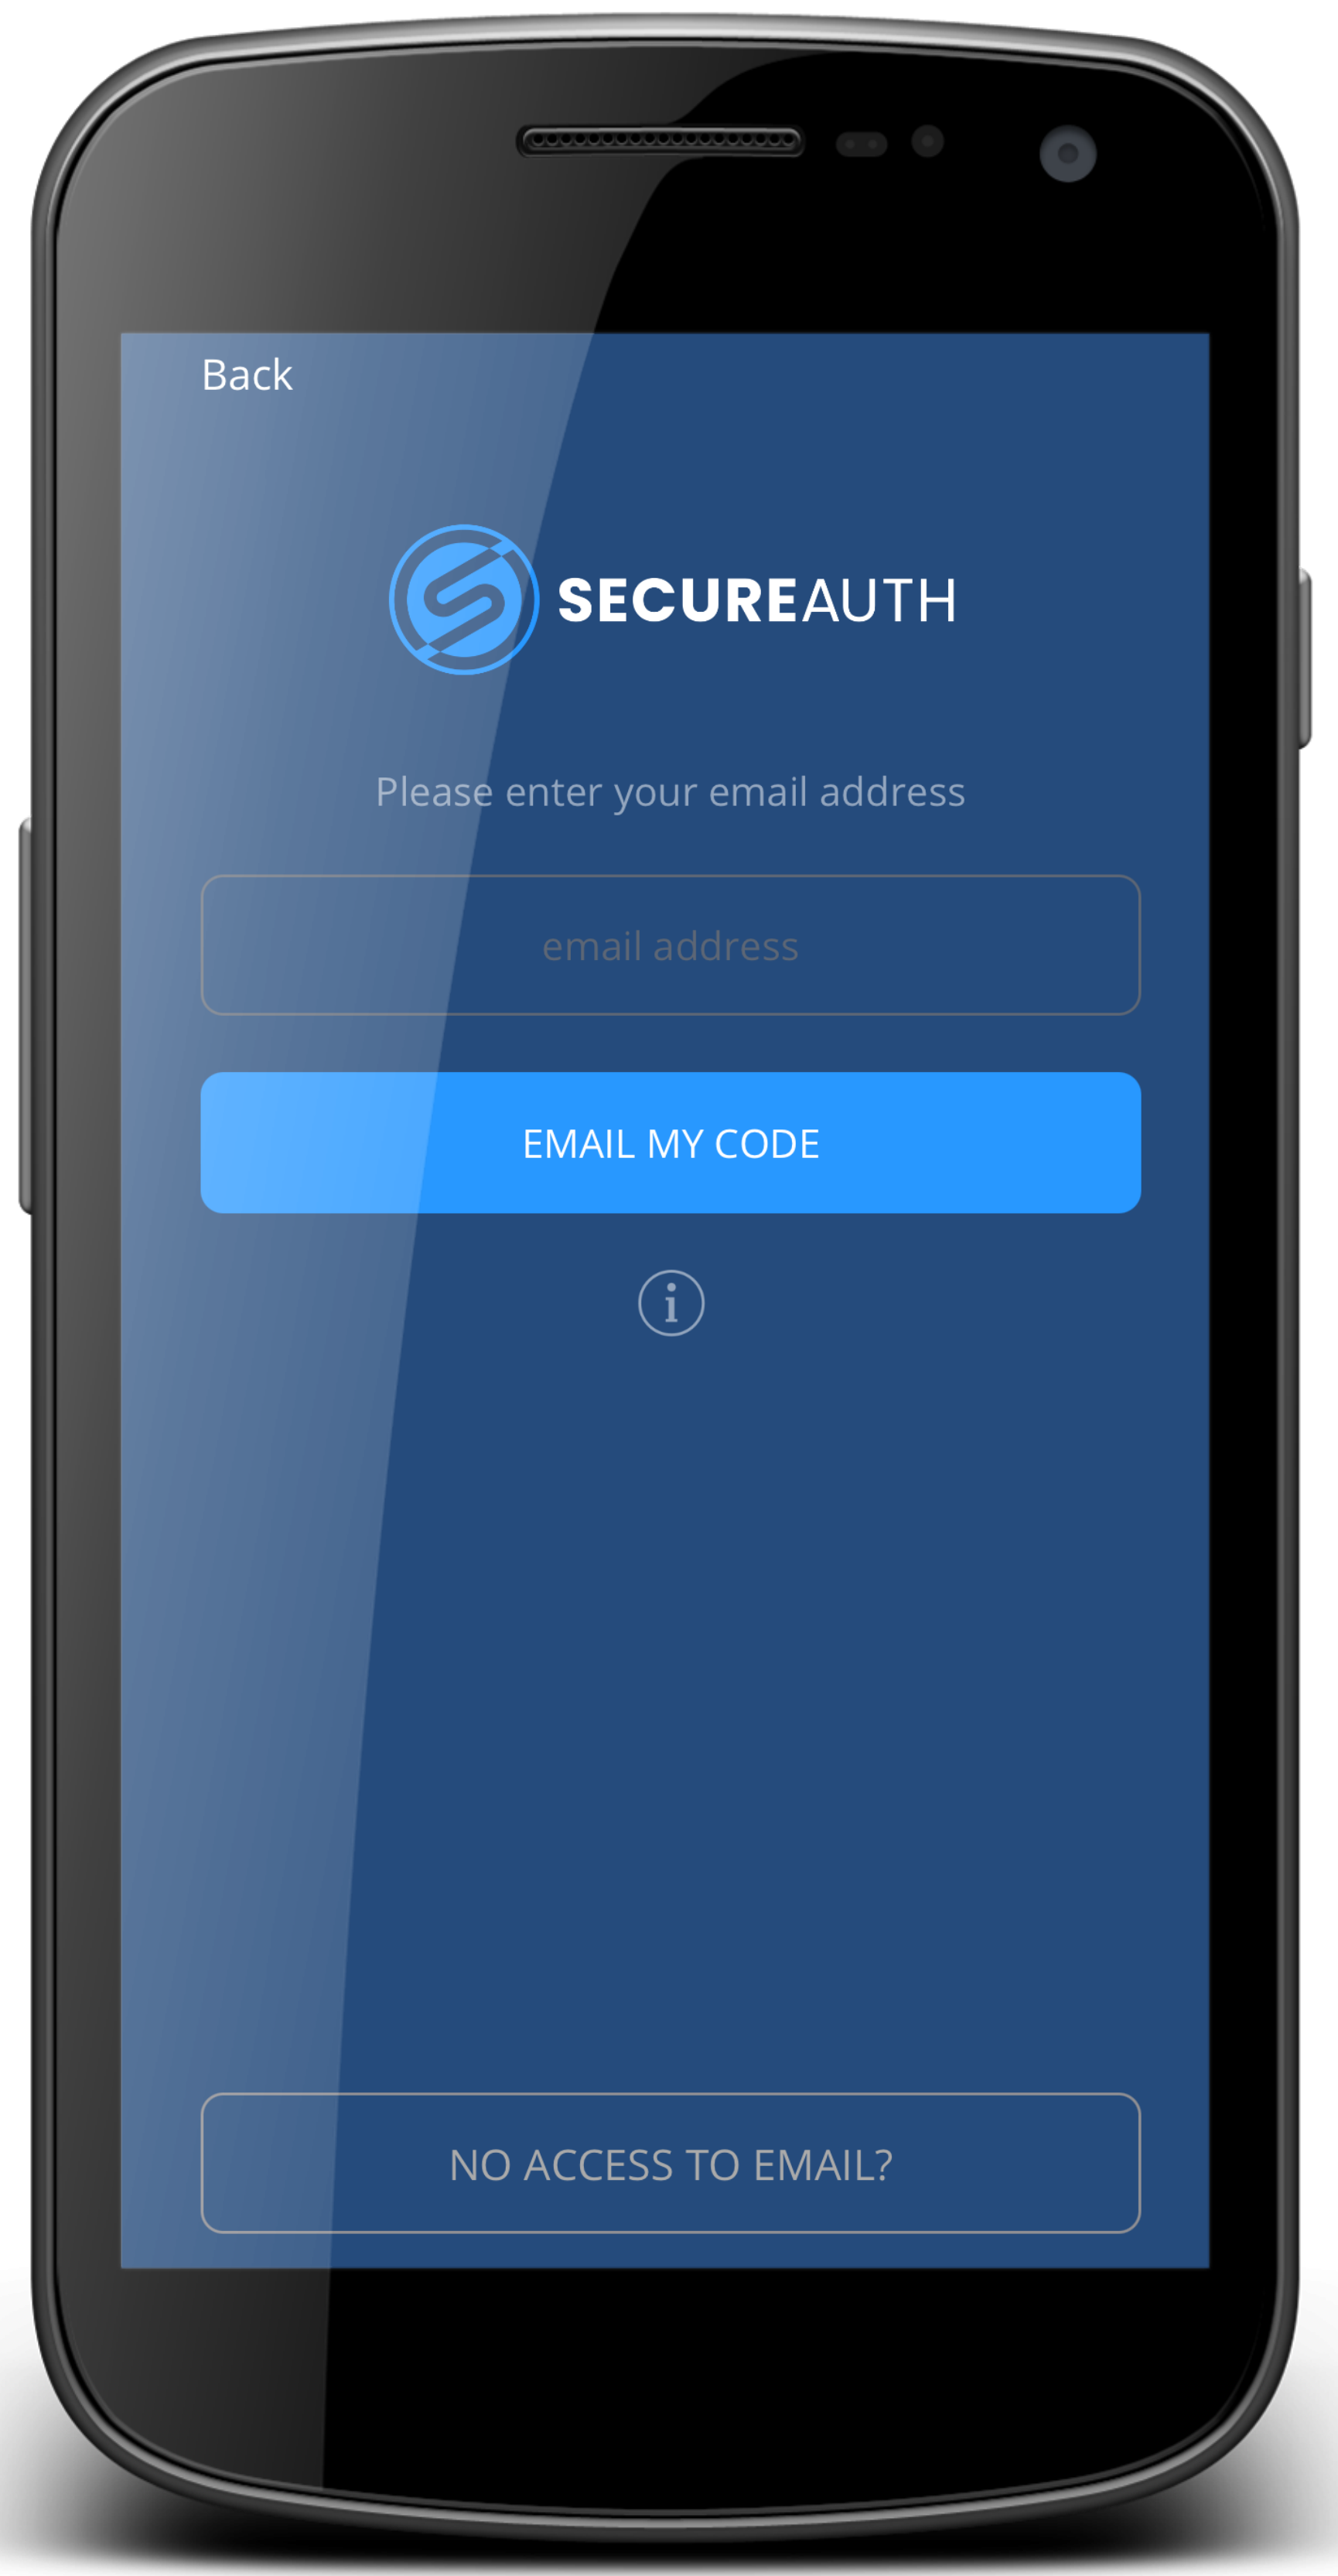
Enter email address
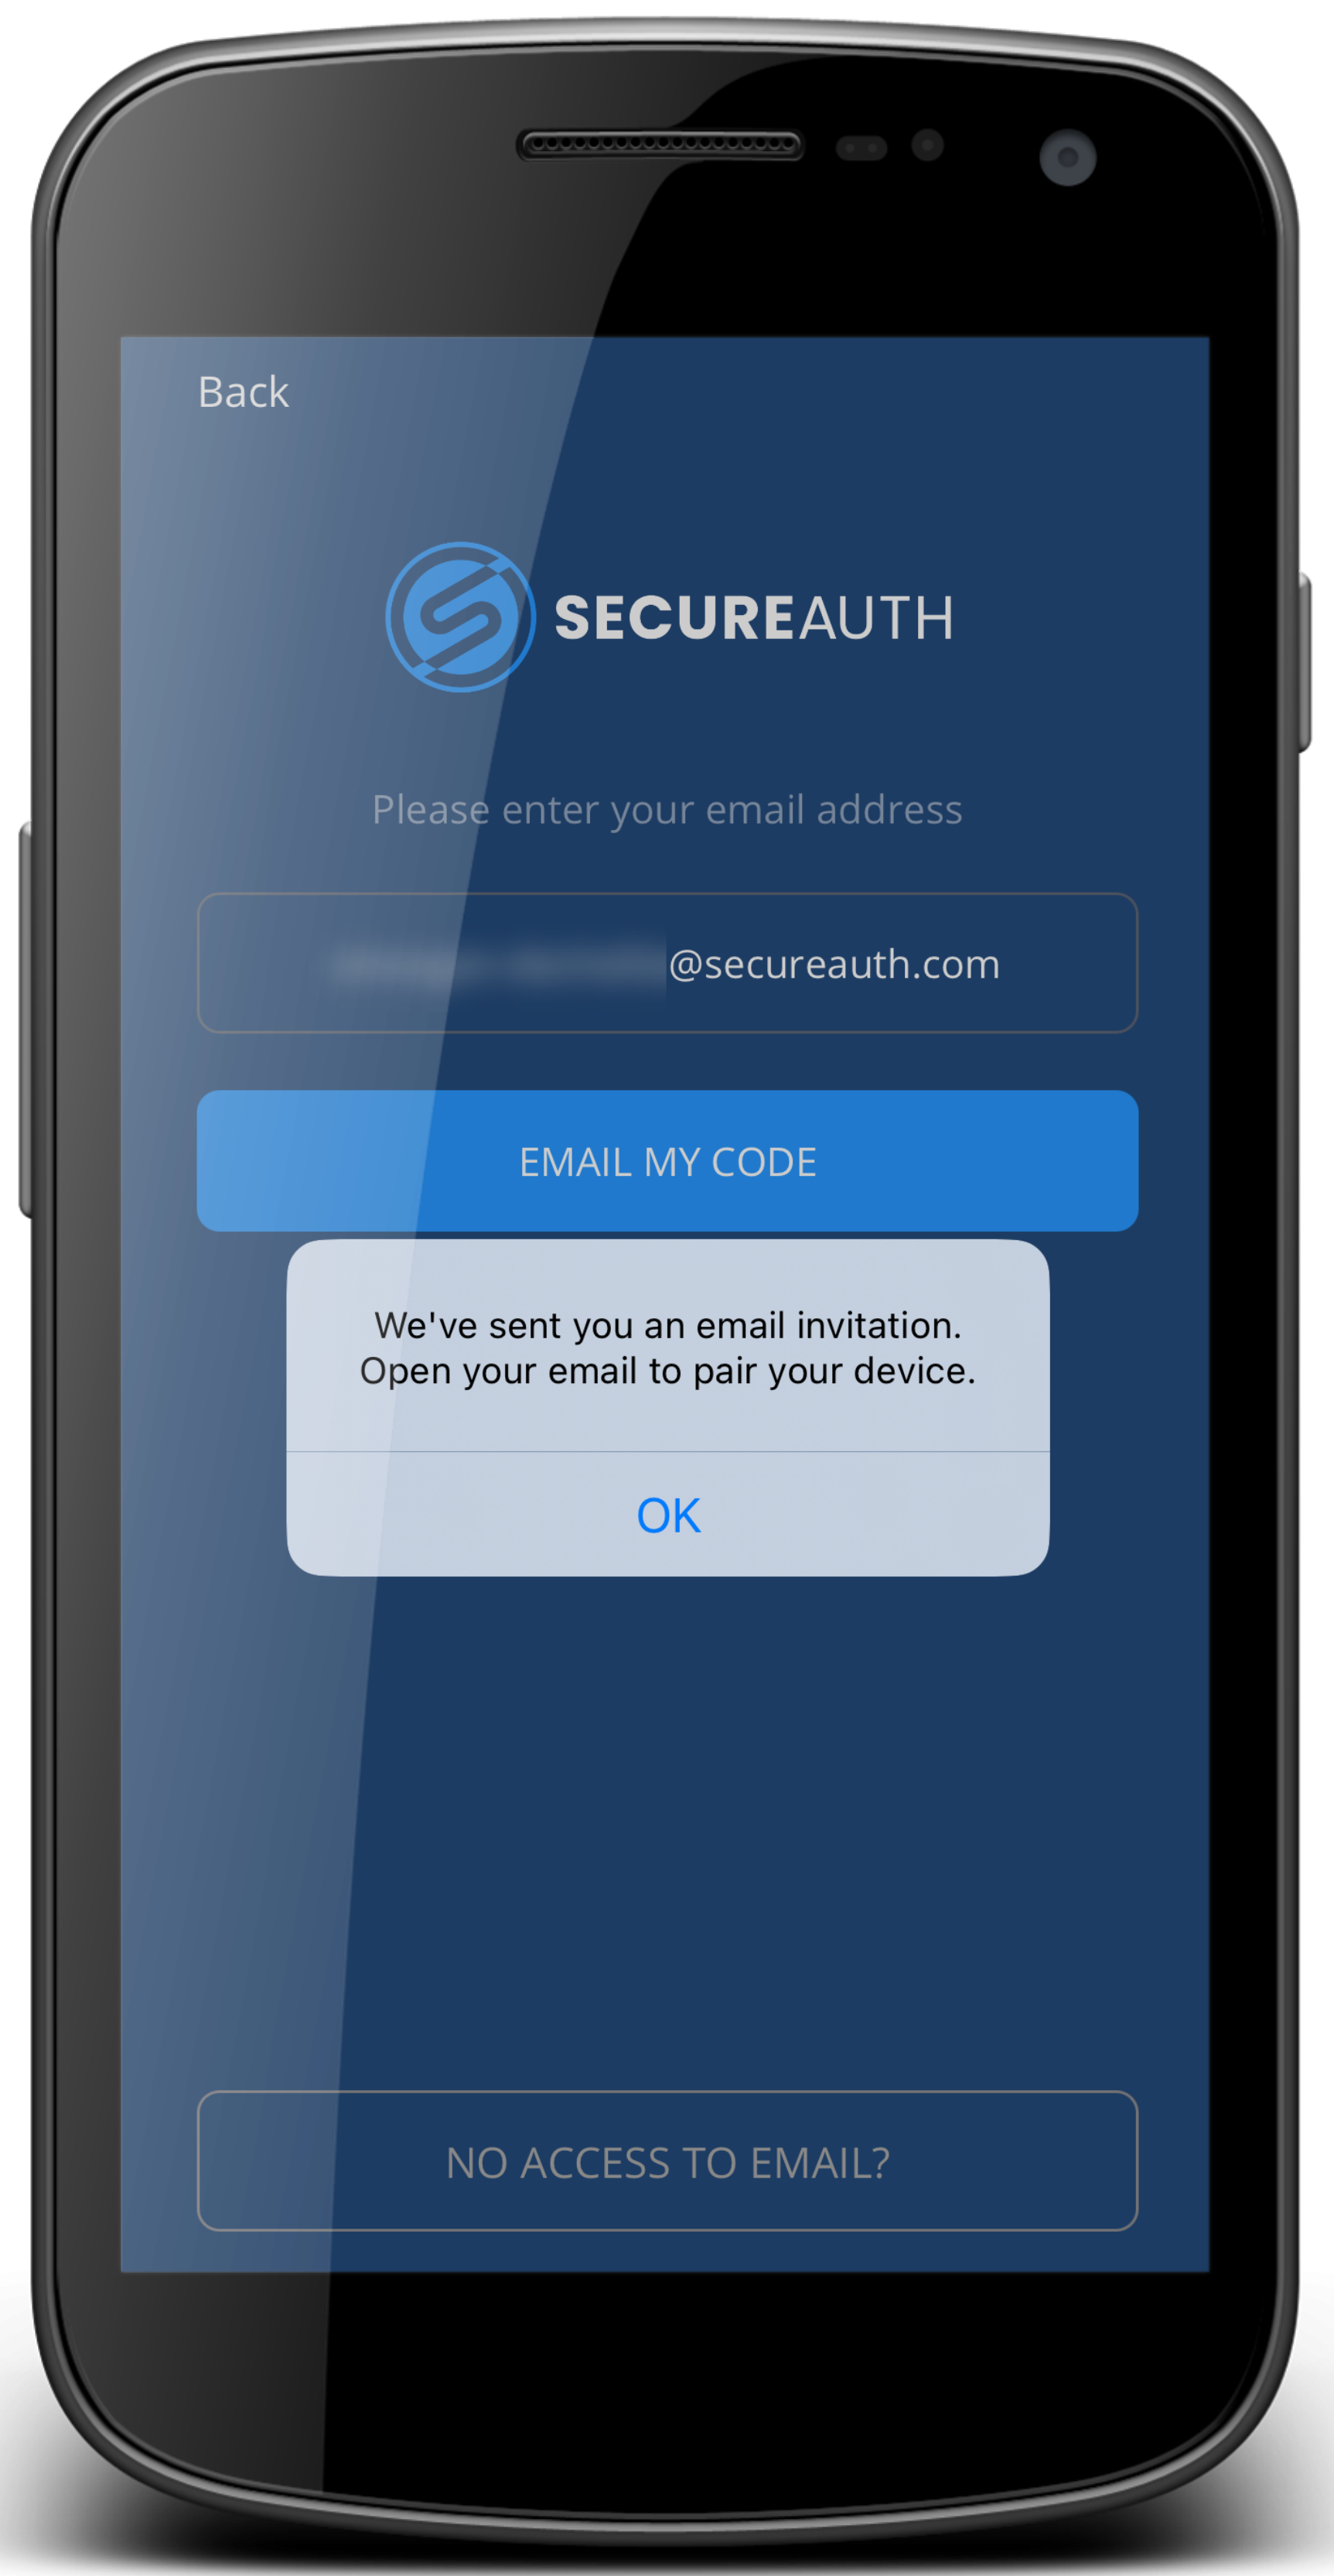
Check your email
On your computer, open your email.
Use the SecureAuth MFA app to scan the QR code in the body of the email.
Take note that the QR code in the email is only good for a certain amount of time as set by your organization. If it expires, repeat step 2 above to get another email request with a new QR code.
Use this method if your organization provides a Magic Link for fast pairing on a mobile device.
On your mobile device, open SecureAuth MFA app.
Tap No QR Code? Sign up!.
Tap No QR Code? Sign up!
Next, enter your organization email.
You will receive an email with instructions to pair.
Enter email address
Check your email
Use your mobile device to open your email.
Scroll down to the bottom the email and find the Magic Link for Tap to Pair.
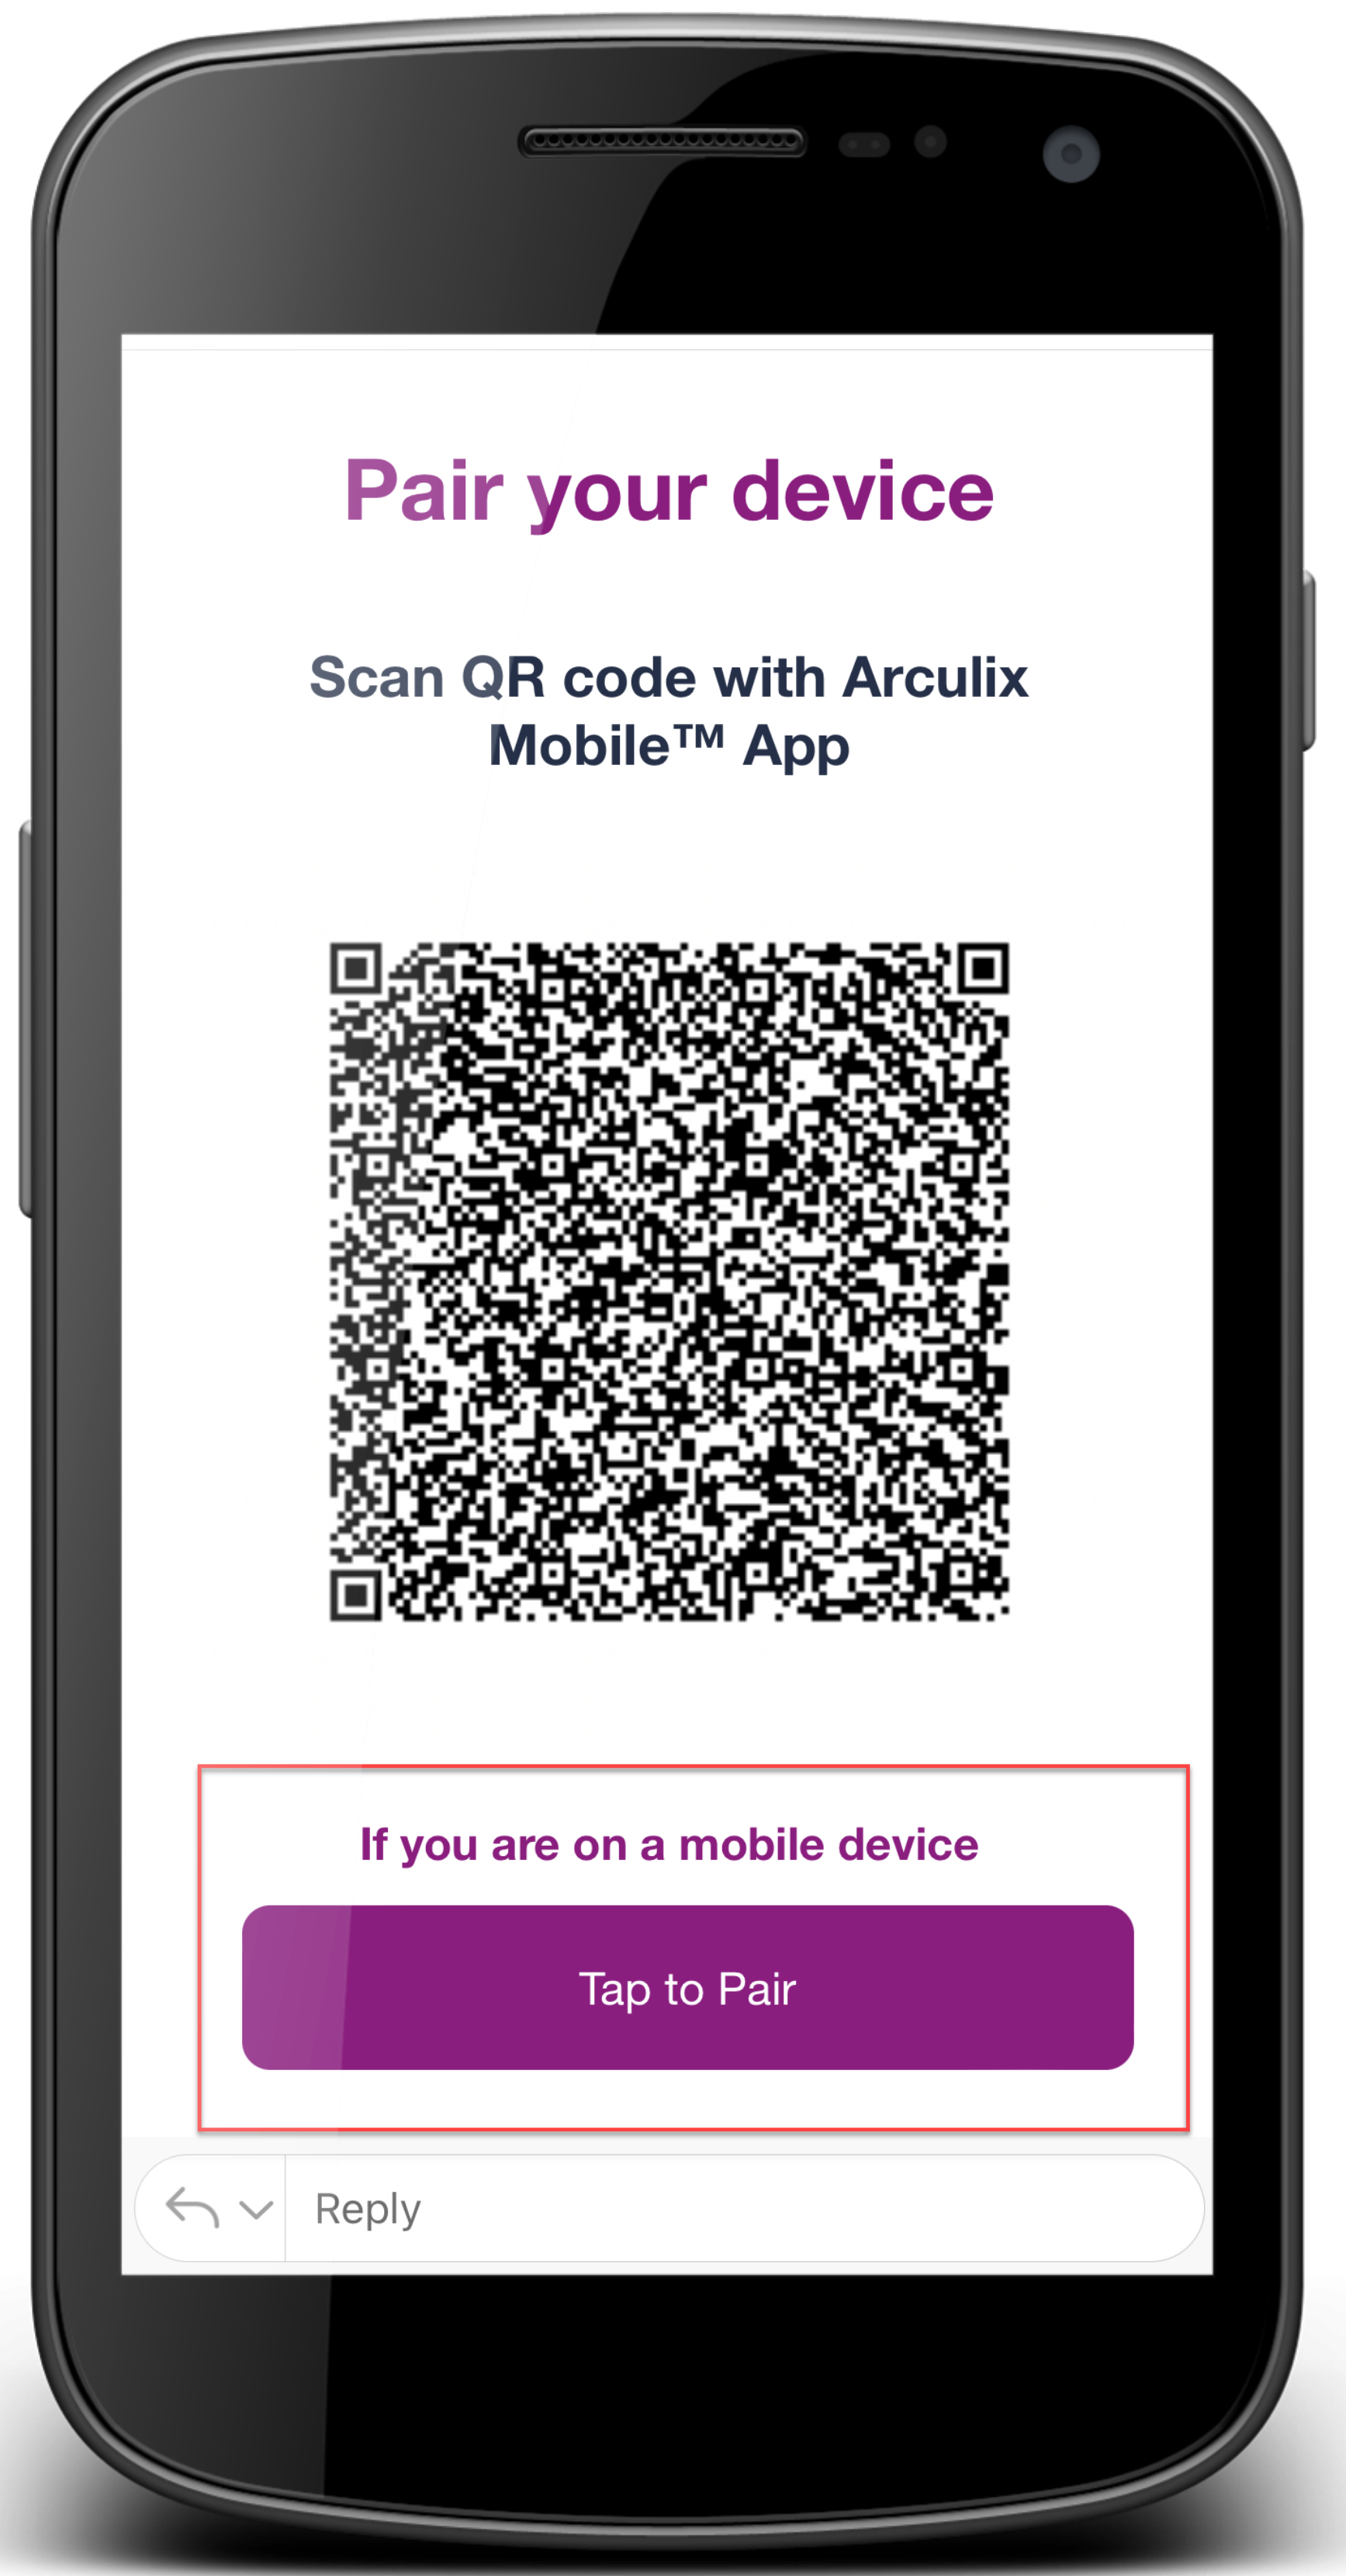
Magic Link - tap to pair your mobile device
Task C: Login and verify with SecureAuth MFA
Login and verify access with SecureAuth MFA.
Login to your computer or application.
SecureAuth MFA prompts you to take action to approve access.
This will depend on your organization's settings. To approve access, you may need to tap "Accept", tap the matching symbol, use biometrics, or enter the app's displayed passcode.
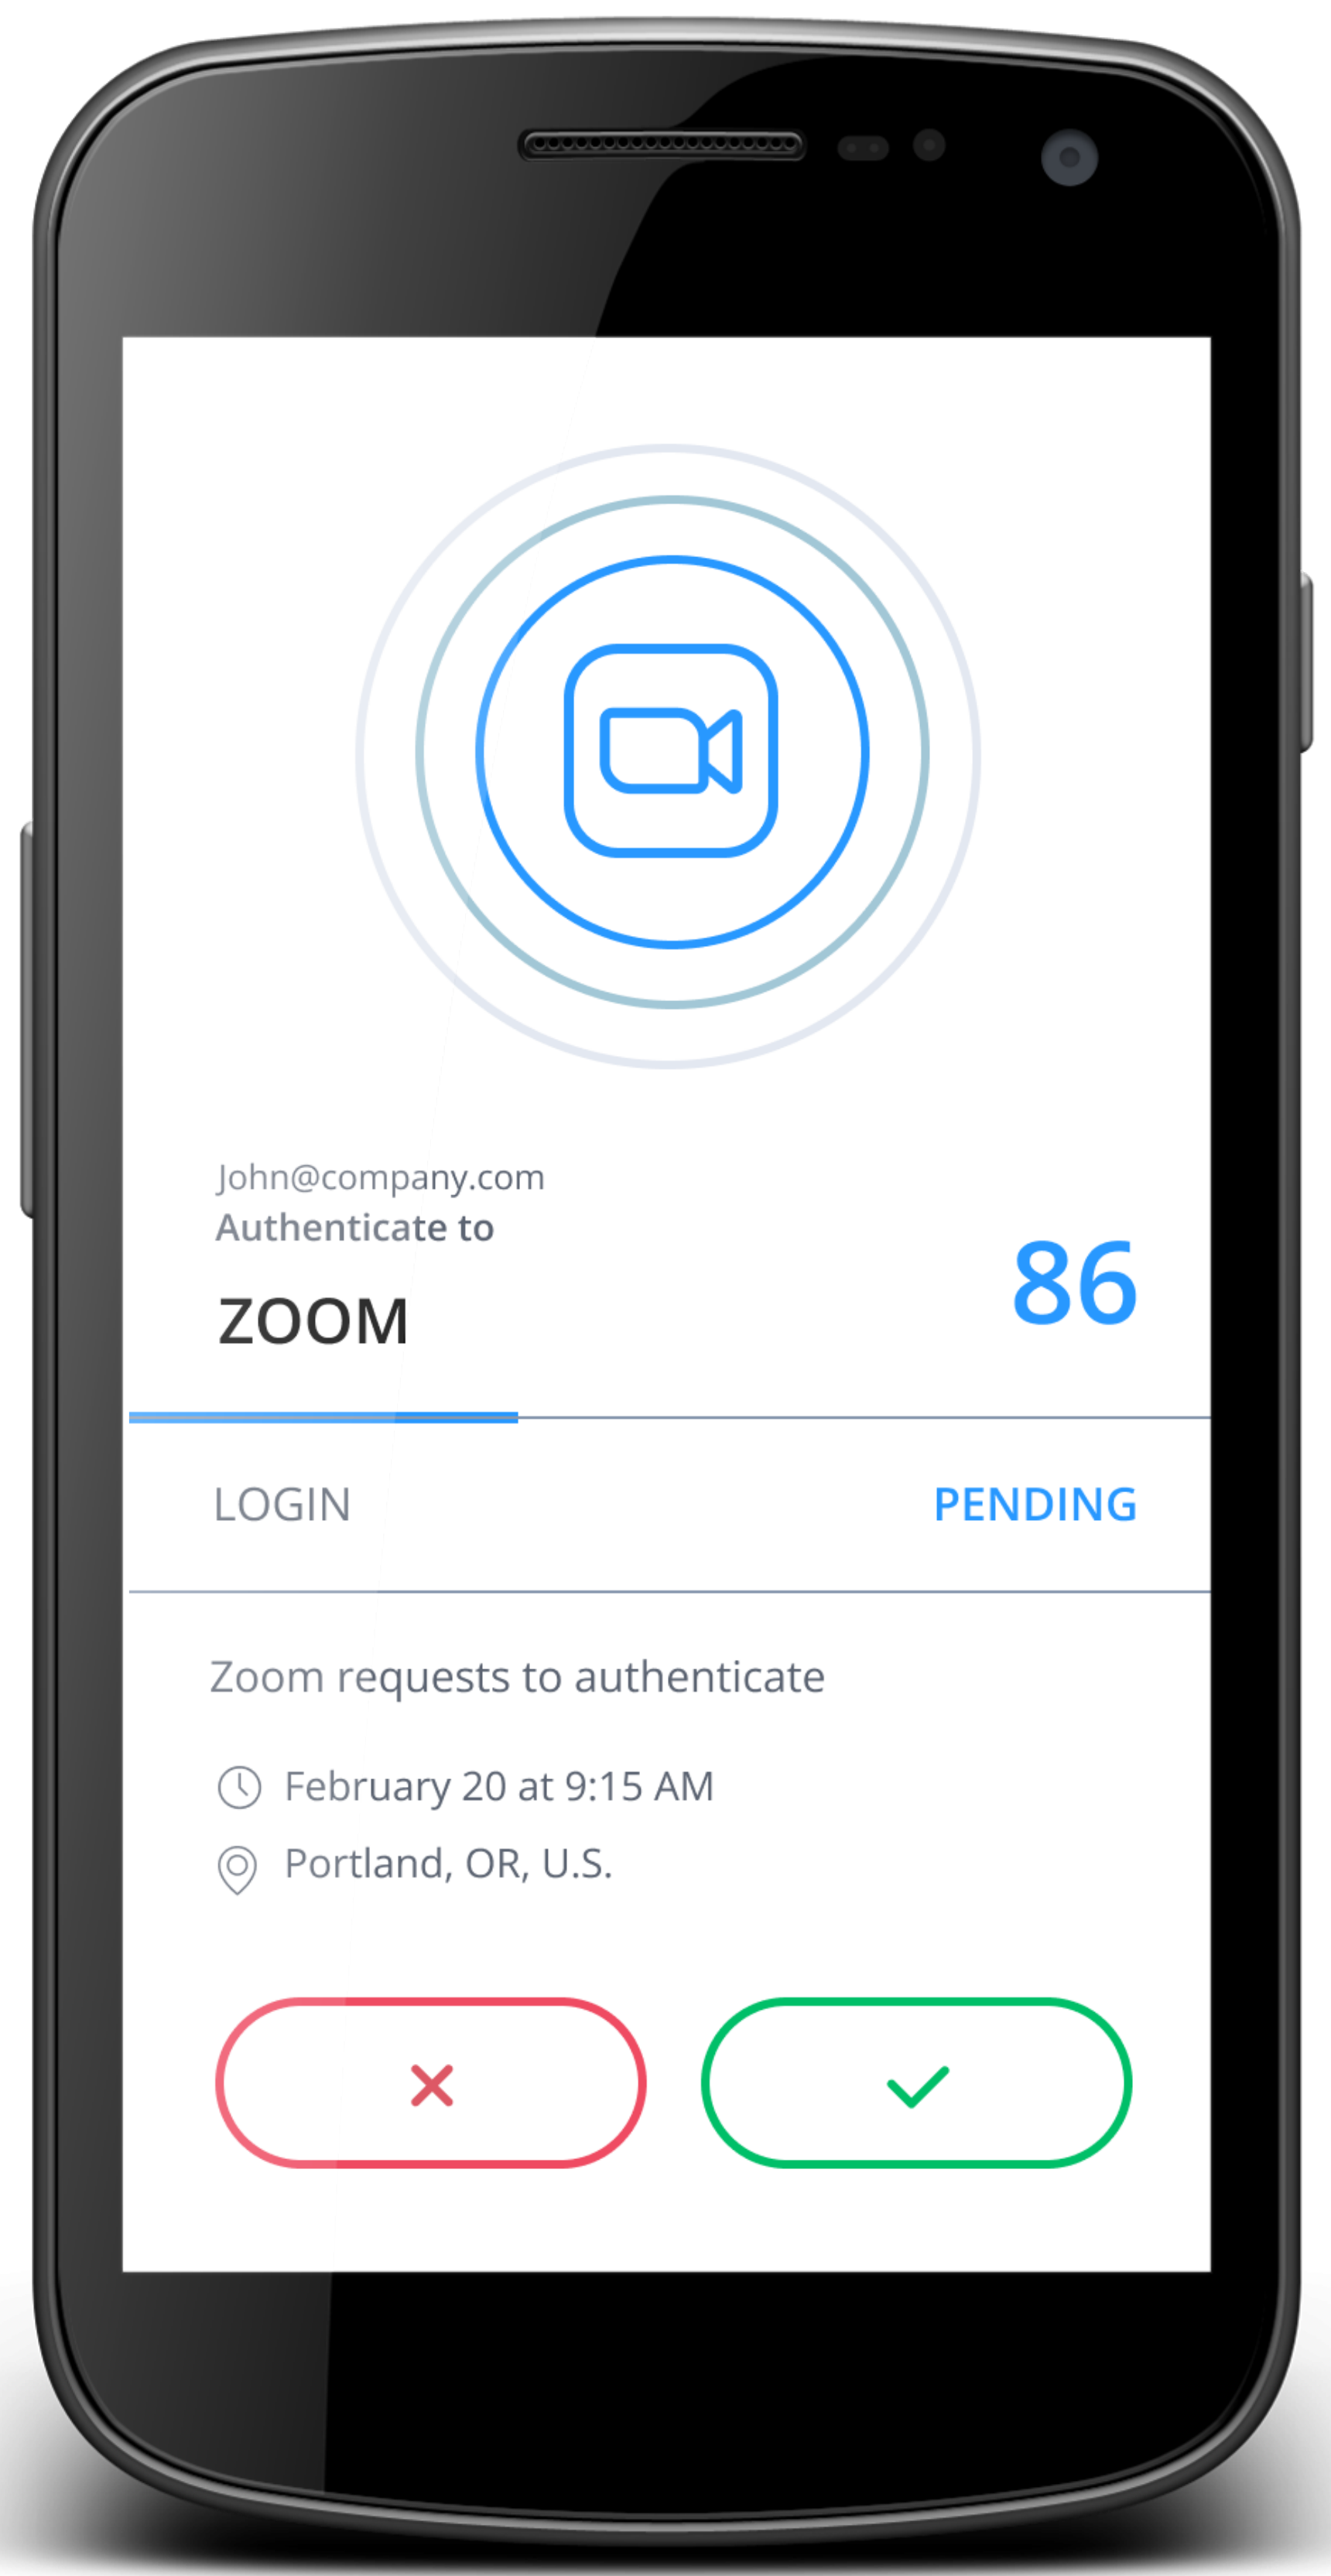
Accept to approve
View passcode
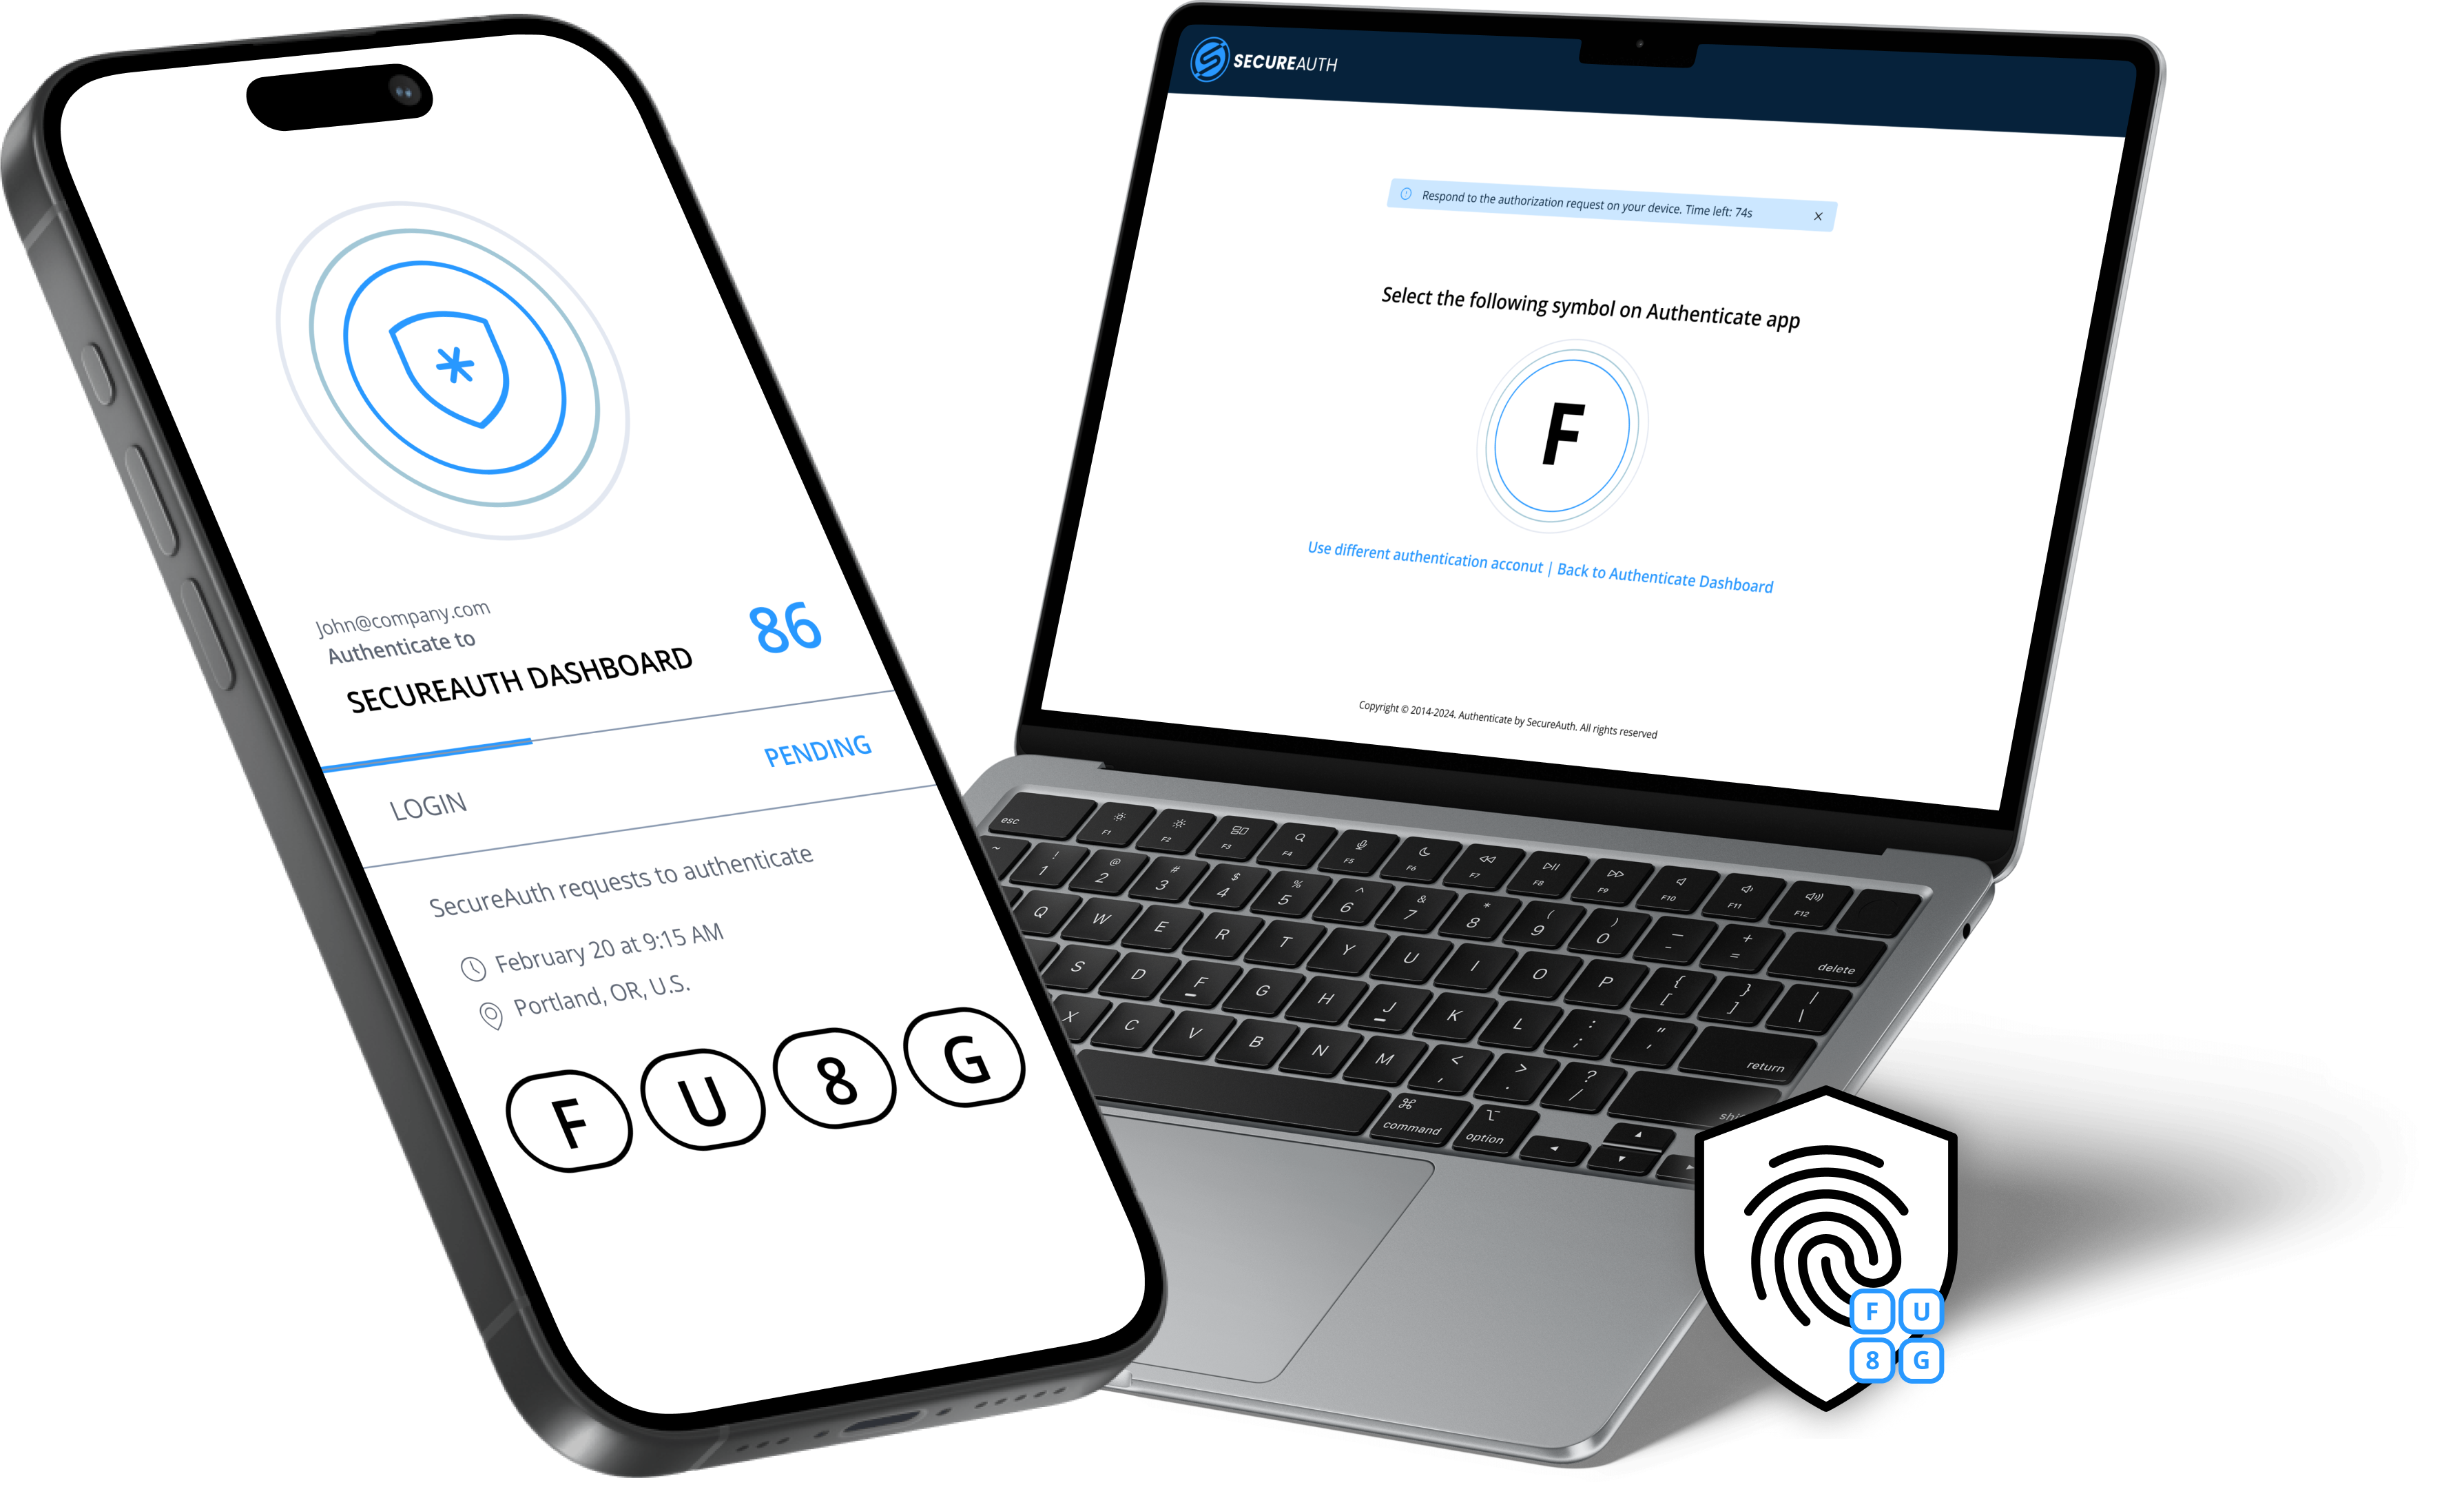
Symbol Push login method
Other features in SecureAuth MFA
Some key features in SecureAuth MFA are described next.
Multi-Accounts | Use the fast switch menu at the top of the Dashboard to switch accounts. 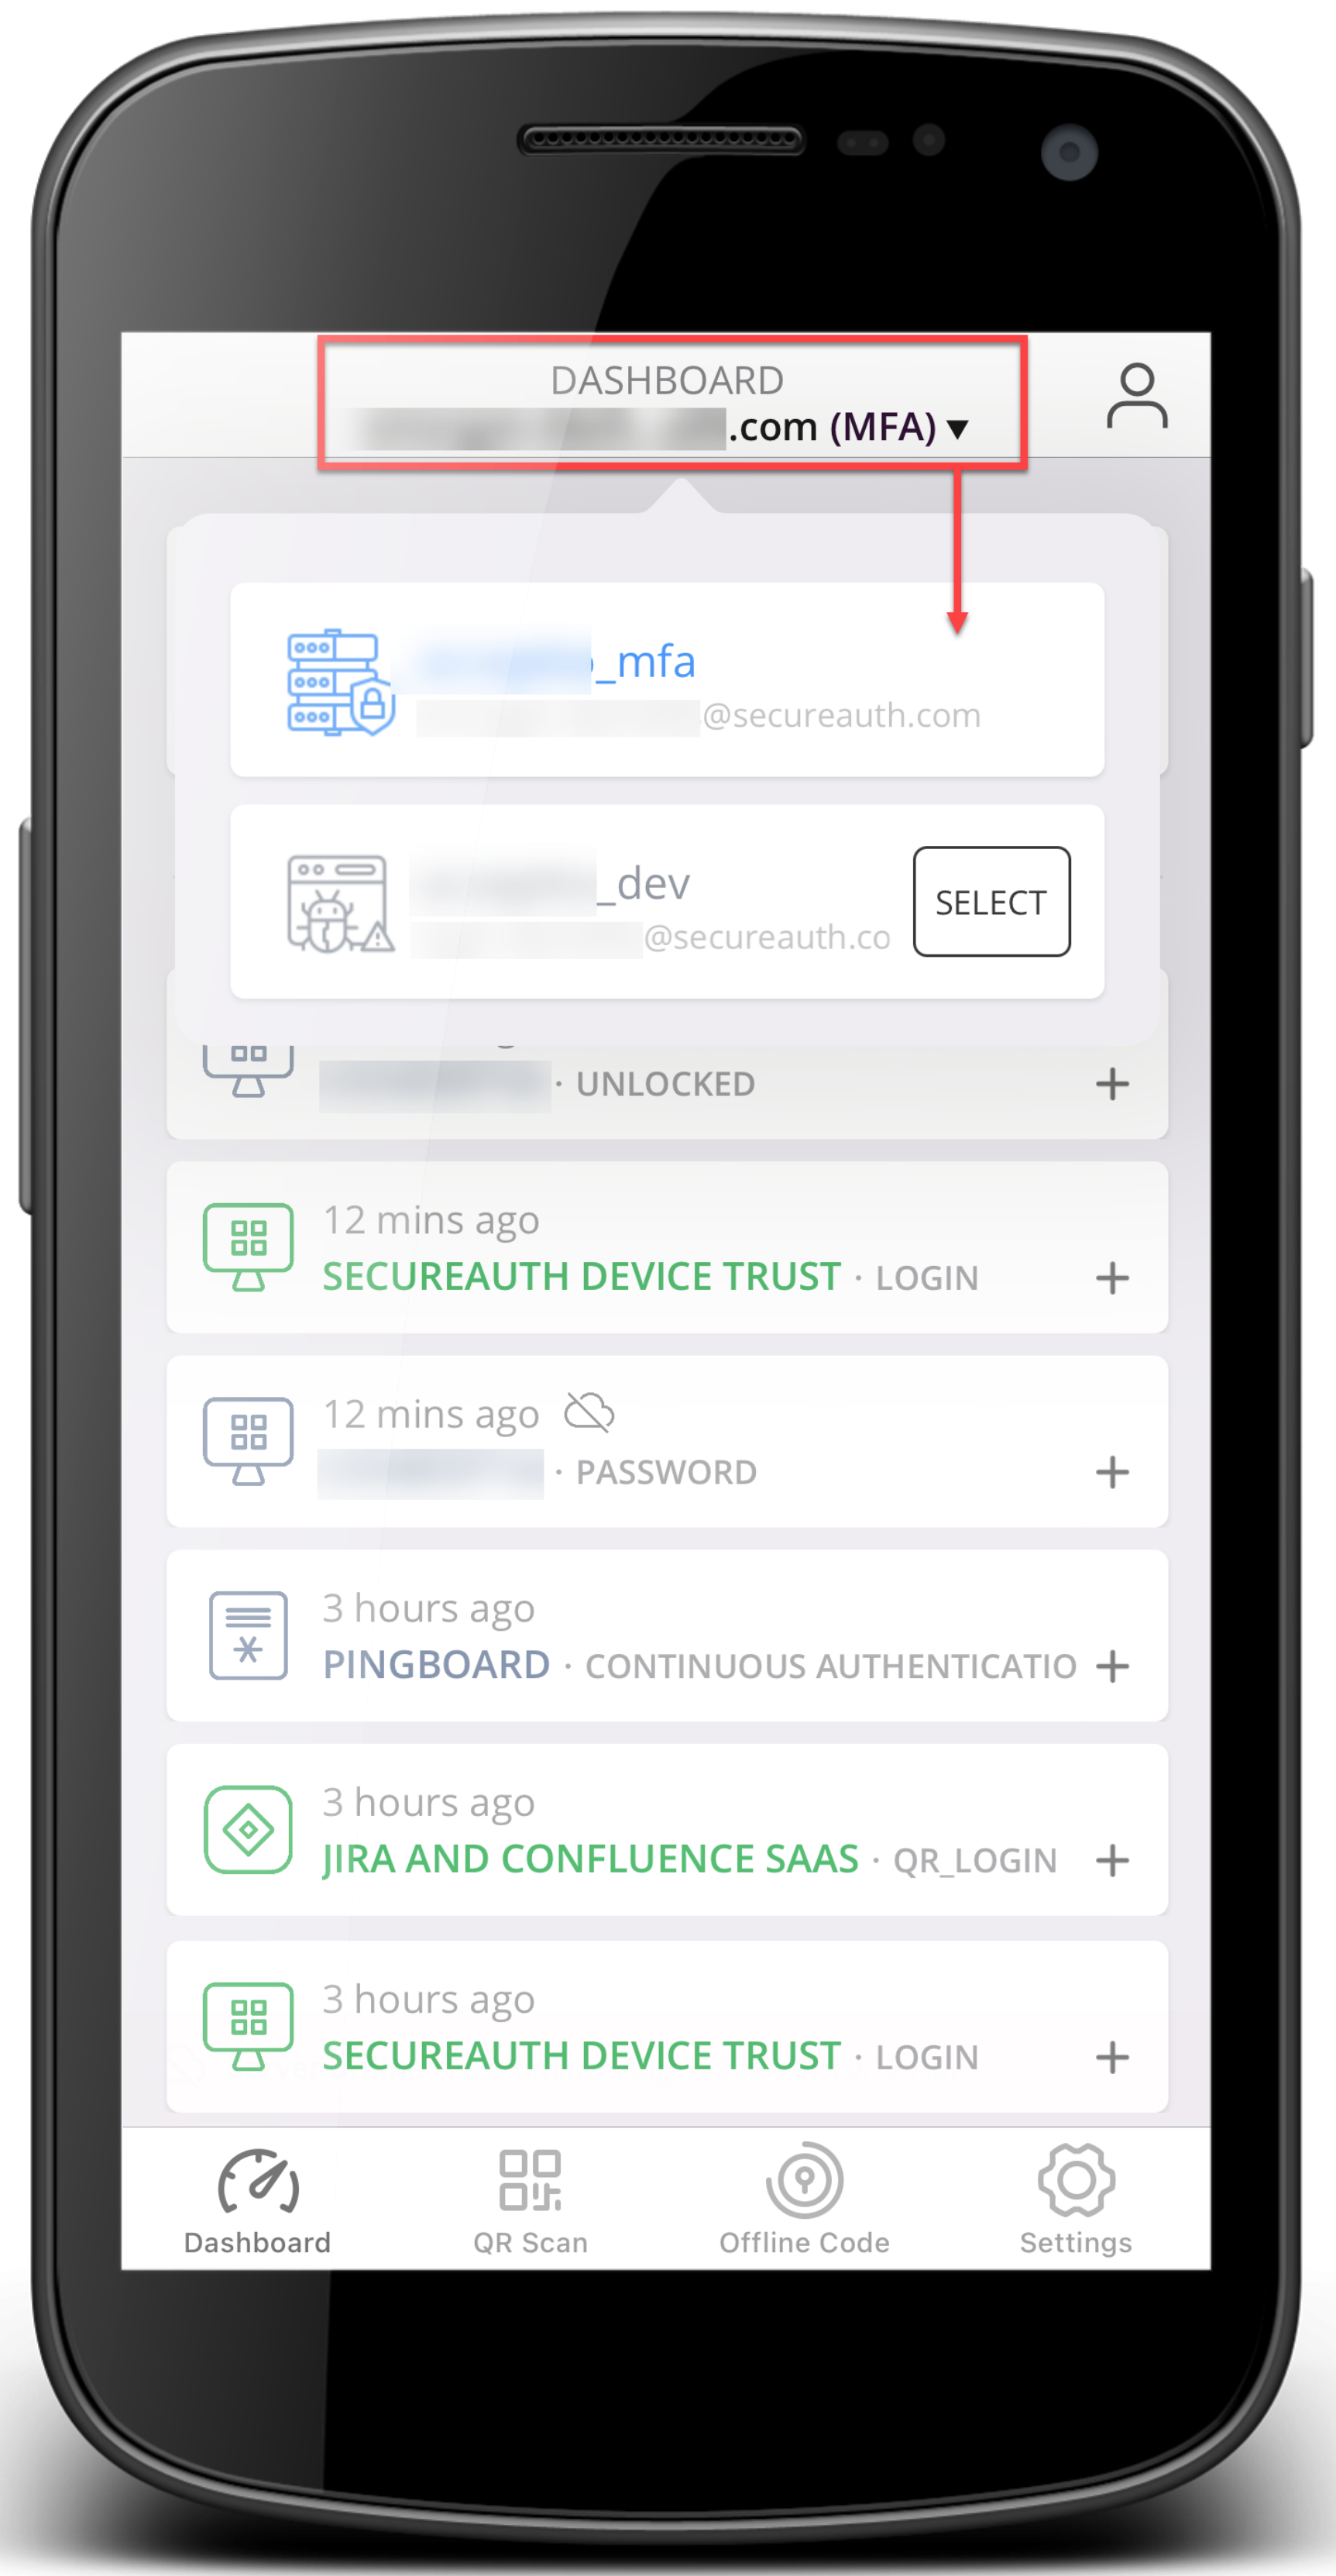 Multi-accounts Working with multiple accounts. Some features work simultaneously for all accounts:
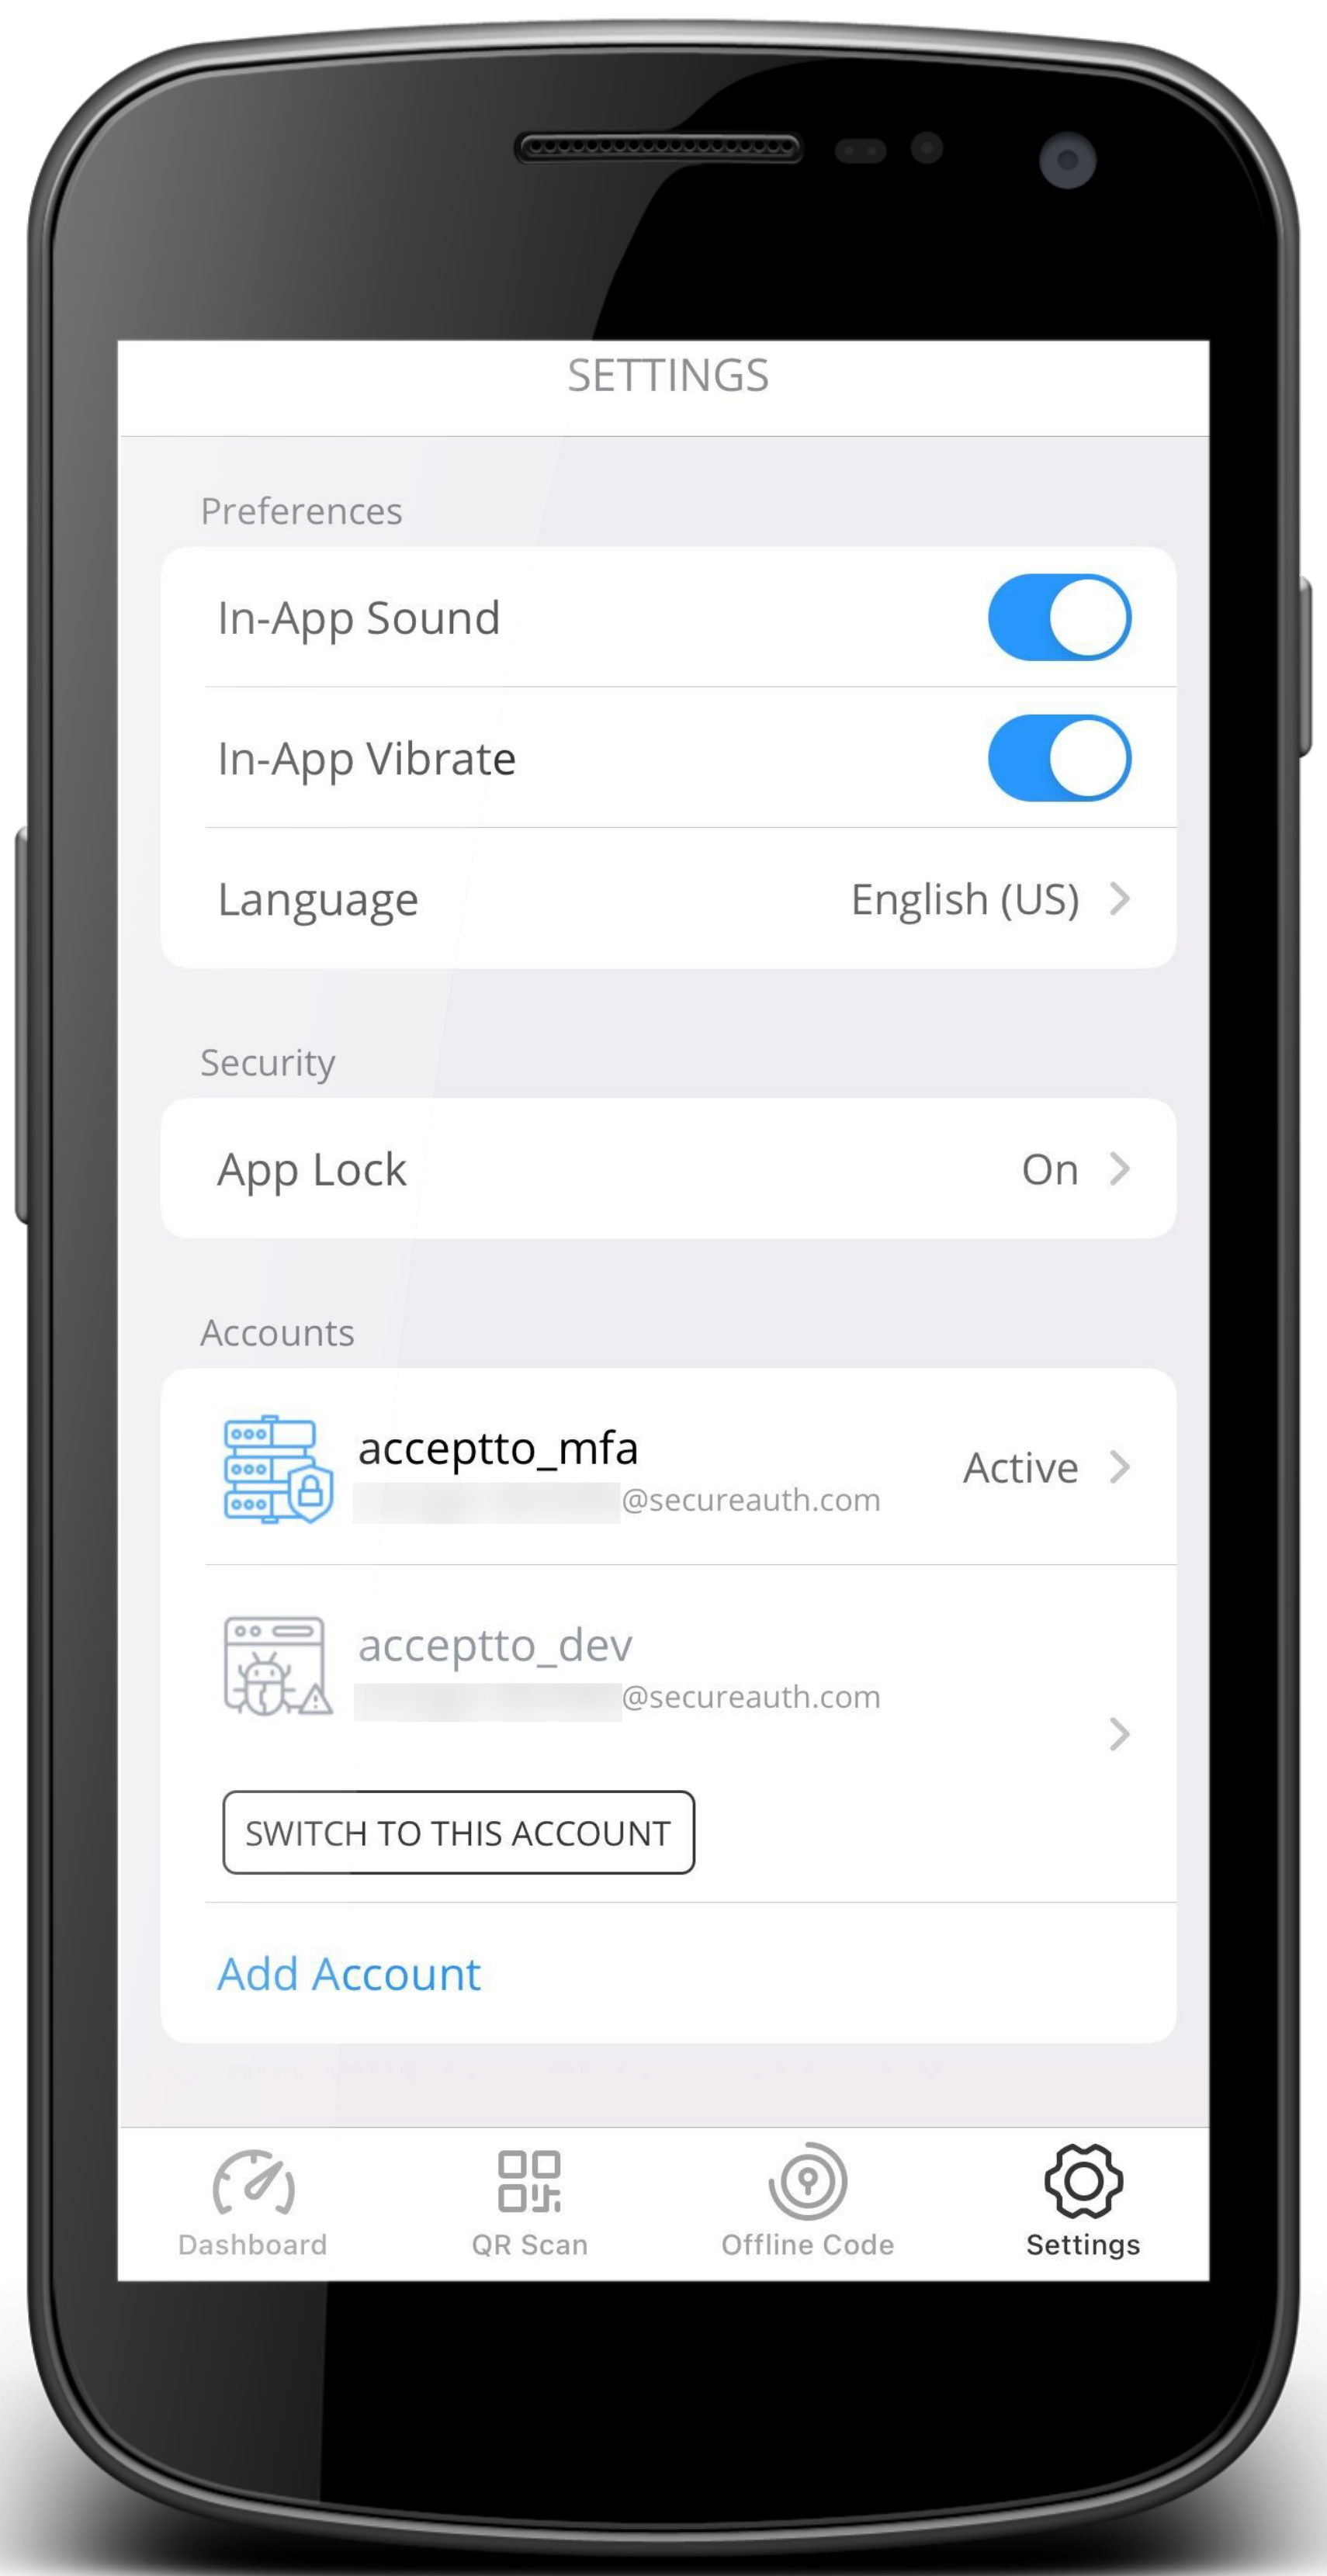 Multi-account view in Settings 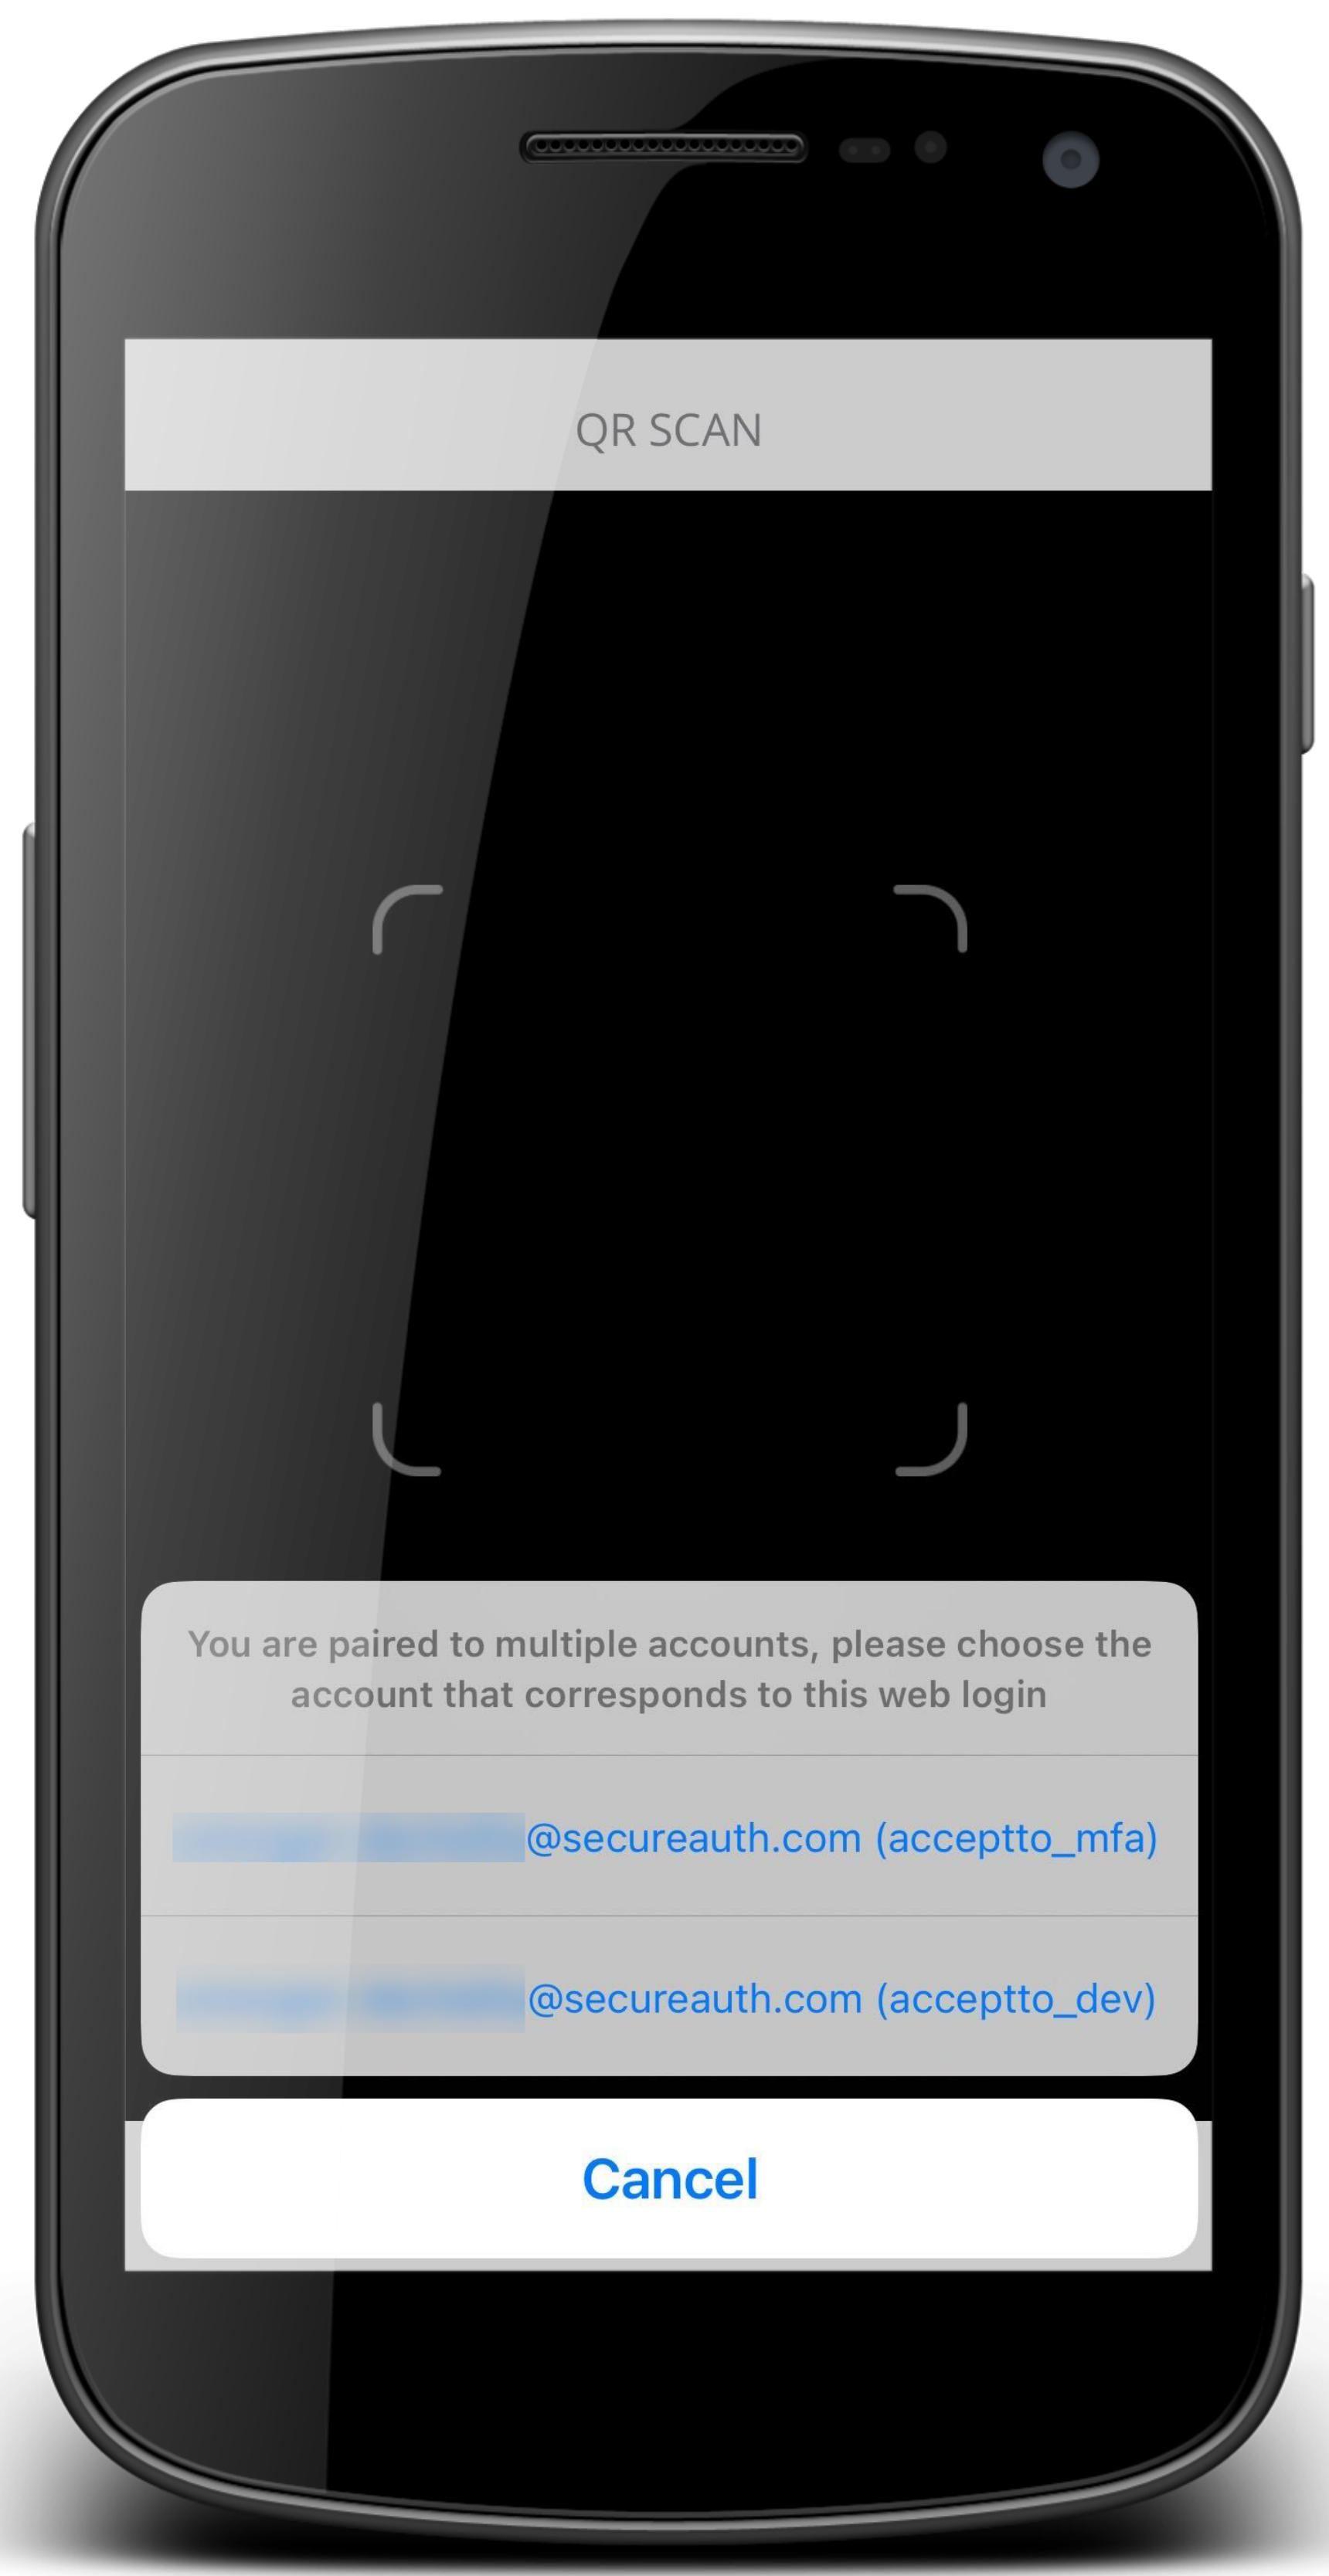 Select account when using QR code scan | ||
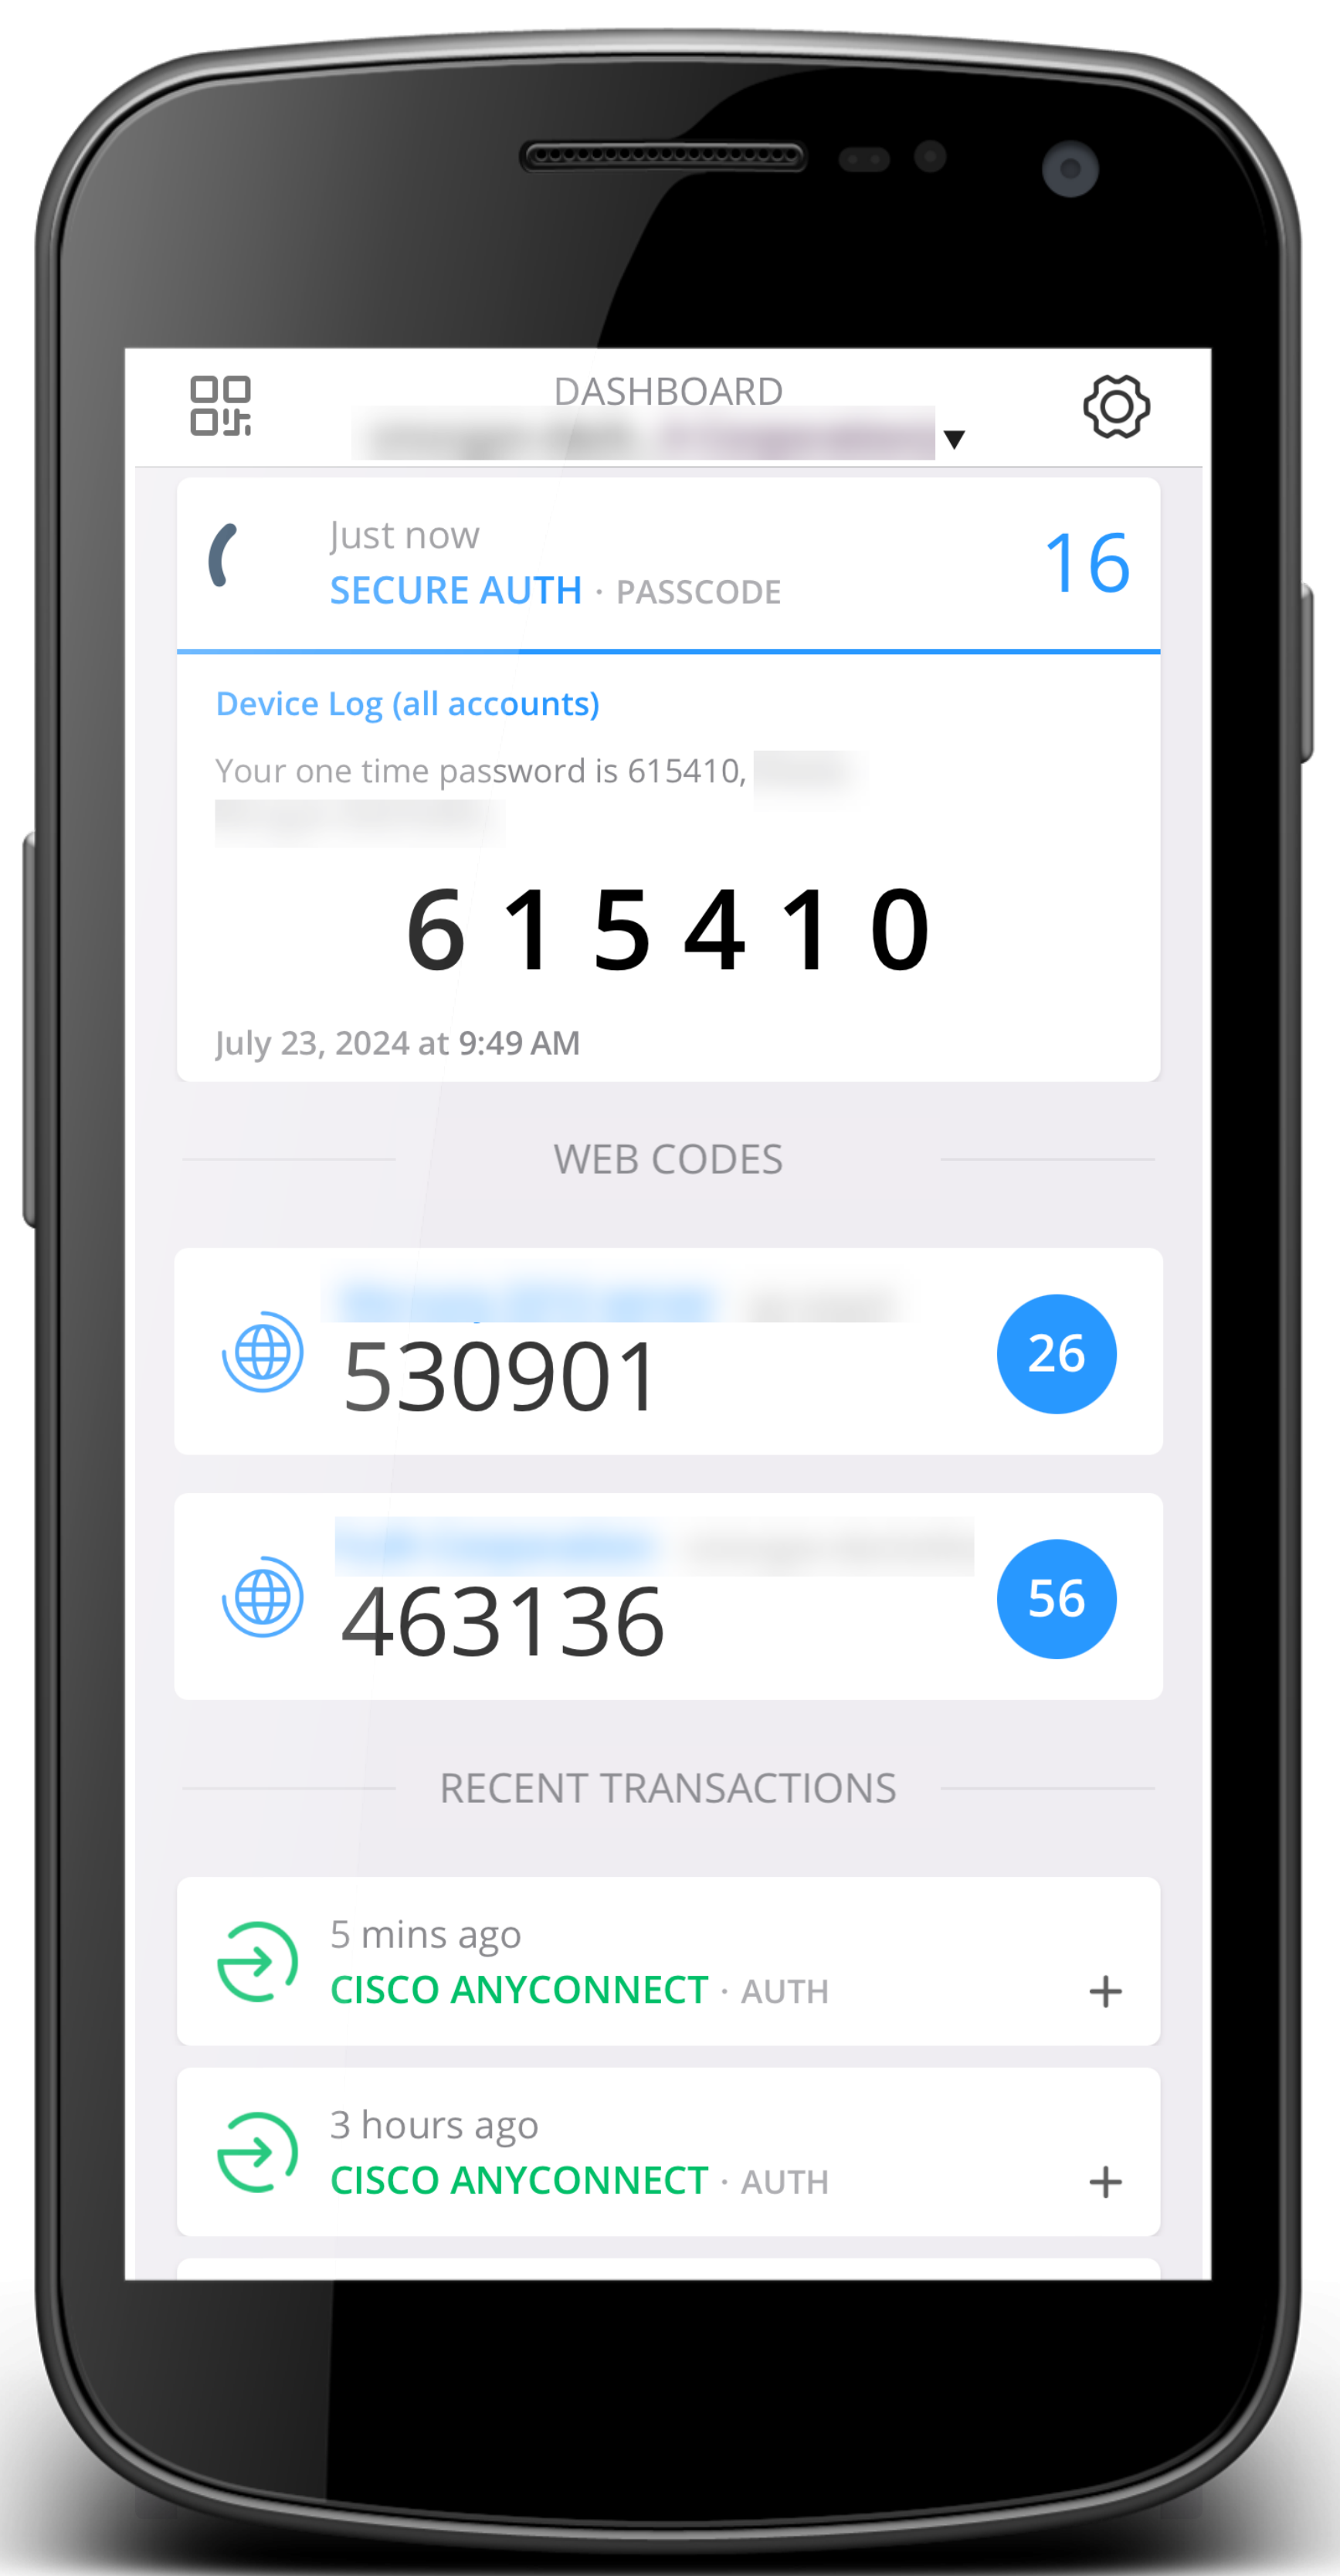
Dashboard | Key sections of the Dashboard:
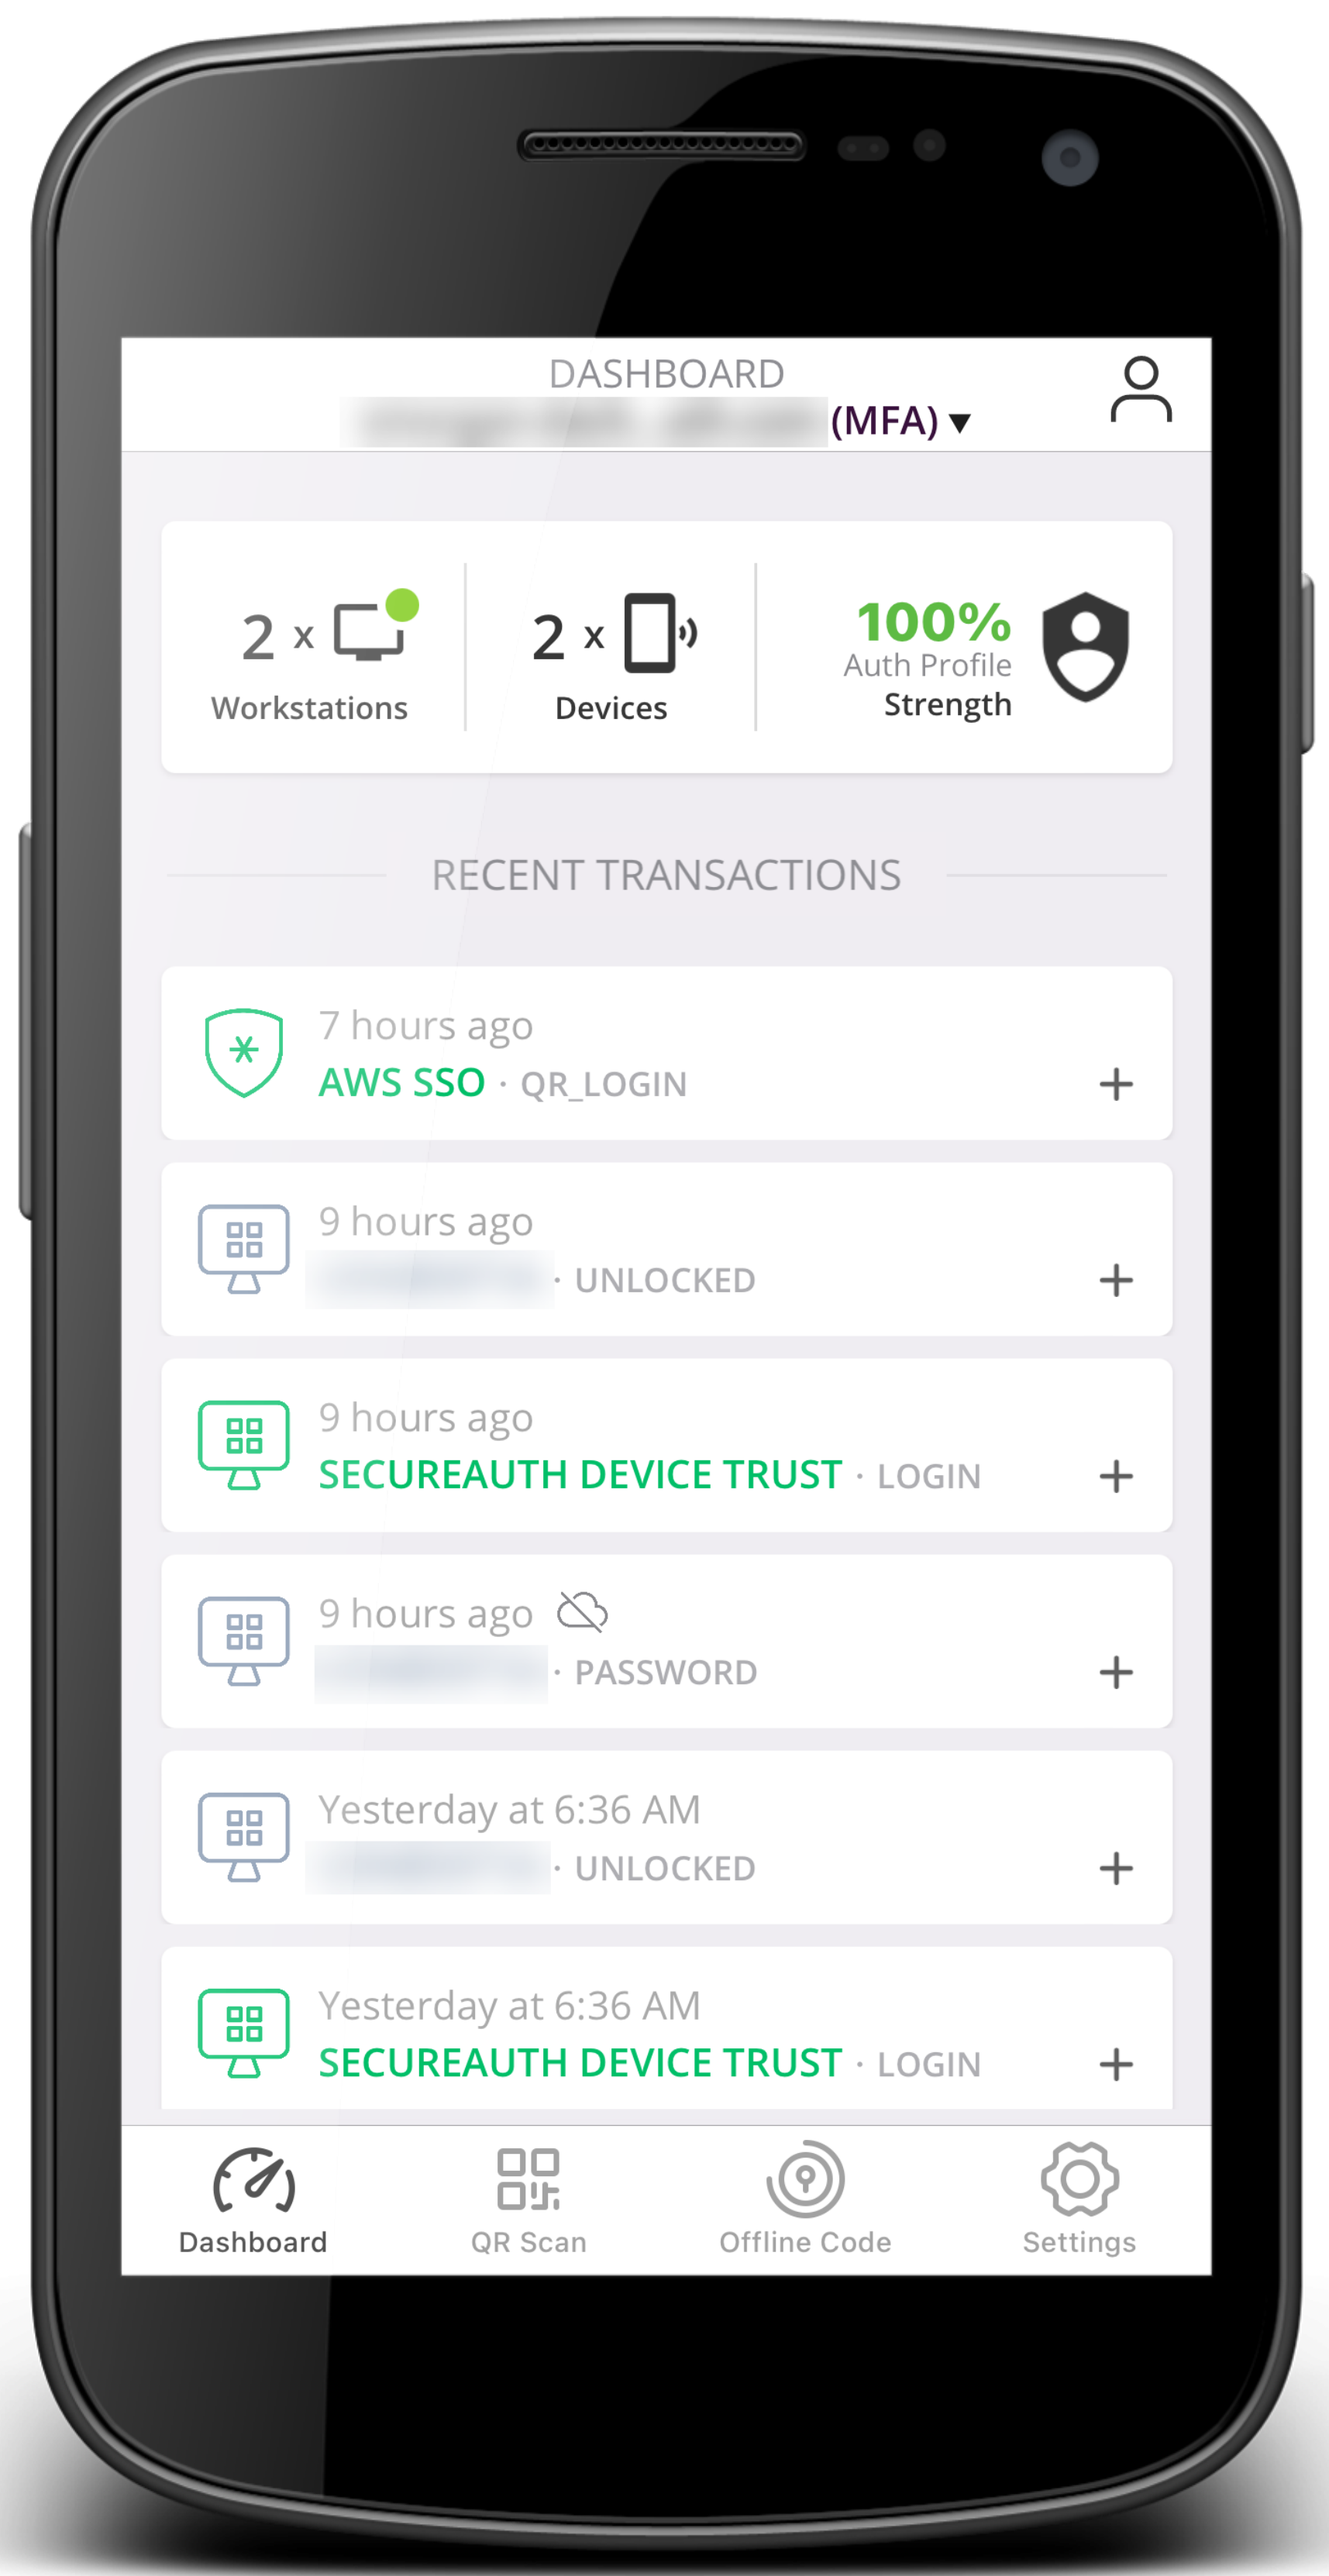 Dashboard view | ||
QR code | On the Dashboard, at the bottom, tap QR Scan.  QR scan | ||
Offline Code | Access time-based one-time passcode (TOTP) for offline logins. Your organization has a zero-knowledge policy, so offline codes are stored only on the user device. Each time you scan a new QR code, reconnect an account, or reconnect a computer, it refreshes the offline codes. This prevents conflicts between new and old offline codes for the same account. 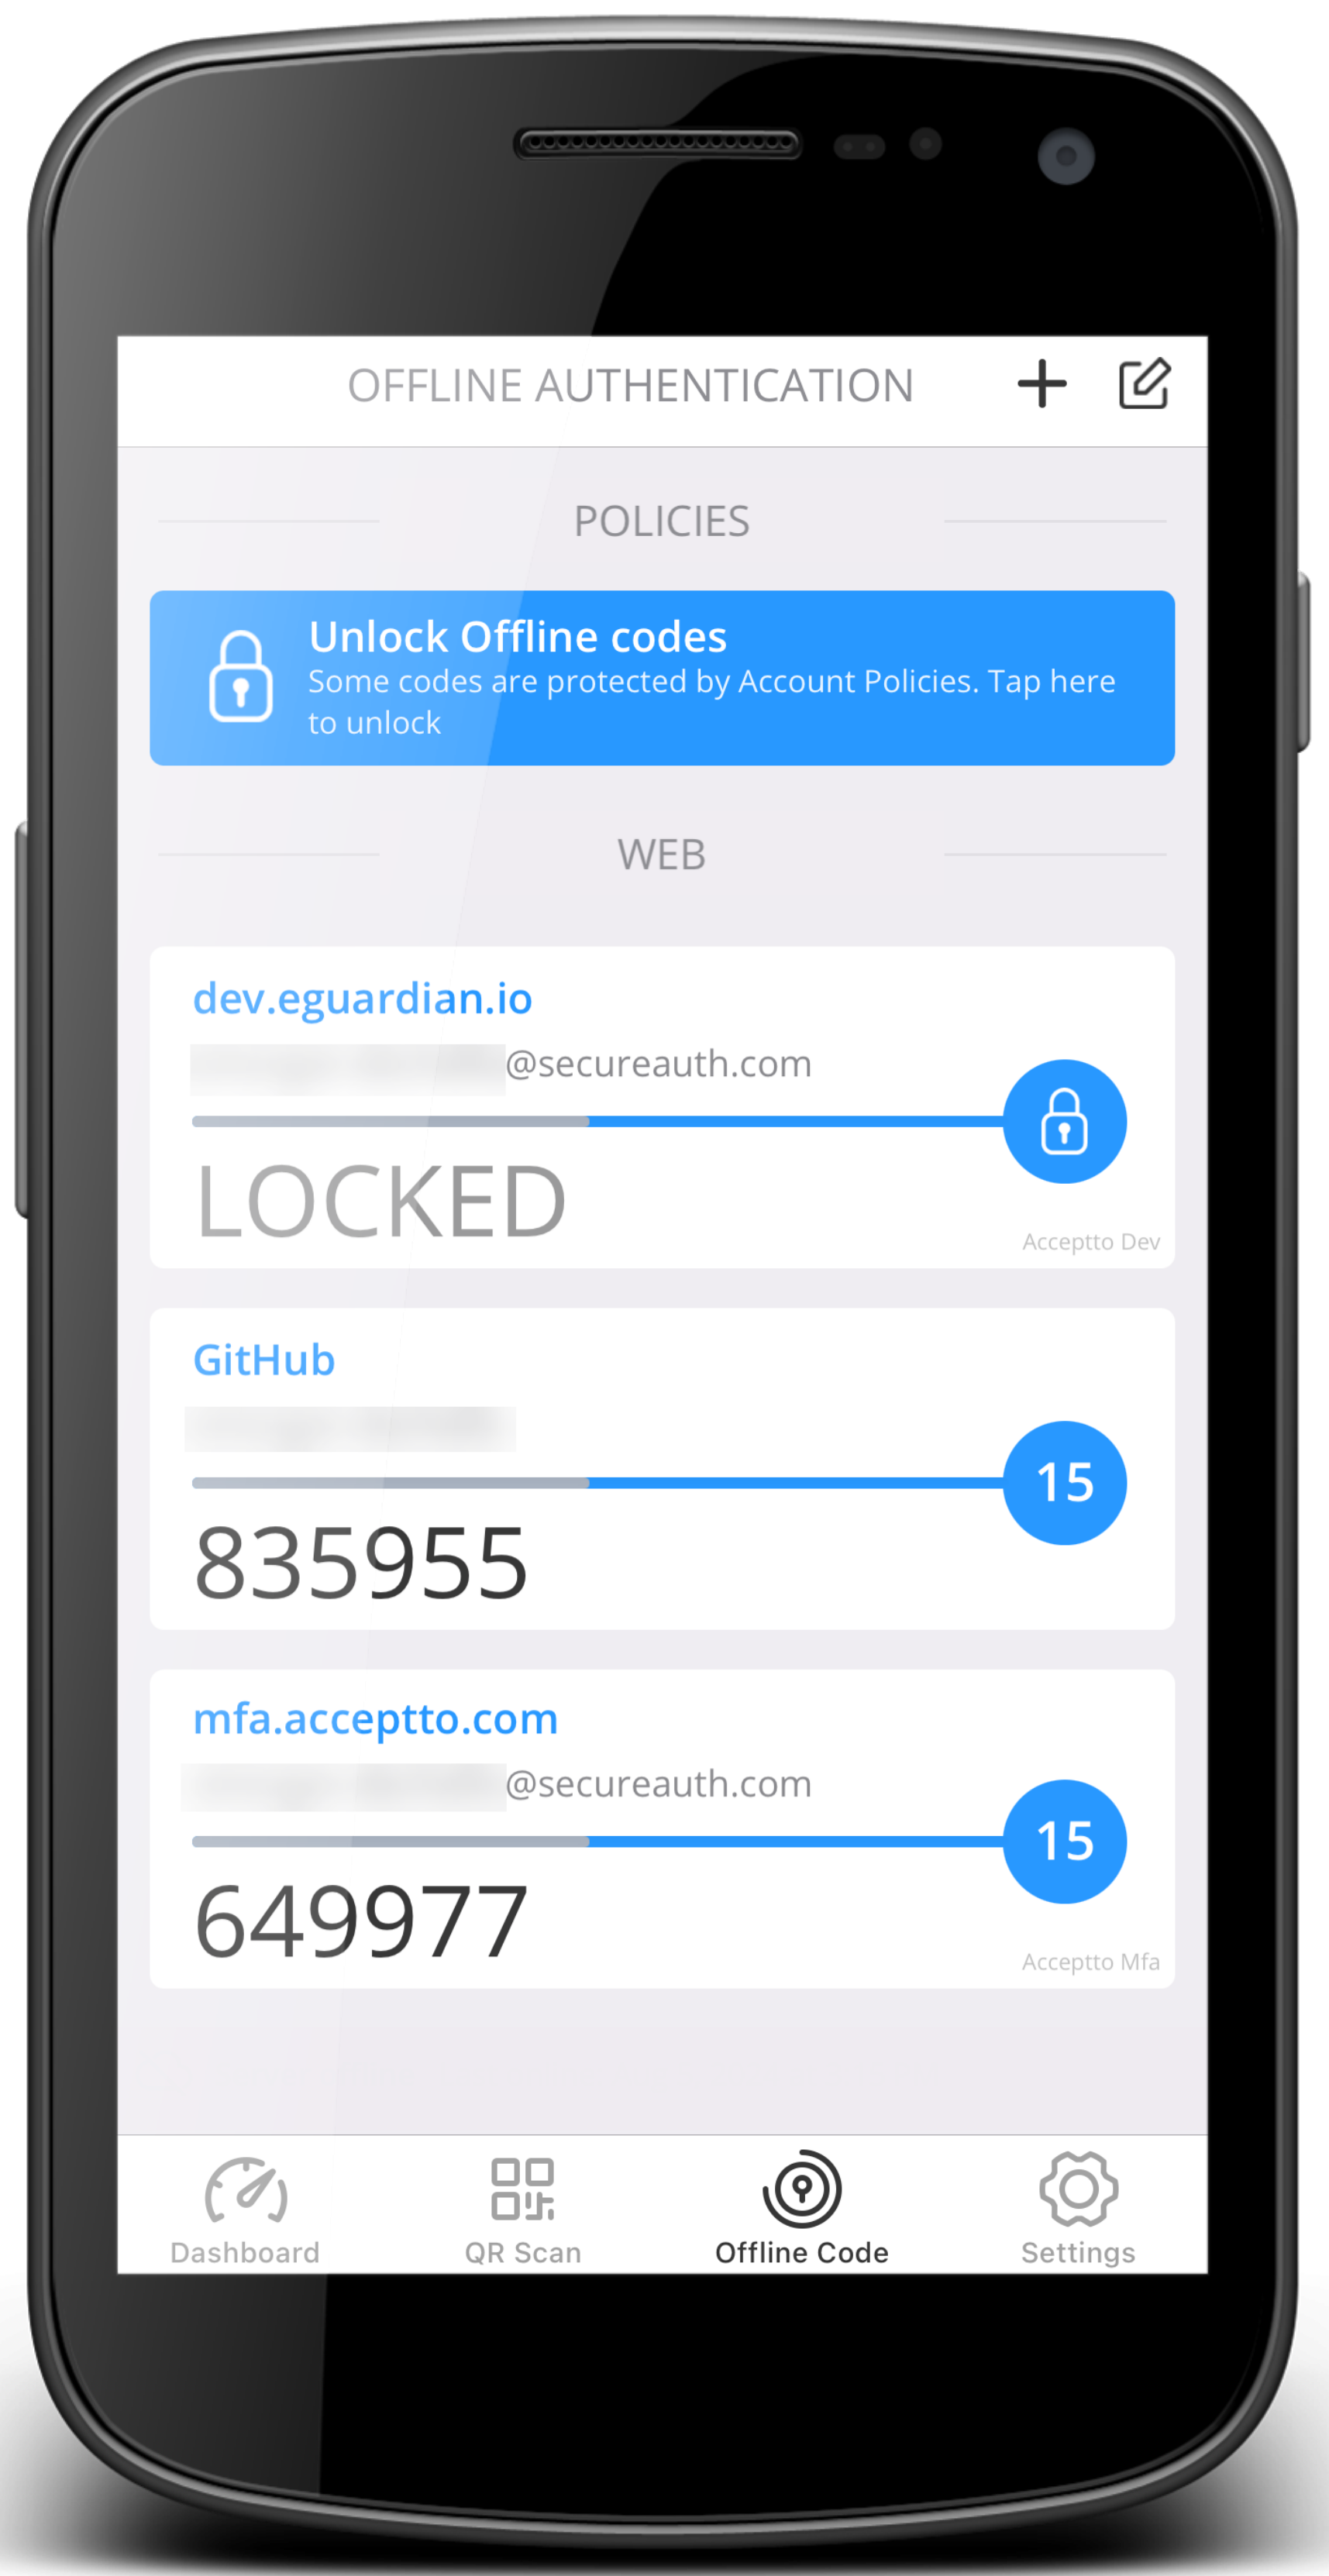 Offline Code tab | ||
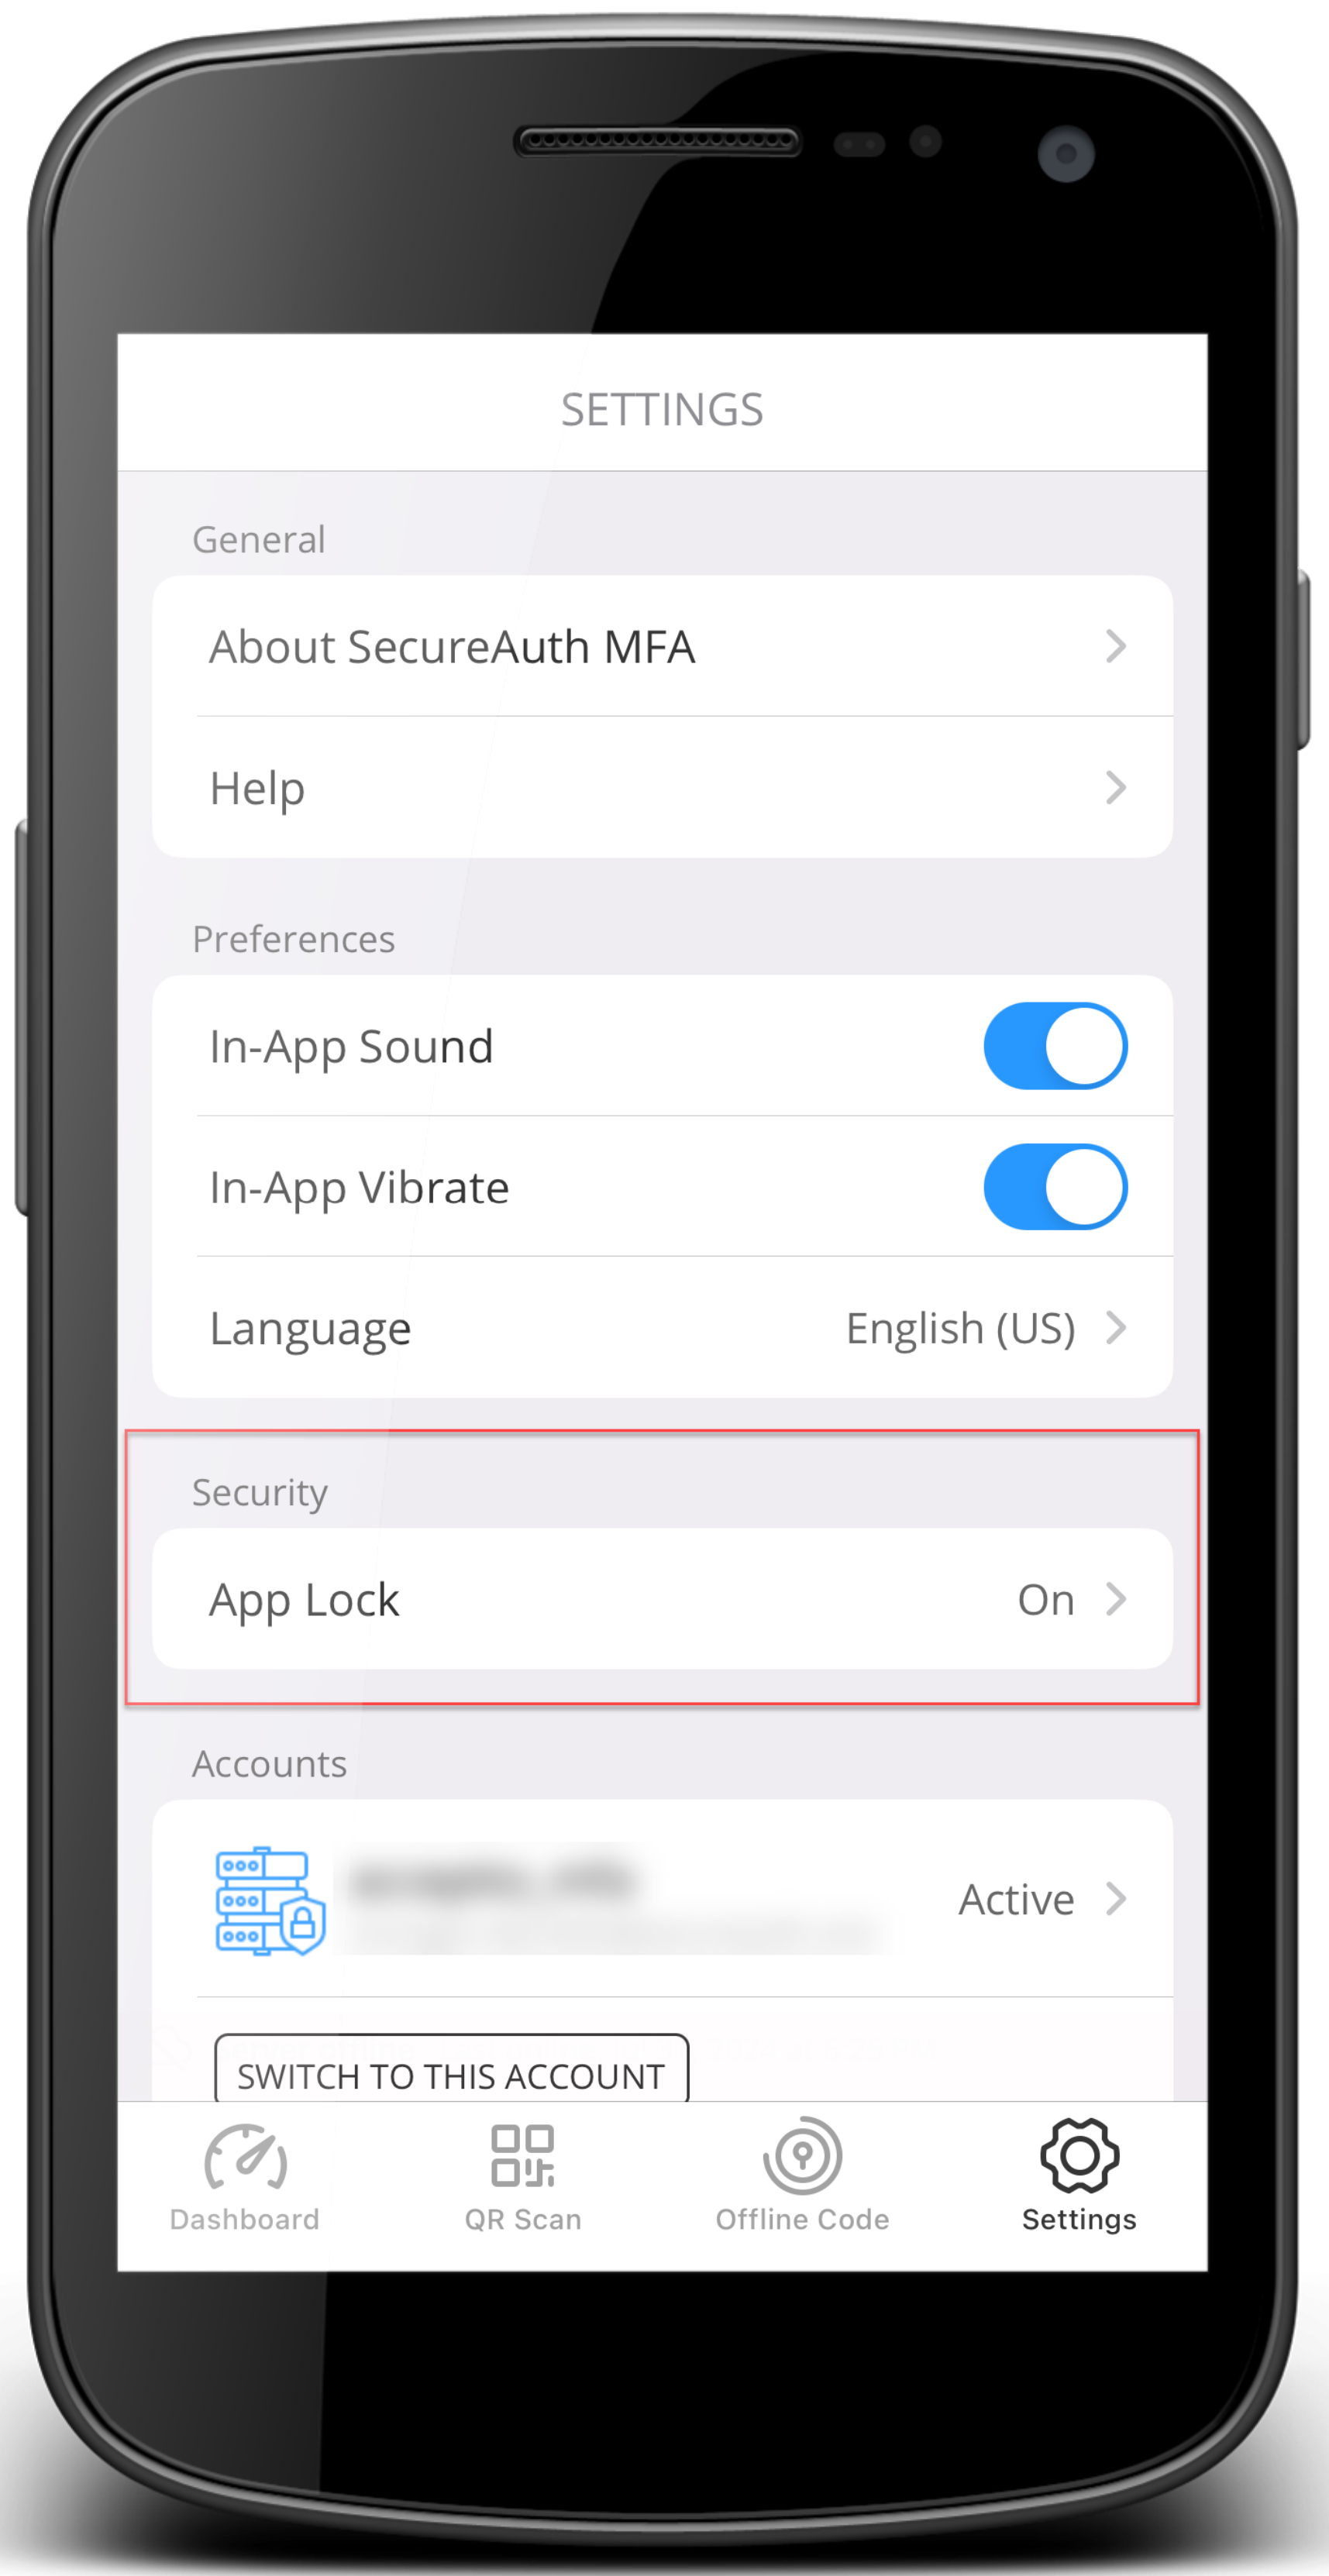
App Lock (as a required setting) | As a required setting. Your system administrator might have a policy that requires you to set an App Lock to view time-based one-time passcodes (TOTP). If this is the case, you will receive a notification to turn on App Lock and set a passcode (PIN). Depending on your organization settings, you'll set up a 4-digit or 8-digit passcode (PIN). If you've previously set up a PIN and there is a policy change, it might require you to change your PIN. NoteBe sure to remember or securely store your passcode (PIN) in a safe place. If you forget your PIN, you will need to pair your device again. 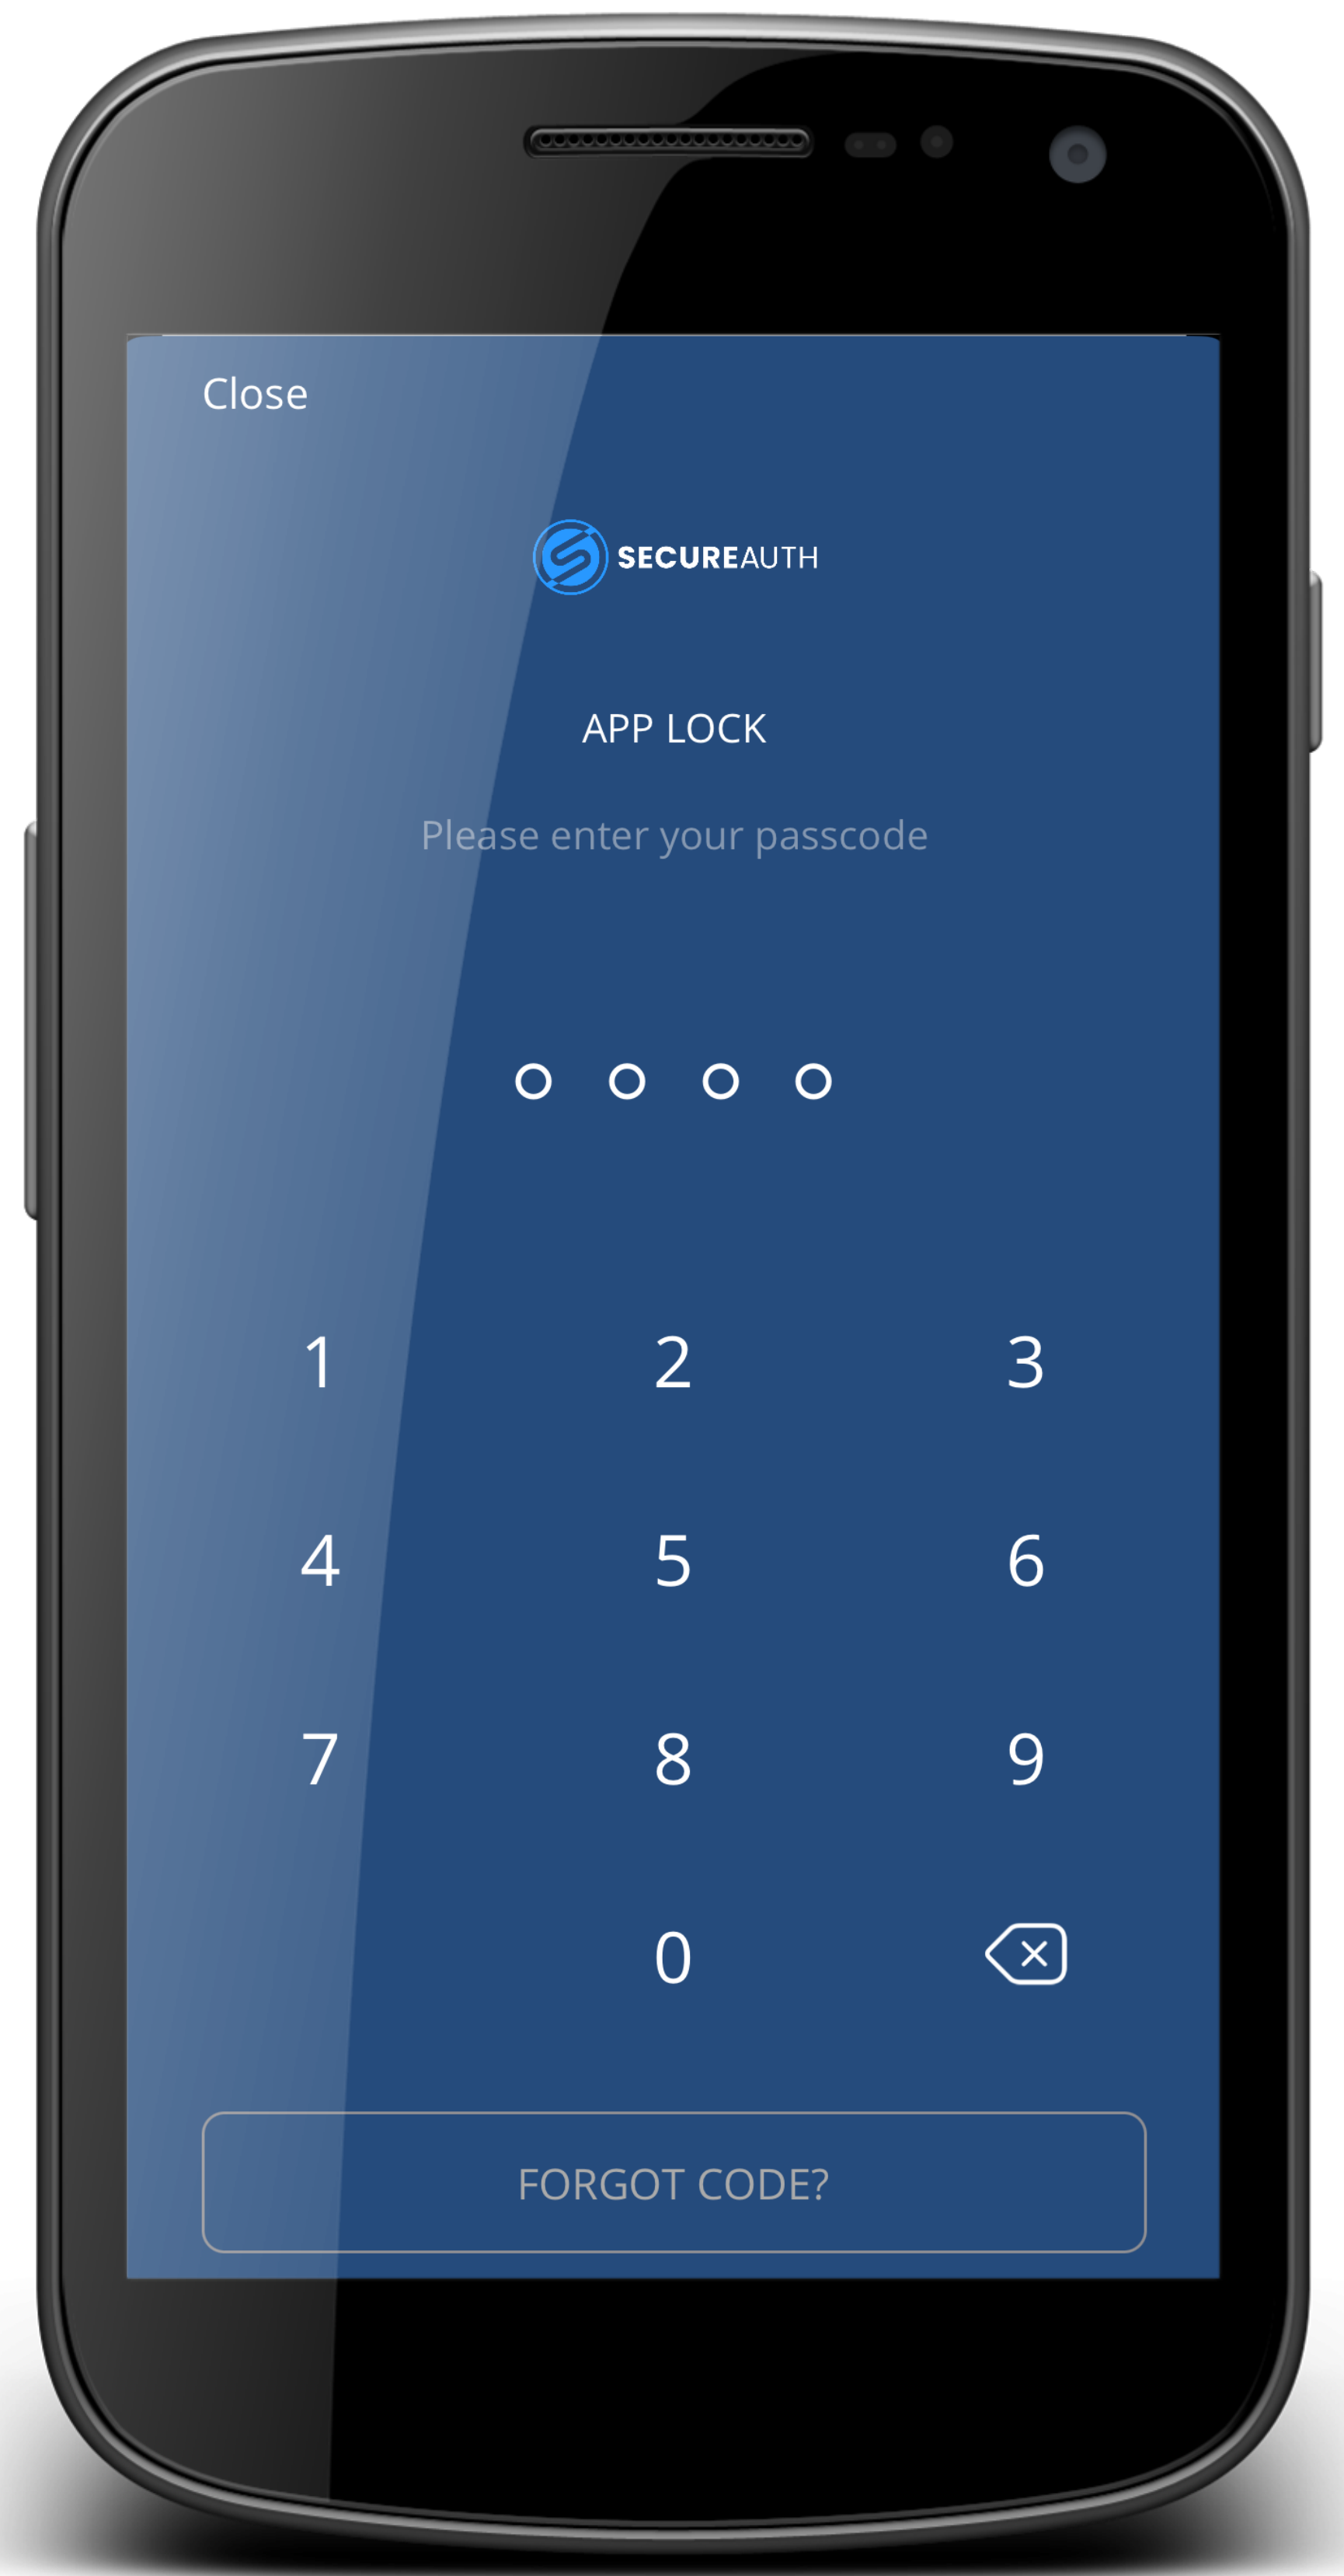 Set PIN for App Lock NoteWhen the App Lock option is turned on and the app detects a change in biometrics, like adding or removing a fingerprint on the mobile device, it will unpair all accounts. Be careful when changing biometric settings on shared devices. Consider this scenario -- Alice has connected accounts in SecureAuth MFA. Bob does not. Alice and Bob share a mobile device. If Bob removes or adds a fingerprint, SecureAuth MFA will unpair all accounts for Alice. Alice will have to connect their mobile device again with SecureAuth MFA. | ||
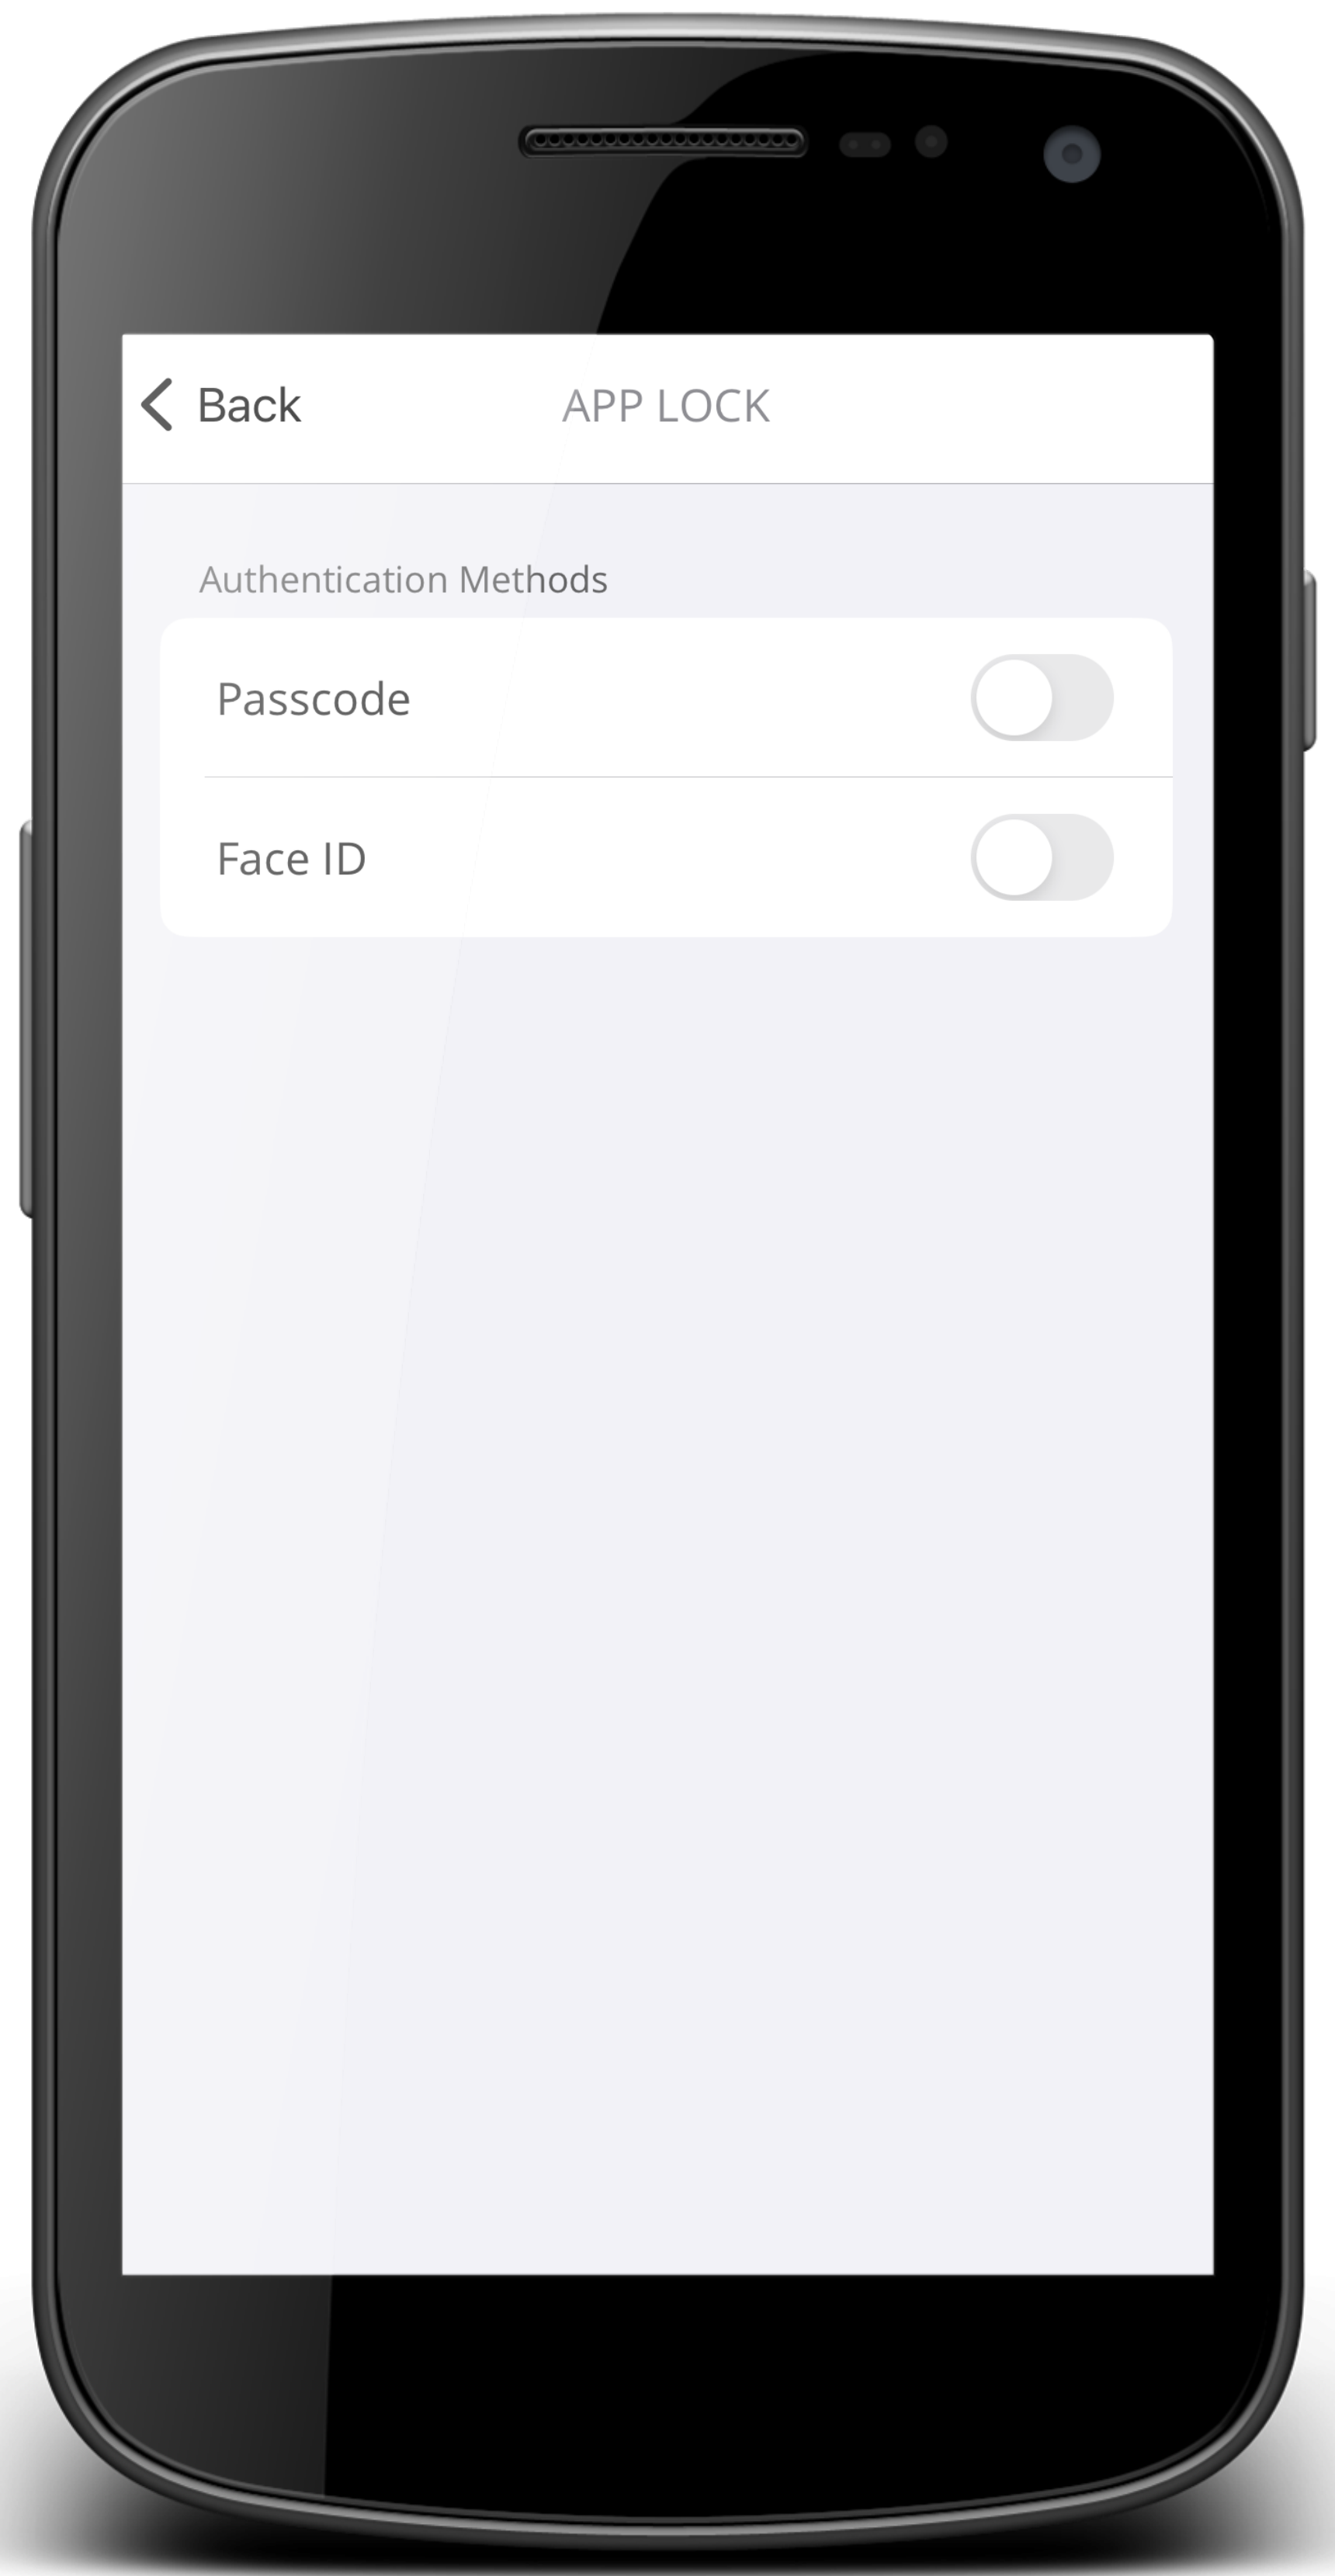
App Lock (as an optional setting) | App Lock is in the Settings menu. As an optional setting. Add another layer of security by turning on App Lock. When you turn on this feature, it requires you to enter a passcode (PIN) or use biometrics like Face ID to approve an authentication request or to view offline codes. NoteBe sure to remember or securely store your passcode (PIN) in a safe place. If you forget your PIN, you will need to pair your device again.
You must turn on and set up a Passcode (PIN) first before you can enable Face ID. The Passcode option is the fallback method in case the the biometrics method does not work. NoteWhen the App Lock option is turned on and the app detects a change in biometrics, like adding or removing a fingerprint on the mobile device, it will unpair all accounts. Be careful when changing biometric settings on shared devices. Consider this scenario -- Alice has connected accounts in SecureAuth MFA. Bob does not. Alice and Bob share a mobile device. If Bob removes or adds a fingerprint, SecureAuth MFA will unpair all accounts for Alice. Alice will have to connect their mobile device again with SecureAuth MFA. |
FAQs and troubleshooting
Read on to learn more or troubleshoot issues with the SecureAuth MFA app.
- I have a new phone. How do I connect the SecureAuth MFA app again?
- I have a new phone. How can I log in to my computer if it requires MFA until I can connect my new phone with SecureAuth MFA?
- I have a rooted or jailbroken device. Can I pair my device with SecureAuth MFA?
- When I try to pair my device, why do I see this message: SecureAuth MFA does not support modified devices. Please restore the device to factory settings in order to use this application?
- When I try to pair my device, why do I see this message: This device cannot be paired with SecureAuth MFA as your organization requires support for a hardware security module?
- Why am I getting this message in SecureAuth MFA: "We have detected a change in the Face IDs on this device. For your security, Face ID was disabled in SecureAuth MFA and you have been logged out."
I have a new phone. How do I connect the SecureAuth MFA app again? | |
Follow these instructions to connect your new mobile device to your account.
| |
I have a new phone. How can I log in to my computer if it requires MFA until I can connect my new phone with SecureAuth MFA? | |
Use another form of MFA like password or a code via SMS to log in to your computer. Then, follow the steps to connect your new mobile device to your account.
| |
I have a rooted or jailbroken device. Can I pair my device with SecureAuth MFA? | |
No. A warning message will display when you try to open the SecureAuth MFA app: SecureAuth MFA does not support modified devices. Please restore the device to factory settings in order to use this application. Workaround: Restore your mobile device to its factory settings and try again. | |
When I try to pair my device, why do I see this message: SecureAuth MFA does not support modified devices. Please restore the device to factory settings in order to use this application? | |
SecureAuth MFA has detected that the mobile device is rooted or jailbroken. The SecureAuth MFA app will not work at all on rooted or jailbroken devices. Workaround: Restore your mobile device to its factory settings and try again. | |
When I try to pair my device, why do I see this message: This device cannot be paired with SecureAuth MFA as your organization requires support for a hardware security module? | |
Your organization has a policy setting that requires built-in security features like Touch ID and Face ID on your mobile device. | |
Why am I getting this message in SecureAuth MFA: "We have detected a change in the Face IDs on this device. For your security, Face ID was disabled in SecureAuth MFA and you have been logged out." | |
SecureAuth MFA has a setting called App Lock. It lets you use biometrics like Face ID or fingerprint to approve an authentication request. Workaround: Connect your mobile device again with SecureAuth MFA, using Method 1: Connect with QR code, Method 2: Email pairing, or Method 3: Magic link. NoteWhen the App Lock option is turned on and the app detects a change in biometrics, like adding or removing a fingerprint on the mobile device, it will unpair all accounts. Be careful when changing biometric settings on shared devices. Consider this scenario -- Alice has connected accounts in SecureAuth MFA. Bob does not. Alice and Bob share a mobile device. If Bob removes or adds a fingerprint, SecureAuth MFA will unpair all accounts for Alice. Alice will have to connect their mobile device again with SecureAuth MFA. |