.NET SAML Consumer VAM Deployment Guide
Updated February 2020
This document details the method for enabling SecureAuth customers to integrate the .NET SAML Consumer into their current Internet Information Services (IIS) environment.
The .NET SAML Consumer VAM enables custom-built, nonstandard .NET applications that do not currently support Federation to be converted quickly and easily to a SAML Federation-supporting application. This VAM provides companies with SecureAuth single sign-on (SSO) access to applications that did not previously support federation access. The VAM simplifies integration times and provides increased security and a better user experience during application access.
Benefits of using the .NET SAML Consumer include:
Increase security by using SAML certificate validation and protocol security
Eliminate unnecessary cookie data transfers and custom-built authentications, thereby standardizing architecture throughout your environment
Simplify the integration between SecureAuth IdP and the .NET form-based authentication supporting the application
Allow for the application to live cross-domain from SecureAuth IdP
The SecureAuth® Identity Platform, released as version 19.07, was formerly called SecureAuth IdP.
.NET SAML Consumer features include the following:
Contains a full administrator user interface
Support identity provider metadata
Supports multiple identity providers
Supports SecureAuth realm structure
Supports load balancer and reverse proxy with force SSL functions
Supports RelayState
Supports service provider-initiated signing of a SAML request
Supports different federation URLs based on different identity provider selections
Supports form-based authentication ticket passing
Prerequisites
To perform this integration, you need the following components:
SecureAuth IdP 9.2 and later or SecureAuth® Identity Platform 19.07 and later; set up in your environment or an accessible environment
.NET SAML Consumer compressed file
Internet Information Services (IIS) servers: IIS7 or IIS8
Valid X509 certificate to sign the assertion
.NET Framework 4.5 and later
Installation
The .NET SAML Consumer deployment process involves the following steps:
Virtual Directory Installation
The following steps describe how to install a virtual directory.
Open the Internet Information Services Manager by typing run in the Start menu, then typing inetmgr.
If the IIS manager console is not displayed, enable it manually. In the Control Panel, select Programs and Features. In the left pane, click Turn Windows features on or off. In the Windows Features screen, expand the Internet Information Services and then expand Web Management Tools. Select the IIS Management Console option , then click OK.
In Connections in the left pane, open the top-level directory and expand the Sites folder to see the Default Web Site.
Right-click the Default Web Site and select Add Application.
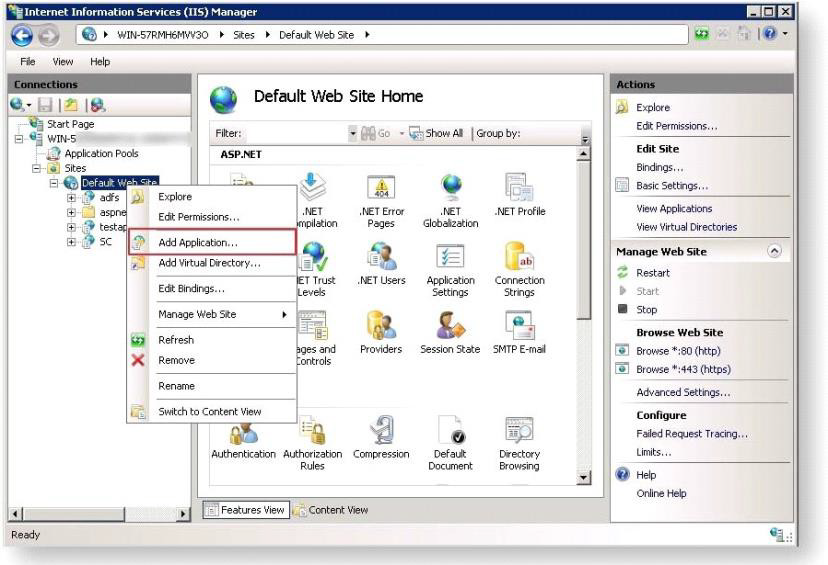
In the Add Application screen, enter a name for the site in the Alias field. This will be the URL to be used later.
To the right of the Application Pool field, click Select. In the Select Application Pool screen, select .NET v4.5.
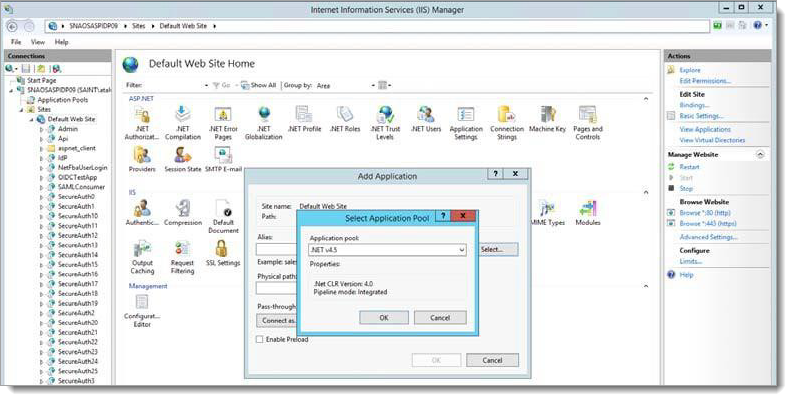
Add a physical path location.
Open the Browse for Folder dialog box.
Click Make New Folder.
Enter the SAMLConsumer as the new folder name and click OK.
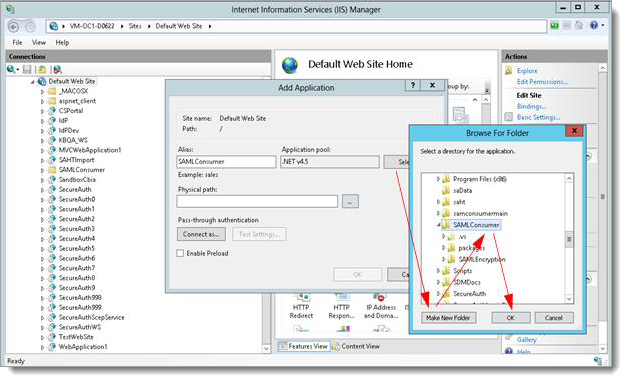
In the Add Application dialog box, specify the Alias as SAMLConsumer and place the .NET SAML Consumer files in the newly-created samlconsumer folder.
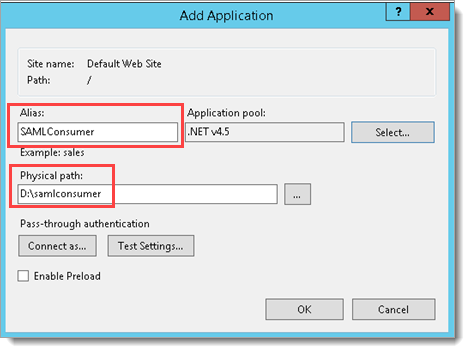
Click OK to save the changes.
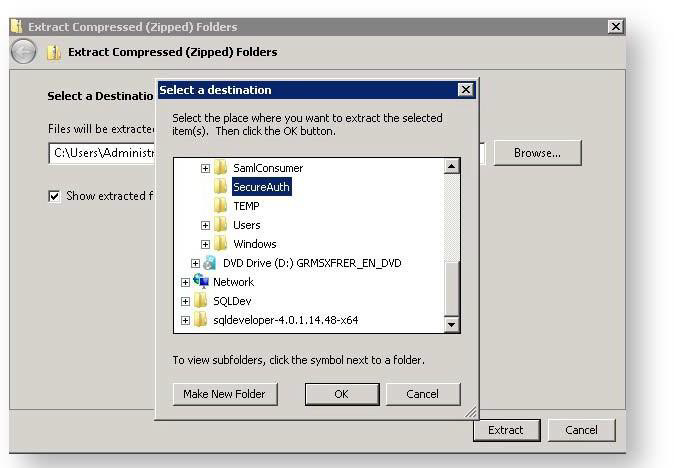
Extract the contents of the .NET SAML Consumer compressed file into the directory created above.
Return to the IIS Manager screen and validate that the ASP.NET v4.0 application pool has the correct identity defined so that it can read from or write to the newly-created directory.
On the left pane of the IIS Manager, select Application Pools. All available application pools are displayed in the main pane.
Click the ASP.NET v4.5 application pool.
On the right Actions pane, select Advanced Settings.
The Advanced Settings window appears.
Hover over the Identity text field for the identity. The Application Pool Identity dialog box is displayed.
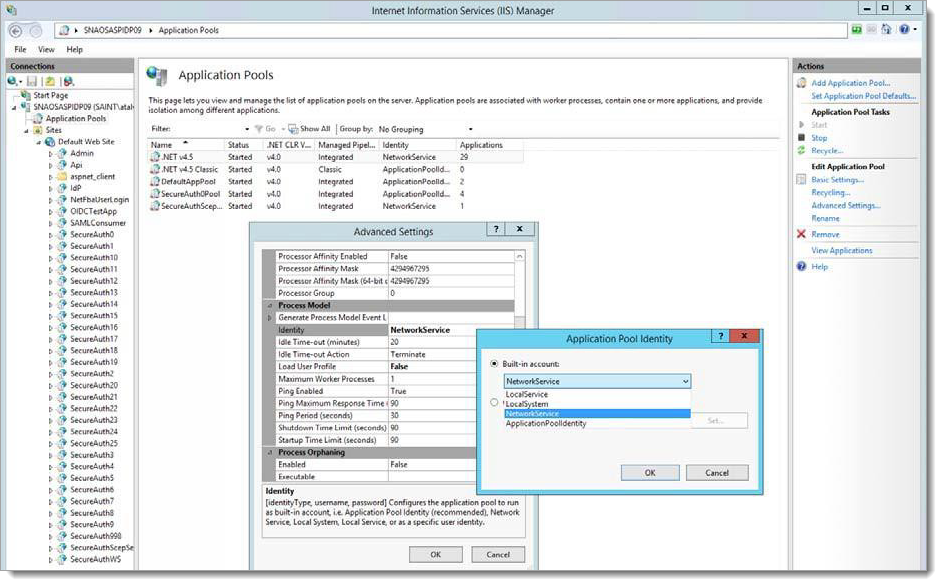
From the available options in the Built-in account window, click to highlight a valid account then click OK.
Define the rights to the assigned folder (samlconsumer) you created in step 3.
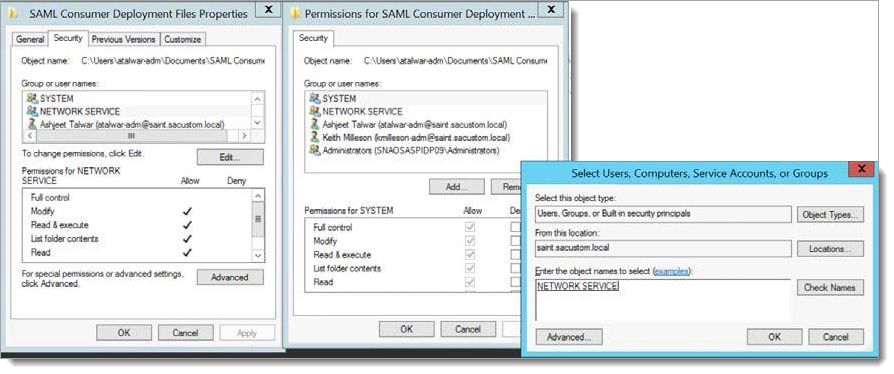
Right-click the folder you created and select Properties to open the properties page.
Click Edit to open the Permissions page for the folder.
Click Add and enter the account name in the Enter the object names to select field
Click Check Names to verify that this account name is correct then click OK.
The Permissions page is displayed with the newly-defined permission highlighted, NETWORK SERVICE in the example in the following image.
In the Permissions box at the bottom of the screen, set Allow for the Modify permission.
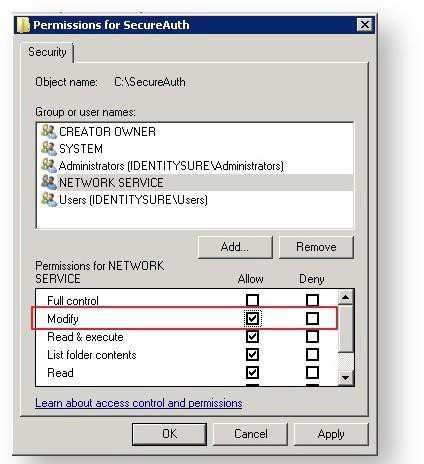
Click Apply and OK.
Click OK in the Select Users, Computers, Service Accounts, or Groups dialog box to save the changes.
SAML Consumer Configuration
Complete the following steps to configure the SAML Consumer for use with SecureAuth IdP.
Load the admin console for the newly-created site by typing the following into a browser:
https://<FQDN>/<Folder name, e.g., samlconsumer>/SamlAdmin.aspxThe
SamlAdmin.aspxfile is one of the files extracted into the new folder previously created. The SecureAuth SAML Consumer page appears.Note
You can access the
SamlAdmin.apsxpage only from the box where you deployed the .NET SAML Consumer Files.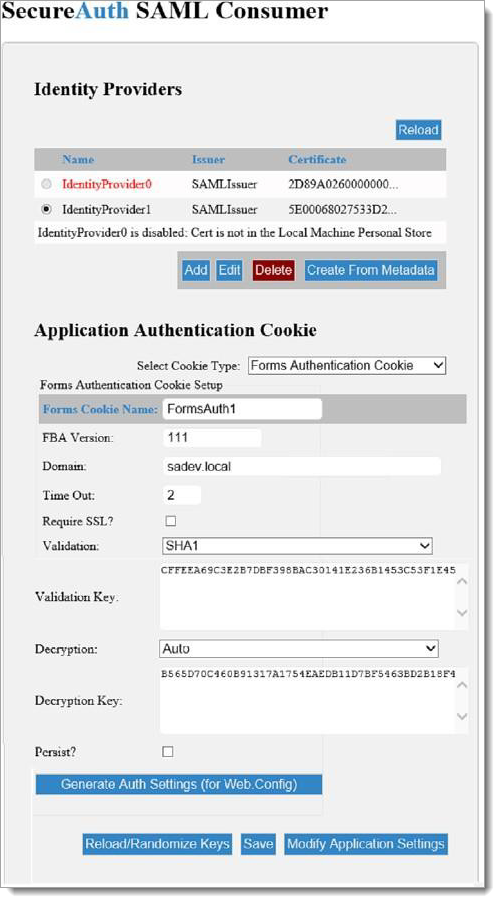
Alternatively, you can create a identity provider from existing metadata by clicking the Create From Metadata button. For more information, see Create an Identity Provider from metadata.
By default, IdentityProvider0 is disabled; click Add in the Identity Provider section then click Edit.
To enable the Identity Provider, click Get to select a certificate.
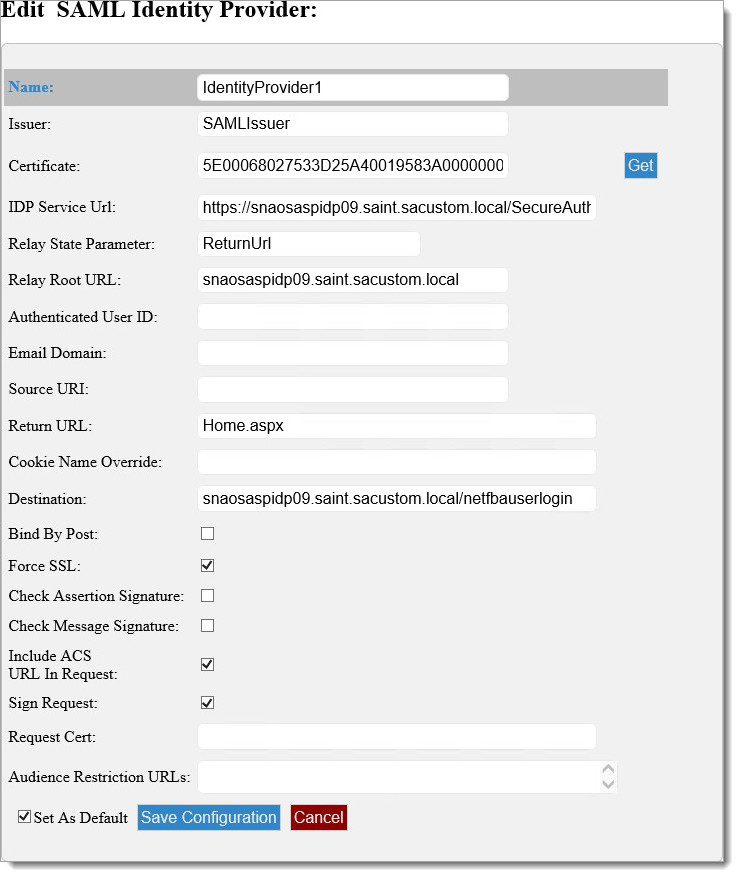
The following table describes the fields on the Edit SAML Identity Provider screen.
If you want to follow directions without customizing, continue to step 3.
Option
Description
Issuer
Populated in the SAML request Issuer attribute
Certificate
This certificate will be assigned on the System Info tab of the SecureAuth IdP realm used in the workflow under the setting “Client Cert Serial Nbr.” It must reside in the Local Computer/Intermediate Certification Authorities/Certificates store on both the SecureAuth server and the target application server.
IdP Service URL
The URL of the SecureAuth realm to be used, ending in secureauth.aspx
Relay State Parameter
This is typically “returnUrl.” By default, ASP.NET uses this. If a non-ASP.NET application is being configured, which is rare, specify the name here.
Relay Root URL
The base URL for the target application without the protocol (http:// or https://).
Authenticated User ID
Use this advanced use value if the actual user ID for authentication is not the same attribute returned in the identifier in the assertion. Extremely rare to change this.
Email Domain
Use this advanced use value to route the SAML Consumer to a specific predefined identity provider configuration based on the domain of an email address
Source URI
This advanced use option is an inline virtual URL that is combined with the relay root URL that results in https://mycompany.com/myapplication, where myapplication is the name of a pre-defined identity provider configuration in the SAML Consumer.
Return URL
When the workflow completes, this is the landing page that is redirected to, for example, Login.aspx.
Cookie Name Override
Advanced use. A very limited use case, such as when the name of the form’s auth cookie is different at either end of the transaction.
Destination
Specifies the SAML protocol Destination value. Rarely needs to be specified.
Bind by Post
This is checked when the length of a request exceeds the maximum size of a query string, so a POST is used instead. Typically, http redirect is used.
Force SSL
Check this box to require the use of SSL. This will enforce the prefix of https:// on all calls.
Check Assertion Signature
Determined by the application.
Check Message Signature
Determined by the application.
Include ACS URL in Request
If using the SecureAuth IdP, it must be checked.
This is typically checked so the IdP knows to direct to the URL defined in Manage Application Settings for ACS URI. Known reasons for this to be unchecked are when ADFS is used.
Sign Request
Check this box to determine by application. Usually false but included for specific use cases.
Request Cert
If “Sign Request” is checked, this value is the serial number of the certificate used. It can be the same as the response cert, but this provides flexibility.
Audience Restriction URLs
Check this box to limit the use of the assertion to an audience, e.g., https://mycompany.com
Set as Default
Check this box to save this Identity Provider as the default provider when no other can be determined.
Set up the SecureAuth SAML Consumer by editing the following fields.
On the Issuer field, type a valid issuer.
Note
The valid issuer can be any name that matches the issuer of the Identity Provider.
On the Certificate field, enter the certificate serial number or click the Get to select a certificate from a list of installed certificates.
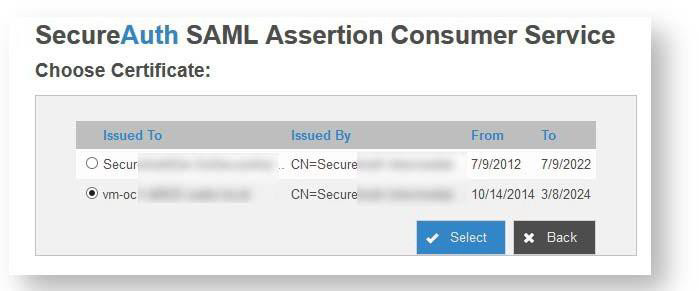
If the required certificate is not listed, import the required certificate using the Windows MMC snap-in for managing local computer certificates.
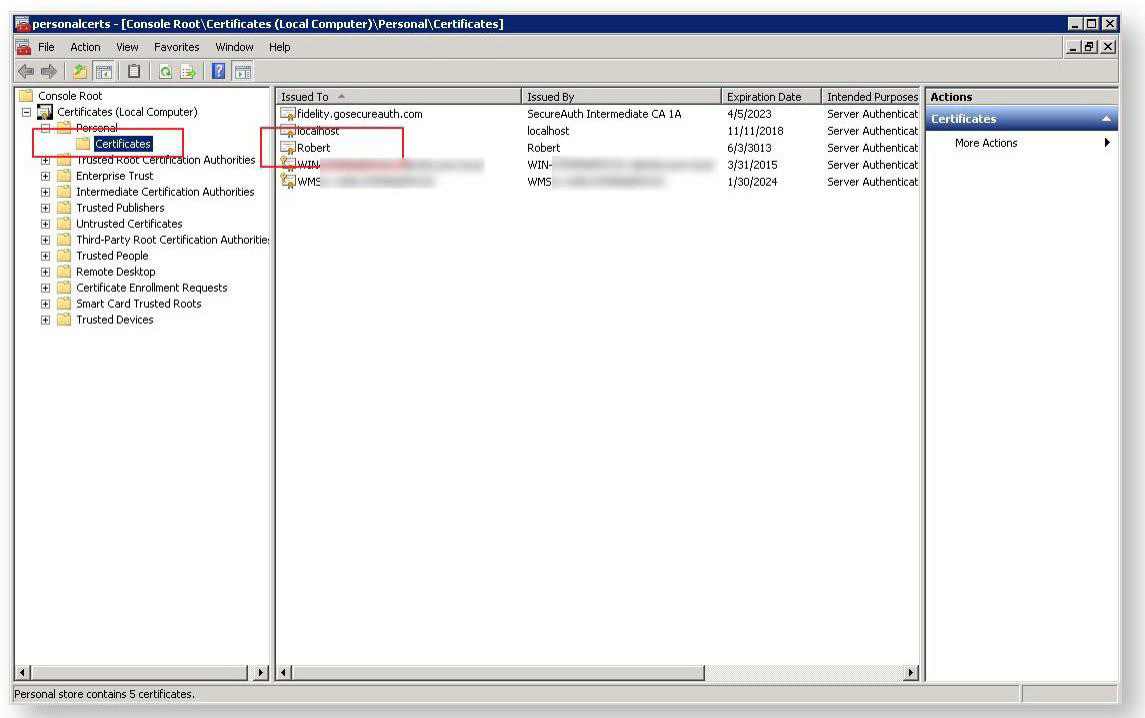
Install the certificate that was supplied by the Identity Provider Owner. This should be a base-64 file with a .cer extension, such as Robert.cer.
Return to the admin console and click Get. The Choose Certificate screen is displayed.
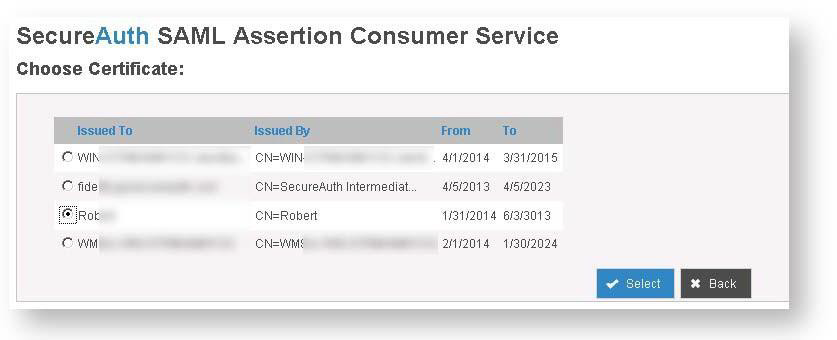
Click the radio button next to the certificate you loaded into the certificate console, then click Select.
Click Save Configuration to update the settings file.
Settings for the identity providers, primarily encryption-related, are displayed in the Application Authentication Cookie section.
Create a folder for the SAML Consumer logs where the SAMLConsumer folder is located.
In the Application Authentication Cookie section, select one of the following options in the Select Cookie Type field.
Cookies
Description
Forms Authentication Cookie
Use this option for target applications that accept and process the UserID and UserData (SAML claims) of a Forms- Based Authentication (FBA) ticket.
For more information, see Implement FBA.
Standard Cookie
Use this option for applications other than FBA.
This option is deprecated and will be removed in future releases.
If you select the Forms Authentication Cookie option, the Forms Authentication Cookie Setup screen is displayed.
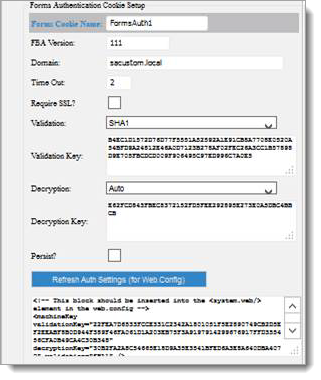
The following table describes the fields on the Forms Authentication Cookie Setup screen.
Option
Description
FBA Version
The shared secret where 111 is the default value, same as the appliance.
Forms Cookie Name
Used by the target application to read the correct cookie where the FBA ticket is embedded.
Domain
If the server containing the target application is joined to a Windows domain, that domain name should be used.
Timeout
Used by browsers to determine if the cookie containing the FBA ticket is still valid.
Require SSL
Corresponds to the Require SSL check box option in IIS for the target application.
Validation*
Sets the cryptography method used to validate the FBA ticket.
Validation Key*
Indicates the key used in the cryptography routine to validate the FBA ticket.
Decryption*
Sets the cryptography method used to decrypt the FBA ticket.
Decryption Key*
Indicates the key used in the cryptography routine to decrypt the FBA ticket.
Persist
Check this box to indicate the Forms Authentication cookie does not survive the session. Only a few use cases require this feature.
Refresh Auth Settings (for web.config)
Generates the settings using the values entered above to be inserted into the target application’s web.config file.
* This field value is automatically retrieved from IIS for the SAML consumer application; you can review it at SAMLConsumer\ASP.NET\Machine Key. Load balanced environments must all match.
If you select the Standard Cookie option, a form like the following image is displayed.
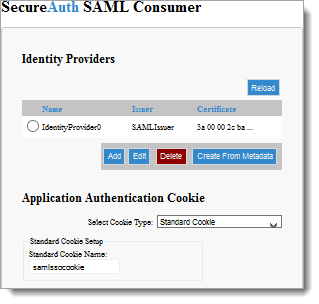
The only field associated with this form is Standard Cookie Name, which is a read-only field that indicates the current name assigned to this cookie.
Open the Forms Authentication Cookie Setup screen by clicking Refresh Auth. Settings (for Web.Config).

In the text box, copy the string that is displayed and paste it into both the service provider web.config file and the SAMLConsumer web.config file.
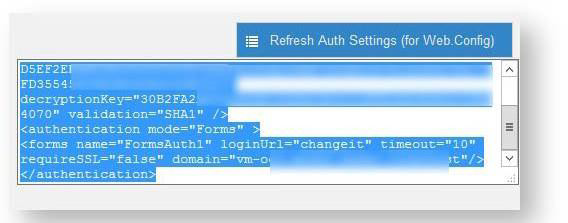
An additional modification might be required in the two web.config files. In the “authentication” section, ensure the name attribute of the “forms” node is the same for both files, both with entries like the following example.
<authentication mode="Forms">
<forms name="FormsAuth1" loginUrl="https://vm-oc1- d0622.sadev.local/samlconsumer/ sp.aspx?idpkey=IdentityProvider0" requireSSL="false"/>
</authentication>
Use the three buttons at the bottom of the page as follows:

Option
Description
Reload/Randomize Keys
This button applies only to Forms Authentication Cookie selection. The option will generate new authentication and encryption keys.
NOTE: This will not update IIS. The values must be manually transferred. The values are saved to the saml.config file.
Save
Click this button to save the current page to the saml.config file.
Modify Application Settings
Click this button to enable modifications to the SAML Consumer default values used when new identity providers are added.
For more on this, see Modify the SAML Consumer Configuration.
Click Save when you are finished with modifications.
Create an Identity Provider from metadata
If you have an existing metadata file, you can use it to create a new identity provider by using the Create from Metadata option.
Open the SAML Consumer SAMLAdmin page by entering the following URL in a browser, where
<server>is the name of your server:https://<server>/SAMLConsumer/SAMLAdmin.aspxIn the Identity Providers section at the top, click Create From Metadata.
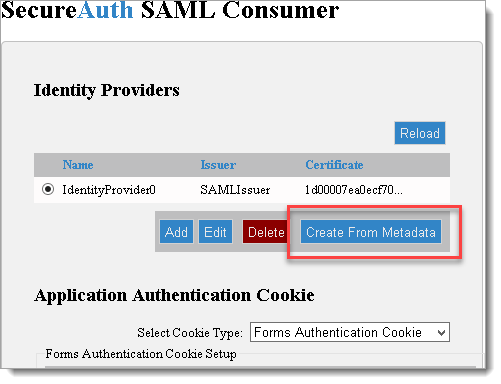
In the Select A Metadata File dialog box, click the Browse button and select the file containing the metadata you need to import.

When you’ve selected the correct file, click OK. The file is added, as in the following image:

A suggested path for the certificate embedded in the metadata is displayed.
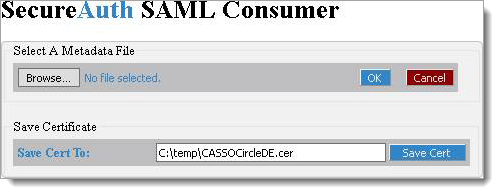
Click Save Cert.
The original admin page displays a new ID Provider; however, this new ID Provider will not be selectable since the certificate has not yet been installed on your local machine store.
Install the certificate.
In the File Explorer, browse to the location where you saved the certificate and double-click it to view the certificate.
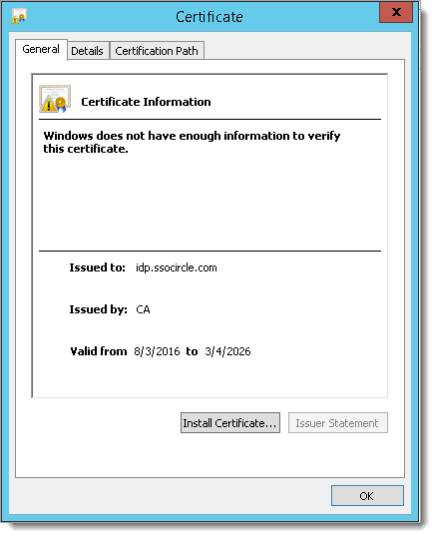
Click the Install Certificate button to view the following Certificate Import Wizard.
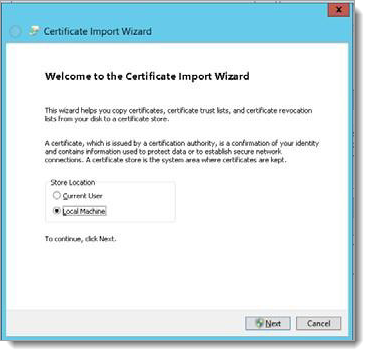
Select the Local Machine radio button then click Next.
Select the Place all certificates in the following store radio button, then click Browse.
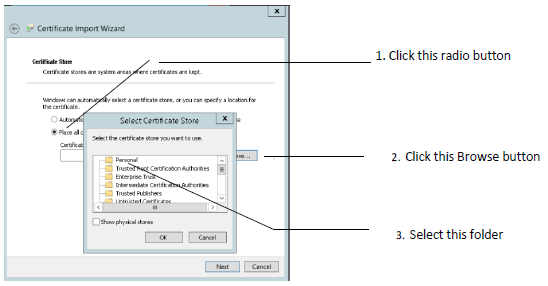
In the Select Certificate Store dialog box, select the Personal folder and click OK.
Click Finish.
A success or failure message will be displayed reflecting the state of the import.
Return to the SAML Consumer Admin page and click the Reload button.
You can now select the new Identity Provider for verification and further editing, if required.
Modify the SAML Consumer Configuration
To modify existing SAML Consumer settings, complete the following steps.
At the bottom of the Application Authentication Cookie page, click on the Modify Applications Settings button.
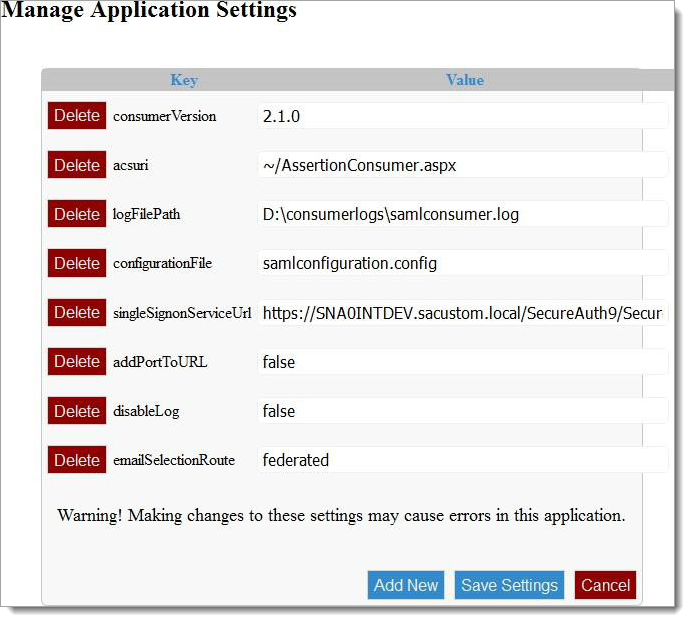
Use the following table to set the fields.
Change the fields that allow direct editing.
Click Add New to create new fields as needed.
Click Delete at the required field to delete a field and value as needed.
Key
Value
consumerVersion
Information only. Has no impact on the system.
acsuri
Should be changed by SecureAuth Support only. This is a virtual path.
logFilePath
Location and name of the debug output for the SAML Consumer.
configurationFile
The name of the SAML Consumer configuration file. This should not be changed unless by SecureAuth Support. The file is
expected to be in the root of the SAML Consumer application
singleSignonServiceUrl
The URL of the SecureAuth realm used by the SAML Consumer. Should be the URL that ends with SecureAuth.aspx.
addPortToUrl
Advanced use. If you are running on a port other than standard 443, enter it here.
disableLog
Values are true or false. If false, debug logging to the logFilePath entry above will not occur.
emailSelectionRoute
If the option to collect a user email address is invoked for a given IdP record, this will override the built-in SelectIDPByEmail page to collect that value. It is of limited use but is included for flexibility.
Add New
If an upgraded version of the SAML Consumer is installed and a new setting is added, this allows SecureAuth Support to add the new settings.
Click Save Settings when you are finished making changes
Configure a SecureAuth IdP realm
Create a realm to handle this .NET SAML Consumer VAM. Configure the following tabs in the Web Admin before configuring the Post Authentication tab:
Overview – Describe the realm and define the SMTP connections.
Data – Integrate an enterprise directory with SecureAuth IdP.
Workflow – Define the way end users access this application.
Multi-Factor Methods – Define the multi-factor authentication methods used to access this page, if necessary.
For information about these settings, see the SecureAuth IdP Realm Guide.
After you have configured the SecureAuth IdP tabs, proceed to the Post Authentication tab and perform the following steps.
Select the Post Authentication tab.
From the “Authenticated User Redirect” dropdown, select SAML 2.0 (SP Initiated) Assertion.

Scroll down to the User ID Mapping section and in the User ID Mapping dropdown, select the SecureAuth IdP property that corresponds to the directory field containing the username, such as Authenticated User ID.

In the Name ID Format dropdown, select the default value: urn:oasis:names:tc:SAML:1.1:nameid- format:unspecified.
In the Encode to Base64 dropdown field, select False.
Scroll down to the SAML Assertion/WS Federation section.

Set the ‘SAML Consumer URL’ field to:
https://<FQDN>/samlconsumer/ assertionconsumer.aspx?IDProviderName=Id entityProviderXSet the WSFed/SAML Issuer field to your Wombat's Entity ID (such as SAMLIssuer)
In the Sign SAML Assertion dropdown, select True.
In the Sign SAML Message dropdown, select True.

Leave the ‘Signing Cert Serial Number’ field as the default value unless you are using a third- party certificate for the SAML assertion.
When using a third-party certificate, click Select Certificate and choose the appropriate certificate.
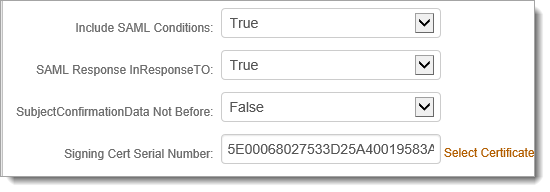
Note
This certificate must match the certificate on the SAML Consumer UI Settings, otherwise certificate errors occur.
Upgrade information
Before upgrading SecureAuth software, open a Support ticket. The process of upgrading to a newer SecureAuth software version might cause the SecureAuth VAM to become invalid and stop working. When your site is ready to upgrade SecureAuth software, get started by creating a support ticket selecting I have a question or issue regarding SecureAuth Value-Added Modules (VAMs) from the "Submit a request" list. A SecureAuth Tailoring engineer will contact you to evaluate and ensure that the VAM will work with updated SecureAuth software.
Implement FBA
The following guide will assist you in coding for FBA in your ASP.Net application using SQL database. The following link will take you to the Microsoft website article How to Implement Forms-Based Authentication in Your ASP.NET Application by Using C#.NET.