Epic CareLink VAM Deployment Guide
This document details the deployment and configuration of the Value-Added Module (VAM) that enables Epic CareLink system applications to access SecureAuth® Identity Platform (formerly SecureAuth IdP) for authentication and authorization.
Deployment and setup
This section details the required steps to deploy and configure the VAM for Epic CareLink.
Prerequisites
Once you have purchased the VAM license, SecureAuth sales engineer or representative will send you the following files:
CareLink.aspx
CareLink.aspx.cs
Download the files on the appliance to which the Identity Platform resides.
Configuration steps
This section covers the required steps to integrate this VAM with the Identity Platform.
In the Identity Platform Web Admin console, create a realm to handle Epic CareLink security.
At this time, you only need to specify the name and other basics for this realm. The remaining details come later.
For more information about creating a new realm, see SecureAuth IdP Realm Guide.
In the Identity Platform realm folder for the Epic CareLink integration, create a
\Customizedfolder.For example, the realm number is SecureAuth23, create a directory like this:
[LocalComputer]\SecureAuth\SecureAuth23\CustomizedCopy the two downloaded files to the \Customized folder like this:
[LocalComputer]\SecureAuth\SecureAuth23\Customized\CareLink.aspx[LocalComputer]\SecureAuth\SecureAuth23\Customized\CareLink.aspx.cs
In the Identity Platform Web Admin, select the new realm and go to System Info tab.
Scroll down to the Links section and click the Web Config Editor link.
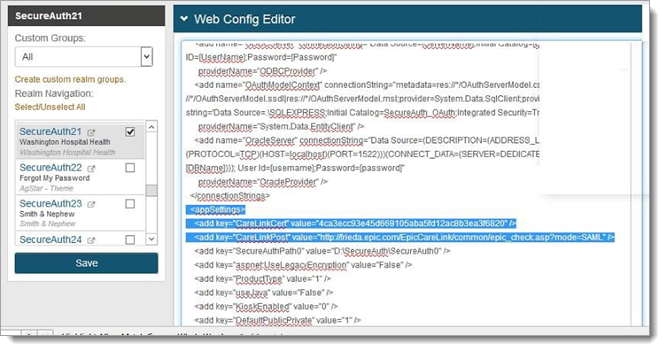
In the Web Config Editor, go to the <appSettings> section with the CareLink keys like the following example:
<appSettings>
<add key="CareLinkCert" value="4ca3ecc93e45d669105aba5fd12ac8b3ea3f6820"/>
<add key="CareLinkPost" value="http://epic.com/EpicCareLink/common/epic_- check.asp?mode=SAML" />

Make the following changes to the
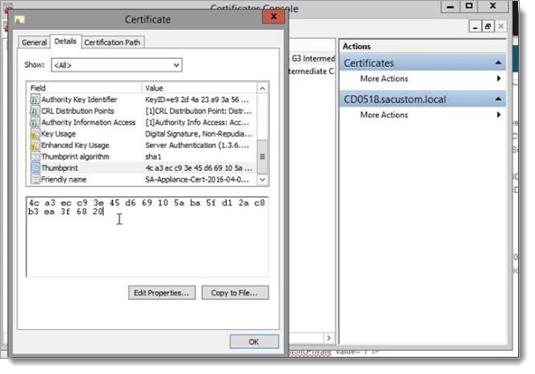
CareLinkCertvalues to use the certificate thumbprint.To find the thumbprint, open
CertMgrin Windows (on the same machine to which this realm resides).Locate the certificate.
From the Details tab, select the Thumbprint entry.
This populates the box at the bottom similar to the following example.
Note
You do not need to remove the spaces for the CareLinkCert value; the Post Authentication page automatically handles this.

Copy the certificate value and paste into the Web Config Editor for the CareLinkCert value.
If necessary, you can use a text editor to modify the text and copy/paste into the Web Config Editor.

Save your changes and exit the Web Config Editor.
Select the Post Authentication tab.
In the Post Authentication section, set the following:
Set Authenticated User Redirect to Use Custom Redirect.
In the Redirect To field, enter the location and name of the aspx file you copied to the
\Customizedfolder
The Epic CareLink integration requires a post authentication event (using CareLink.aspx) to send a signed XML POST to the Epic CareLink application.
Note
The certificate must reside on both the Identity Platform appliance in the LocalComputer\Personal Store as well as the Epic CareLink server and be accessible by both applications. The certificate on the Identity Platform appliance must have a private key.
Upgrade information
Before upgrading SecureAuth software, open a Support ticket. The process of upgrading to a newer SecureAuth software version might cause the SecureAuth VAM to become invalid and stop working. When your site is ready to upgrade SecureAuth software, get started by creating a support ticket selecting I have a question or issue regarding SecureAuth Value-Added Modules (VAMs) from the "Submit a request" list. A SecureAuth Tailoring engineer will contact you to evaluate and ensure that the VAM will work with updated SecureAuth software.