Epic EPCS VAM Deployment Guide
Updated October 29, 2024
This document details the deployment and configuration of the Epic EPCS Value-Added Module (VAM) on a SecureAuth® Identity Platform (formerly SecureAuth IdP) appliance. The addition of the Epic EPCS VAM in your environment enables authentication and authorization of applications on Epic EPCS.
The SecureAuth Epic EPCS VAM enables seamless integration between the Identity Platform multi-factor authentication (MFA) and the Epic Hyperspace platform for the Electronic Prescriptions of Controlled Substances (EPCS) system. Using this integrated package, qualified physicians can write prescriptions quickly and securely while meeting DEA requirements for electronic prescriptions.
This guide also includes instructions on installing and configuring the VAM that enables the link between Epic Hyperspace and the Identity Platform.
What's new in version 4.0.5
The Value-Added Module (VAM) by SecureAuth for Epic ECPS in version 4.0.5 introduces several enhancements. It enables user redirection to IDP realm for direct MFA validation using embedded Chromium browser, allows skipping MFA based on the number of login attempts, and bypasses MFA based on the time since the last successful login. Furthermore, it maintains the existing feature of selecting various MFA options for authentication, including biometric methods.
Why select the SecureAuth Identity Platform?
SecureAuth’s flexible authentication framework allows providers to deploy DEA compliant two-factor authentication (2FA) in ways that are not intrusive on physicians; in many cases SecureAuth can actually optimize workflows by reducing clicks. Its aim is to provide the quickest way to ensure that the accessing physician is the one authorized to approve the prescription, per DEA standards.
Features
Seamless integration into preexisting Epic e-Prescribing workflows
Multiple authentication methods that not only meet DEA regulations but also make 2FA easy for physicians – such as push-to-accept, fingerprint, and other DEA-compliant methods
Flexible authentication platform that allows providers to select the 2FA method which best meets their needs
Skipping MFA validation based on the number of allowed skips configured for the user
Skipping MFA validation based on the time since the last successful login
Redirecting the user to the SecureAuth IDP realm for user validation
Benefits and use cases
The Epic EPCS VAM enables SecureAuth MFA and modern authentication methods for stronger security.
MFA and adaptive authentication
MFA methods used for EPCS transactions are required to meet FIPS 140-2 Level 1. Choose among the following available authentication methods.
SecureAuth Mobile <Push-To-Accept>
SecureAuth Mobile App <Soft Token> TOTP
SecureAuth <Hardware> Token TOTP
SecureAuth Mobile Fingerprint
SecureAuth Mobile FaceID
Note
Verify that these methods meet your organization’s interpretation of the EPCS Guidelines.
List of MFA options
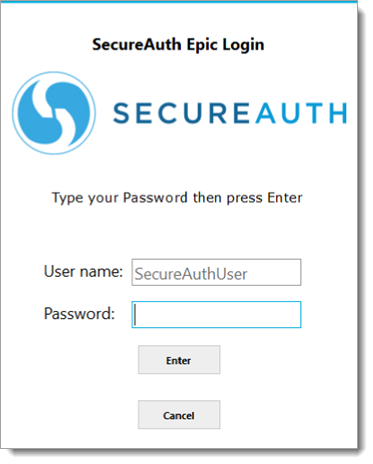
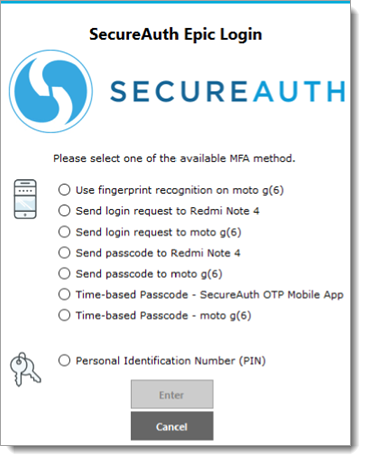
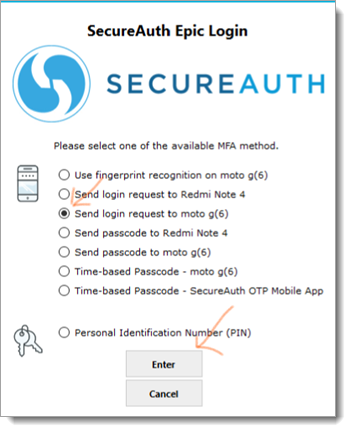
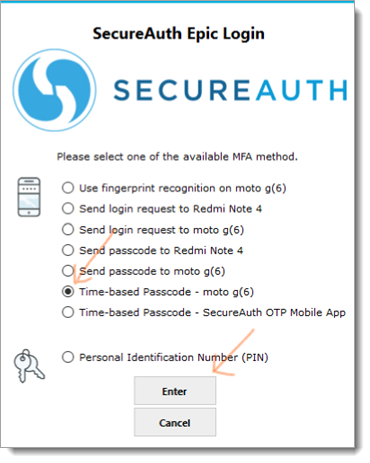
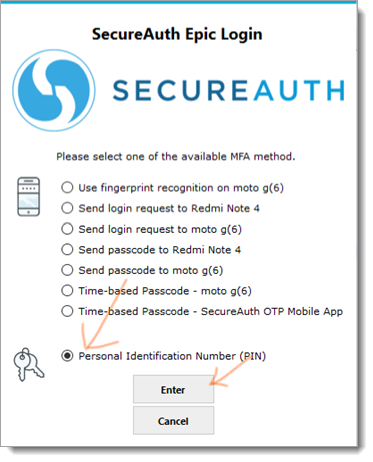
The following example illustrates a newly added workflow presenting the list of all FIPS 140-2 compliance MFA methods for the user to choose from. To activate this new workflow we have to update ShowMFA="1" in SASettings.xml, or else it works as before in version 2.0.
In this example:
The physician enters a username and is prompted for a method to receive the required password; if
RequirePasswordkey is set to1in SASettings.xml, or else it skips to step 3 in the login workflow.The physician enters the password and presses Enter.
This opens a user interface with list of available MFA options.
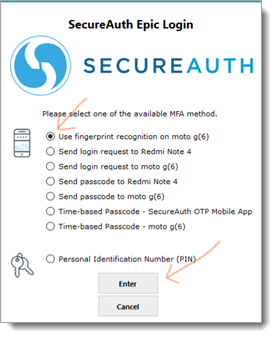
The physician needs to select a preferred MFA option and presses Enter.
Based on the selected MFA option, the next page appears to complete 2FA.
The physician receives entry to the EPCS system.
Note
Reading a fingerprint/FaceID is compliant with the FIPS 140-2 standard and can only be handled by those mobile devices that support fingerprint/FaceID reading.
 |
 |
Fingerprint/FaceID: When a physician selects fingerprint or face ID, they will receive a fingerprint/faceID request on their mobile device.
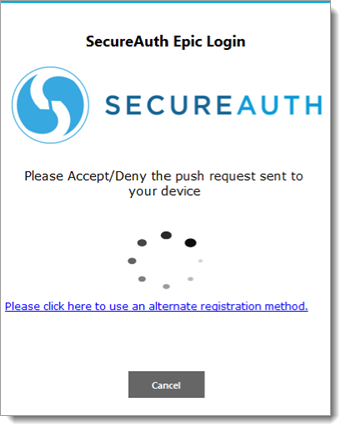
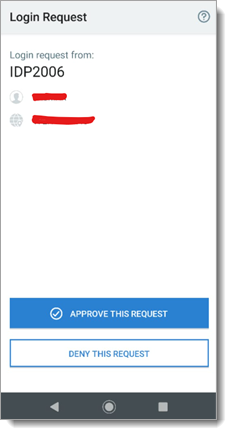
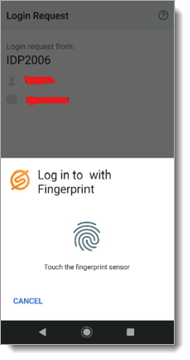
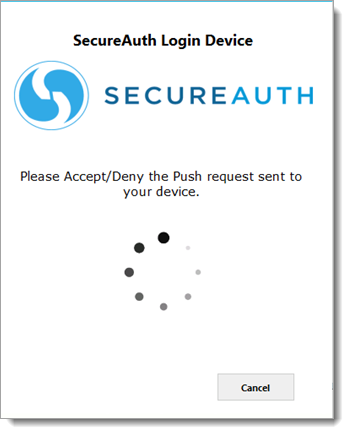
Send Login Request (Push to Accept): When a physician selects send login request, they will receive a login request on their mobile device.


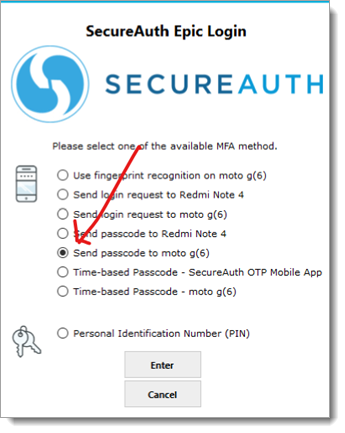
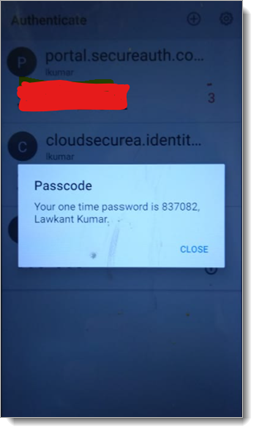
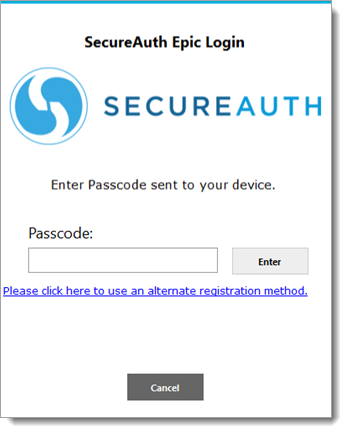
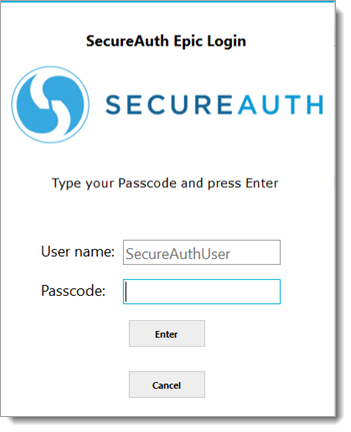
Send passcode to mobile app: When a physician selects send passcode to mobile app, they will have to enter a passcode sent to mobile app in the next screen and press Enter.
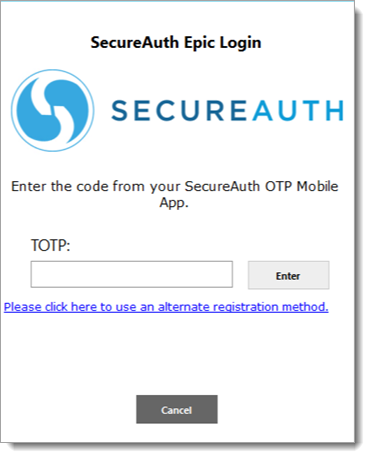
Time-based passcode (TOTP): When a physician selects time-based passcode, they will have to enter a time-based passcode in the next screen and press Enter.
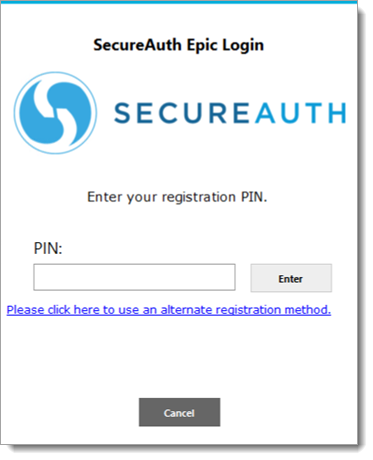
Personal Identification Number (PIN): When a physician selects personal identification number (PIN), they will have to enter their PIN in the next screen and click Enter.
Soft-token EPCS with second factor
The following example illustrates a commonly deployed 2FA method using mobile devices featuring FIPS 140-2-compliant one-time passcode (OTP) tokens. This method is easy for physicians to use, and because of its FIPS 140-2 compliance, it meets the DEA’s requirement for 2FA.
In this example:
The physician enters a user name and is prompted for a method to receive the required passcode.
The physician receives the passcode on their registered device.
The physician enters the received passcode and presses Enter.
The physician is granted access to the EPCS system.

Soft-token EPCS with password
In a variation on the first example, the process requires the physician to perform soft-token EPCS second factor as shown in the following illustration examples (using both a password and a passcode).
The physician uses their mobile application with fingerprint ID (if supported by FIPS 140-2) to unlock their onetime passcode.
The physician enters a user name and is prompted for a fingerprint.
The physician authenticates with a fingerprint on the mobile device.
Note
Reading a fingerprint is compliant with the FIPS 140-2 standard and works only on mobile devices that support fingerprint reading.
 |
 |
The physician is granted access to EPCS data.
Push-to-Accept EPCS
To comply with DEA requirements while providing the quickest possible access, the Identity Platform also features push-to-accept with TouchID for EPCS authentication. Many providers are moving to push-to-accept with TouchID because it not only reduces the number of clicks and character entries a physician must perform, but also incorporates all three of the authentication factors identified by the DEA:
Something you know (username/password).
Something you have (mobile device).
Something you are (fingerprint for TouchID).
An example of the process required to perform push-to-accept EPCS 2FA is shown in the following illustration example:
The physician opens the application on their mobile device or computer.
The application prompts the physician for authentication. At the same time, the secondary device is activated.
The physician pushes a button on the secondary device to accept the request for entry.
The application then allows physician access to the required data.
Note
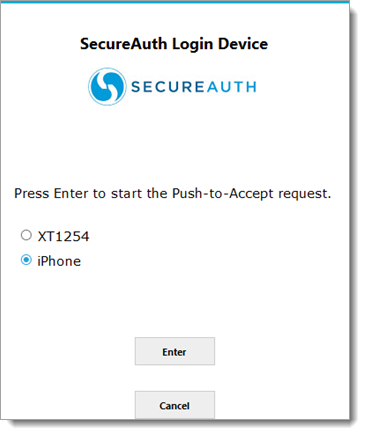
If Push-to-Accept is used with accounts that have multiple registered mobile devices, a page appears with a list of mobile devices from which the user can select, as shown below.
 |
Redirect workflow
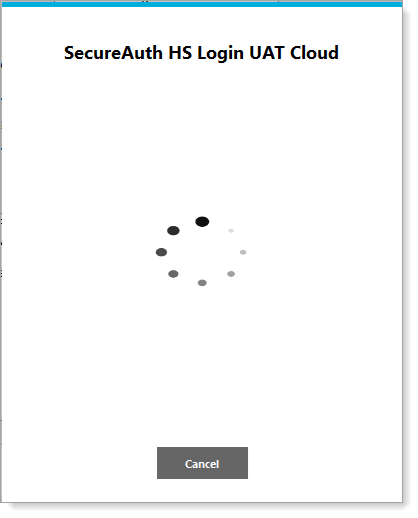
To integrate directly with the SecureAuth IdP realm, we have established a workflow that uses an embedded chromium browser to authenticate the user directly in the SecureAuth IdP realm. See the following example of a workflow when EPIC MFA is enabled with a redirect to the SecureAuth realm.
 |
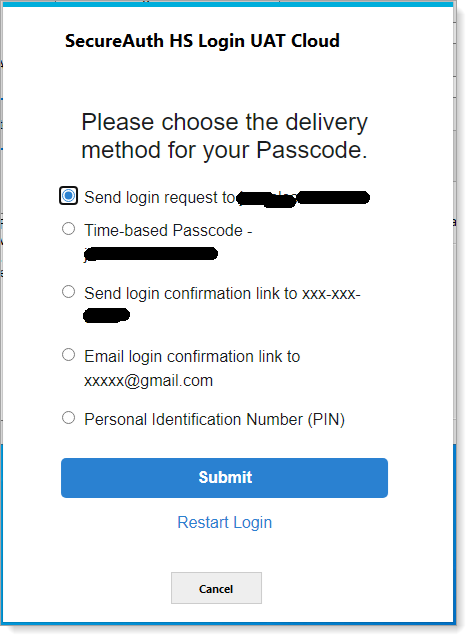 |
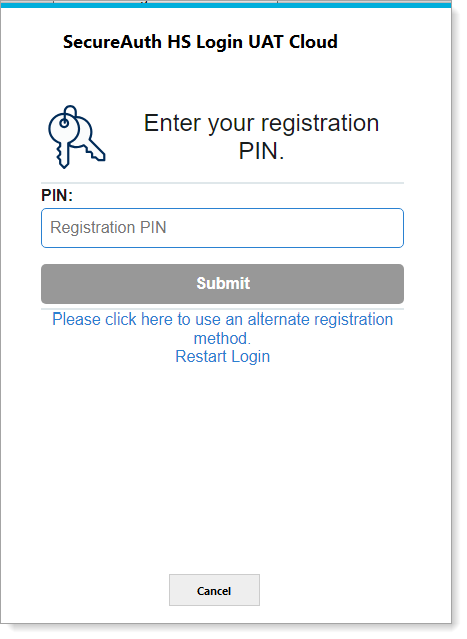
Next screen displays based on the selection of the MFA option as shown in the screenshot above. In this case, the PIN method was selected.
 |
The process flow using the Epic EPCS VAM is shown below.
 |
Configuration tasks to support this VAM
This section covers the required configurations to integrate this VAM with the Identity Platform.
Prerequisites
This document is based on the development of the Epic EPCS VAM using the following systems:
Epic EPCS version 8.4 and 8.7 installed and running on Windows
Identity Platform version 9.2 or later
Internal developer tested environments
SecureAuth VAM team developed a test tool for testing and validating the result internally, EPIC Hyperspace was not available internally.
Configure the Identity Platform
Configuring the Identity Platform for use with Epic EPCS involves the creation of a realm dedicated to handling the necessary API instructions.
Note
Configuring the Identity Platform for use with Epic EPCS should be handled, at least initially, by the SecureAuth deployment staff and should not be the client’s responsibility.
Designate a realm in your Identity Platform appliance to provide API access to the SecureAuth Epic EPCS VAM.
For more information about creating a new realm, see SecureAuth IdP Realm Guide.
Go to the Data tab and configure the required fields for a data store integration.
A data store integration is required for the Identity Platform to pull user profile information during the login process. For more information about configuring the Data tab, see Data Tab Configuration.
Select the API tab.
In the API Key section do the following:
Select the Enable API Key for this realm check box.
Click Generate Credentials to create a new Application ID and Application Key, which are unique to this realm.
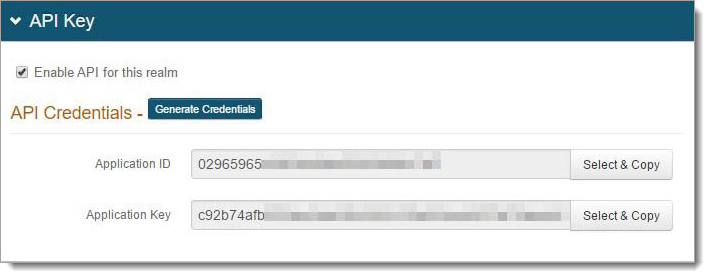
Note
The API key looks as if it consists of 64 random characters, but it is actually composed of 32 two-character hexadecimal values. This is important when using the API key to produce the required HMAC hash.
Copy and paste each of the credentials into a text editor.
These values will be required in the HTTP Header configuration.
In the API Permissions section, do the following:
Select the Enable Authentication API check box.
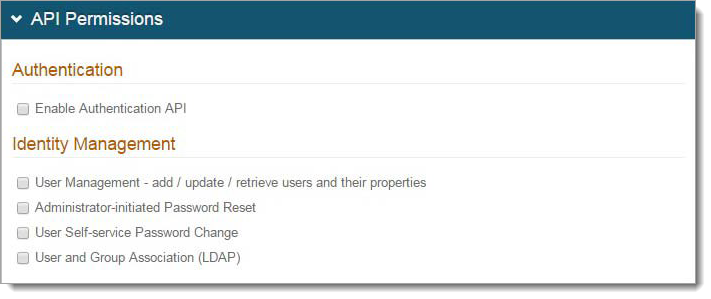
Save your changes.
Install and configure the Epic EPCS VAM
Copy the provided ZIP file to a location on the system running Hyperspace.
Do one of the following:
If running the Hyperspace thick client from a workstation, install the SALoginDevice on the workstation itself, for example Win10.
If using a VDI server, such as Citrix, for access to Hyperspace, install the SALoginDevice on all Citrix servers.
Extract the SecureAuth folder to the C:\ drive. This folder can be installed in another location if write access is provided to the logs folder.
Open the SecureAuth folder and run RegisterSALoginDevice.bat as an Administrator.
UnRegister - C:\Windows\Microsoft.NET\Framework\v4.0.30319\RegAsm.exe
"C:\Epic EPCS Login Device\SecureAuthLoginDevice.dll" /u

Register - C:\Windows\Microsoft.NET\Framework\v4.0.30319\RegAsm.exe
"C:\Epic EPCS Login Device\SecureAuthLoginDevice.dll" /codebase
This adds SecureAuthLoginDevice.dll to the system code base.
Note
By executing this .bat file, the SecureAuth Epic EPCS VAM is automatically registered, enabling you to bypass
regsvr32for this DLL.Open SASettings.xml using a text editor and modify the following settings:
Setting
Description
EPICVersion
Default is “Hyperspace”, if appsetting is missing or empty then it will consider as a "Hyperspace". Set value to “Hyperdrive”, If need to use for Hyperdrive.
SecureAuthAPIUrl
The URL used to access the Authentication API realm defined in the SecureAuth configuration.
It must be accessible by HTTPS and the certificate used to serve the SSL connection must be trusted by the Epic Hyperspace server.
EPCSUrl
Deprecated, should be empty.
AppID
The Application ID provided in the Identity Platform appliance configuration for the Authentication API.
AppKey
The Application Key provided in the Identity Platform appliance configuration for the Authentication API.
Retry
Indicates the number of failed attempts by the user to enter a correct OTP before the Epic EPCS VAM returns to Epic and fails to authenticate the message.
LogLevel
Default value set to 0, which turns off logging.
Do not change this value unless instructed to do so by a SecureAuth Engineer.
WindowTitle
Indicates the title text that displays on the Epic EPCS VAM dialog box.
RequirePassword
When set to 1, the user is required to enter their password for the configured data store in the Authentication API realm when using the Epic EPCS VAM.
LogoPath
Specifies the full file path on the appliance for the custom logo image displayed in the Epic EPCS VAM. For example, C:\SecureAuth\logo.png.
EnablePush
Enables Push-to-Accept as the second factor method provided by the Epic EPCS VAM. Valid values:
0 – Default value, which disables push-to-accept.
1– Enables this setting. The following scenarios can occur:
When the Push-to-Accept method is used with accounts that have multiple registered mobile devices, the software displays a list of devices from which the user can select.
When no devices are found, the software notifies the user
When only one device is found, it automatically sends the push request without waiting for a selection.
PreferStaticPin
Enables or disables the static PIN feature. Valid values:
0 – Indicates the use of TOTP (OATH) token
1 – Enables the use of a static PIN. When this feature is enabled, it verifies against the static PIN. When no PIN is found for the user, it defaults to using a standard TOTP token.
PreventNonMobileDevices
Skip Oath/TOTP/PUSH authentication for non-mobile devices:
0 – Enable authentications for all devices.
1 – Disable authentication for Windows/Mac devices. That’s means authentication will be skipped for Windows/Mac devices.
ShowMFA
Indicate whether to show the MFA workflow to users. Valid values:
0 – Disable the MFA workflow
1 – Enable the MFA workflow
MFAOrder
This is a comma separated MFA option value to decide the order of MFA options shown on the user interface.
The default order is PUSH,TOTP,PIN.
BioLogoPath
Specify the file path for the custom logo image displayed for biometric options list.
For example: C:\SecureAuth\ bioLogo.png
PinLogoPath
Specify the file path for the custom logo image displayed for PIN options list.
For example: C:\SecureAuth\ pinLogo.png
NoMFAError
Error message to show to user when there is no MFA option available.
NoMFASelected
Error message to display to user when no MFA option selected.
AcceptDenyPushRequest
Text to display once user selects biometric/push request option.
APIConnectionError
Text to display if there is an error while validating the input.
APIDeniedError
Text to display if biometric/push request is denied.
APIFailedError
Text to display if biometric/push request has failed.
APINotFoundError
Text to display if biometric/push request is not found.
APIInvalidError
Text to display if biometric/push request is invalid.
APIUnknownError
Text to display if there is some unknown error.
EnterPasscode
Text prompting user to provide passcode.
EnterTOTP
Text prompting user to provide TOTP.
EnterPIN
Text prompting user to provide PIN.
UnknownMFAError
Text prompting user to select another authentication method (in case of current selection option is not working for any reason).
PasscodeNotMatchError
Text to display when the passcode the user provides does not match.
SelectedDeviceError
Text to display when there is an issue with the selected device.
TOTPNotMatchError
Text to display when the TOTP the user provides does not match.
BlankPasscode
Text to display when the user provides a blank passcode.
BlankTOTP
Text to display when the user provides a blank TOTP.
BlankPIN
Text to display when the user provides a blank PIN.
ExternalDllPath
A physical path where we have all the Chromium dependency.
ExternalDlls
List of all DLLs whitelisted to be loaded dynamically.
SecureAuthRedirectCheckConditionTime
True / False
SecureAuthRedirectClockSkewMins
A number (1, 2, 3, …..)
SecureAuthRedirectValidityPeriodHours
A number (1, 2, 3, …..)
SecureAuthRedirect
1 or empty
SecureAuthRedirectRealm
URL for SecureAuth IdP realm.
SecureAuthRedirectCert
SecureAuth IdP realm certificate
SecureAuthRedirectSAMLIssuer
SAML Issuer
SecureAuthRedirectErrorMsg
Fail message like "Authentication Failed!"
SecureAuthRedirectBypassWorkHours
Bypass hours since last successfully login
SecureAuthRedirectBypassWorkHoursAuxID
AuxID to store last successful login time
SecureAuthRedirectBypassAttempts
Number of attempts to by pass the authentication after last successful login
SecureAuthRedirectBypassAttemptsAuxID
AuxID to store number of bypass attempts
SecureAuthRedirectBypassAttemptsMSG
Skip button text
SecureAuthRedirectBypassAttemptsContinueMSG
Continue button text
SecureAuthRedirectBypassAttemptsContinueURL
URL to redirect user after by passing the verification process
Refer to the following sample of the SASettings.xml file.
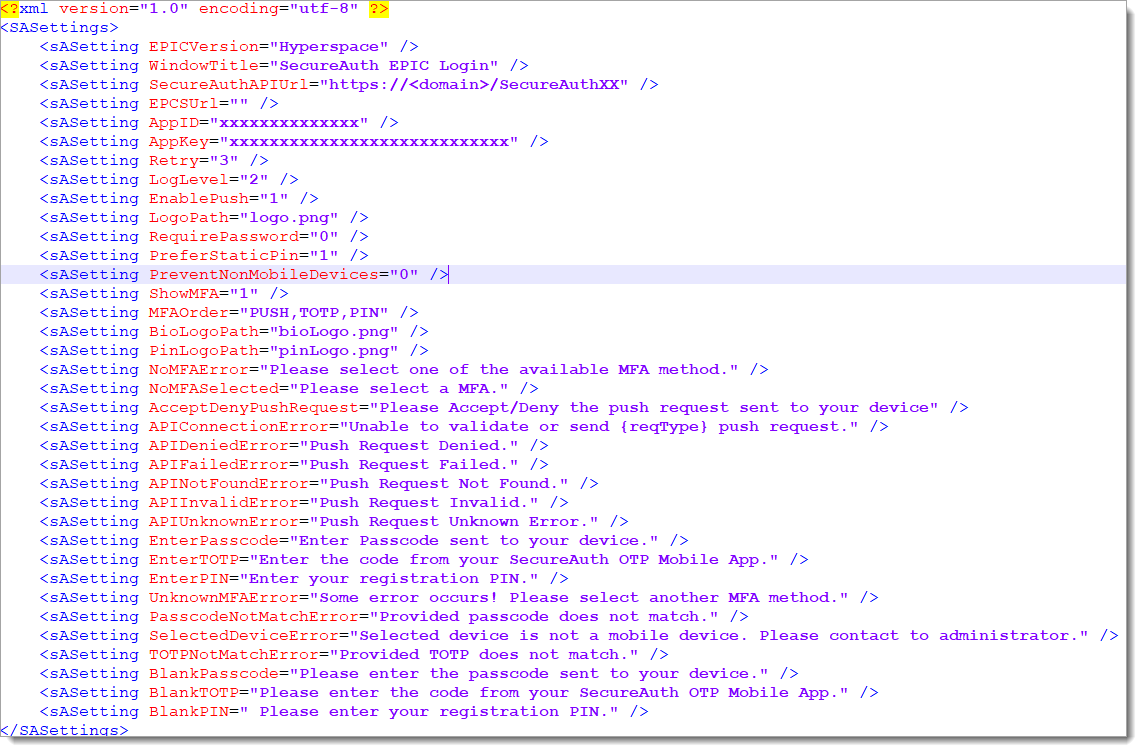
<?xml version="1.0" encoding="utf-8" ?>
<SASettings>
	<sASetting EPICVersion="Hyperspace" />
	<sASetting WindowTitle="SecureAuth EPIC Login" />
	<sASetting SecureAuthAPIUrl="https://<domain>/SecureAuthXX" />
	<sASetting EPCSUrl="" />
	<sASetting AppID="xxxxxxxxxxxxxx" />
	<sASetting AppKey="xxxxxxxxxxxxxxxxxxxxxxxxxxxx" />
	<sASetting Retry="3" />
	<sASetting LogLevel="2" />
	<sASetting EnablePush="1" />
	<sASetting LogoPath="logo.png" />
	<sASetting RequirePassword="0" />
	<sASetting PreferStaticPin="1" />
	<sASetting PreventNonMobileDevices="0" />
	<sASetting ShowMFA="1" />
	<sASetting MFAOrder="PUSH,TOTP,PIN" />
	<sASetting BioLogoPath="bioLogo.png" />
	<sASetting PinLogoPath="pinLogo.png" />
	<sASetting NoMFAError="Please select one of the available MFA method." />
	<sASetting NoMFASelected="Please select a MFA." />
	<sASetting AcceptDenyPushRequest="Please Accept/Deny the push request sent to your device" />
	<sASetting APIConnectionError="Unable to validate or send {reqType} push request." />
	<sASetting APIDeniedError="Push Request Denied." />
	<sASetting APIFailedError="Push Request Failed." />
	<sASetting APINotFoundError="Push Request Not Found." />
	<sASetting APIInvalidError="Push Request Invalid." />
	<sASetting APIUnknownError="Push Request Unknown Error." />
	<sASetting EnterPasscode="Enter Passcode sent to your device." />
	<sASetting EnterTOTP="Enter the code from your SecureAuth OTP Mobile App." />
	<sASetting EnterPIN="Enter your registration PIN." />
	<sASetting UnknownMFAError="Some error occurs! Please select another MFA method." />
	<sASetting PasscodeNotMatchError="Provided passcode does not match." />
	<sASetting SelectedDeviceError="Selected device is not a mobile device. Please contact to administrator." />
	<sASetting TOTPNotMatchError="Provided TOTP does not match." />
	<sASetting BlankPasscode="Please enter the passcode sent to your device." />
	<sASetting BlankTOTP="Please enter the code from your SecureAuth OTP Mobile App." />
	<sASetting BlankPIN=" Please enter your registration PIN." />
</SASettings>
Save the SASettings.xml file.
Create the SecureAuth login device
In Chronicles, access the Authentication Devices (E0G) master file, then go to <Data Management> 1. Enter Data | Create/Edit Device <Y>.
Enter a name for the device. For example,
SecureAuthLoginDevice.Enter a new ID. For example,
10001+.On the General Settingspage, set the following:
Set the Description to SecureAuthLoginDevice.
Set the Platform to 1-Desktop.
On the Desktop Settings page in the ProgID field, enter SecureAuthLoginDevice.Receiver2 supporting both Hyperdrive and Hyperspace which is for EPIC VAM version 3.1+.
Note
Older EPIC VAM version supporting Hyperspace ONLY using SecureAuthLoginDevice.Reciever.
Configure the SecureAuthLoginDevice as the secondary authentication device
Once the SecureAuthLoginDevice is created, you will need to specify it as the secondary authentication device.
Open Hyperspace and go to Epic | Admin | Access Management | Authentication Administration.
Select the System level.
Select the desired Context.
Set the first authentication method as the Primary Device.
Typically, this is the username and password.
Set the SecureAuthLoginDevice as the Secondary Device.
Click Accept.
Test the Epic EPCS VAM
Epic provides a standalone .NET Testing tool that can be used to verify that the Epic EPCS VAM is working before adding it to the Hyperspace configuration. The steps below outline how to use the tool.
From the SecureAuth folder, open the Test folder.
Run the StandAloneNETTester.exe file.
The MainForm window appears.
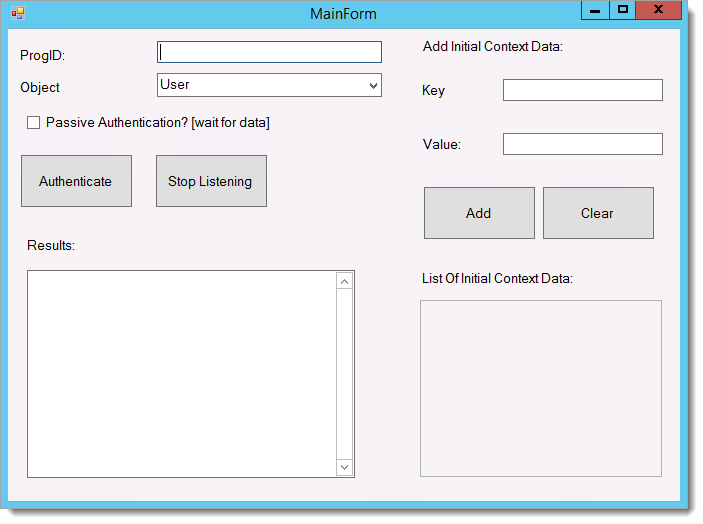
In the ProgID field, enter SecureAuthLoginDevice.Receiver2.
Click Authenticate.
The RequestForm window appears.
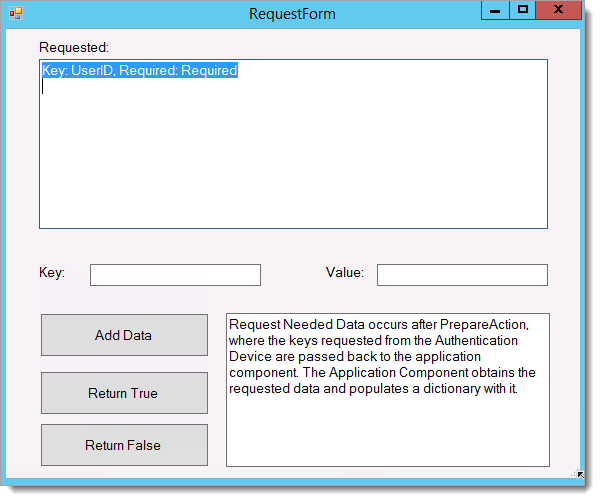
Do the following:
In the Key field, enter the UserID.
In the Value field, enter the username to be tested.
Click Add Data.
Click Return True.
Follow the authentication flow as prompted on the screen.
After successful authentication, you will see the following screen.
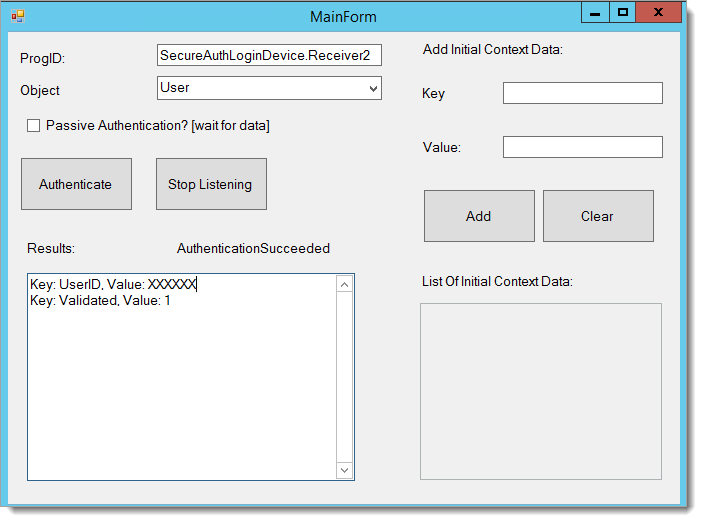
The Epic EPCS VAM appears. If the device completes successfully, the Results field on the MainForm window updates with a success; otherwise, the field displays Perform Action Failed.
Hyperdrive configuration
Deploy “SecureAuth.EPIC.dll” from the package received under “D:\SecureAuth\SecureAuthXX\bin” of the SecureAuth API realm.
Setup SAML IDP-initiated post auth realm as per below configuration.
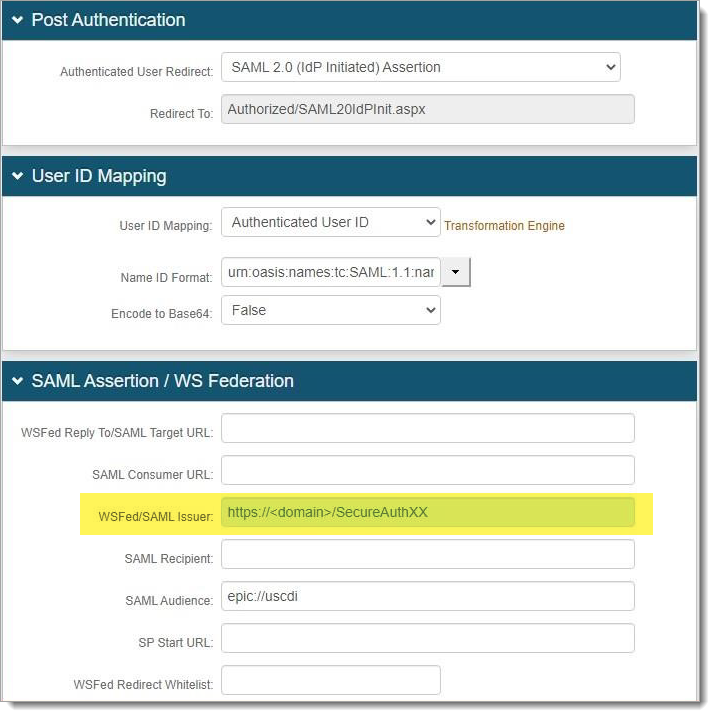
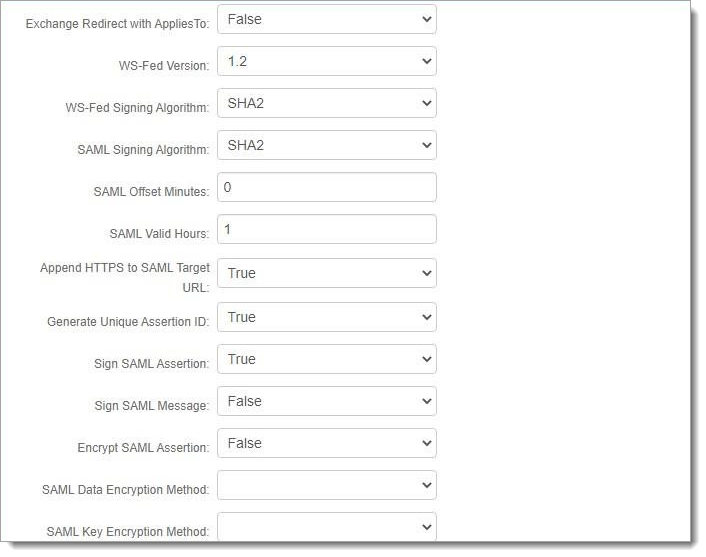
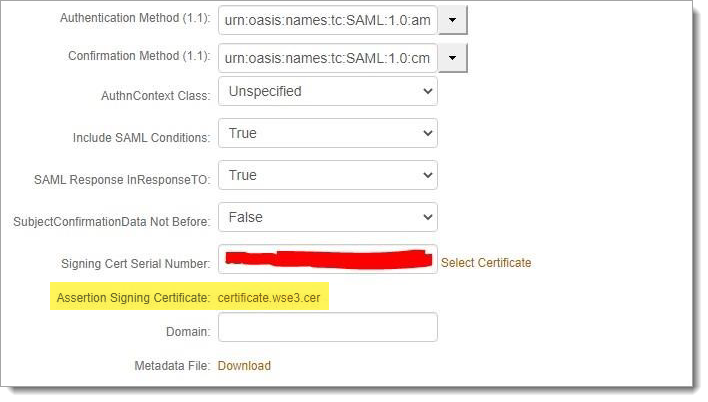
Set the Name ID Format to urn:oasis:names:tc:SAML:1.1:nameidformat:unspecified.
Send SAML issuer and signing certificate from SecureAuth IdP to EPIC.
Download the certificate and make a note of the SAML Issuer as shown in the highlighted screenshot above.
Export the entire SecureAuth certificate chain and key to a .PFX file.
Export the entire certificate chain to a .PEM file using the following command:
openssl pkcs12 -in SecureAuth01VM.company.com.pfx -nokeys -out SecureAuth.SAML.wse3.pem
The .pem file must be placed on each operational database server or user application server (if ECP).
Note
Epic recommends using the
/epic/pki/certdirectory as the location for the .PEM cert file, since this is where the other certificates are stored.This command exports the ROOT CA, ICA cert, and server cert.
The CN value will change based on the certificate each customer will use. For example:
CN=SecureAuth01VM.company.com
CN=SecureAuth G3 Root Certificate Authority
CN=SecureAuth G3 Intermediate Certificate Authority 2A
In the Authentication Devices (E0G) master file, add the SAML Issuer (SecureAuth realm).
Enter the SAML Key File, which is the path to the location of the .PEM cert.
See the following example.

In the SASettings.xml file, update
"<sASetting EPICVersion="Hyperspace" />"to" <sASetting EPICVersion="Hyperdrive" />".Now when you test using the test tool and if authentication is successful, then you will see a SAML response in the text area.
See the following screen shot as an example.
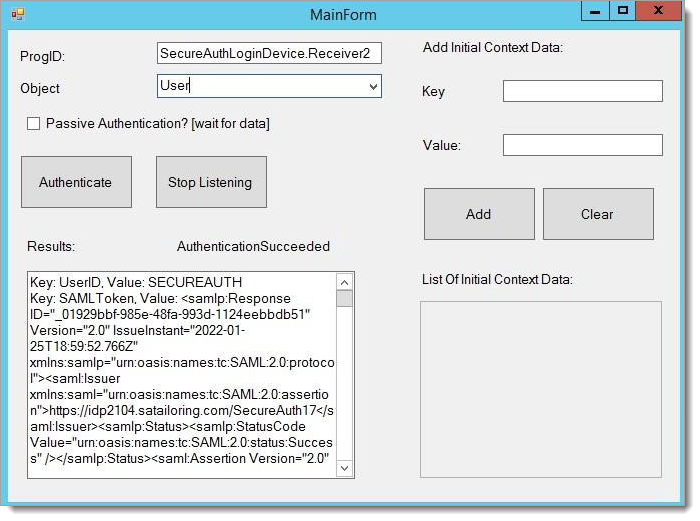
Test Epic EPCS VAM using Hyperdrive
EPIC Hyperdrive testing is ONLY successful if EPIC has properly configured Hyperdrive for your organization and per SAML configuration from SecureAuth as noted in this document. Work with the EPIC team to make sure Hyperdrive environment is ready for testing.
See the upgrade information below for any issues with deployment and testing.
Upgrade information
Before upgrading SecureAuth software, open a Support ticket. The process of upgrading to a newer SecureAuth software version might cause the SecureAuth VAM to become invalid and stop working. When your site is ready to upgrade SecureAuth software, get started by creating a support ticket selecting I have a question or issue regarding SecureAuth Value-Added Modules (VAMs) from the "Submit a request" list. A SecureAuth Tailoring engineer will contact you to evaluate and ensure that the VAM will work with updated SecureAuth software.