Add a SAML service provider
Add a downstream SAML 2.0 service provider (SP) to SecureAuth Connect, which acts as the SAML identity provider (IdP) and issues a signed assertion to the SP after each user signs in. This pattern fits commercial SAML SaaS and internal applications that pre-date OIDC.
What you gain
- One sign-in, many applications. Users authenticate once at SecureAuth and reach every connected SAML application without re-entering credentials. Common in employee or contractor SSO across HR, finance, and ops platforms.
- Centralized policy and audit. MFA rules, risk evaluation, group restrictions, and audit logging that already apply to your tenant carry over to the SAML application automatically.
- Bridge modern IdPs to legacy SAML applications. If upstream identity lives in Okta, Microsoft Entra ID, or local identity pools, SecureAuth brokers it into a SAML assertion the downstream application accepts. Useful for federating partner or contractor identity into vendor portals.
- Role-aware attribute passthrough. Send department codes, group memberships, or other attributes the SP needs to drive what the user sees. For example, separate clinician, administrator, and front-desk views in clinical and operational systems.
- No per-application credential store. The SP trusts the signed assertion. There's no separate password to provision, rotate, or audit on the application side.
This guide covers the admin work to register and configure the SP. The Quickstart tab on the SP detail page is where developers pick up after that. It generates working integration code snippets pre-filled with this application's IdP details.
Prerequisites
Before you begin, gather the following from the SP vendor or application team:
- SAML metadata for the SP, in one of three forms:
- A metadata URL (preferred – the URL refreshes automatically when the SP rotates certificates)
- A downloadable metadata XML file
- The Entity ID, ACS URL, and signing certificate as separate values
- Required SAML attributes the SP expects in the assertion (commonly
email,userPrincipalName, or a department code) - The NameID format the SP uses to recognize the user (often email, sometimes a custom identifier)
- (Optional) A user policy if you want to restrict access by group, attribute, or risk signal
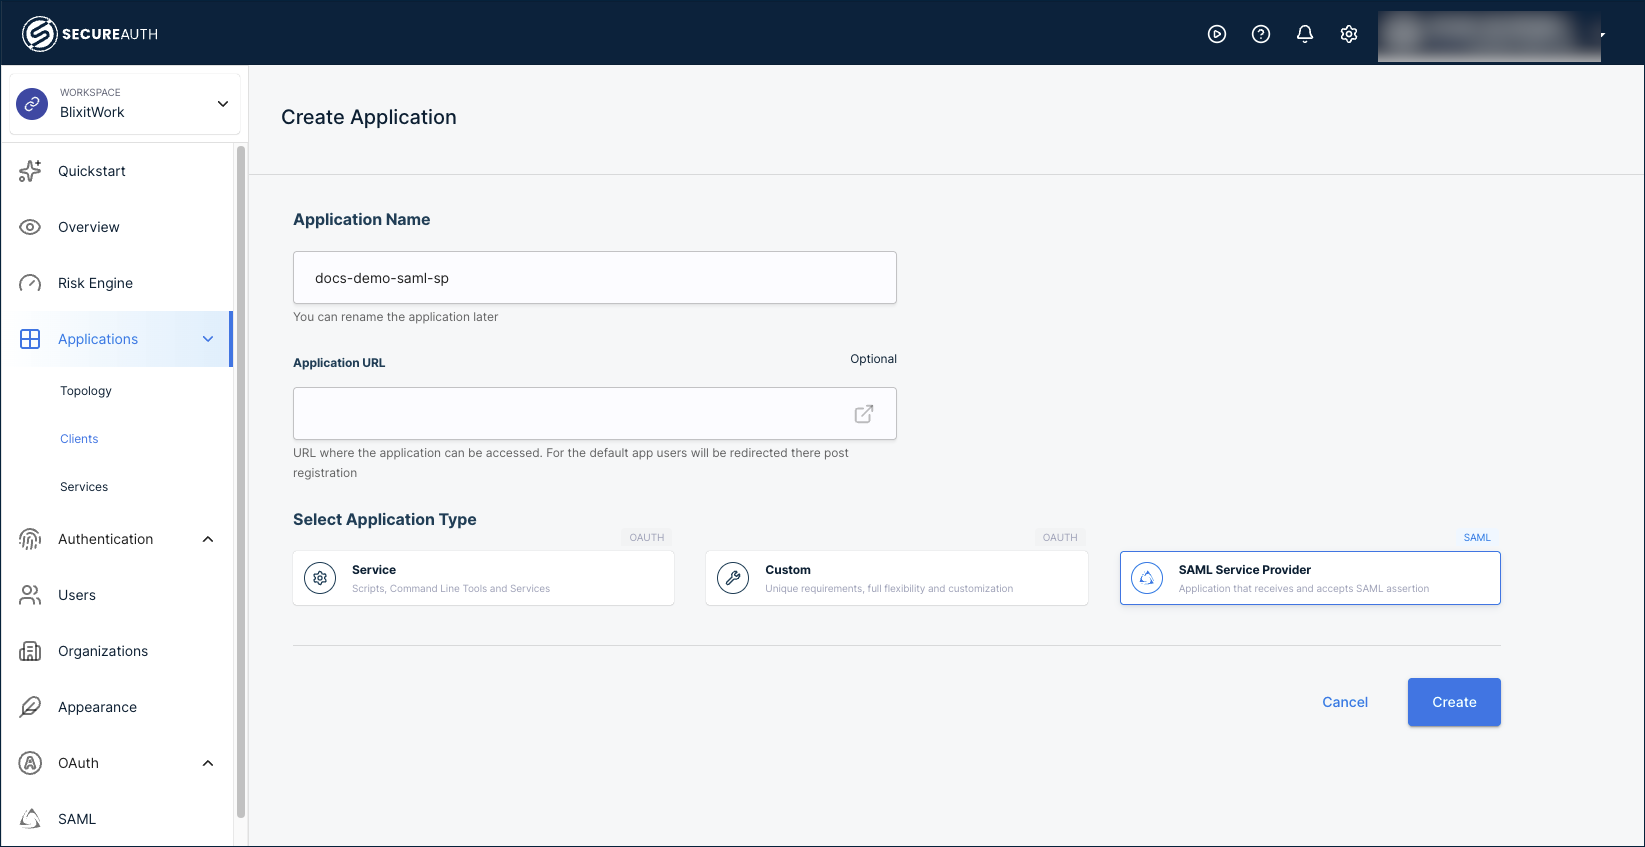
Step 1: Create the SAML SP application
Each SP gets its own client record. That record identifies the destination application and applies per-application policy and attribute settings.
-
In your workspace, go to Applications > Clients and click + Create Client.
-
Name the application after the destination SP and environment (for example,
MyApp ProdorWorkday Sandbox). -
(Optional) Enter the Application URL. This is the page where users start their SP-initiated sign-in. Leaving it blank does not affect SAML authentication; users can still go to the SP directly and be redirected to SecureAuth for sign-in. Set it if you plan to launch the application from the user portal.
-
Select SAML Service Provider as the application type.
-
Click Create.
Step 2: Configure application details
The Overview tab is where you confirm the high-level settings and read off the IdP details you'll need for the SP-side SAML configuration.
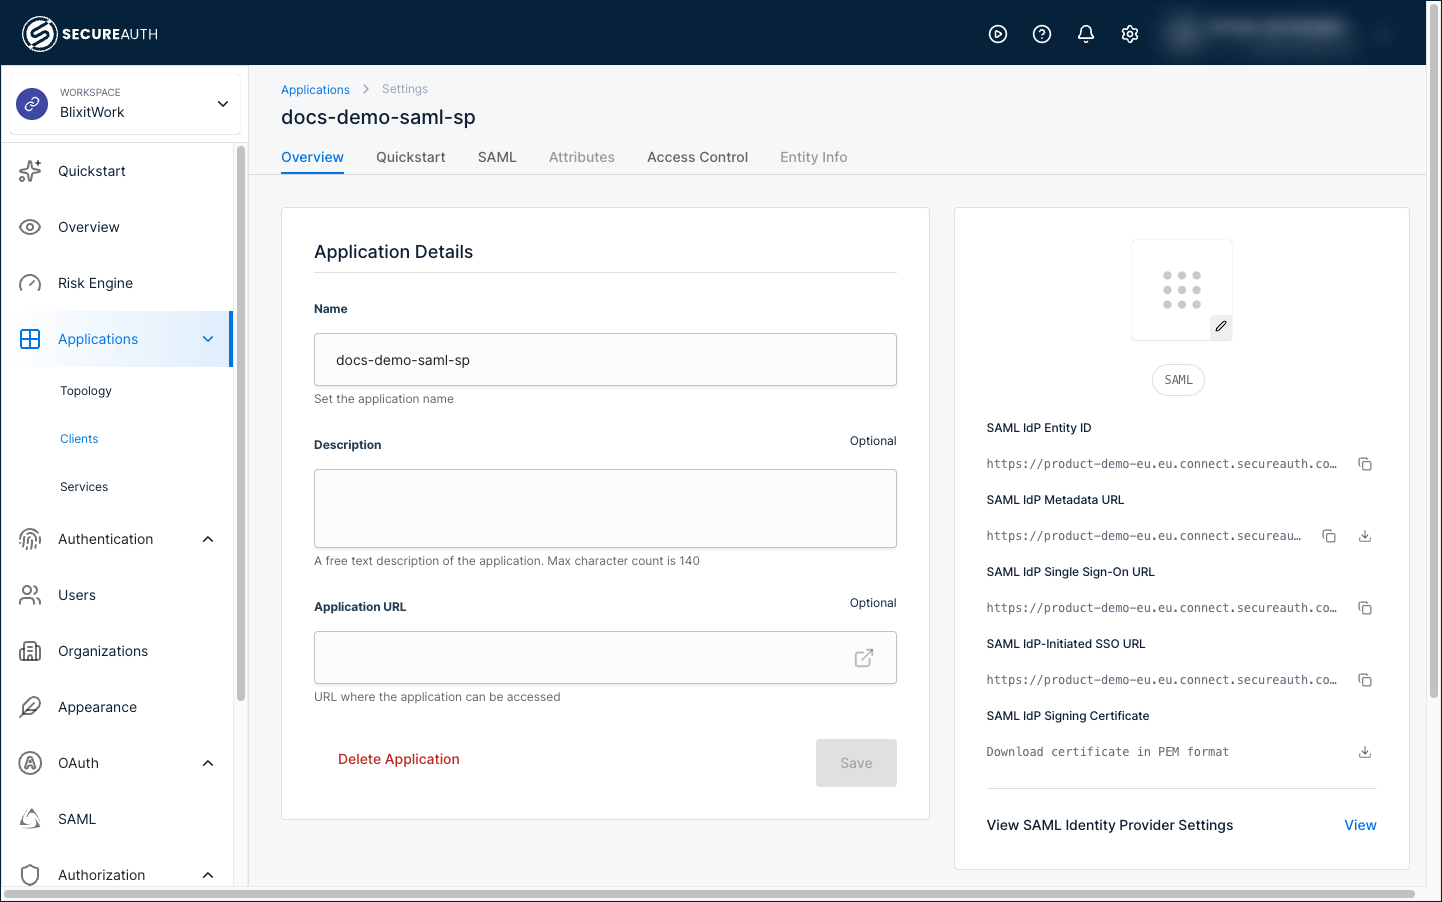
The panel on the left holds editable settings:
| Setting | Description |
|---|---|
| Name | Display name for the application. Change this whenever the SP-side name changes. |
| Description | Optional summary, useful when multiple SAML applications share similar names. |
| Application URL | Optional. Used when launching the application from the user portal. |
The panel on the right holds the SAML IdP values needed to register SecureAuth as the IdP in the SP application.
Two toggles affect which tabs are usable:
- Add Entity Info: activates the Entity Info tab so you can attach JSON key/value metadata to the SP record. Use it for SP-specific configuration the team needs to retrieve later, such as region codes or contract IDs.
- Override SAML Attributes: activates the Attributes tab so you can customize the attributes sent in the assertion. Use it when the SP expects a non-default attribute set or different attribute names than your default IdP configuration.
Both tabs stay visible but disabled until you flip the toggle.
Step 3: Configure the SAML connection
The SAML tab covers the three configuration decisions that complete the trust relationship: where to send the assertion, what user identifier to send, and how to sign it.
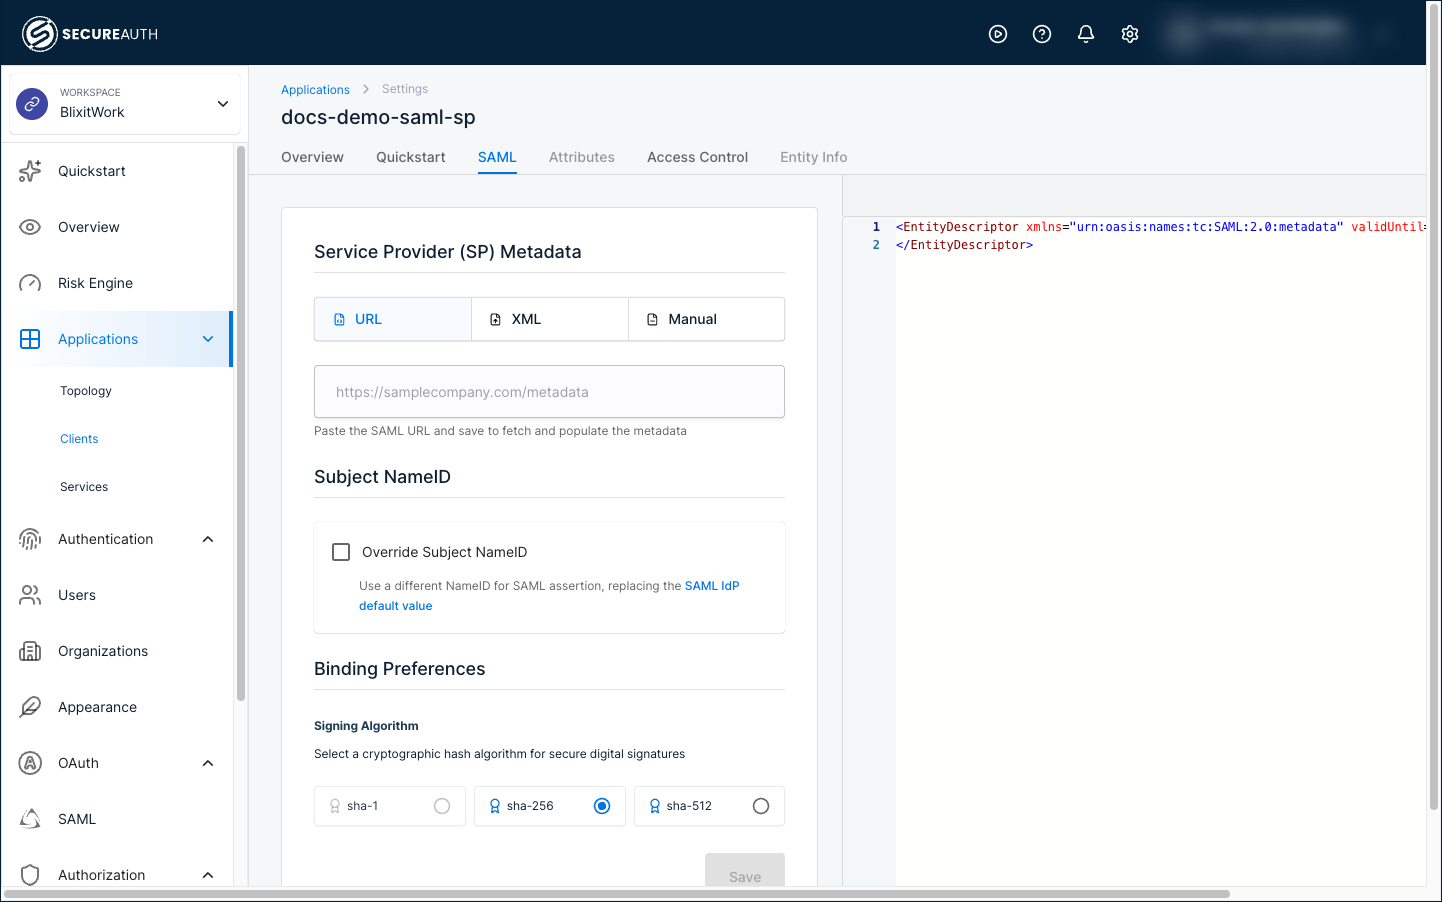
Provide service provider metadata
Metadata from the SP tells the IdP where to send the SAML assertion (the ACS URL) and how to identify the receiving application (the Entity ID). The Service Provider (SP) Metadata section offers three import methods; choose based on what the SP exposes.
URL method (recommended). Paste the metadata URL provided by the SP. Metadata is fetched, Entity ID and ACS URL populate automatically, and the URL re-fetches periodically so SP-side certificate rotations don't break the integration. Use when the SP publishes a metadata URL endpoint. Most modern SAML SPs do.
XML method. Upload the metadata XML file. The values are parsed and stored once. You'll need to re-upload if the SP changes its certificates. Use when the SP provides a downloadable XML but no URL.
Manual method. Enter Entity ID, ACS URL, and (optionally) the signing certificate by hand:
| Setting | Description |
|---|---|
| Entity ID | Unique identifier for the SP. Provided by the SP. |
| ACS URL | Assertion Consumer Service endpoint that receives the SAML assertion after sign-in. |
| Signing Certificate | Certificate the SP uses to validate logout requests or responses. Optional. |
| SSO Binding Method | Form Post for most cases. Redirect for SPs that require URL-parameter delivery. |
Use when no metadata URL or XML is available. Higher risk of misconfiguration; double-check the Entity ID matches exactly.
Do not append /Users or /Groups to a metadata URL. Most SPs (Okta, OneLogin, Entra ID) automatically resolve those paths. Adding them manually causes the SP metadata refresh to fail.
Set Subject NameID
The Subject NameID is the user identifier the SP uses to match the assertion to its own records. If the SP looks up users by email but you send a userID, the SP can't match the assertion to a user.
Two options on the SAML tab under the Subject NameID section:
| Option | Description |
|---|---|
| Use default (check box cleared) | Inherits the NameID value from your global SAML IdP settings. |
| Override Subject NameID | Define a different NameID format and source attribute for this SP. Useful when one SP wants email but another wants a department-specific identifier. |
Many SPs require a specific NameID format, usually urn:oasis:names:tc:SAML:1.1:nameid-format:emailAddress. Check the SP documentation before overriding.
Choose the signing algorithm
Every SAML assertion is signed with the algorithm you select here. The SP rejects assertions signed with an algorithm it doesn't accept, so select an algorithm the SP supports.
Scroll to Binding Preferences on the SAML tab.
| Algorithm | When to choose |
|---|---|
| SHA-1 | Avoid. Deprecated and rejected by most modern SPs. |
| SHA-256 | Recommended. Industry baseline; supported by virtually every SAML SP. |
| SHA-512 | Use only if the SP explicitly requires it. Stronger but rarely necessary. |
Step 4: Set access policies
The Access Control tab governs who can sign in to the SP. Two independent policy stages run in sequence:

| Stage | When it runs | What it evaluates | Typical use |
|---|---|---|---|
| Pre-login policy | Before the user authenticates | Request context: IP address, time of day, device fingerprint, geographic region | Block access from unauthorized regions or outside business hours before exposing the auth UI |
| User policy | After the user authenticates | User attributes: group membership, role, custom claims, risk score | Restrict to a specific department, require step-up MFA for sensitive groups |
Leave both fields as Unrestricted (No Policy) for open access to all authenticated users. Assign one or both policies to restrict access.
Manage policies under Authorization > Policies in your workspace. Both Pre-login and User policy fields draw from the same policy catalog. The difference is when in the flow each one runs.
Step 5: Save and apply IdP metadata to the SP
Save the configuration, then provide the IdP details to the SP-side SAML setup to complete the trust relationship.
- Click Save at the bottom of the SAML tab to persist all configuration.
- Return to the Overview tab.
- From the panel on the right, copy the SAML IdP Entity ID, SAML IdP Metadata URL, and SAML IdP Single Sign-On URL to use in the SP-side SAML configuration.
- Download the SAML IdP Signing Certificate (PEM format) and provide it in the SP-side configuration if the SP imports certificates rather than fetching from your metadata URL.
- To review the full IdP configuration applied to this SP, click View next to View SAML Identity Provider Settings.
Integrate with your application
The Quickstart tab on the SP detail page generates SAML library code in .NET, Java, and Node.js, pre-filled with this SP's Entity ID, ACS URL, IdP SSO URL, and signing certificate. It's the developer companion to the admin setup above.
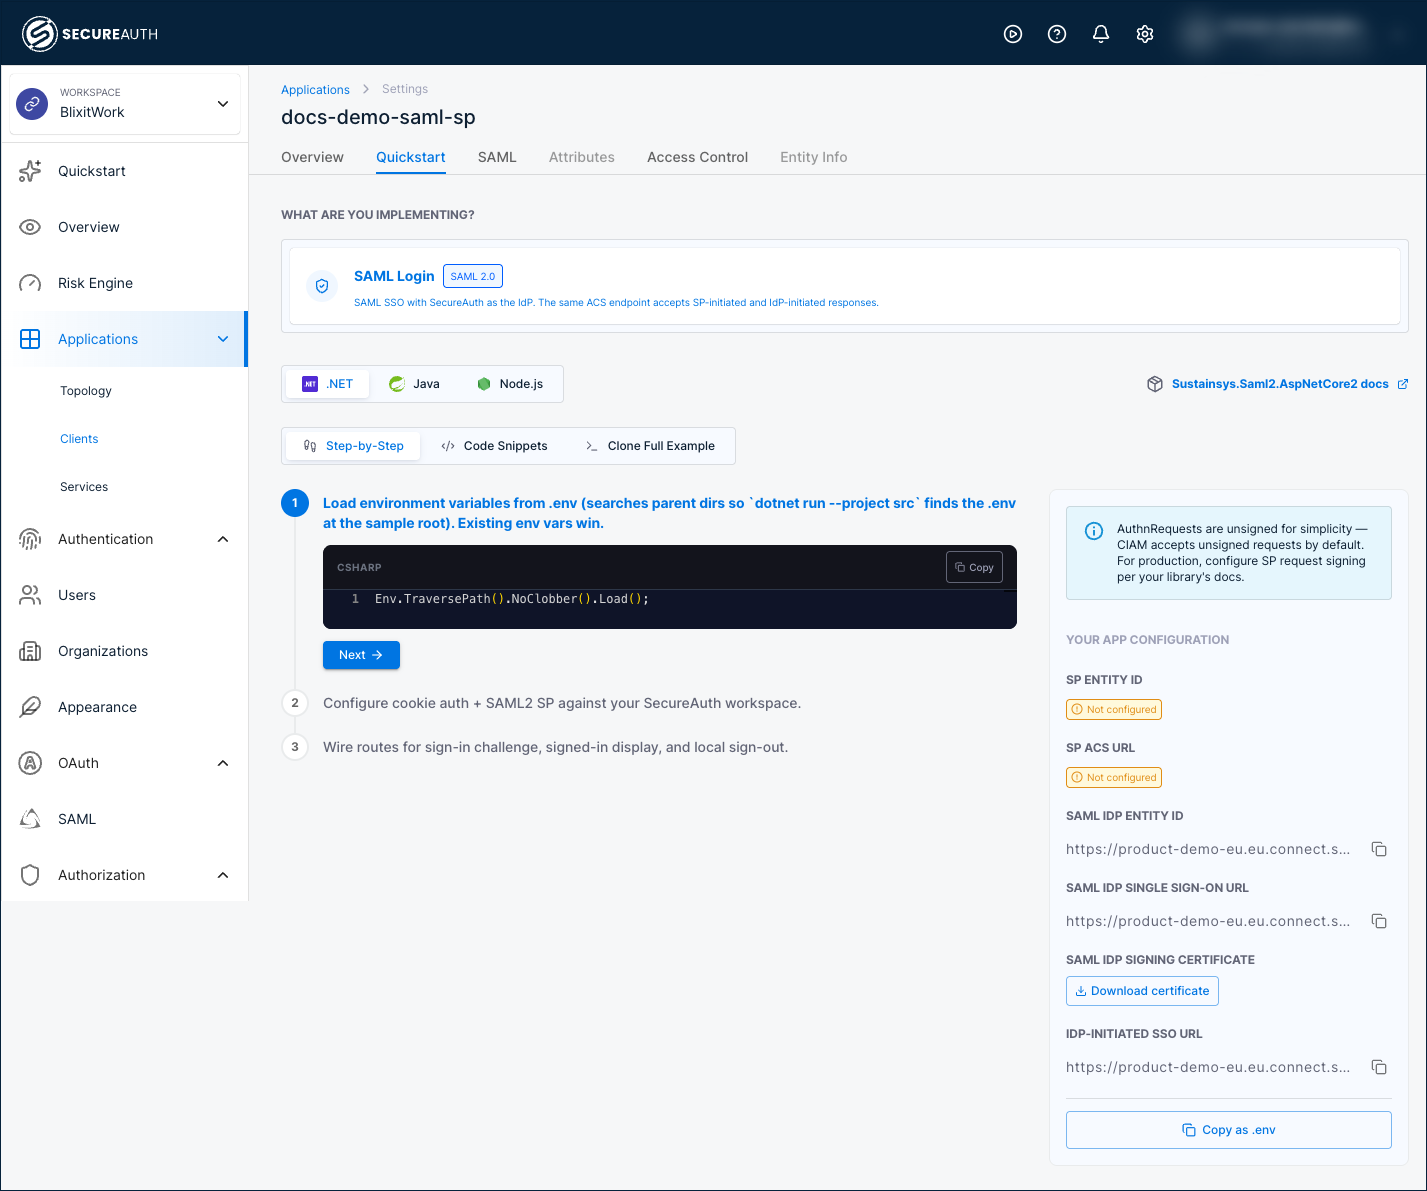
Use it when you need to:
- Configure a SAML library in a custom-built application where you control the source. The generated snippets show the minimal code to validate the IdP assertion and start a session.
- Hand a developer a starting point that already references the right IdP URLs for this tenant. Saves the back-and-forth of "what's the SSO URL again?" during integration.
- Bootstrap a proof-of-concept before connecting to a production SAML library.
For commercial SAML SPs (Salesforce, Workday, etc.), the Quickstart tab is usually unnecessary. Those products have their own SAML configuration UIs; the admin setup above is enough.
For an overview of the Quickstart tab across all application types, see Integrate your application using the Quickstart tab.
Verify the integration
After saving, test end-to-end:
- Go to the SP application and start a sign-in.
- Confirm the browser redirects to SecureAuth for authentication.
- Sign in as a test user.
- Confirm the SP receives the assertion and grants access.
If something fails, capture the SAML response from the browser using a tool like SAML Tracer (Firefox/Chrome extension). The response includes the exact NameID, attributes, and any error codes the SP returns.
Troubleshooting
| Issue | Symptom | Resolution |
|---|---|---|
| Metadata import fails | Error when saving SP metadata via URL | Verify the URL is reachable from the network and returns valid SAML metadata XML. |
| Authentication loop | User bounces between the SP and SecureAuth without landing | The Entity ID or ACS URL stored in the SP record doesn't match what the SP expects. Re-import the SP metadata or correct the values manually. |
| Access denied after sign-in | User authenticates but the SP blocks access | Re-check the Pre-login and User policy assignments on the Access Control tab. Confirm the user meets policy criteria. |
| SP metadata refresh fails | Error on save or background refresh: could not refresh saml sp metadata, the entity id changed from <old> to <new> | The Entity ID returned by the SP's metadata URL differs from what's stored on this SP record. See Resolve an SP metadata refresh error below. |
Resolve an SP metadata refresh error
During the metadata refresh, the Entity ID in the fetched metadata is compared to the value stored on the SP record. If those differ, the refresh aborts and shows this error to admins:
could not refresh saml sp metadata, the entity id changed from <old> to <new>
The most common trigger is a change to the SP's Entity ID, usually a side effect of an http:// to https:// switch on the SP, a domain rename, or an environment migration. SAML treats Entity IDs as immutable identifiers, so the integration refuses to silently overwrite the trust relationship.
To resolve:
- Confirm the Entity ID change is intentional. If it was rolled back or accidental, fix it on the SP side and the next refresh succeeds.
- If the new Entity ID is correct and permanent, update the SP record:
- Open the SP record on the SAML tab.
- Re-import the SP metadata using the URL or XML method. Re-import overwrites the stored Entity ID with the new value.
- Or, switch to the Manual method, paste the new Entity ID, and save.
- Re-test sign-in to confirm the integration works end-to-end.
Two related external errors share the same SP metadata refresh path and may surface alongside or in place of the entity-ID mismatch:
failed to get saml sp metadata during refresh: the metadata URL was unreachable. Check network reachability and the URL itself.failed to decode saml sp metadata: the URL was reachable but the response wasn't valid SAML metadata XML. The SP may be returning an error page or HTML.
See also
- Federate a SAML IdP to a downstream SAML SP through SecureAuth: walks through the end-to-end pattern where SecureAuth receives SAML from an upstream IdP and issues SAML to this SP
- Set up SAML IdP: the upstream side of federation, where SecureAuth receives SAML from a customer IdP
- Integrate your application using the Quickstart tab: the cross-application overview of the Quickstart tab
- Configure authentication policies: used in the Pre-login and User policy fields
- Adding outgoing SAML assertion attributes sent to service providers: when the SP expects a non-default attribute set