CyberArk RADIUS integration
Use this guide to enable multi-factor authentication (MFA) access via RADIUS to a CyberArk Password Vault Server.
Prerequisites
CyberArk Password Vault Server
Configure and test CyberArk Password Vault Server with Password Vault Web Access (PVWA)
Create, sign, and install a certificate for the Vault Server as detailed in Certificate instructions.
Configure the multi-factor app enrollment realm for the RADIUS OTP authentication requests
Install and configure the SecureAuth RADIUS server
CyberArk Password Vault Server configuration
To configure the CyberArk Password Vault Server, perform the following steps.
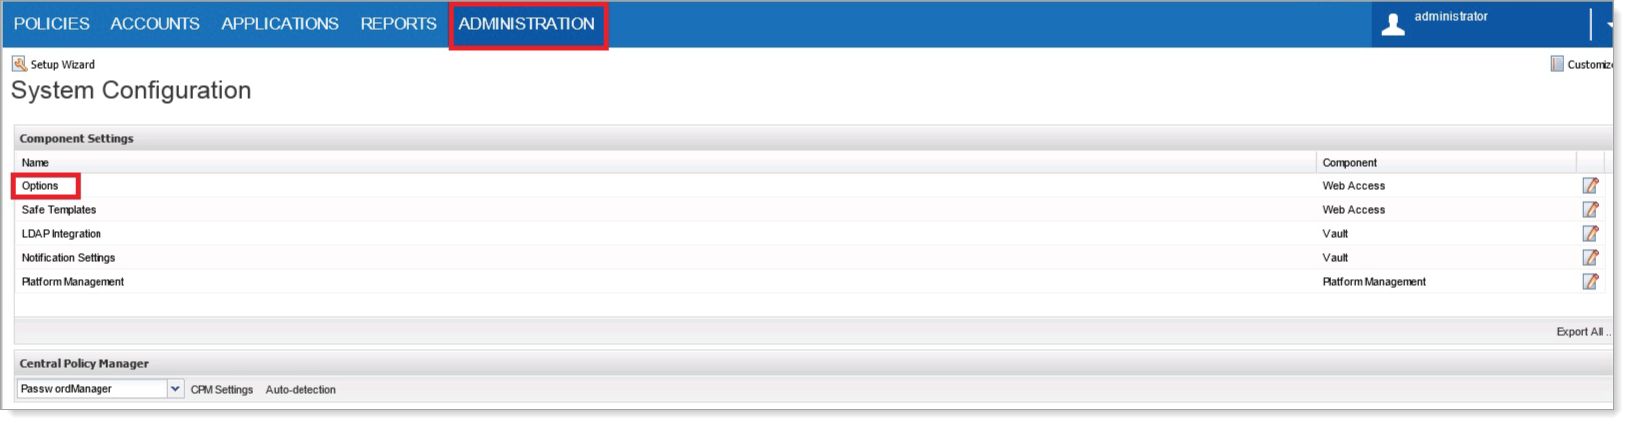
Log in to the CyberArk Password Vault Web Access, go to the Administration tab and then select Options.
In the left navigation, go to Authentication Methods > radius.
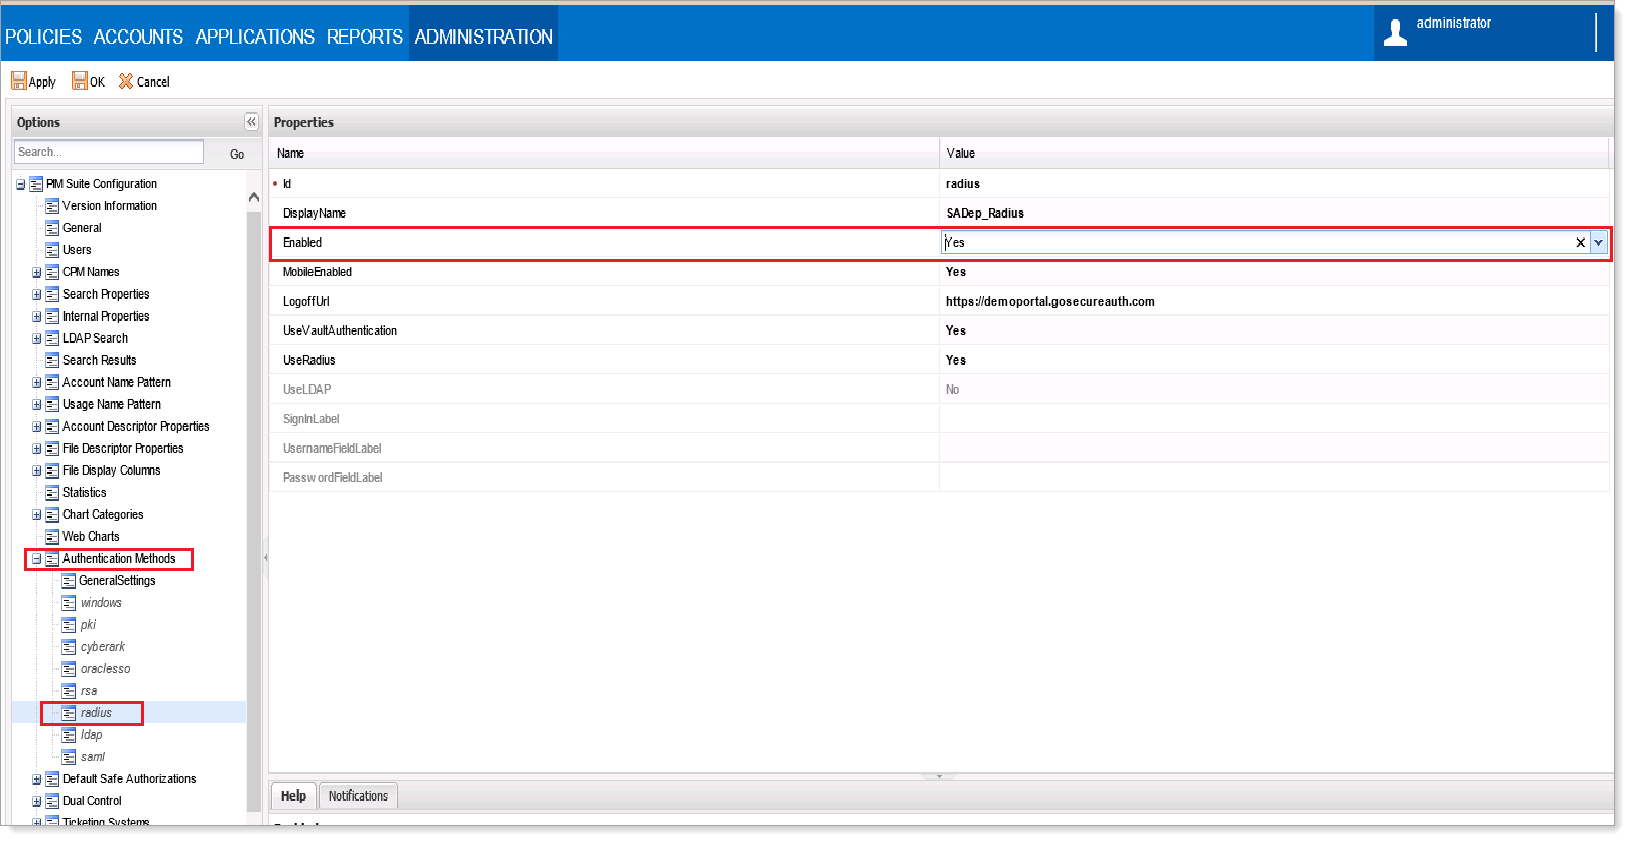
In the Properties section, set Enabled to Yes.
Click Apply.
Stop the Password Vault Server.
To create an encrypted RADIUS shared secret file, open
CMDas an administrator and runCAVaultManagerusing this format:CAVaultManager SecureSecretFiles /SecretType Radius /Secret VaultSecret / SecuredFileName c:\RadiusSecret.dat
As an example, we'll generate a shared secret file using
test123as the shared secret:C:\Program Files (x86)\PrivateArk\Server> CAVaultManager.exe SecureSecretFiles /SecretType Radius /Secret test123 /SecuredFileName C:\test.dat
Note
There is a 14-character limit for the RADIUS Secret.
Make sure that the shared secret in the CyberArk configuration is the same as in the SecureAuth RADIUS server settings.
In the
C:\Program Files (x86)\PrivateArk\Serverdirectory, find the Password Vault ServerDBParm.inifile and back up this file.Open the
DBParm.inifile. Under the[MAIN]section, add theRadiusServerInfokey.RadiusServersInfo=RADIUS_Server_IP;RADIUS_Port;vaulthostname;radiusauth.dat where; RADIUS_Server_IP = The IP of the RADIUS server RADIUS_Port = Port number of the RADIUS vaulthostname = The name of the RADIUS client radiusauth.dat = The shared secret file, created in the previous section Example: RadiusServersInfo=192.168.16.32;1812;SADept;BGRadius.dat
Replace the
RadiusServersInfo,RADIUS_Server_IP,RADIUS_Port,vaulthostname, andradiusauth.datplaceholder values with the actual values.Note
It is critical that the
vaulthostnamevalue is the same exact value as shown in the RADIUS client. For example, if thehostnameis all lowercase, the RADIUS client value must be identical.Make sure to set up an additional RADIUS server for authentication.
The following code is an example of two RADIUS servers:
RadiusServersInfo=192.168.16.32;1812;SADept;BGRadius.dat,10.50.50.10;1812;SADept;BGRadius.dat
Save the
DBParm.inifile.Start the Password Vault Server.
Troubleshooting and common issues
Here are a list of issues you might encounter and how to fix them:
Verify the following RADIUS configurations:
Authorization of the Vault Servers as RADIUS clients
Make sure the name of the RADIUS clients are identical on both sides
Make sure the RADIUS secret is identical on both sides
Make sure to enable the network and firewall rules for the RADIUS ports from the Vaults to the RADIUS servers.
When authenticating to the PrivateArk Client with RADIUS authentication, users might fail because a certificate is untrusted.
Refer to Certificate Instructions in the Prerequisites section for more on creating, signing, and installing a trusted certificate.
RADIUS secret fails if it contains a caret symbol (^).