Passkeys
SecureAuth Connect passkey authentication enables passwordless sign-in using FIDO2 discoverable credentials or standard WebAuthn. You can configure one of two modes per workspace:
| Mode | How it works |
|---|---|
| Smart | The user signs in with a single tap, no username required. The authenticator presents available passkeys automatically using discoverable credentials. Works with platform authenticators (Touch ID, Windows Hello) and modern FIDO2 hardware keys (YubiKey 5, Titan). |
| Classic | The user enters a username first, then confirms with a passkey. The server provides the authenticator with the registered credential IDs for that user. Works with all FIDO2 authenticator types. |
Both modes support hardware security keys. Smart mode does not work with legacy U2F keys (pre-FIDO2) because they do not support discoverable credentials.
Use cases
Passkeys work well when you want strong authentication that's easy for users.
- Consumer apps (B2C): Passkeys eliminate password reset tickets and phishing risk. Sign-in is a single biometric tap on the user's device.
- Workforce (internal): Passkeys bound to a managed device satisfy phishing-resistant MFA requirements (for example, NIST AAL3, Executive Order 14028).
- High-assurance flows: Pair passkeys with a second factor (PIN, hardware key attestation) when regulatory requirements call for it.
- Bring-your-own-device B2B: Users enroll one passkey per device (laptop, phone, hardware key). Users name each passkey, so you and your users can revoke a lost device without disrupting others.
Passkeys are not a good fit when users need to sign in on shared or kiosk devices they do not control, or when your users include authenticators that predate FIDO2 (U2F-only hardware keys).
Where passkey settings live
You configure passkeys in two locations in the admin console:
| Location | What it controls |
|---|---|
| Authentication > Settings > Methods | Which passkey mode is active for the workspace (Smart or Classic). This is a workspace setting. Different workspaces on the same tenant can use different modes. |
| Users > [identity pool] > Sign-in and Sign-up | Relying Party ID and Origins (Passkey Settings section), credential limits (Pool Limits section), and whether passkey is available as a first or second factor (Sign-in section). Apply these in the identity pool. |
Step 1: Enable passkeys in the workspace
-
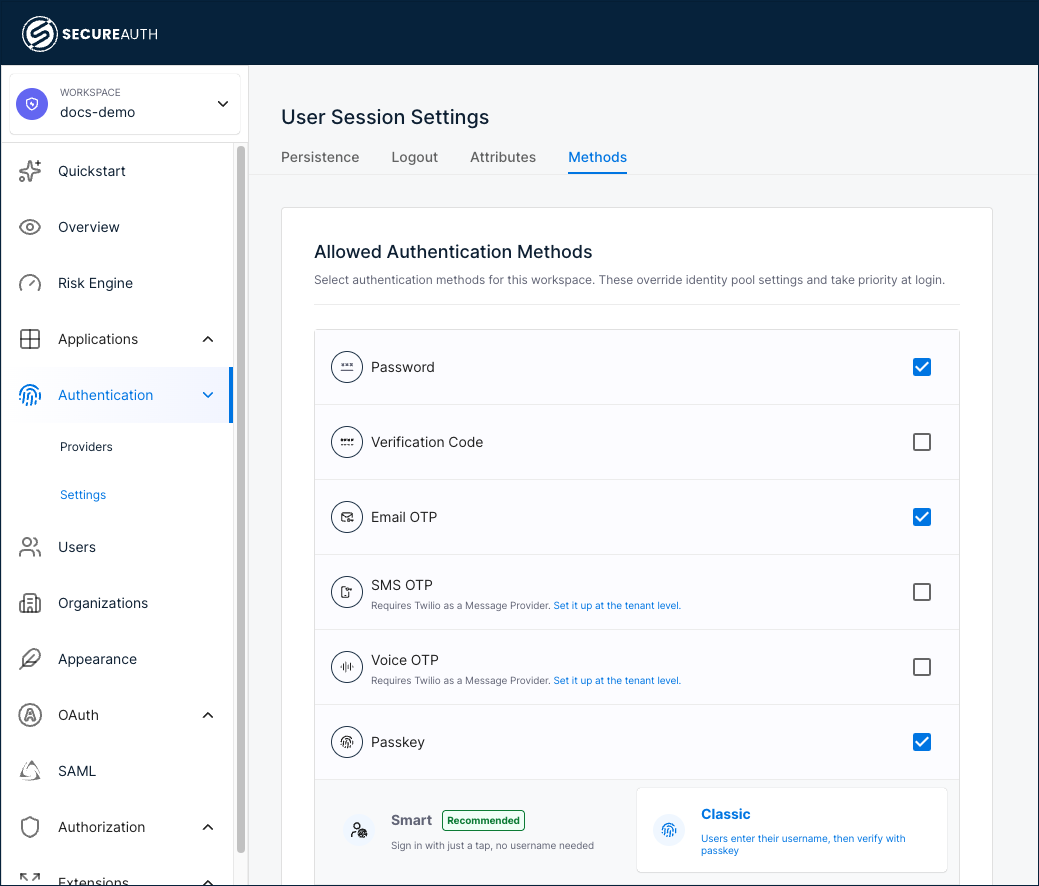
In your workspace, go to Authentication > Settings > Methods.
-
Under Allowed Authentication Methods, enable Passkey.
-
Select a mode:
- Smart: Users sign in without entering a username. The authenticator presents available passkeys automatically.
- Classic: Users enter a username first, then verify with a passkey.
You can switch between Smart and Classic at any time. Switching in either direction requires existing users to re-enroll if they only have credentials registered under the previous mode.
Step 2: Add passkeys to the identity pool
-
Go to Users > your identity pool > Sign-in and Sign-up.
-
Expand the Sign-in section.
-
Under First-Factor Authentication Methods or Second-Factor Authentication Methods, select + Add method and choose Passkey.
-
To set Passkey as the preferred method, click the three-dot menu and choose Make Preferred. The preferred method appears first at sign-in.

-
Save your changes.
Step 3: Configure passkey settings
Passkey settings define the domain and origins where your passkeys work, and control when the browser passkey prompt appears. A passkey works only on the domain you register it for.
-
Go to Users > your identity pool > Sign-in and Sign-up.
-
Scroll to the bottom and expand the Passkey Settings section.

-
Configure the following fields:
| Field | Description | Example |
|---|---|---|
| Require user interaction before passkey prompt | When enabled, the browser passkey prompt appears only after the user clicks Continue, instead of automatically on page load. Use this when the automatic prompt interferes with your sign-in page. | – |
| Relying Party ID | The domain your passkeys work on. Do not include a scheme, port, or path. Leave blank to use the server domain. | yourcompany.com |
| Relying Party Origins | The full URLs of pages where users register or sign in with passkeys. Include a scheme and host. The URLs must match or be subdomains of the Relying Party ID. Leave blank to use the server origin. | https://app.yourcompany.com |
- Save your changes.
Step 4: Set passkey credential limits
Users can register multiple passkeys, for example a work laptop, a personal phone, and a hardware security key.
-
Go to Users > your identity pool > Sign-in and Sign-up.
-
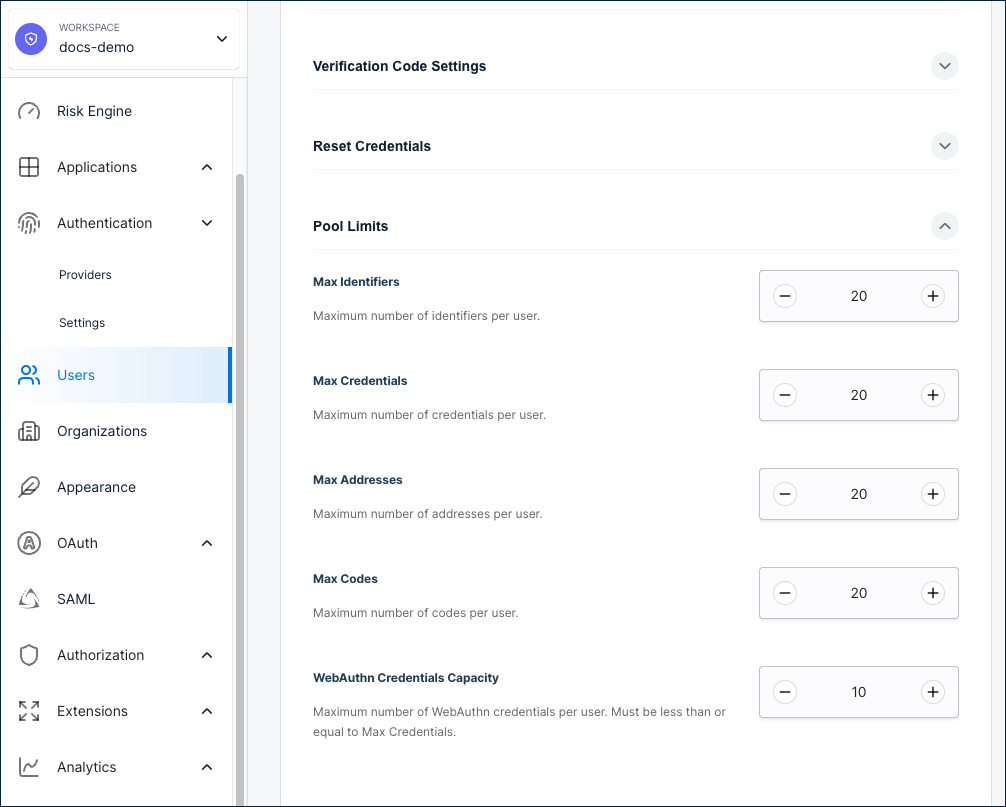
Expand the Pool Limits section.
-
Update WebAuthn Credentials Capacity to your preferred maximum. The default is
10. The maximum is100. The value must be less than or equal to Max Credentials. -
Save your changes.
User self-enrollment
Users can manage their own passkeys from the self-service portal without admin action:
- Register a new passkey.
- Give each passkey a name (for example, "Work MacBook" or "iPhone 16").
- Delete passkeys they no longer use (users cannot delete their last remaining passkey).
The enrollment flow automatically matches the active mode. If Smart mode is active, new enrollments create discoverable credentials. If Classic mode is active, new enrollments create standard credentials.
Developer reference
You can manage passkeys through both self-service and system API endpoints.
Self-service endpoints
The user must be authenticated within the last 5 minutes with the manage_ss_profile scope. See the Identity Self-Service API reference.
| Endpoint | Mode | Description |
|---|---|---|
POST /v2/self/webauthn/create/begin | Classic | Start Classic passkey enrollment |
POST /v2/self/webauthn/create/complete | Classic | Complete Classic passkey enrollment |
POST /v2/self/usernameless-webauthn/create/begin | Smart | Start Smart passkey enrollment |
POST /v2/self/usernameless-webauthn/create/complete | Smart | Complete Smart passkey enrollment |
DELETE /v2/self/webauthn/{credentialID} | Both | Delete a passkey |
PUT /v2/self/webauthn/{credentialID}/name | Both | Name a passkey |
System endpoints
These endpoints require the identity scope. See the Identity System API reference.
| Endpoint | Mode | Description |
|---|---|---|
POST /system/pools/{ipID}/users/{userID}/webauthn/create/begin | Classic | Admin starts Classic enrollment for a user |
POST /system/pools/{ipID}/users/{userID}/webauthn/create/complete | Classic | Admin completes Classic enrollment |
POST /system/pools/{ipID}/users/{userID}/usernameless-webauthn/create/begin | Smart | Admin starts Smart enrollment for a user |
POST /system/pools/{ipID}/users/{userID}/usernameless-webauthn/create/complete | Smart | Admin completes Smart enrollment |
POST /system/pools/{ipID}/user/webauthn/add/request | Classic | Send OTP to user before adding passkey |
POST /system/pools/{ipID}/user/webauthn/add/complete | Classic | Validate OTP and add passkey |
DELETE /system/pools/{ipID}/users/{userID}/webauthn/{credentialID} | Both | Admin deletes a user's passkey |
PUT /system/pools/{ipID}/users/{userID}/webauthn/{credentialID}/name | Both | Admin names a user's passkey |
Listing a user's passkeys
Passkeys are stored as user credentials with type webauthn. To retrieve a user's enrolled passkeys, call the Get User Details endpoint and filter the credentials array for entries where type is webauthn:
GET /system/pools/{ipID}/users/{userID}
The discoverable_id field in each credential distinguishes Smart credentials (populated) from Classic credentials (empty).
Key difference between modes
The Smart enrollment endpoints set ResidentKeyRequirement: required in the WebAuthn creation options, which tells the authenticator to create a discoverable credential. The Classic endpoints use standard WebAuthn registration without this requirement. All other request and response shapes are identical.
Pool authentication mechanism values
The mechanism in the authentication_mechanisms configuration controls the passkey mode:
| Mode | Mechanism value |
|---|---|
| Smart | usernameless_webauthn |
| Classic | webauthn |
These values are mutually exclusive per workspace. Only one can be active at a time.