Configure and use dynamic client registration
SecureAuth Connect supports Dynamic Client Registration (DCR), the OAuth 2.0 standard (RFC 7591) that lets a client application register itself with an authorization server through an API call. Instead of an administrator creating every client by hand in the admin portal, a developer sends a registration request to an endpoint and receives back a client_id, credentials for confidential clients, and a token to manage the client afterward.
This topic is for two audiences: administrators who enable and protect DCR on a workspace, and developers who register and manage client applications against it.
What DCR solves
Without DCR, every OAuth client has to be provisioned manually before it can authenticate. That works when you control a handful of applications, but it does not scale when many external or partner applications need to onboard themselves, often without any direct contact with your administrators.
DCR moves client provisioning from a manual, admin-driven task to a self-service API. Because it follows the OAuth standard, any client that speaks DCR can register without custom integration work on either side.
When to use DCR
Use DCR when applications need to register on their own, at scale, rather than being set up individually. Common cases include:
- Open ecosystems. Open banking, FDX, Open Finance, and Consumer Data Right (CDR) require third parties to register through DCR as part of the standard.
- Partner and third-party onboarding. Partners register their own applications without waiting on your team to create each client.
- Automated provisioning. Deployment pipelines or multi-tenant platforms create clients programmatically as new environments or customers come online.
For interactive applications that you build and control yourself, creating the client in the admin portal is usually simpler than DCR.
Before you begin
- You need administrator access to the workspace to enable DCR and configure how the registration endpoint is protected.
- Decide how you will protect the endpoint before you enable it. If you enable DCR without a protection method, the registration endpoint is available anonymously to anyone who can reach it. See Enable and configure DCR.
Enable and configure DCR
Enabling DCR is an administrator task. Turn it on for the workspace whose authorization server will accept registration requests, then configure how the endpoint is protected and how registered clients behave.
-
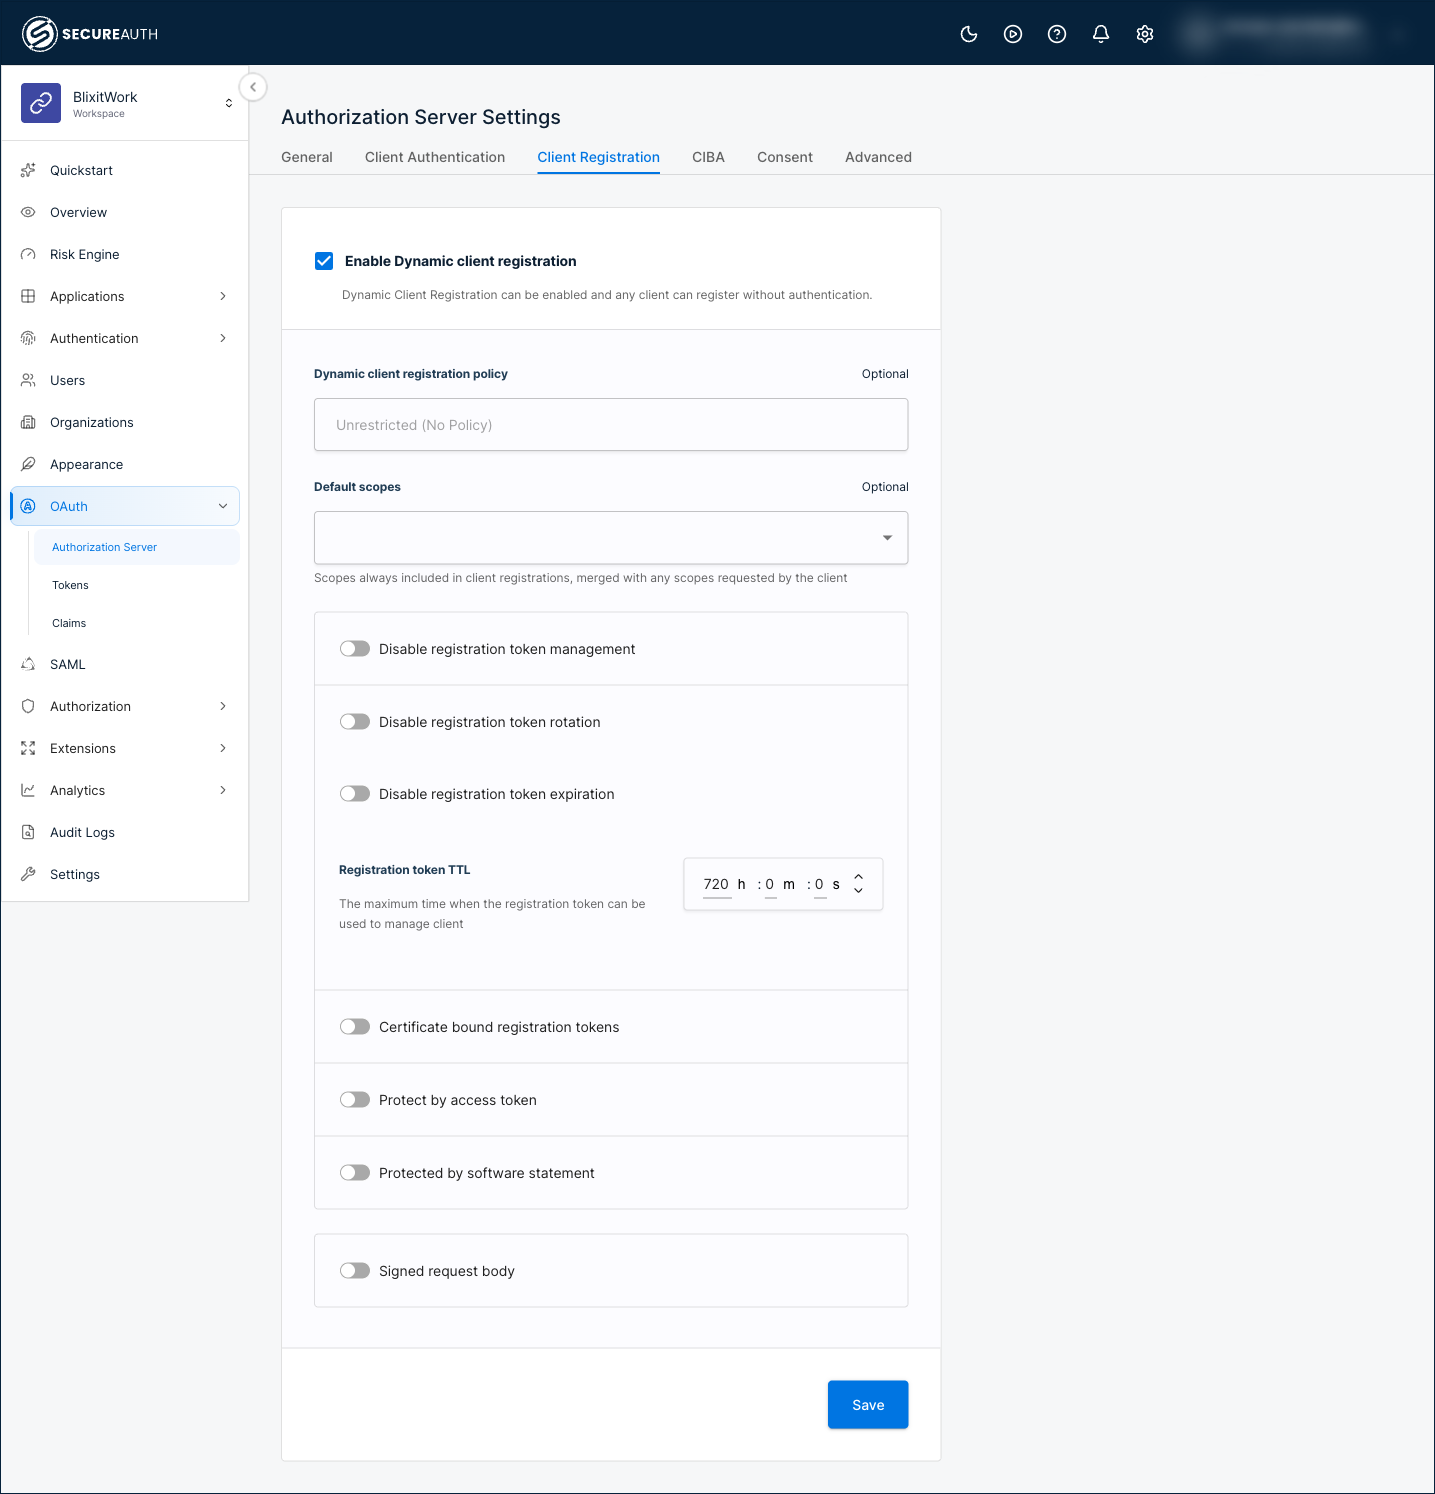
In the workspace, go to OAuth > Authorization Server in the sidebar, then select the Client Registration tab.
-
Select the Enable Dynamic client registration checkbox. The remaining settings appear.
-
Configure the settings for your use case. Every setting other than the checkbox is optional.
Registration rules
- Dynamic client registration policy – Select a policy to evaluate on each registration request, so you can allow or reject requests based on your own rules. The default,
Unrestricted (No Policy), applies no policy. - Default scopes – Scopes that are always included in every registration, merged with the scopes each client requests. Leave this empty to apply the workspace default scopes.
Registration access token
Registering a client returns a registration access token that manages the client afterward. These settings control how that token behaves.
- Disable registration token management – Prevent clients from being managed with the registration access token. Clients instead manage themselves using an access token from the client credentials flow.
- Disable registration token rotation – Keep the registration access token stable instead of rotating it on each fetch or update.
- Disable registration token expiration – Issue registration access tokens that never expire.
- Registration token TTL – Set how long the registration access token can be used to manage the client. The default is 720 hours (30 days) and the minimum is 24 hours.
- Certificate bound registration tokens – Bind the registration access token to the client certificate used to register the client, so only that certificate can use it.
Endpoint protection
Protecting the registration endpoint prevents unauthorized parties from registering clients. You can combine methods.
- Protect by access token – Require an access token with the
dcr_registerscope on the registration request. Issue the token from a separate client that uses the client credentials grant. The token is terminated after a successful registration. - Protected by software statement – Require a
software_statementin the request body. The software statement is a signed JWT that carries additional information about the client. Configure public keys (through a JSON Web Key Set or a URI) so the authorization server can verify it. To accept requests both with and without a software statement, also select Allow registration without a software statement, described in Accept registrations with and without a software statement. - Signed request body – Require the registration request body to be signed. Configure public keys (through a JSON Web Key Set or a URI) so the authorization server can verify the signed request.
- Dynamic client registration policy – Select a policy to evaluate on each registration request, so you can allow or reject requests based on your own rules. The default,
-
Save your changes.
Result: DCR is enabled on the workspace, and clients can register through the registration endpoint.
Accept registrations with and without a software statement
Protected by software statement normally makes the software statement mandatory, and a request without one is rejected. Select Allow registration without a software statement to accept both kinds of request on the same workspace.
Use this when only some of the clients registering with you are vouched for by a third party. A partner whose software statement is signed by a registry you trust registers with the metadata that registry asserts. An internal or self-service application registers with the metadata it sends itself. Neither case needs its own workspace.
This setting changes when a software statement is required, not how it is checked. A client that sends one still has it verified against the keys you configured. The registration is rejected if the statement is malformed, is signed with a key you do not trust, or is missing the iss claim.
What differs between the two kinds of client
A client that registers with a software statement:
- Takes its metadata from the statement. A value in the statement overrides the same value in the request body, so a
client_namein the statement wins over aclient_namethe client sends. - Stores the statement's decoded claims on the client as
software_statement_payload. - Keeps the statement for its lifetime. If a later update leaves the software statement out, the stored one is kept and verified again, so a client cannot shed it, or the metadata it asserts, by omitting it.
A client that registers without a software statement keeps the metadata it sent, and its software_statement_payload stays empty.
That difference is what lets you treat the two kinds differently later. A dynamic client registration policy can read software_statement_payload, which is populated for one kind of client and empty for the other. You can then grant a sensitive scope only to clients that presented a software statement.
Restrictions
- Select Protected by software statement first. Allow registration without a software statement appears underneath it, because the keys you configure there are what verify a statement when a client does send one.
- You cannot combine it with Signed request body when the request signature is verified using Client software statement keys. Those keys are read from the software statement itself, so nothing is left to verify the request body when a client omits the statement. Verify the signed request body with workspace keys instead.
- It is unavailable on open banking workspace profiles, such as FDX and Consumer Data Right, because those standards require a software statement on every registration.
- Turning Protected by software statement off later discards each client's stored statement the next time that client updates itself, and re-enabling the setting does not bring it back. Any policy that keys on
software_statement_payloadtreats those clients as though they never presented one.
Register a client
Registering a client is a developer task. First find the registration endpoint, then post the client's details to it.
The examples use my-tenant.us.connect.secureauth.com with the tenant my-tenant and workspace my-workspace. Replace these with your own tenant domain, region, and workspace.
-
Request the workspace's OpenID Connect metadata to find the registration endpoint.
curl https://my-tenant.us.connect.secureauth.com/my-tenant/my-workspace/.well-known/openid-configurationThe response includes the
registration_endpoint.{"registration_endpoint": "https://my-tenant.us.connect.secureauth.com/my-tenant/my-workspace/oauth2/register"} -
Send a registration request to the endpoint with the client's metadata.
curl -X POST https://my-tenant.us.connect.secureauth.com/my-tenant/my-workspace/oauth2/register \-H "Content-Type: application/json" \-d '{"client_name": "Sample server-side web app","grant_types": ["authorization_code"],"response_types": ["code"],"redirect_uris": ["https://example.com/callback"]}'noteDepending on your DCR settings, the request may also need a
software_statementin the body or anAuthorization: Bearerheader.The response returns the registered client. Confidential clients, such as this server-side web app, receive a
client_secret. Public clients, such as single-page or native apps that use PKCE, do not.{"client_id": "buvn05busbftqfiocc4","client_secret": "h7lhK-ALR1BKEdnbOyYT08ZUunlMmvSE2IxLrAi7AEw","scopes": ["openid", "profile", "email"],"registration_access_token": "q-Xl15r0bolJZ0Av30GqdgKrWI7kwZ09o5DXtphhJyU.bHzjkljpF80sxm5lAKNJZ_bGvHnsc6CSkRdtz5ECV","registration_access_token_expires_in": "2592000"}- The
scopesarray reflects the scopes granted to the client. It includes any default scopes configured for the workspace, merged with the scopes the client requests. - The
registration_access_tokenmanages the client after registration. Its lifetime is set byregistration_access_token_expires_in, in seconds, and defaults to 30 days.
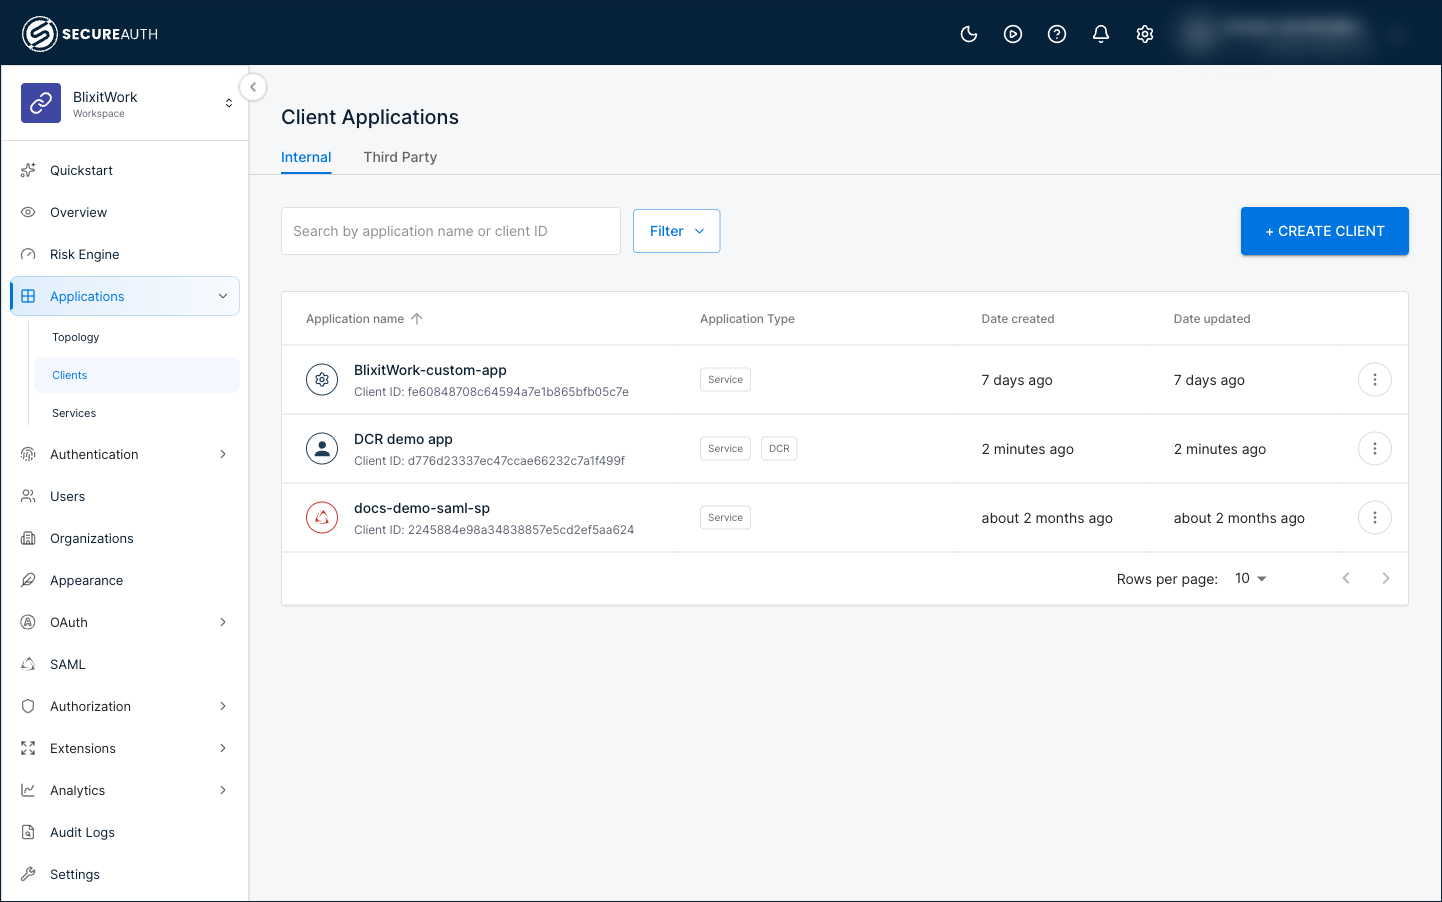
Result: The client is registered and ready to use. In the admin portal, it appears in the Applications view with a DCR label.
- The
Manage a client
Use the registration_access_token from the registration response to get, update, or delete the client. Each request goes to the registration endpoint with the client_id in the path and the token in the Authorization: Bearer header.
The following request retrieves the current client configuration.
curl -X GET https://my-tenant.us.connect.secureauth.com/my-tenant/my-workspace/oauth2/register/buvn05busbftqfiocc4 \
  -H "Authorization: Bearer q-Xl15r0bolJZ0Av30GqdgKrWI7kwZ09o5DXtphhJyU.bHzjkljpF80sxm5lAKNJZ_bGvHnsc6CSkRdtz5ECV"
{
  "client_id": "buvn05busbftqfiocc4",
  "client_secret": "h7lhK-ALR1BKEdnbOyYT08ZUunlMmvSE2IxLrAi7AEw",
  "scopes": ["openid", "profile", "email"],
  "registration_access_token": "oe_YlidF0DWhQRoWQPDXRwOy_iOdI5ABls-pZKskkzU.2K5nIJ_XDSs9Ow63mGzhCpXxkQqLsrtpVhoEIQIEu4",
  "registration_access_token_expires_in": "2592000"
}
To update the client, send a PUT request with the changed metadata to the same URL. To remove it, send a DELETE request.
The registration_access_token rotates every time you fetch or update the client. Always use the token from the most recent response, because earlier tokens are terminated.