Access Policies
Define security policies that control which tools agents can use
Policies are the security rules that govern how agents interact with tools through the gateway. They control which tools are available, to whom, and under what conditions. Without any rules, all requests are denied by default, though new organizations start with a seeded default Allow all rule so agents work out of the box; edit or delete it once you're ready to lock things down.
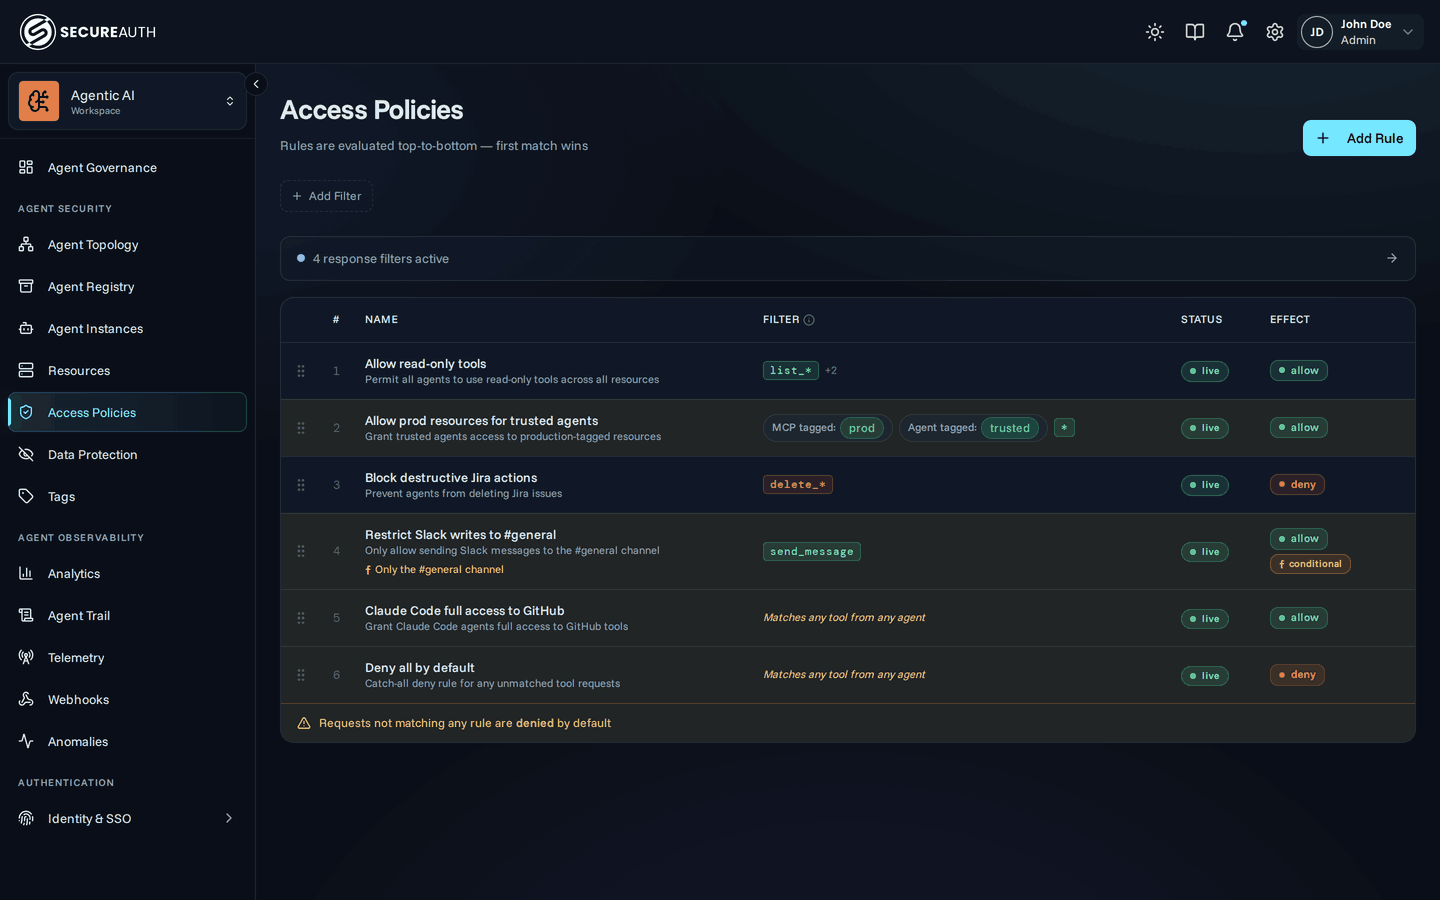
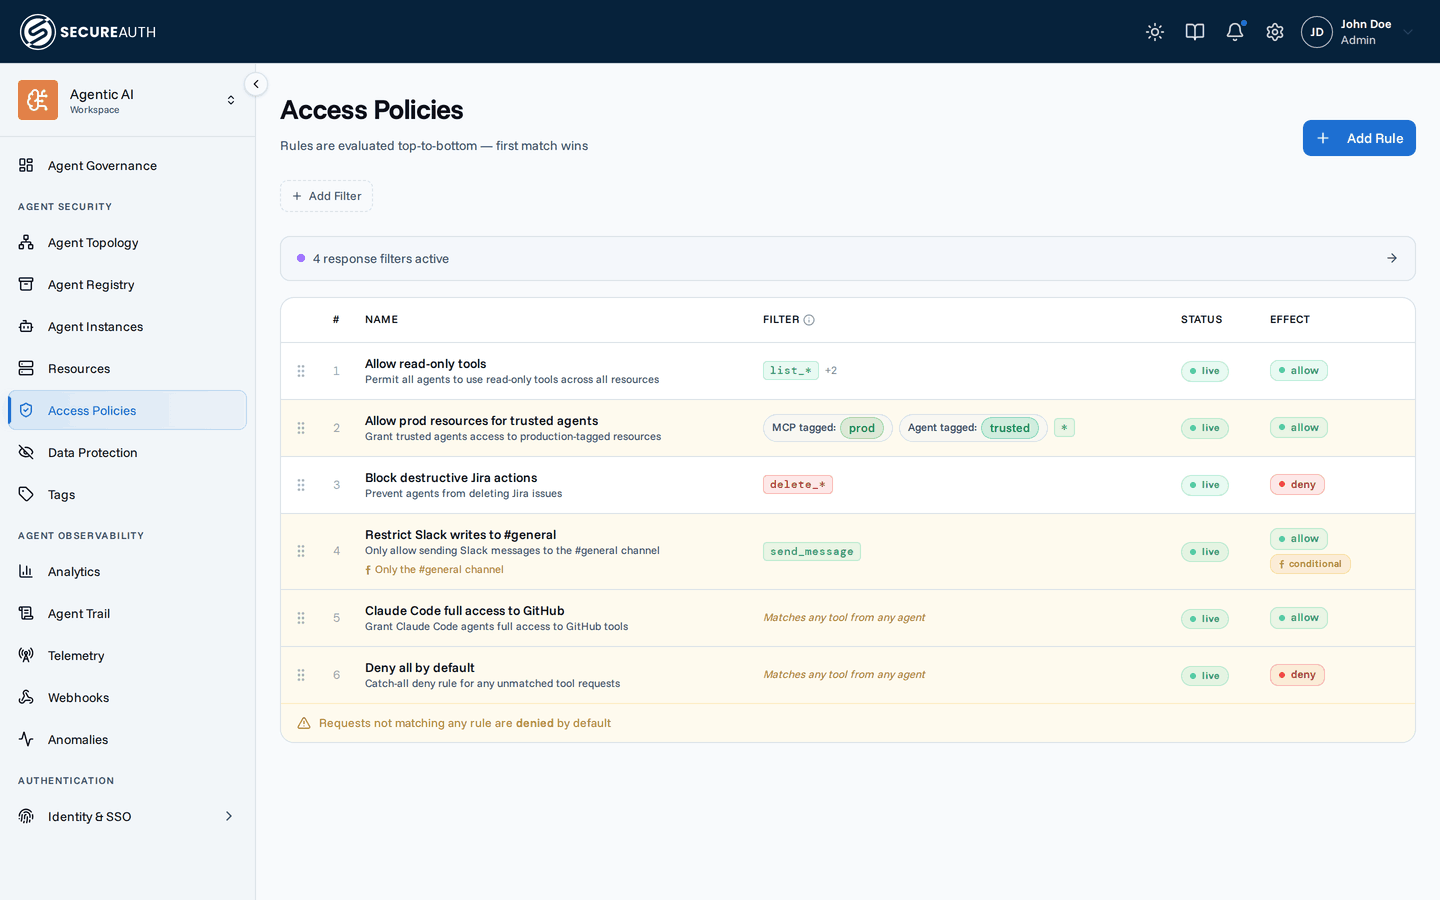
Evaluation model
When an agent makes a tool call, the gateway evaluates rules in priority order (top-to-bottom). The first matching rule wins: its effect is applied and no further rules are checked. If no rule matches, the request is denied.
- Only active rules are evaluated. Draft and disabled rules are skipped.
- A rule whose condition is invalid or errors fails closed: allow rules are skipped, deny rules still deny. A malformed expression never accidentally grants access.
Each rule has one of two effects:
- Allow – permit the tool call to proceed
- Deny – block the tool call
The effect is only applied when all of the rule's scope filters and tool patterns match the request, and any condition evaluates to true.
Rewriting a response (masking an SSN or API key before an agent sees it) is a separate concern handled by Data Protection, not by a policy effect.
Rule lifecycle
Rules carry a status to support safe rollout:
- Draft – saved but not enforced; useful for testing before going live
- Active – the rule is enforced during evaluation
- Disabled – the rule is temporarily turned off without being deleted, useful for debugging or incident response
You can change a rule's status at any time by editing it.
When a change takes effect
Rules are compiled into a snapshot when an agent connects, so a change applies on that agent's next connection: a session that's already open keeps the rules it connected with. Creating, editing, deleting, or reordering a rule drops the gateway's cached snapshot for the affected agents right away, as does any tag change that a rule matches on, so the new rules compile on the next connection rather than waiting for a cache to expire. Data Protection filters behave the same way.
Creating a rule
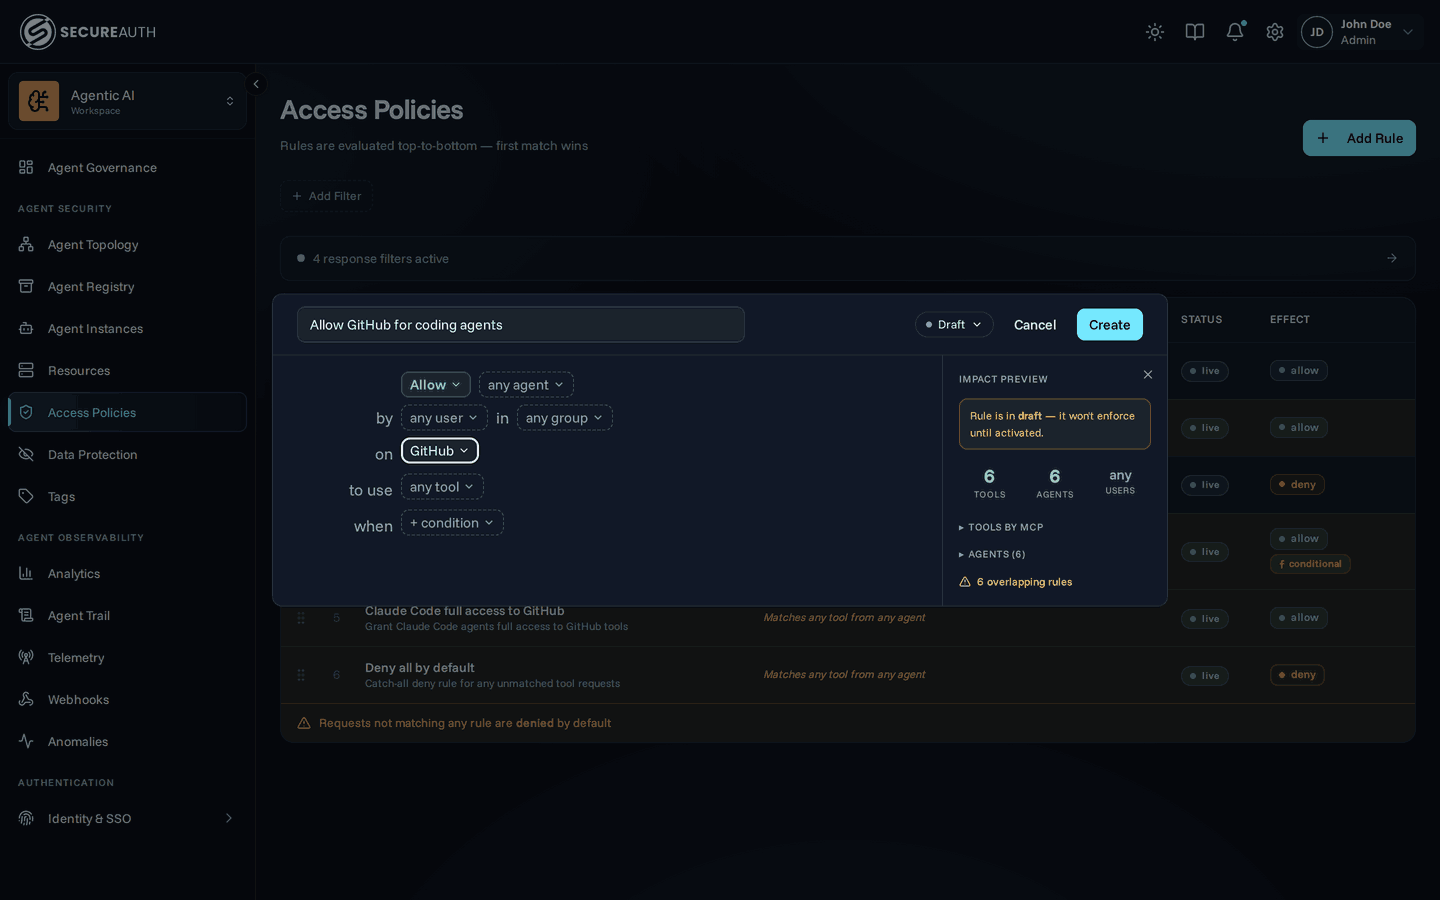
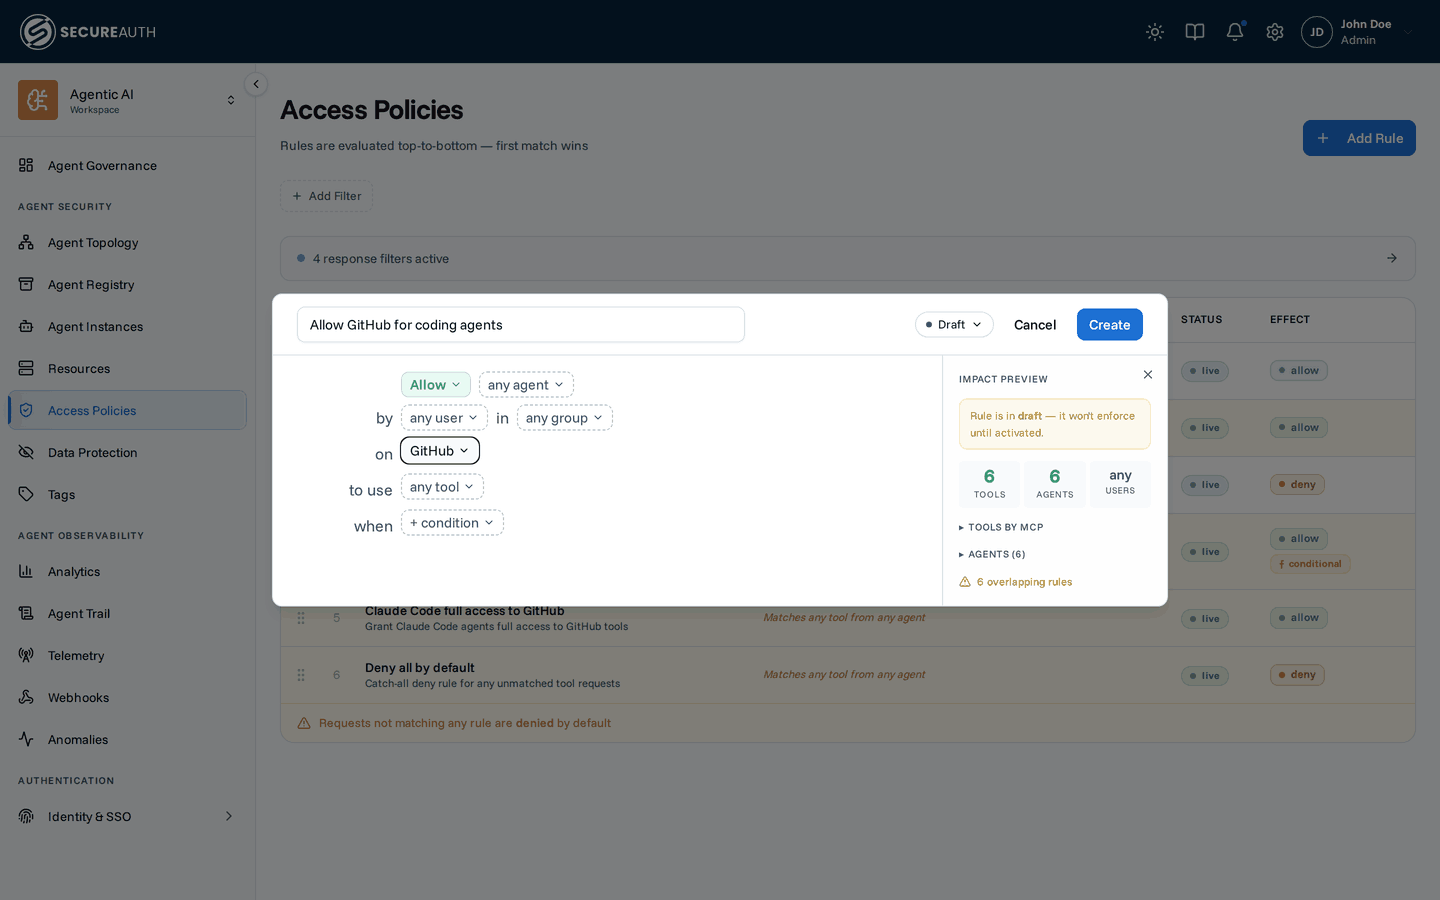
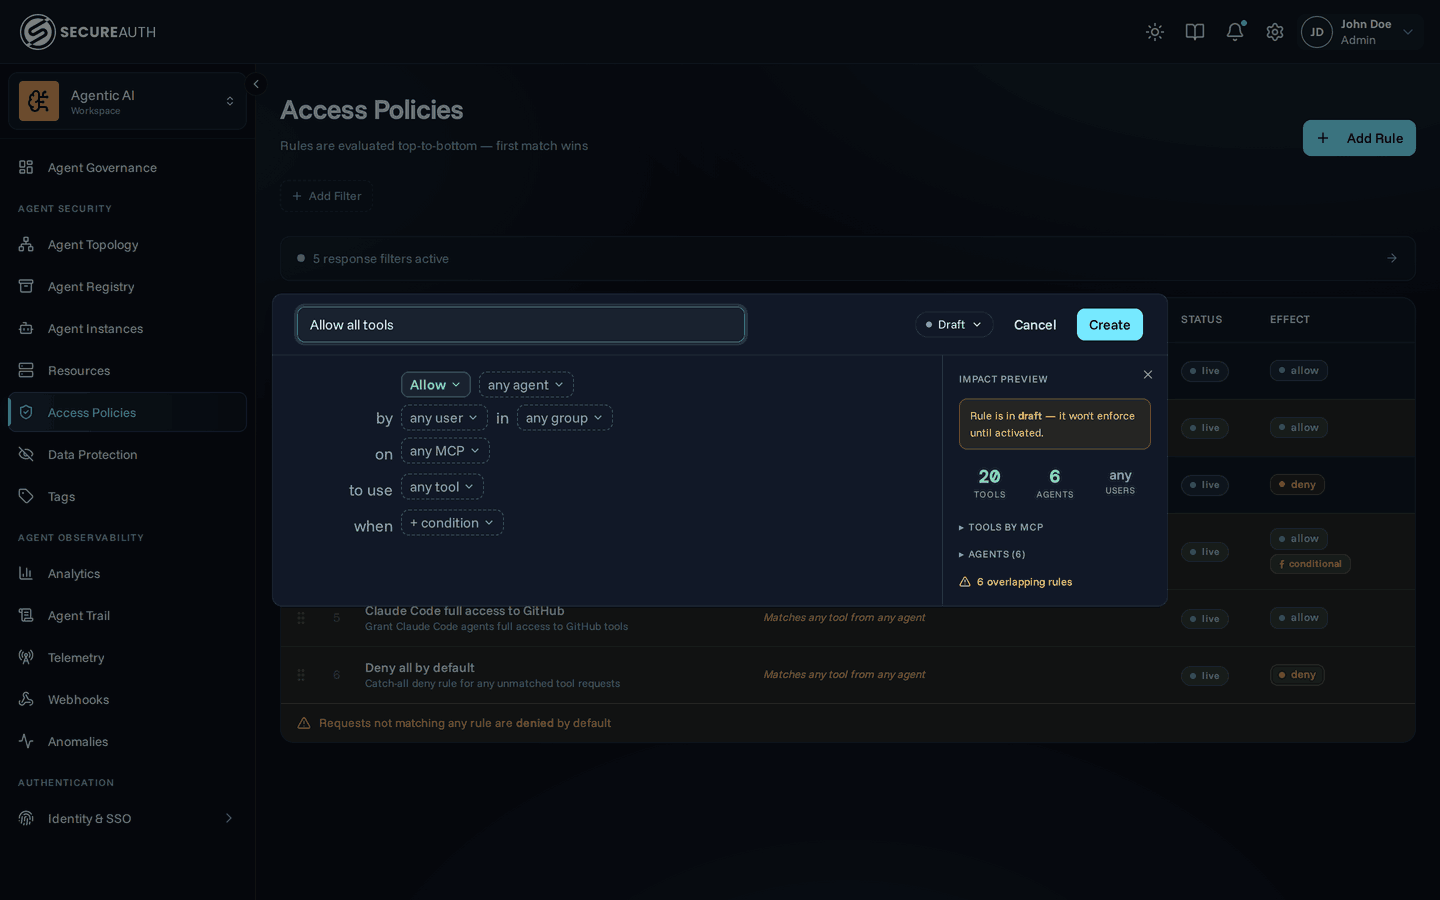
The editor reads as a sentence: an effect pill (Allow or Deny) followed by scope pills for the agent, user, group, MCP, and tools the rule applies to. Click a pill to choose what it matches; leave a pill on its placeholder (for example, "any agent") to keep that part a wildcard.
- Navigate to Agent Actions and click Add Rule
- Name the rule (for example, "Allow read-only tools")
- Set the effect pill to Allow or Deny
- Build the scope with the agent, MCP, and tools pills (see Scope and Tool patterns)
- Set the status: start with Draft to test, switch to Active to enforce
- Click Create
New rules are added at the top of the list, ahead of existing rules. Drag rows to reorder them.
Scope
Each scope pill narrows one dimension of the rule:
- Agent – restrict to specific agents (for example,
claude-codeorcursor) or to a single connected agent instance; an agent match applies to every instance of that agent, current and future - User and Group – restrict to specific users or OIDC groups. You can type a group the gateway hasn't seen yet to set up a rule in advance. It matches nobody until that group's first member signs in
- MCP – restrict to tools from specific MCP servers
- Tools – the tool patterns the rule covers (see Tool patterns)
Within one pill, multiple selections of the same kind are OR-ed: any one matches. Across pills, scopes are AND-ed: every pill you set must match for the rule to apply. A pill left on its placeholder acts as a wildcard.
The Agent pill is the exception worth knowing: it holds two different dimensions. Agent types (and agent tags) OR together, instances OR together, but a type selection combined with an instance selection is AND-ed, not OR-ed. Picking type claude-code and a connected cursor instance in the same pill yields a rule that matches nothing, since no single call can satisfy both. Pick one level per rule: types and tags, or specific instances.
Matching by tag
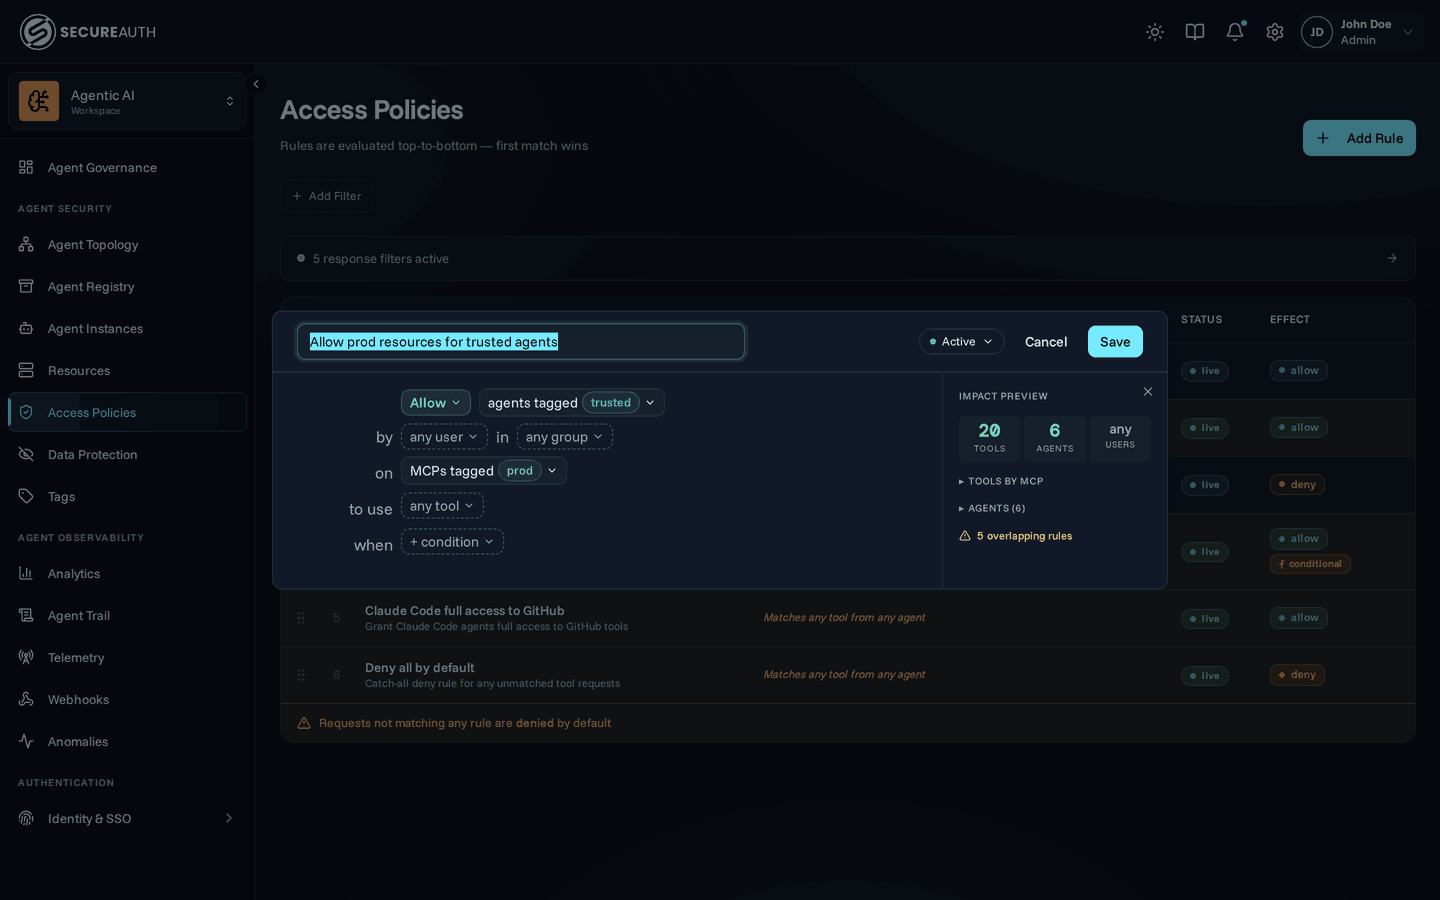
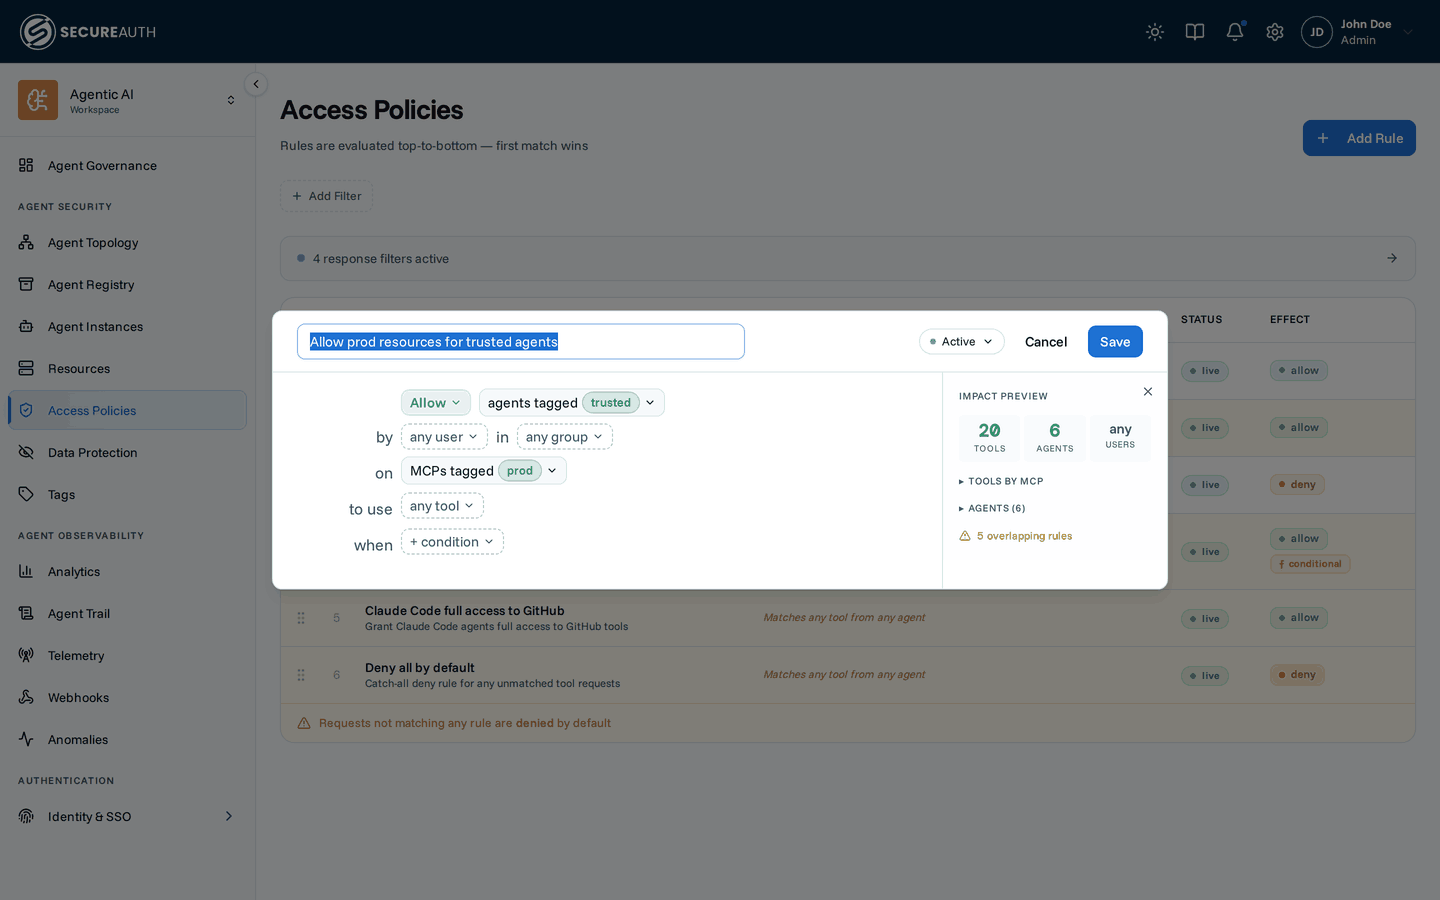
Instead of naming each entity, the Agent, MCP, and Tools pills can match by tag. Open a pill and pick a tag rather than (or alongside) a specific entity:
- Agent tag – matches every agent carrying the tag
- Resource tag – matches every MCP server carrying the tag
- Tool tag – matches tools carrying the tag
Prefer a tag when the rule is about a class of resources or agents (everything in production, every trusted agent) rather than one named entity. Tag matches stay current automatically: label a new server prod and every rule that matches the prod resource tag covers it immediately, with no policy edit. Within a pill you can combine concrete selections and tags; they're OR-ed together.
SecureAuth also provides built-in tags for what a tool does. See built-in tags.
Tags are also available inside conditions as agent.tags, mcp.tags, and mcp.tool.tags. Reach for those when a tag should gate the rule alongside other CEL logic rather than stand alone as a scope pill.
Tool patterns
Open the tools pill, type a pattern, and press Enter to add it. A rule matches a tool if any of its patterns match (OR logic).
| Pattern | Matches |
|---|---|
* | All tools |
send_* | Tools starting with send_ |
*_message | Tools ending with _message |
*_send_* | Tools containing _send_ |
read_file | Only the exact tool read_file |
When an MCP server scope is set, autocomplete filters to show only tools from that server.
Conditions
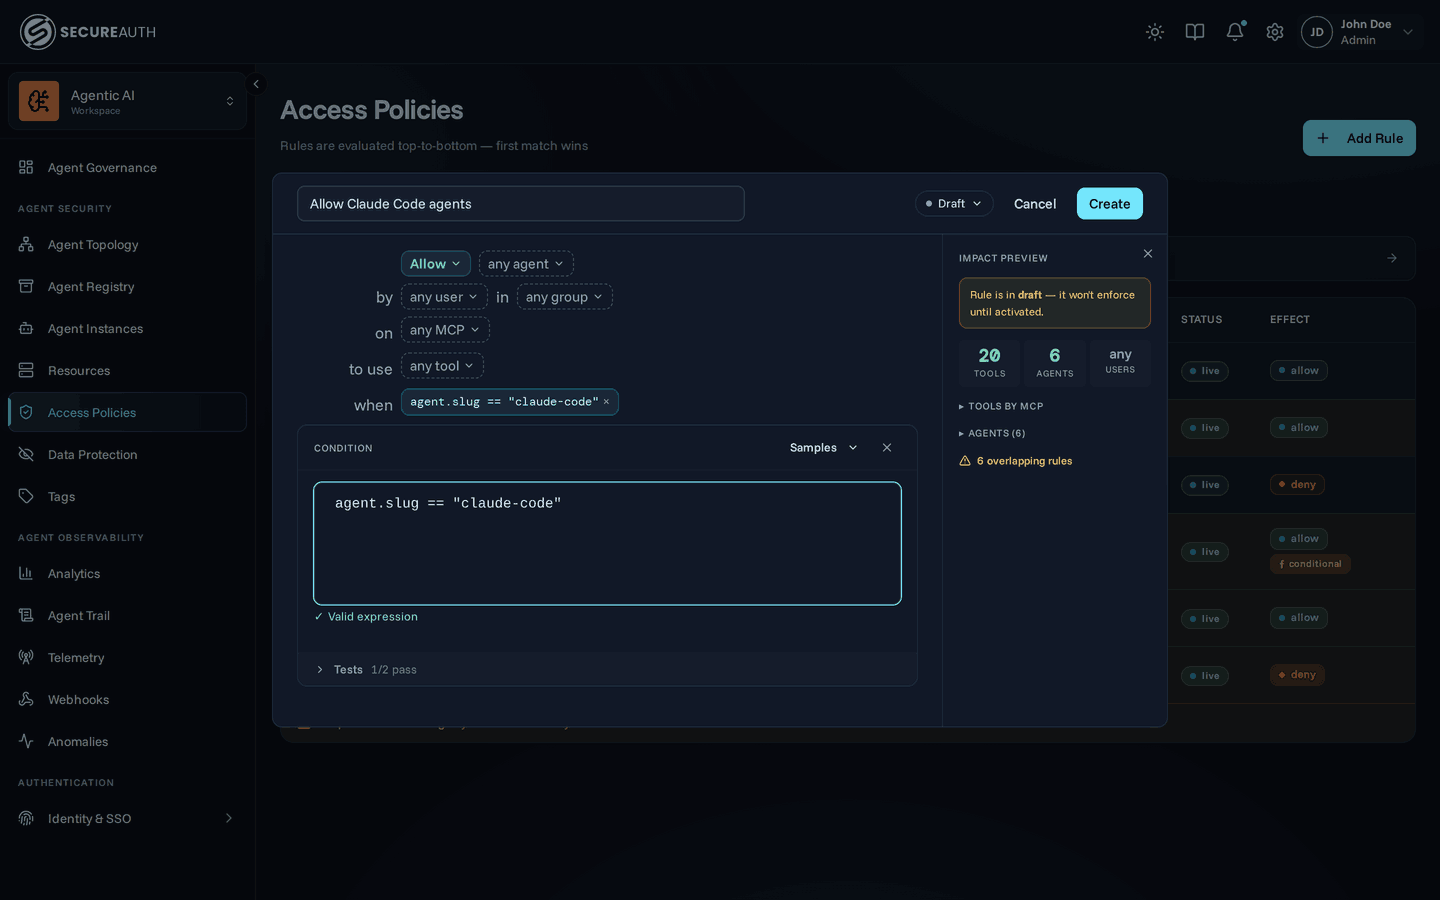
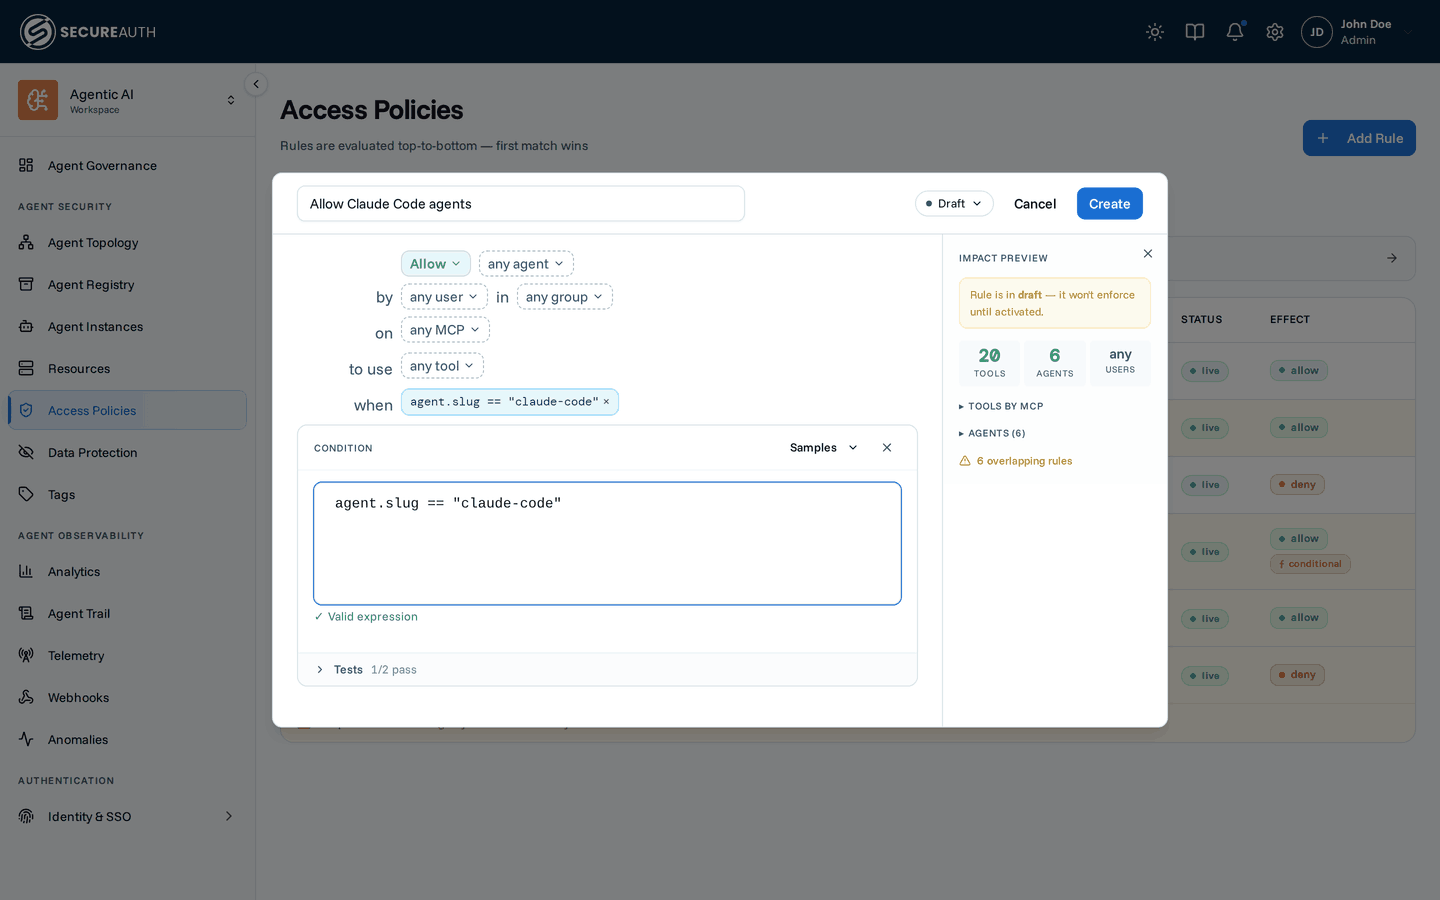
Click the + condition pill in the rule sentence to attach a CEL expression. The expression must return true for the rule to apply; if it errors at runtime, behavior is fail-closed: an allow rule is skipped, a deny rule still denies. See the CEL condition reference for the complete list of variables, operators, and macros.
The condition editor opens inline beneath the sentence, with syntax highlighting and autocompletion. Click Samples for pre-built expressions you can insert as a starting point, and expand the Tests panel to check the expression before activating the rule.
Available fields
| Field | Description |
|---|---|
agent.id, agent.name, agent.slug | Agent identity and type |
user.id, user.name, user.email | User identity |
user.groups (list<string>) | Groups the user is a member of |
agent.tags (list<string>) | Tag names assigned to the agent's slug; use with in |
mcp.id, mcp.name, mcp.slug | MCP server identity |
mcp.tags (list<string>) | Tag names assigned to the MCP server; use with in |
mcp.tool.name, mcp.tool.tags (list<string>) | Name of the tool being called, and tag names assigned to that tool |
request.args.<field> | A field from the live tool-call arguments. Fields and types are inferred from each matched tool's schema. See Argument-level conditions. |
request.ip | Client IP the gateway resolved for the call. See Network conditions. |
Operators
== != in && || .startsWith() .endsWith() .contains() .matches() .inCidr() has() .size()
List fields also support the CEL macros .exists(x, …), .all(x, …), .exists_one(x, …), .filter(x, …), and .map(x, …). Use these when membership alone (in) isn't enough, for example matching a prefix across every group.
Examples
| Expression | Description |
|---|---|
agent.slug == "claude-code" | Match Claude Code agents |
mcp.slug == "filesystem" | Match the filesystem MCP server |
agent.slug == "claude-code" && mcp.slug == "github" | Claude Code agents on GitHub only |
agent.slug in ["claude-code", "cursor"] | Match multiple agents |
agent.name.startsWith("prod-") | Agents with names starting with prod- |
user.name != "service-account" | Exclude a specific user |
"admin" in user.groups | Match users in the admin OIDC group |
user.groups.exists(g, g.startsWith("eng-")) | Match users in any eng-* group |
"pii" in mcp.tags | Match servers tagged pii |
"sensitive" in mcp.tool.tags | Match tools tagged sensitive |
has(agent.slug) | Only match when an agent slug is set |
request.ip.inCidr("203.0.113.0/24") | Calls from one office range |
request.ip.inCidr(["10.0.0.0/8", "192.0.2.45"]) | Calls from any listed range or address |
!request.ip.inCidr("10.8.0.0/16") | Calls from anywhere but the VPN |
Testing conditions
Expand the Tests panel below the condition editor:
- Test cases are seeded automatically from your connected agents and MCP servers
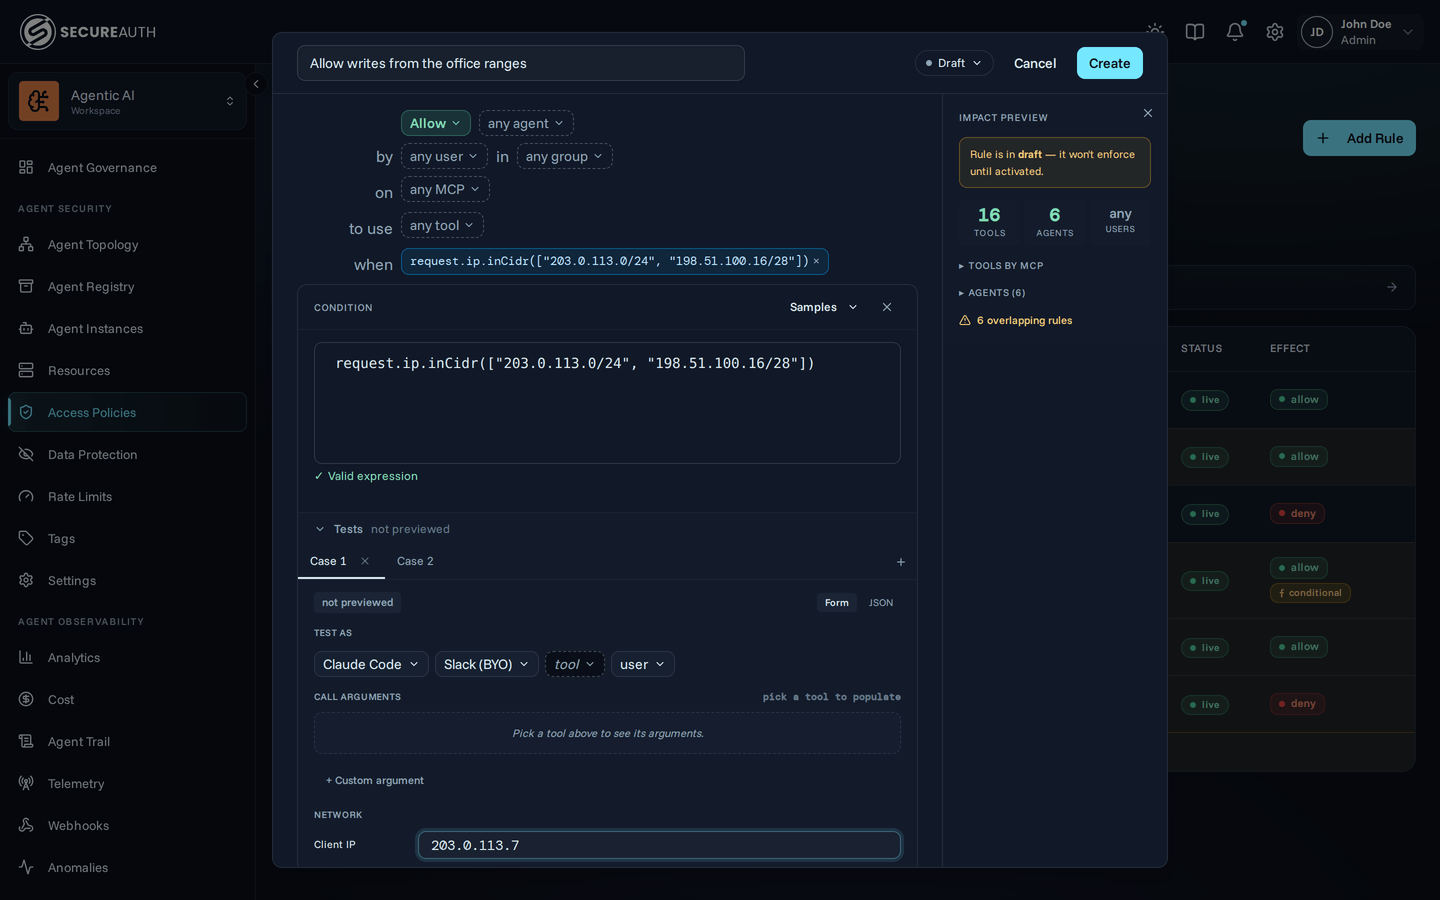
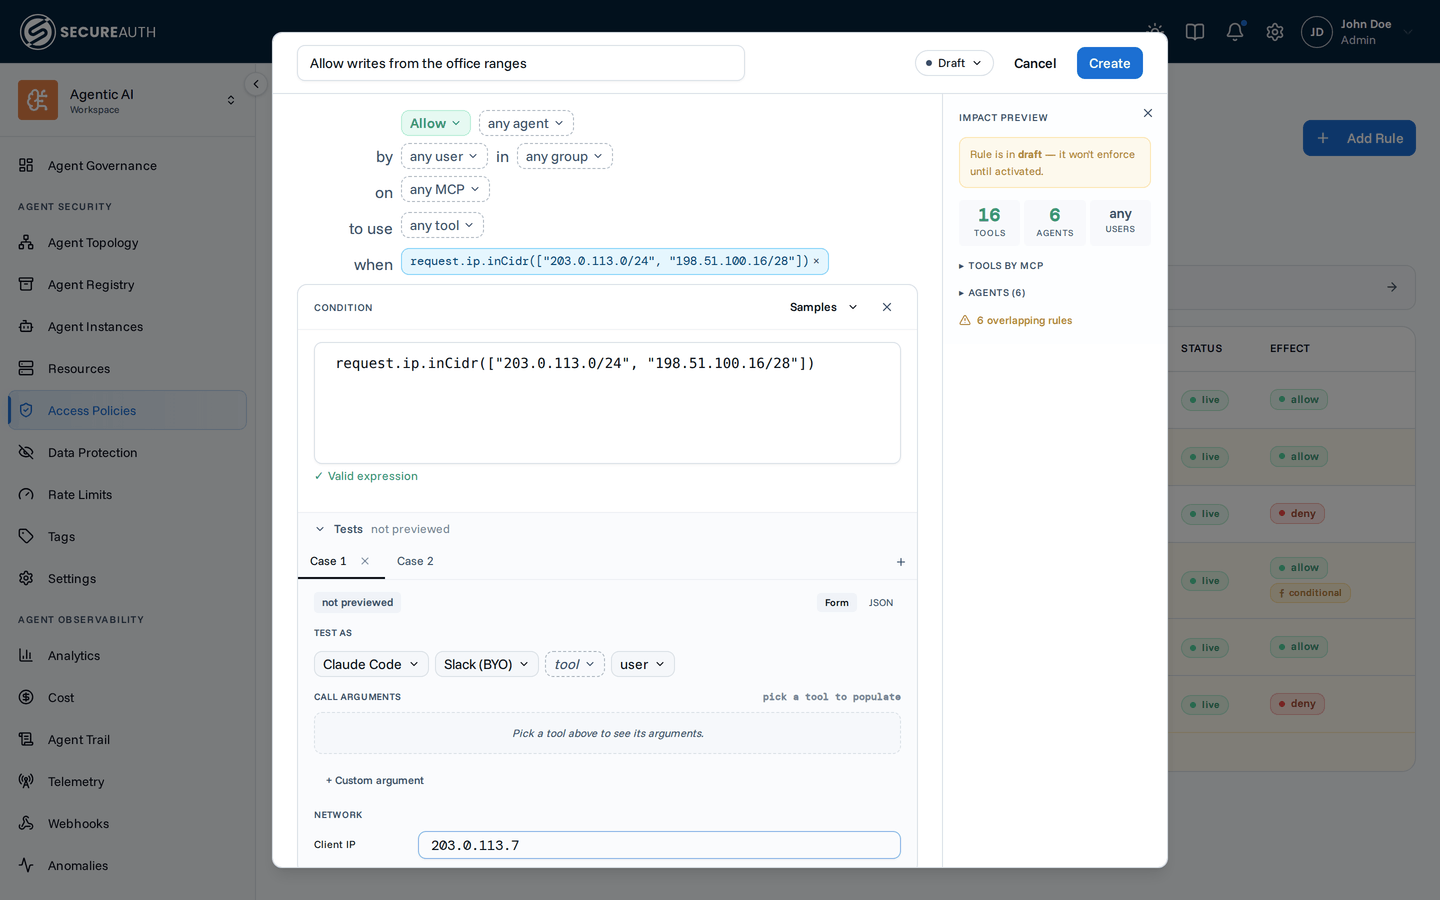
- Each case evaluates live as you edit; the panel header shows how many pass. Conditions the browser cannot reproduce faithfully (IP ranges and regex patterns) are marked not previewed and decided by the server when you save
- Add your own cases, and edit a case's context, to cover specific inputs
- Set the test user to any name, email, and set of groups (including ones that don't exist yet) so you can check group-gated rules like
"admin" in user.groupsbefore anyone is onboarded
Test conditions before activating a rule to verify they work as expected.
Redacting responses
Allow and deny decide whether a call runs at all; rewriting the response itself (masking an SSN or API key before an agent sees it) is a separate concern. See Data Protection for response filters.
Argument-level conditions
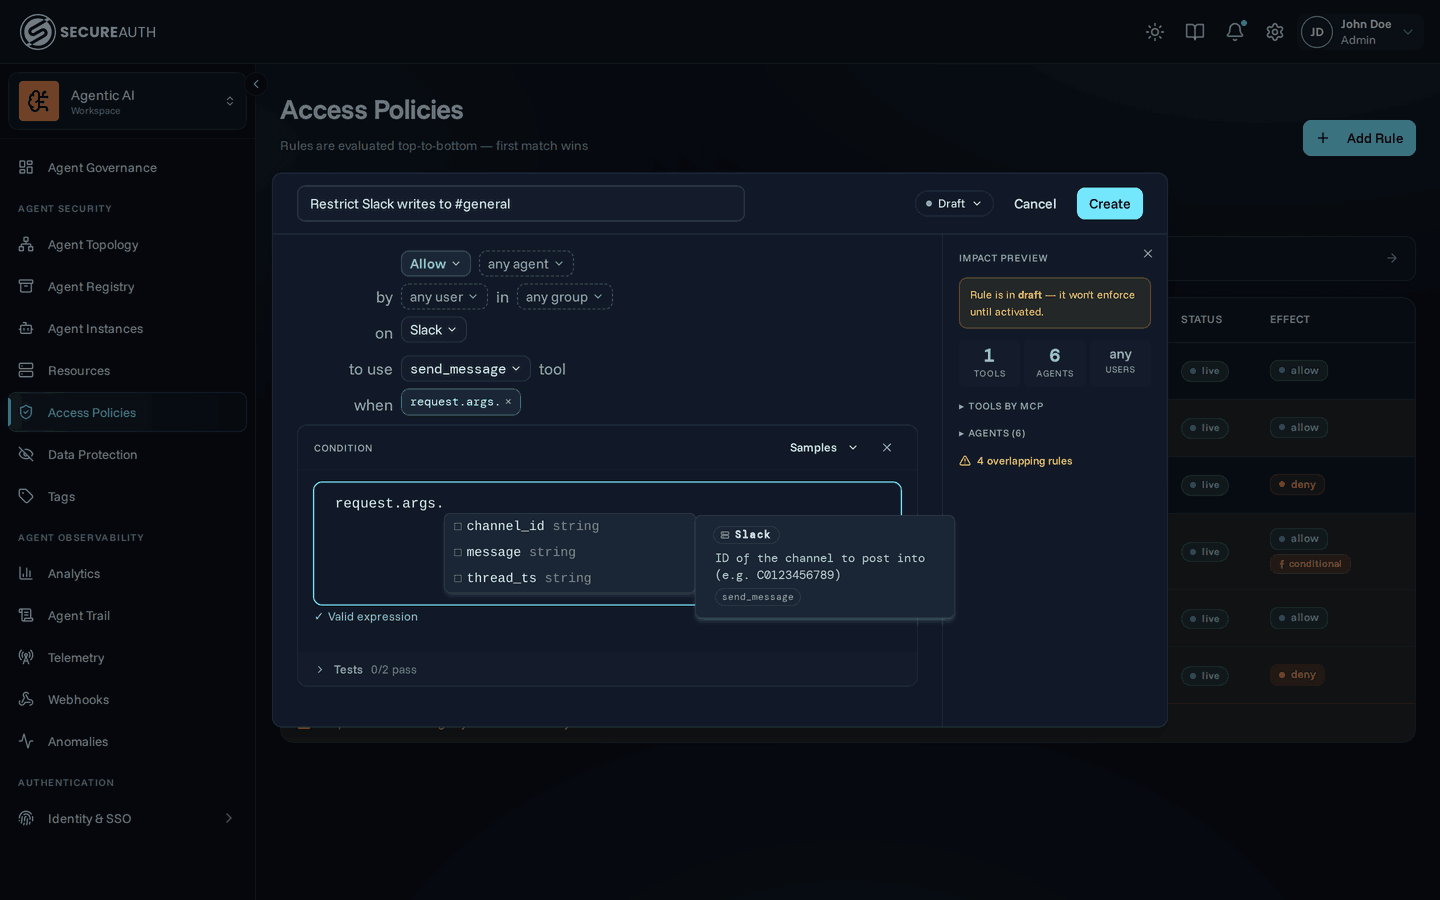
agent, user, and mcp decide who can call which tool. The request.args variable goes one step further: it decides what payload the agent is allowed to send. Every field on every matched tool's input schema becomes part of the policy language, evaluated on each live tool call.
This turns the gateway from a tool-level firewall into a per-call authorization layer. The decision isn't just which tool the agent is allowed to call; it's whether the agent can call this tool with this channel, in this thread, from this user. Without writing custom integration code, you can enforce things like:
- Slack channel allowlist –
mcp.slug == "slack" && request.args.channel_id in ["C_GENERAL", "C_DEVREL"] - Pin agents to your org –
request.args.owner == "acme-corp" - Protect main branch –
!has(request.args.ref) || request.args.ref != "refs/heads/main" - Sandbox filesystem access –
request.args.path.startsWith("/workspace/") - Block destructive SQL –
!request.args.query.matches("(?i)\\bdrop\\b") - Keep email internal –
request.args.to.endsWith("@acme.com") - Jira project allowlist –
request.args.projectIdOrKey in ["ENG", "INFRA"] - Combine with agent identity –
agent.slug == "claude-code" && request.args.channel_id == "C_GENERAL"
A condition that references a missing field (for example, request.args.owner on a tool whose schema has no owner) evaluates to an error. Allow rules with an erroring condition fall through to the next rule (often default-deny); deny rules with an erroring condition still deny, fail-closed. Combine with has() (has(request.args.owner) && request.args.owner == "acme-corp") when the field is optional on some tools.
Authoring with autocomplete
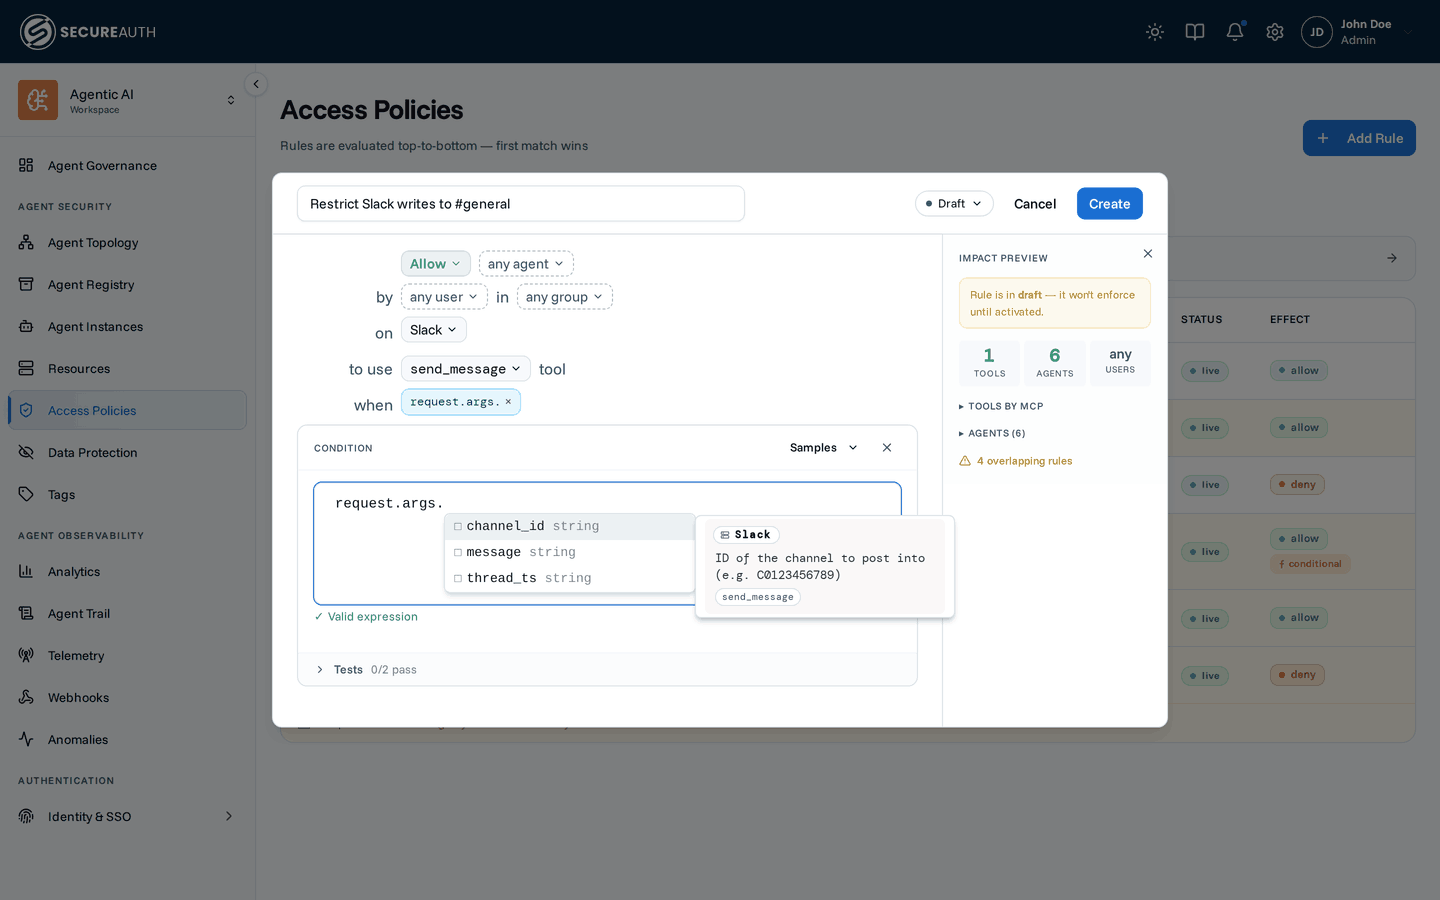
The CEL editor reads the input schemas of every tool matched by the rule's scope and surfaces those fields as you type request.args.. The dropdown is more than a list:
- Coverage chips on each field show how many of the matched tools define it. A green
in allchip means safe to reference unconditionally; an amber3 / 7chip means the field is partial and you should guard it withhas(). A red chip means the field is rare across the scoped tools. - Per-MCP info panel groups occurrences by MCP server, with the description from each tool's schema and the tools that define the field. When the same field name means different things on different MCPs, this is how you spot it.
- CEL string methods (
.startsWith(),.endsWith(),.contains(),.matches(),.size()) autocomplete on string-typed leaves, so common shapes like prefix and regex checks are one keystroke away. - List macros (
.exists(),.all(),.exists_one(),.filter(),.map()) and.size()autocomplete on list-typed fields (user.groups, tag lists, and array-typedrequest.argsfields) with the element variable pre-filled. And if you slip and write.field access on a list (user.groups.admin), the validator points you toinor a macro instead of a parser error.
Inside a macro body, the condition editor knows the type of the loop variable and autocompletes its methods. Type g. after user.groups.filter(g, and it offers the string methods (startsWith, contains, …). For lists of objects (such as some request.args fields), it offers the object's fields.
Completion follows chains too: after user.groups.filter(g, g.size() > 0). the
editor offers the list macros again, and inside the next macro body the loop
variable is typed from the filtered list.
Narrow the rule's MCP and tool-pattern scope before writing the condition. The tighter the scope, the more focused the autocomplete and the more meaningful the coverage chips.
How it's evaluated
Argument-level conditions evaluate at tool-call time, not at discovery time. That means:
- At discovery time (when an agent connects and lists its tools), a tool that's conditionally allowed shows up to the agent: agents see the tool exists, but each call is still gated. The audit log records these as
toolsentries withstatus: conditionalon theagent.connectedevent so you can see exactly which tools are gated for each connection. - At call time, the gateway evaluates the condition against the actual arguments the agent sent. If the condition is
false, the rule is skipped (next rule wins). If the condition errors (for example, references a field the tool doesn't have), behavior is fail-closed: allow rules are skipped, deny rules still deny. If no rule allows the call, it is denied.
The gateway refuses a call whose arguments repeat a member name (a JSON key), such as {"path": "/tmp", "path": "/etc"}. The call fails before the gateway evaluates any condition. The condition and the MCP server could read different values, so the gateway refuses to guess. The audit log records a gateway.tool.error event with error_type: invalid_parameters.
Network conditions
request.ip is the client address the gateway resolved for the call, and inCidr() matches it against an address or a CIDR range:
request.ip.inCidr("203.0.113.0/24")
request.ip.inCidr(["203.0.113.0/24", "198.51.100.16/28", "192.0.2.45"])
!request.ip.inCidr("10.8.0.0/16")
An argument without a / is an exact address match, so an allowlist can mix hosts and subnets. A malformed range literal is rejected when you save the rule rather than failing quietly at call time; a range built from another field is only checked at call time, where the error denies. When the gateway cannot determine an address, inCidr() returns false, so a deny rule written as !request.ip.inCidr(...) denies calls of unknown origin.
Like every condition, an IP condition gates calls rather than discovery. See How it's evaluated. An agent outside the range still sees the tool in its list, and is denied when it calls.
An IP condition is defense in depth, not a perimeter
request.ip is the address the gateway's upstream proxy reported for the
call. That makes it dependable for segmentation and a useful layer on a rule,
but an origin that can be reached without passing through that proxy cannot
treat it as proof of where a call came from. Scope anything that must not be
reachable from outside by agent, user, or group as well.
See the CEL reference for the full inCidr() semantics.
Impact preview
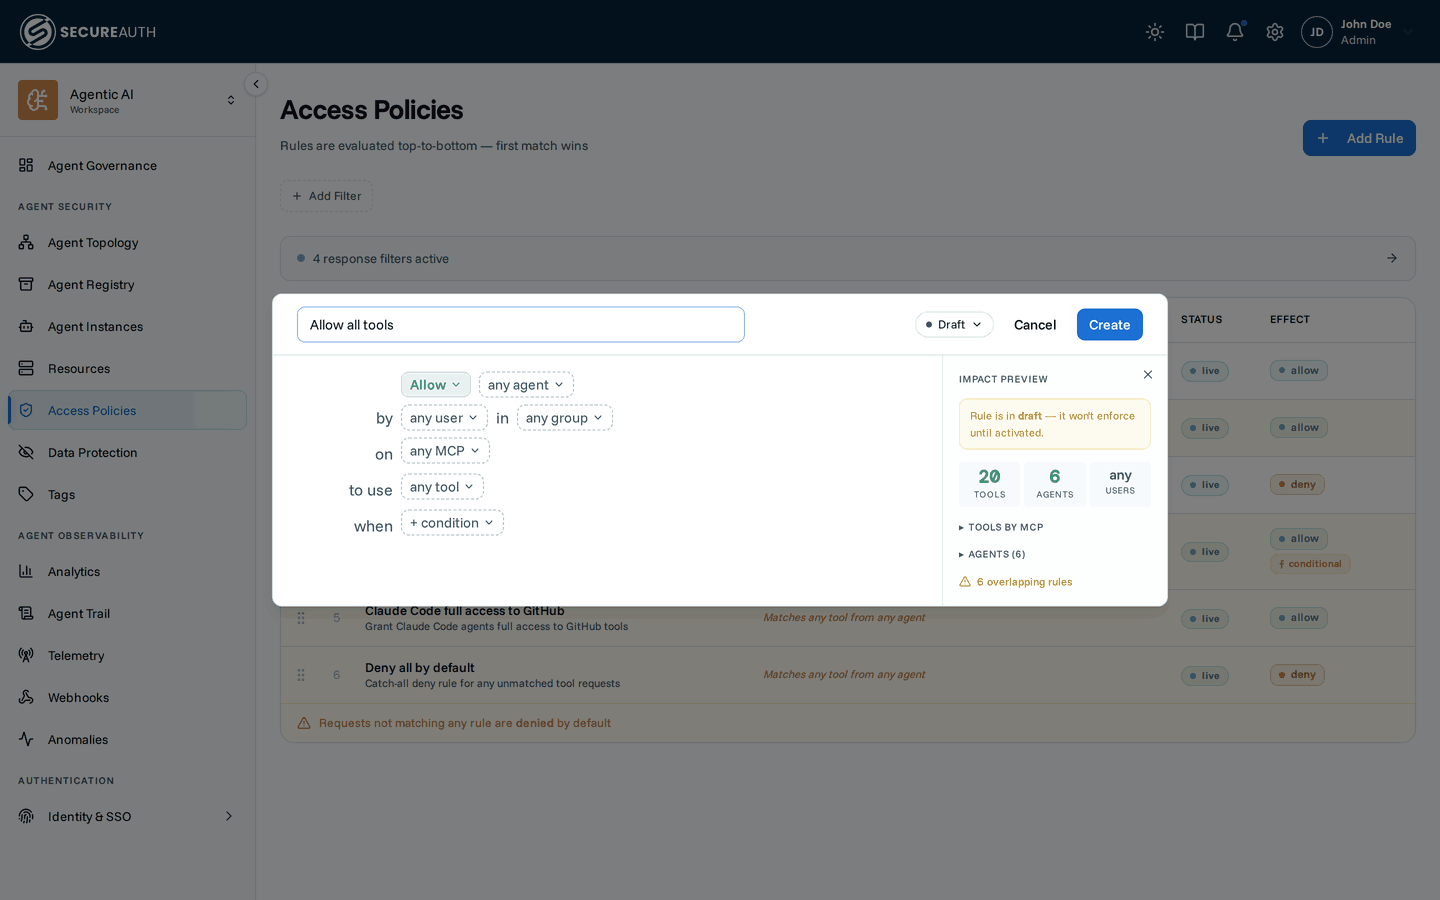
The Impact panel sits beside the rule sentence and updates live as you edit:
- Tools – how many tools match the rule, with a per-MCP breakdown
- Agents – how many agents are affected
- Overlap – warnings when existing rules already cover the same tools
It also flags when a rule is still in draft and won't be enforced yet. Use the toggle on its edge to collapse or reopen it.
Rule order
Rules are evaluated top-to-bottom, so order matters. Drag rows in the table to reorder.
- Put more specific rules above more general ones
- A rule at position 1 is checked first; if it matches, all later rules are ignored
- Example: a deny rule for
delete_*at position 1 blocks deletes even if an allow-all rule exists below
Common patterns
Allow-then-restrict
Start with an allow-all rule at the bottom, then add deny rules above it for specific tools or servers.
- Position 1: Deny –
delete_*,drop_*on postgres-prod - Position 2: Allow –
*
Deny-then-allow
Rely on the default deny (no catch-all rule). This only works once you've disabled or deleted the seeded default Allow all rule, since its blanket match would otherwise undercut the intent. Add targeted allow rules for specific agents and tools.
- Position 1: Allow –
list_*,get_*,search_*for all agents - Position 2: Allow –
*scoped to agentclaude-codeon GitHub
Read-only access
An allow rule only ever adds access: on its own it restricts nothing, because anything it doesn't cover falls through to the next rule, and a fresh org still has the seeded Allow all at the bottom catching every write. Read-only takes two rules:
- Position 1: Allow –
list_*,get_*,search_*,read_*,describe_* - Position 2: Deny –
*on the servers you're locking down
The deny has to sit below the allows, so reads match first and everything else lands on it. Deleting or disabling the seeded Allow all instead of adding the deny also works, but that's an org-wide change: every agent relying on fall-through loses access at once. Add your specific denies first.
Agent-specific access
Scope rules to grant different access levels by agent:
- Position 1: Allow
*scoped to agentclaude-codeon GitHub (full access for Claude Code) - Position 2: Allow
list_issues,list_pull_requestson GitHub (reads for every other agent) - Position 3: Deny
*on GitHub (everything else)
Position 3 is what makes the tiering real. Without it, every agent still reaches GitHub's write tools through the seeded Allow all below.
Argument-level guardrails
Allow a powerful tool, but only with arguments you trust. The rule above the open allow blocks the dangerous shapes; the rule below lets everything else through.
- Position 1: Deny –
create_pull_requeston GitHub whenrequest.args.base == "main"(no agent writes to main) - Position 2: Deny –
slack_send_*on Slack when!(request.args.channel_id in ["C_GENERAL", "C_DEVREL"])(channel allowlist) - Position 3: Allow –
*for the agents that need broad access
Match the tool names exactly as the server publishes them. A pattern with no * in it is an exact match, so a deny rule naming a tool that doesn't exist matches nothing, never fires, and leaves the open allow below it to pass the call: a guardrail that looks present in the table and enforces nothing. Check the resource's page for its tool names, and prefer a prefix pattern like slack_send_* when a family of tools shares the payload you're gating (here it covers slack_send_message and slack_send_message_draft; add slack_schedule_message if scheduled sends matter too).
See Argument-level conditions for the full menu.
Office-only writes
Keep reads open from anywhere, and require the corporate ranges for anything that writes.
- Position 1: Allow –
list_*,get_*,search_*,read_* - Position 2: Allow –
*whenrequest.ip.inCidr(["203.0.113.0/24", "198.51.100.16/28"]) - Position 3: Deny –
*
Position 3 is what closes the rule set: without it, a call from outside the ranges falls through to whatever allow rule sits below.
Next steps
- Tags – match resources and agents by label instead of naming each one.
- Audit log – see every allow and deny decision after the fact.
- Create a policy – the guided walkthrough for your first rule.