Set up Microsoft Entra ID for authentication with SAML
Connect Microsoft Entra ID (formerly Azure Active Directory) to SecureAuth over SAML so users in your tenant can sign in to registered applications. In this setup, Microsoft Entra ID is the SAML identity provider (IdP) and SecureAuth is the service provider (SP). This guide is for administrators connecting a Microsoft Entra ID tenant to a SecureAuth Connect workspace.
How the integration works
SecureAuth Connect connects to Microsoft Entra ID over SAML through its generic SAML connector. There is no Microsoft Entra-specific SAML template, though Microsoft Entra ID also supports OpenID Connect, which does have a dedicated template.
When a user signs in, SecureAuth sends a SAML authentication request to Microsoft Entra ID. Microsoft Entra ID authenticates the user and returns a signed SAML assertion. SecureAuth validates the assertion, maps its attributes into the SecureAuth authentication context, and issues its own tokens to the application.
Before you begin
You need:
- A Microsoft Entra ID tenant where you can create and configure enterprise applications.
- Permission to manage identity providers in your SecureAuth Connect workspace.
You configure the integration in both products, exchanging values between them: SecureAuth generates an Entity ID and an ACS URL that you register in Microsoft Entra ID, and Microsoft Entra ID generates federation metadata that you provide back to SecureAuth.
Connect Microsoft Entra ID to SecureAuth
Start the connection in SecureAuth
-
In your workspace, go to Authentication > Providers, then click Create Connection.
-
Select the SAML template, then click Next.
-
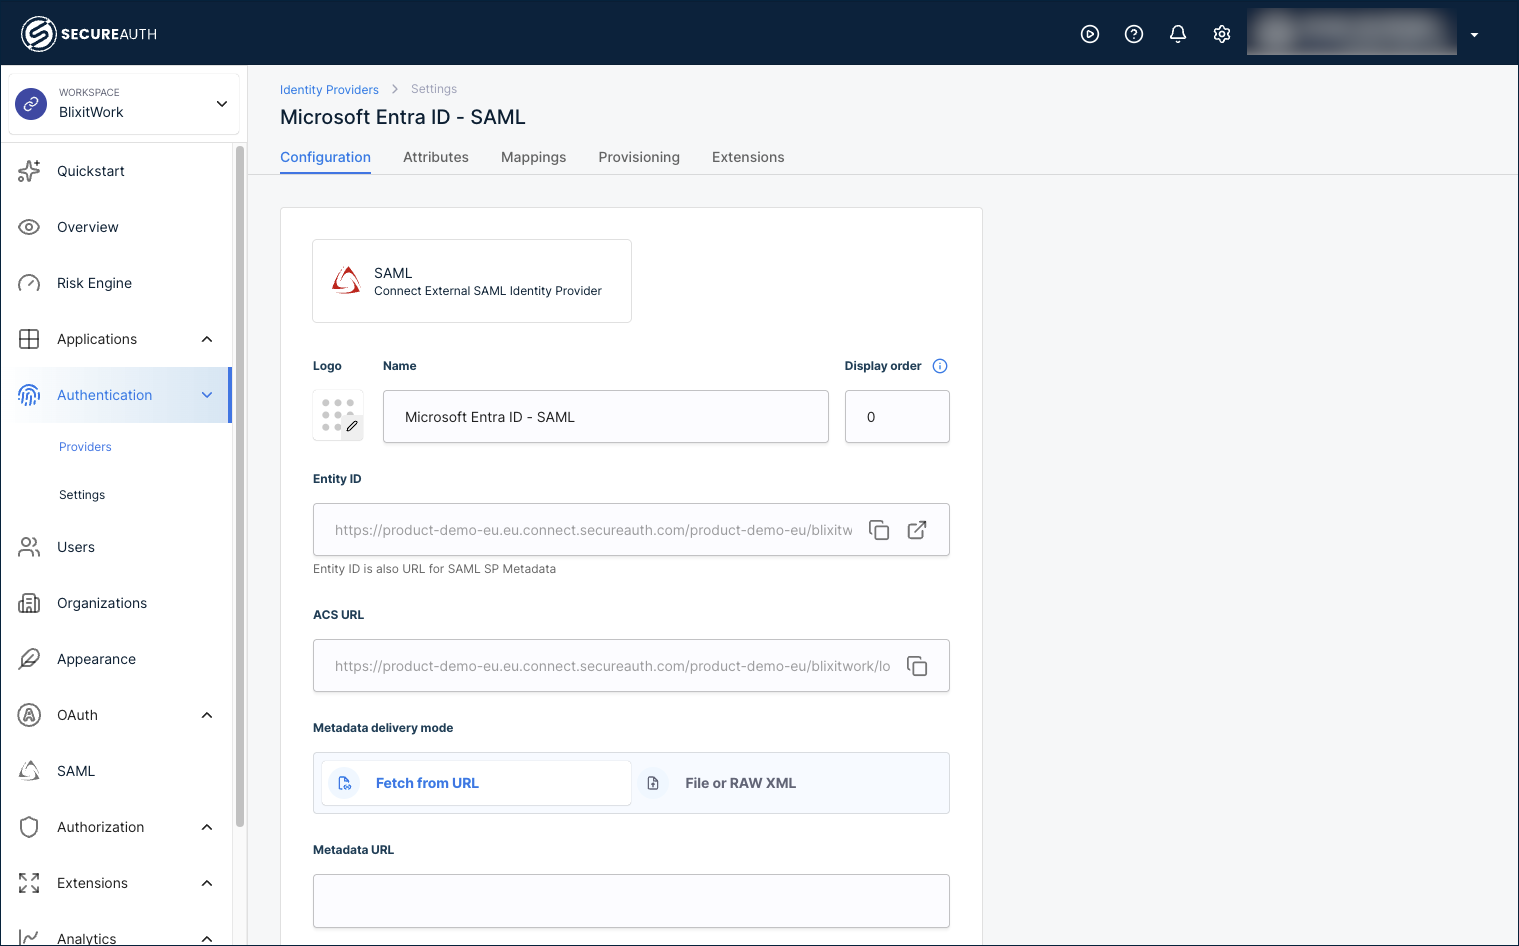
Enter a Name for the connection. Users see this name on the sign-in page.
-
Copy the Entity ID and the ACS URL. You need both to register SecureAuth in Microsoft Entra ID.
Leave this page open.
Configure the enterprise application in Microsoft Entra ID
In Microsoft Entra ID, create an enterprise application and enable SAML-based single sign-on. The steps below cover only the values specific to the SecureAuth integration. For Microsoft's full procedure, see Enable SAML single sign-on for an enterprise application.
-
In Microsoft Entra ID, go to Enterprise applications > New application, then click Create your own application. Do not select an app from the Microsoft gallery: gallery apps generate their own Entity ID, but this integration requires the Entity ID from SecureAuth.
-
In the new application, select Single sign-on, then select SAML.
-
In Basic SAML Configuration, enter the values from SecureAuth:
- Identifier (Entity ID) – The Entity ID from SecureAuth.
- Reply URL (Assertion Consumer Service URL) – The ACS URL from SecureAuth.
- Sign on URL – The ACS URL from SecureAuth.
-
In the SAML Certificates section, copy the App Federation Metadata URL.
-
Assign the users who should be able to sign in through this application.
Finish the connection in SecureAuth
-
Back on the SecureAuth connection form, choose a Metadata delivery mode:
- Fetch from URL – Paste the App Federation Metadata URL you copied from Microsoft Entra ID.
- File or RAW XML – Upload or paste the federation metadata XML.
-
Set the Name ID Format to match the identifier your Microsoft Entra ID application sends.
-
Save your changes.
Optional settings on the Configuration tab: set a Subject Attribute (if empty, the NameID value is used as the subject), enable Sign request to sign the SAML authentication request, and under Advanced settings set an Authentication Method Reference to write into the amr claim.
Attributes
The Attributes tab lists the values SecureAuth reads from the SAML assertion. These are recognized by default:
| Variable name | Display name | Data type | Source |
|---|---|---|---|
mail | String | SAML assertion attribute | |
firstname | First Name | String | SAML assertion attribute |
lastname | Last Name | String | SAML assertion attribute |
saml_name_id | nameID | String | SAML Name ID |
To add a custom attribute that your tenant sends in the assertion, click + Add attribute.
Mappings
Mapping connects the SAML assertion attributes to the SecureAuth authentication context, so every provider feeds a consistent set of user data to your applications. These default mappings apply out of the box:
| Source | Microsoft Entra ID source name | SecureAuth target name |
|---|---|---|
| SAML assertion attribute | ||
| SAML assertion attribute | First Name | Given name |
| SAML assertion attribute | Last Name | Family name |
To customize, click + Add mapping or + Add static mapping, then click Save mappings.
Provisioning
Provisioning controls what happens to a user account when someone authenticates through Microsoft Entra ID. Select a mode on the Provisioning tab.
Disabled
Users are not saved to the user store. Authentication succeeds, but SecureAuth creates no user record.
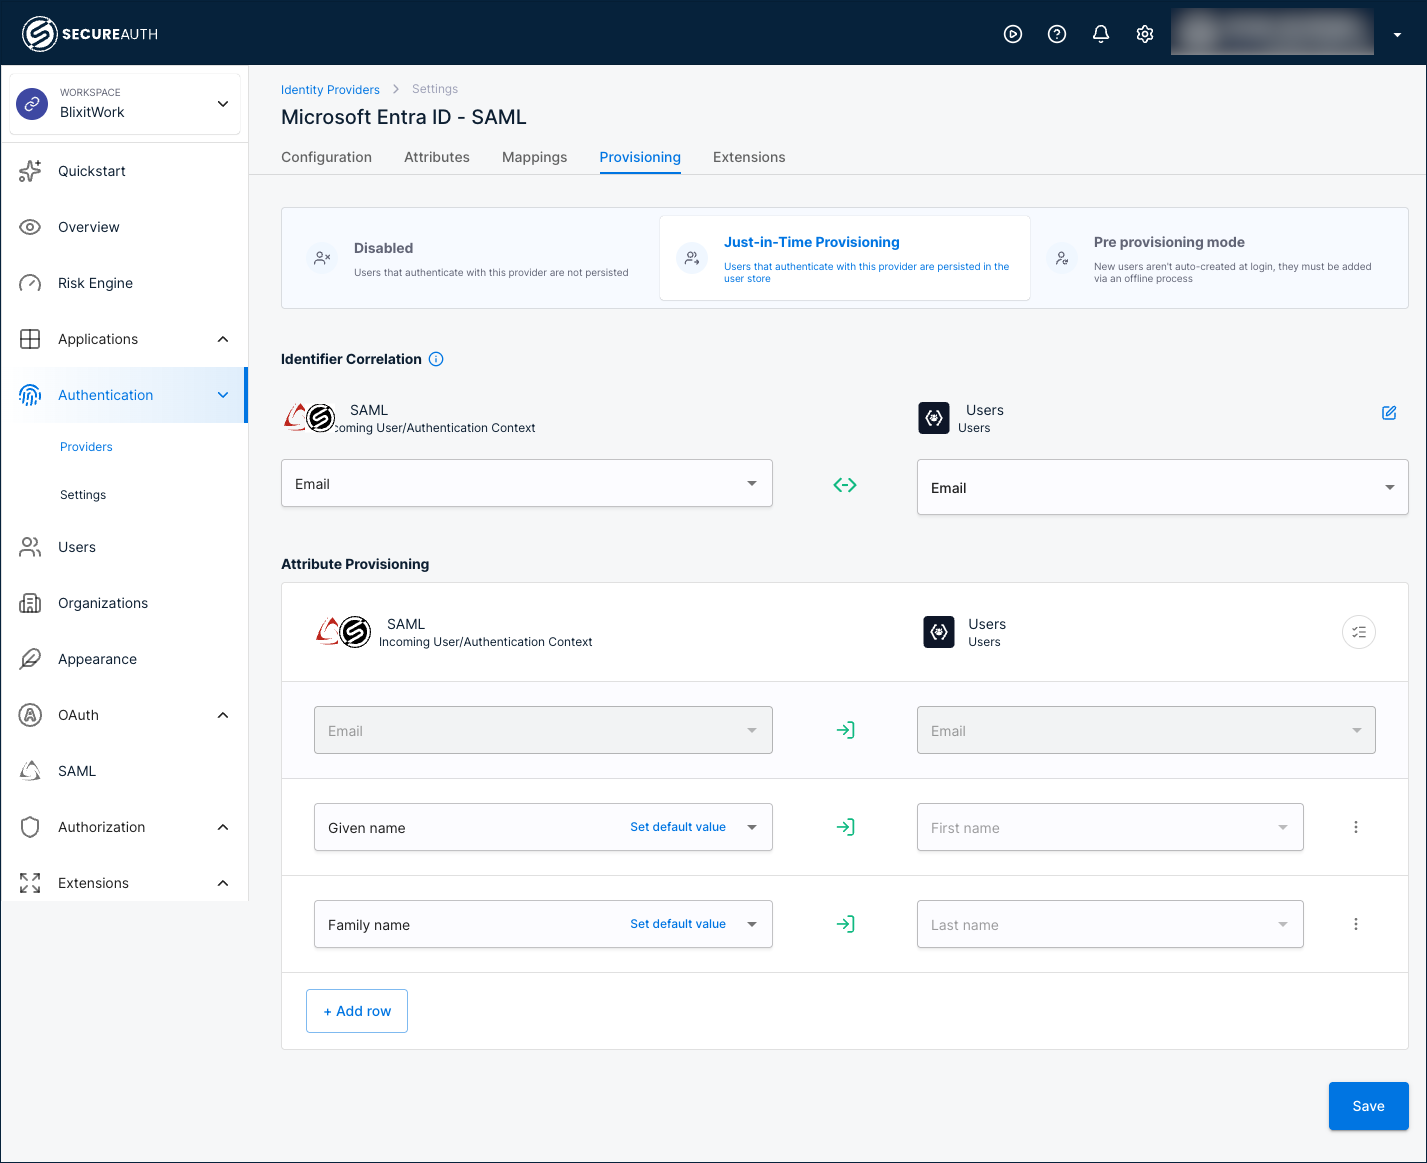
Just-in-Time Provisioning
Users are saved to the user store the first time they sign in.
Identifier Correlation
Matches the incoming Microsoft Entra ID identity to an existing user. Default: Microsoft Entra ID Email ↔ Users Email.
Attribute Provisioning
Maps Microsoft Entra ID attributes to user profile fields. Defaults:
Email→EmailGiven name→First nameFamily name→Last name
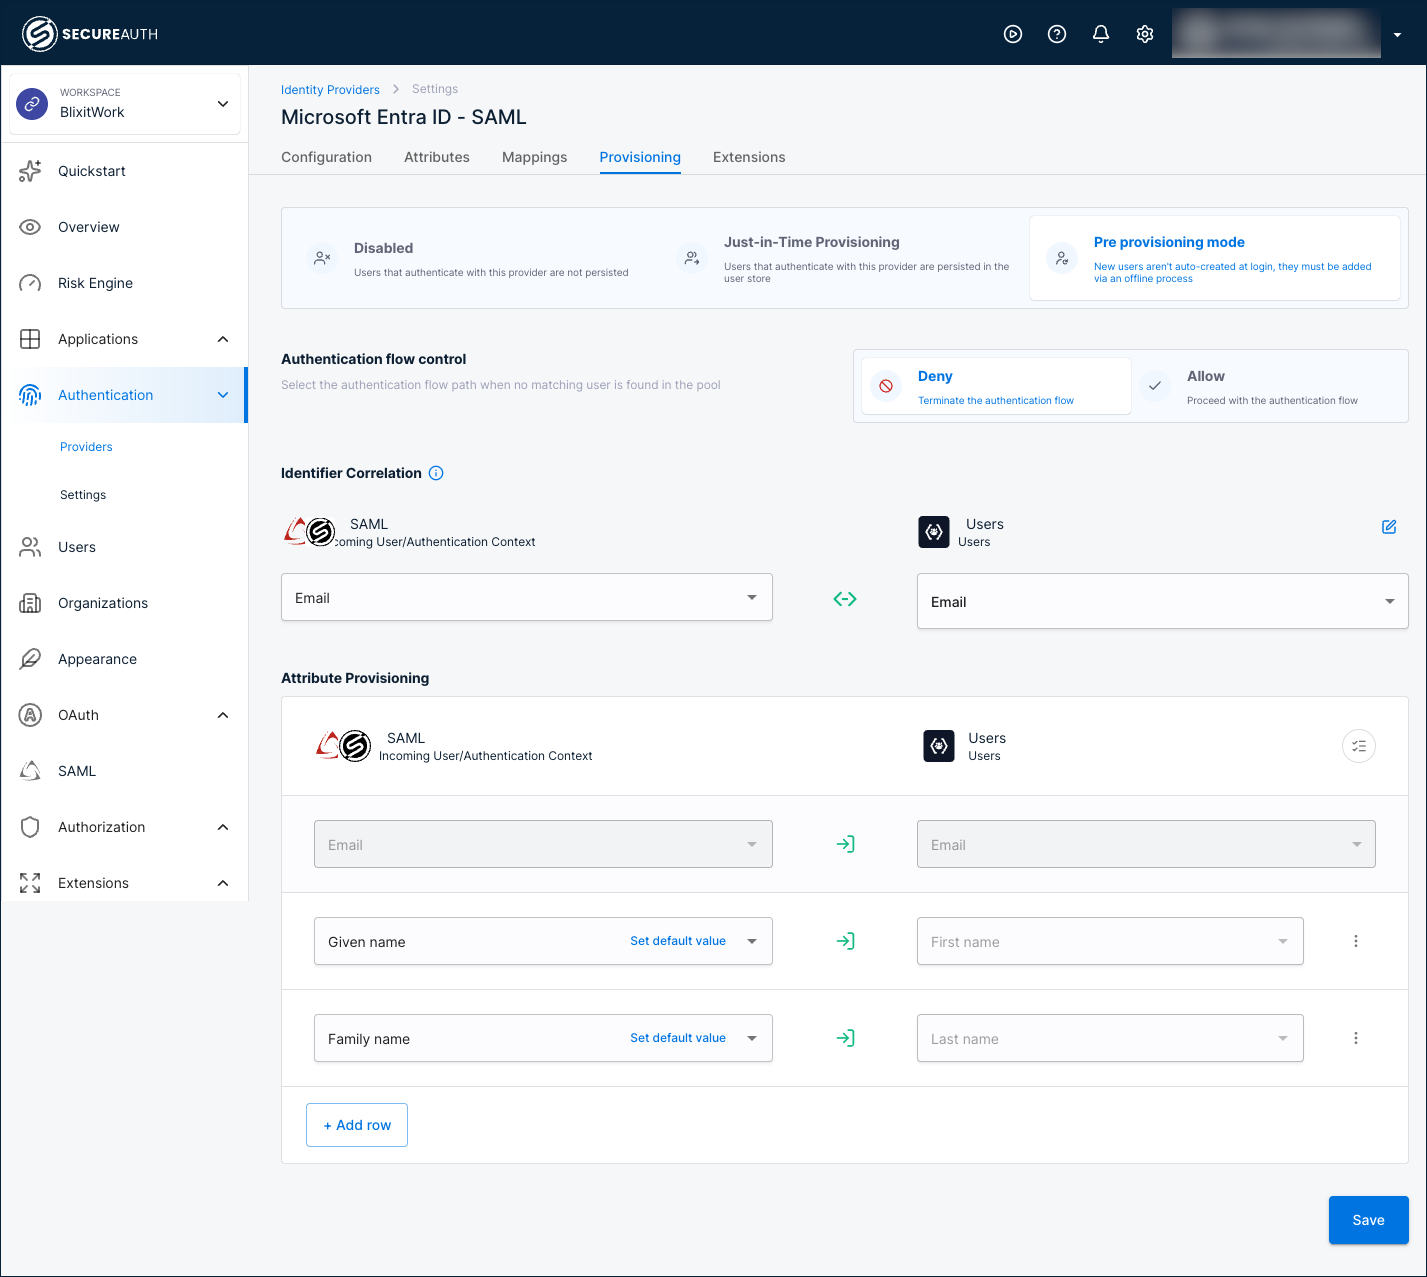
Pre provisioning mode
Users are not created automatically at sign-in. You add them ahead of time through an offline process.
Authentication flow control
Sets what happens when no matching user is found:
- Deny – Terminate the authentication flow.
- Allow – Proceed with the authentication flow.
Identifier Correlation
Matches the incoming Microsoft Entra ID identity to an existing user. Default: Microsoft Entra ID Email ↔ Users Email.
Attribute Provisioning
Maps Microsoft Entra ID attributes to user profile fields. Defaults:
Email→EmailGiven name→First nameFamily name→Last name
Extensions
Extensions run custom logic after a user authenticates with Microsoft Entra ID, such as enriching the authentication context or routing the user through an extra step. Configure them on the Extensions tab.
| Extension | Description |
|---|---|
| Post Authentication script | A server-side script that runs after Microsoft Entra ID authentication completes. Click Manage Scripts to configure. |
| Post Authentication application | A custom application that receives the user after Microsoft Entra ID authentication completes. Click Manage Custom Apps to configure. |
Test the connection
-
Confirm the provider is enabled on the Providers list.
-
Open an application that uses SecureAuth Connect for sign-in, or the built-in User Portal.
-
Start a sign-in and select the Microsoft Entra ID provider by the name you gave it.
-
Authenticate with a Microsoft Entra ID account. After Microsoft Entra ID returns the SAML assertion, SecureAuth issues its tokens with the user data mapped from the assertion.