Set up Active Directory for authentication
This guide covers Active Directory setup through the Authentication > Providers flow. Common use cases include B2B, enterprise, and partner identity. For the Workforce workspace equivalent (which uses the Authentication > User Stores flow), see Connect Active Directory.
Set up Active Directory (AD) as an identity provider so users authenticate against your existing AD infrastructure instead of (or alongside) identity pools. SecureAuth syncs identity lifecycle events (create, update, disable) from AD into identity pools.
This integration is common in B2B, enterprise, and partner scenarios where users already live in an external AD.
Prerequisites
Before you begin, confirm the following:
- AD administrative credentials and a service account with read access to AD.
- AD user accounts have
userPrincipalName,first_name, andlast_namepopulated. Accounts missing these attributes do not sync. - Network connectivity between the planned LDAP Agent location and your domain controllers.
- A virtual server or machine to host the LDAP Agent (or an existing LDAP Agent ready to deploy). You can configure the agent host after creating the AD connection. For the deployment process, see the LDAP Agent deployment guide.
- You have administrative access to the workspace where you want to add AD as an identity provider.
Connect Active Directory
Step 1: Create the Active Directory connection
-
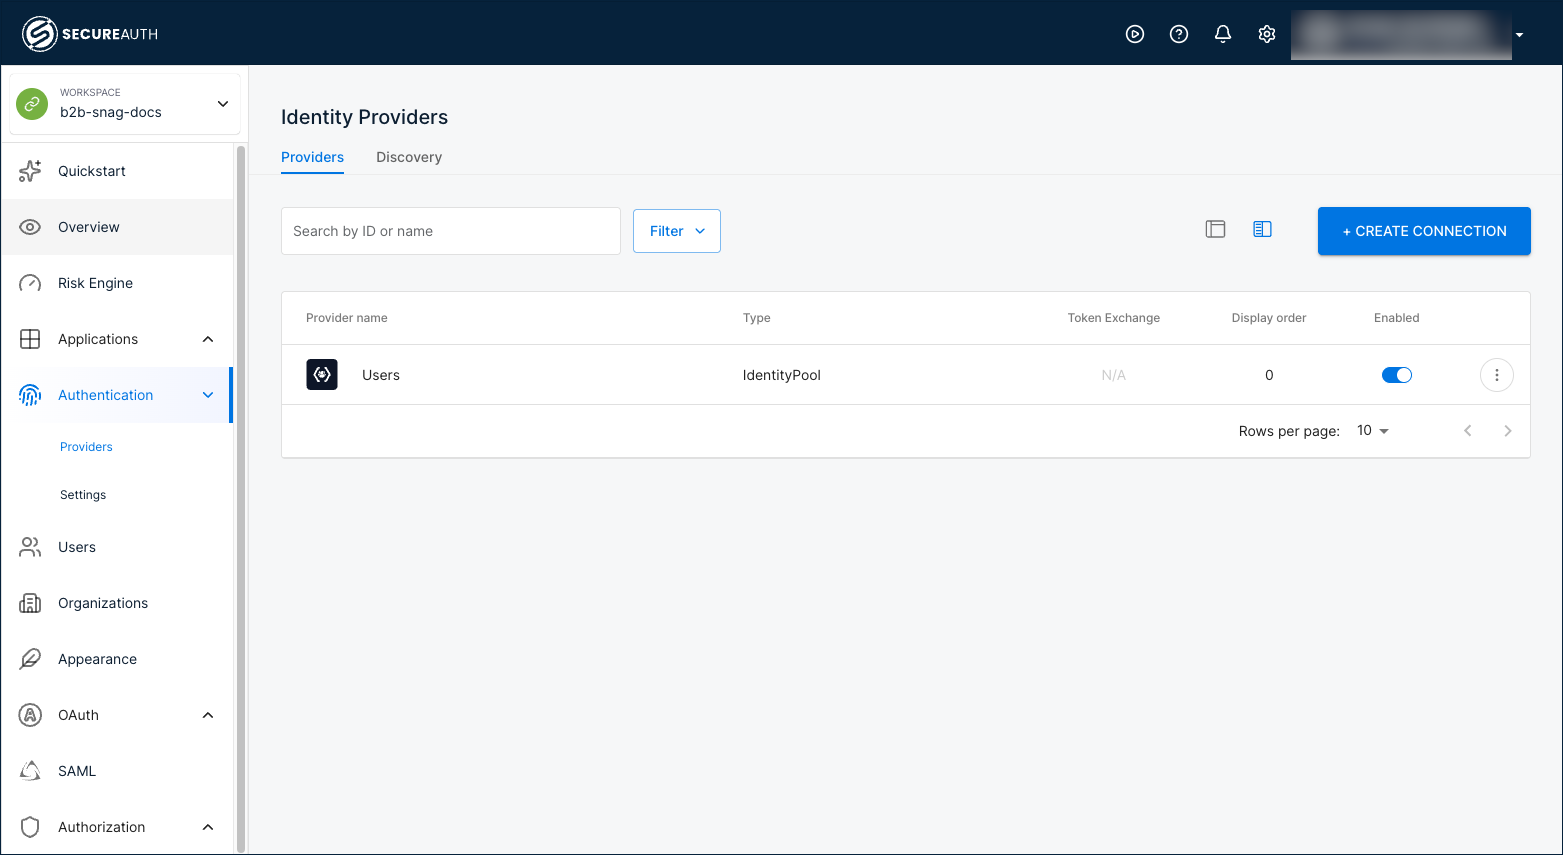
In your workspace, go to Authentication > Providers.
-
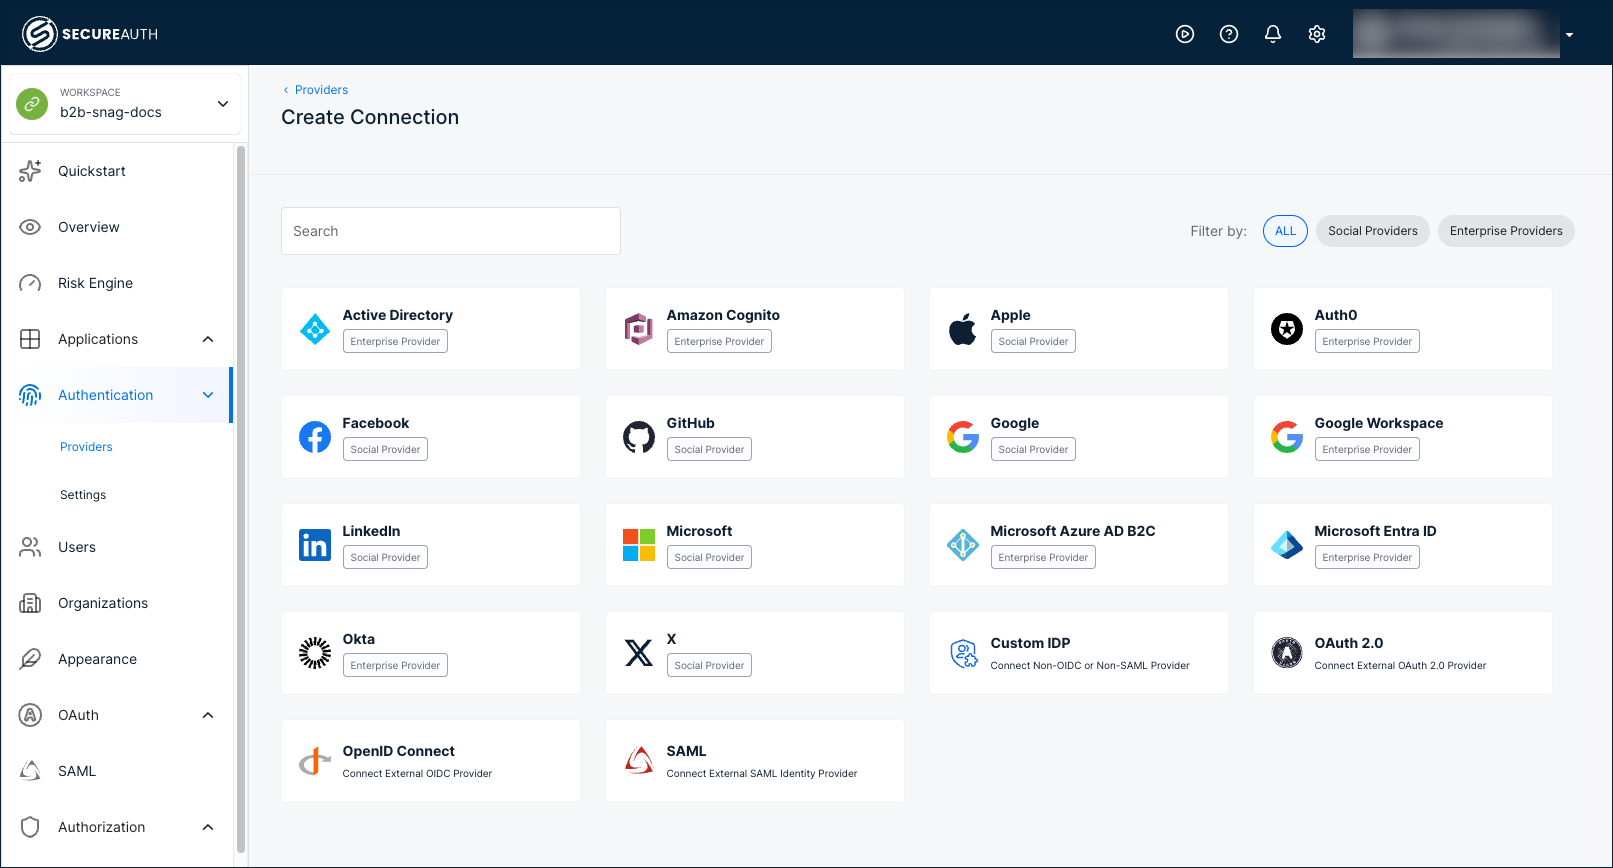
Click + Create Connection.
-
Select Active Directory.
-
Click Save.
Result: SecureAuth registers the connection and opens the Configuration tab.
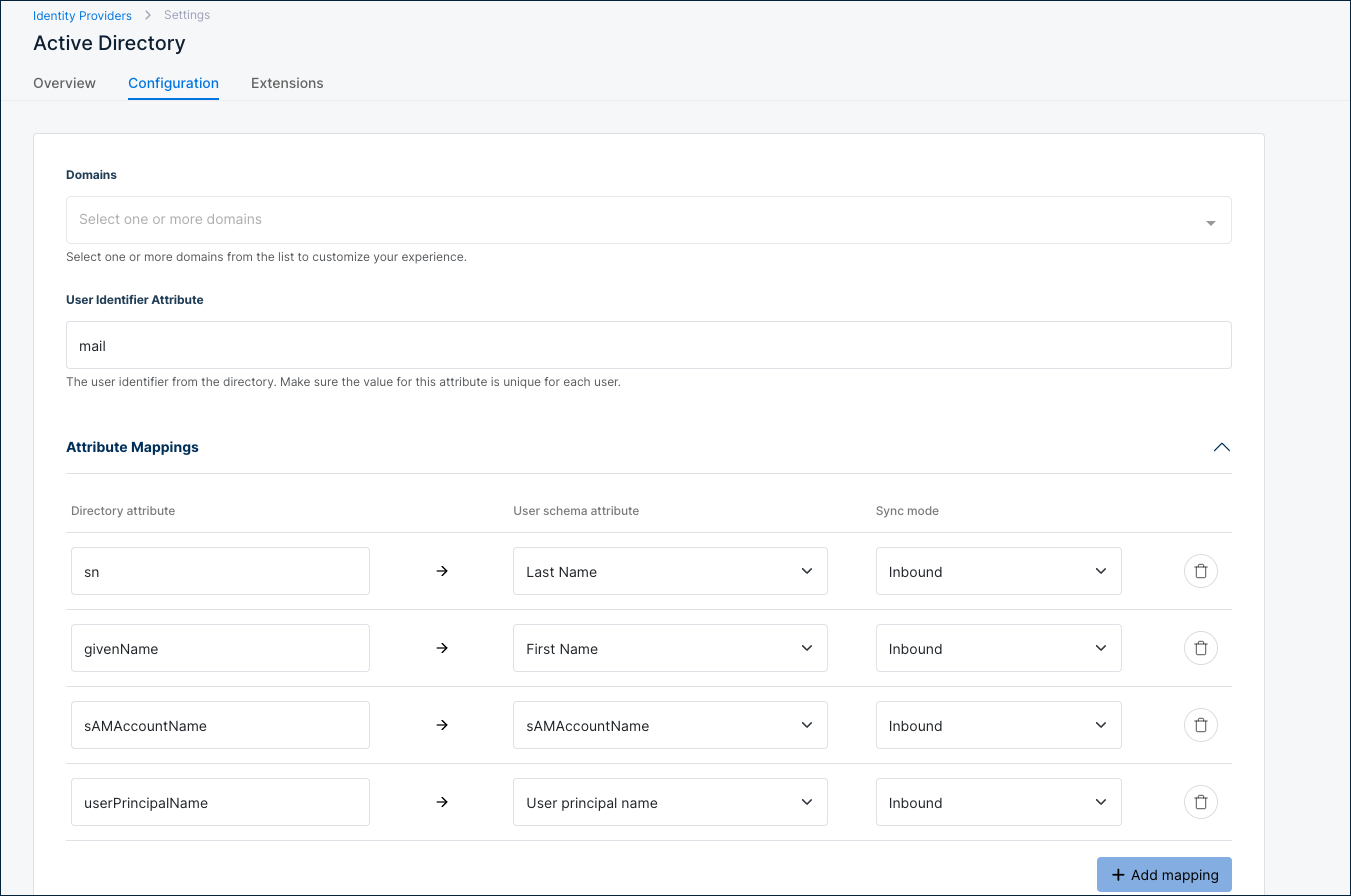
Step 2: Configure directory and attribute mapping
At the top of the Configuration tab, set the directory attributes SecureAuth uses to identify users.
| Setting | Description |
|---|---|
| Domains | Select one or more domains from the list to customize your experience. |
| User Identifier Attribute | User identifier from the directory. Make sure the value is unique for each user. Default: mail. |
If your AD users do not have the mail attribute populated, change User Identifier Attribute to userPrincipalName. Leaving the default in this case prevents SecureAuth from matching and authenticating users.
Under Attribute Mappings, SecureAuth applies the following defaults, all in Inbound sync mode. Click + Add mapping to add custom mappings.
| Directory attribute | User schema attribute | Sync mode |
|---|---|---|
sn | Last Name | Inbound |
givenName | First Name | Inbound |
sAMAccountName | sAMAccountName | Inbound |
userPrincipalName | User principal name | Inbound |
Step 3: Set the Basic Configuration options
Expand Basic Configuration to control provisioning, password, and group behavior.
| Setting | Description |
|---|---|
| Inline Factor Provisioning | Prompts users to set up authentication factors (like SMS, email, mobile authentication apps) during login. |
| Inline User Provisioning | Creates users automatically upon successful authentication. |
| Enable Change Password | Allow users to change their AD password by entering their current password and a new one. Requires an LDAP Agent version with password change support. |
| Enable Reset Password | Allow users to reset their AD password through a password reset flow. Requires an LDAP Agent version with password reset support and bind credentials configured. |
| Attribute Synchronization | Synchronize user attributes between SecureAuth and the directory. |
| Search Directory for Groups | Search and retrieve group information from directory services. |

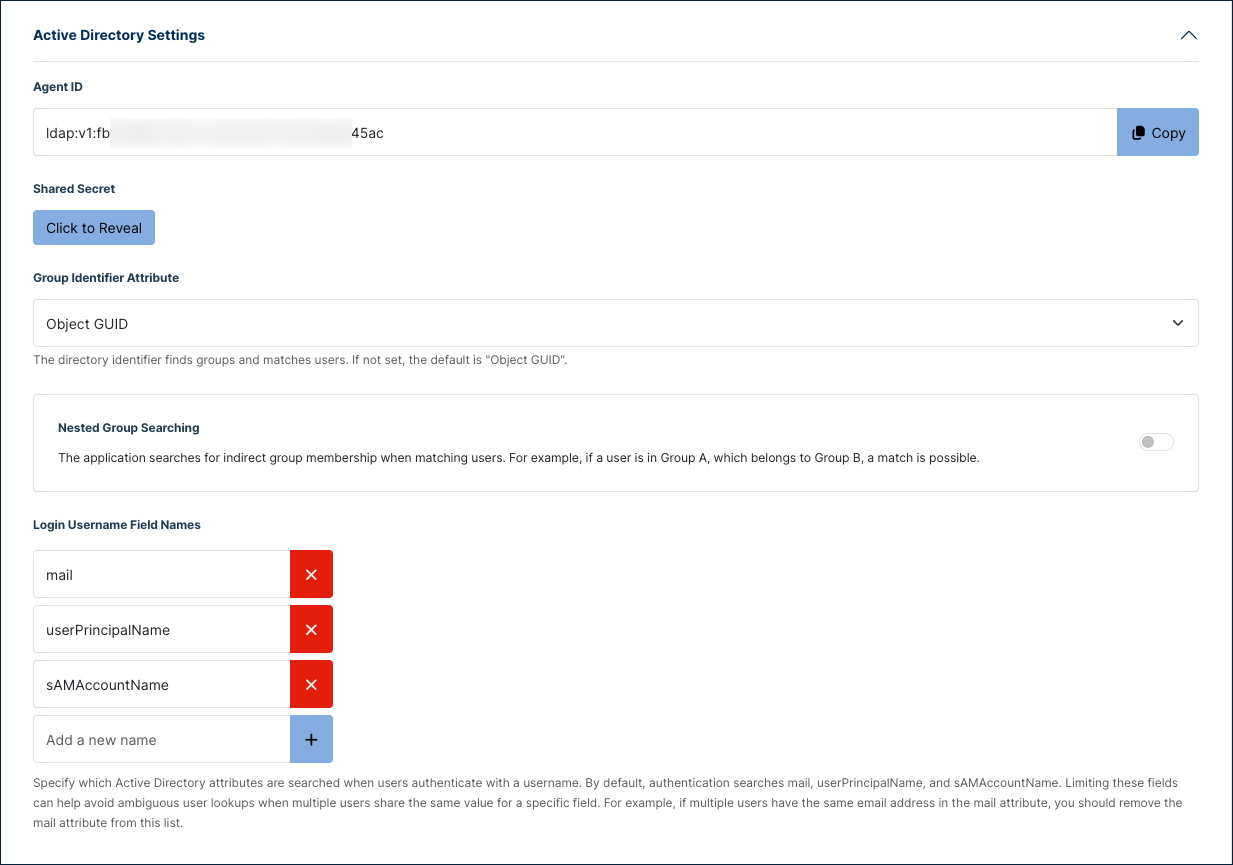
Step 4: Configure Active Directory Settings
Expand Active Directory Settings to view the agent credentials and configure group and login attributes.
| Setting | Description |
|---|---|
| Agent ID | Auto-generated identifier for this connection. Click Copy to copy the value for use during LDAP Agent setup. |
| Shared Secret | Auto-generated credential paired with the Agent ID. Click Click to Reveal to display the value. The LDAP Agent uses this credential to authenticate to SecureAuth. |
| Group Identifier Attribute | Directory attribute used to find groups and match users. Default: Object GUID. |
| Nested Group Searching | Match users to groups through nested (indirect) membership. If a user is in Group A and Group A is a member of Group B, the user matches Group B. |
| Login Username Field Names | AD attributes searched when users sign in with a username. Defaults: mail, userPrincipalName, sAMAccountName. Remove an attribute to avoid ambiguous lookups when multiple users share a value (for example, the same email address in mail). |
Step 5: Configure Connection Settings
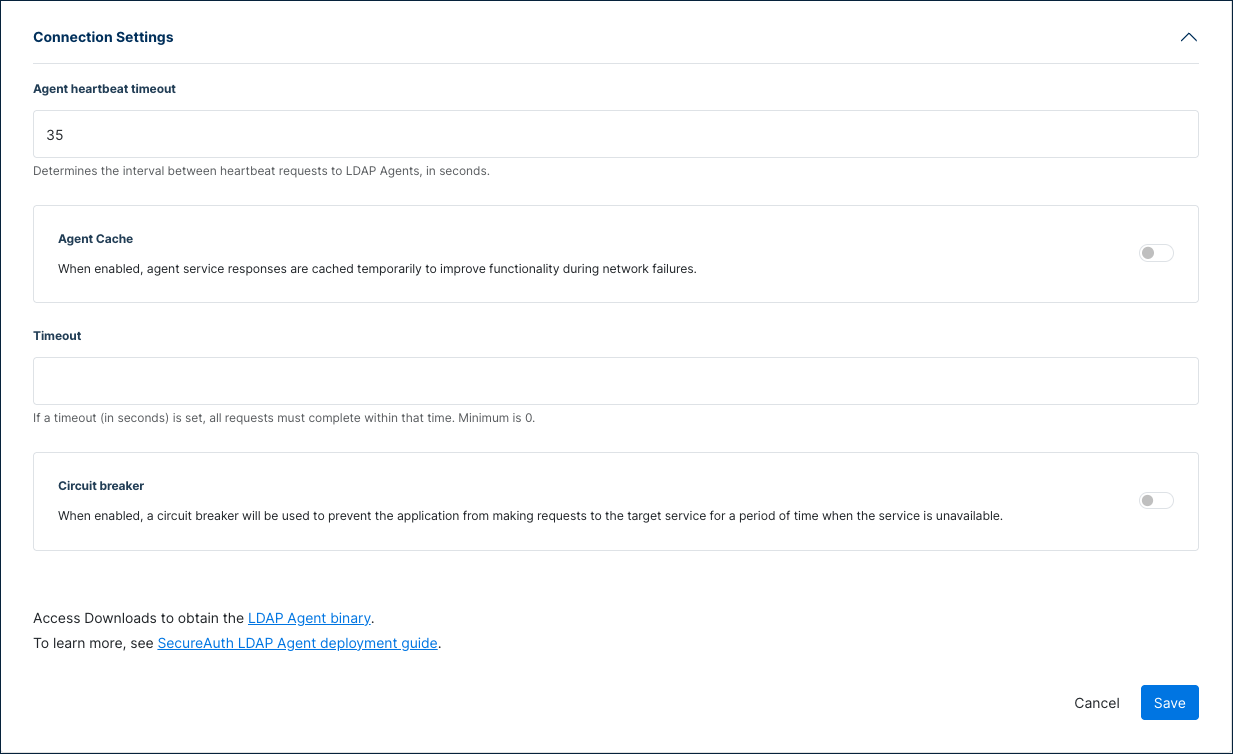
Expand Connection Settings to control how SecureAuth communicates with the LDAP Agent.
| Setting | Description |
|---|---|
| Agent heartbeat timeout | Interval between heartbeat requests to LDAP Agents, in seconds. Default: 35. |
| Agent Cache | Cache agent service responses temporarily to maintain functionality during network failures. |
| Agent Cache Duration | (When Agent Cache is enabled.) How long cached agent service responses remain valid. Enter values in hours and minutes. Default: 25 hours (supports daily user logins). |
| Timeout | Maximum time, in seconds, for a request to complete. Minimum: 0. |
| Circuit breaker | Prevent the application from sending requests to the target service for a period when the service is unavailable. |
| Volume Threshold | (When Circuit breaker is enabled.) Minimum transaction volume in a time window before the error rate is calculated. Minimum: 0. Default: 10. |
| Error Threshold | (When Circuit breaker is enabled.) Error rate percentage of the transaction volume that triggers the circuit to open. Minimum: 0. Default: 50. |
| Time Window | (When Circuit breaker is enabled.) Time window in seconds over which the error rate is calculated. Minimum: 0. Default: 30. |
| Sleep Window | (When Circuit breaker is enabled.) Time the application waits, in seconds, before sending new requests to the target service after the error threshold is met. Default: 300. |
Step 6: Save and connect the LDAP Agent
- Click Save at the bottom of the page.
- In the Connection Settings section, click the LDAP Agent binary download link to download the agent.
- Use the Agent ID and Shared Secret from Active Directory Settings when you configure the LDAP Agent.
- Follow the LDAP Agent deployment guide to install and connect the agent.
Extensions
Use the Extensions tab to attach extensions that run during AD authentication or sync. For background on extensions and what they can do, see Extending SecureAuth capabilities.
Verify the connection
Use the Overview tab on the Active Directory identity provider page to check connection status.
The Directory Information panel on the right auto-refreshes and reports:
- Connector Details — Details about the LDAP Agent, when reachable.
- Agent 1 (and additional agents) — One panel per LDAP Agent, each showing the connector Status, Error Details when available, and Directory Details read from AD.
When no LDAP Agent is connected, Status displays Connector offline and Error Details typically reports an agent_not_found error with the agent ID. After you install and start the LDAP Agent, the panel refreshes automatically and the connector details populate.
To test authentication directly from this page, click Try Sign-in in the left panel.
See also
- LDAP Agent deployment guide
- Connect Active Directory — Workforce workspace equivalent
- Extending SecureAuth capabilities