Approved YubiKey Inventory
The Approved YubiKey Inventory restricts FIDO2 enrollment to a specific set of physical YubiKeys that your organization owns. A YubiKey of a given model looks identical to every other YubiKey of that model under standard FIDO2 attestation, so without this control there is no way to distinguish the keys your organization issued from any other key of the same model. The inventory closes that gap by checking each YubiKey's vendor-issued serial number at enrollment, at every login, or both.
Use this feature when your organization procures YubiKeys directly from Yubico under Enterprise Attestation and assigns them to specific users. SecureAuth holds the per-tenant inventory, validates each YubiKey's attestation certificate against the Yubico root, and enforces the controls you choose. You do not need to build or maintain an external allowlist.
Prerequisites
Identity Platform release 26.2.0 or later.
A batch of YubiKeys procured from Yubico under Enterprise Attestation. Yubico delivers the batch as a ZIP archive of attestation certificates that you upload to SecureAuth.
Enterprise selected as an Attestation Type on the FIDO2 (WebAuthn) global MFA settings page. See FIDO2 WebAuthn global MFA settings.
How this relates to other FIDO2 device controls
The FIDO2 settings page supports three device-gating mechanisms that you can use independently or in combination. Each applies at a different level.
Control | Granularity | Use it to |
Validate device registration with FIDO Alliance | Vendor metadata | Reject devices that are not in the FIDO Alliance metadata service. |
Device Permissions | Device model (AAGUID) | Allow or block specific FIDO2 authenticator models. |
Approved YubiKey Inventory | Physical device (serial number) | Restrict YubiKey enrollment to specific physical devices you procured. |
The three controls stack. For example, you can block competing FIDO2 authenticators at the model level through Device Permissions, allow the YubiKey AAGUID, and narrow further to only the YubiKeys your organization owns through the Approved YubiKey Inventory.
The Approved YubiKey Inventory applies to YubiKey only. Other FIDO2 authenticators are governed by Device Permissions and FIDO Alliance validation.
Enforcement controls reference
The Approved YubiKey Inventory panel has three enforcement toggles. All three are on by default. Decide which to enable based on how strict you want to be at each stage of the device lifecycle.
Reject enrollment when a serial isn't in the inventory
When this control is on, a user can only register a YubiKey whose serial number is on the approved list. An enrollment attempt with any other YubiKey returns a 403 response and the user sees an error message asking them to use a YubiKey provided by their organization.
Turn this on as the primary gate against unauthorized devices. Turn it off only during a phased rollout where you want to observe traffic before enforcing.
Re-check serial at every login
When this control is on, every login validates the user's YubiKey serial against the inventory. If you remove a serial from the inventory, any credentials enrolled with that YubiKey are revoked at the next login. Re-adding the serial restores access without forcing the user to re-enroll.
Turn this on to support active revocation: lost or stolen YubiKeys can be disabled in real time by removing their serials from the inventory. Turn it off only if you want enrollment-time enforcement without ongoing revalidation.
Validate certificate chain against Yubico root
When this control is on, the YubiKey's attestation certificate must chain to the configured Yubico root certificate authority (CA) before SecureAuth accepts the device. This catches forged or untrusted certificates that pass a serial-only check.
Leave this on in production. The Yubico root CA is set automatically for your Identity Platform tenant.
One credential per YubiKey serial
SecureAuth prevents a single YubiKey serial from being enrolled to more than one user account. This control is always on and is not configurable from the admin UI. Contact SecureAuth Support if your environment requires shared-device enrollment.
The Approved YubiKey Inventory table
The inventory table lists every YubiKey serial currently approved for enrollment in your tenant, along with whether each device is in use.
Column | Description |
Serial | The YubiKey's vendor-issued serial number. |
Description | Free-text label you set when you add the serial. Use it to identify a batch, an owner, or a procurement order. |
Source | How the serial was added. Bulk ZIP for serials imported from a Yubico-supplied ZIP, or Manual for serials you added one at a time. |
Status | Whether the YubiKey is currently enrolled to any user. A green Enrolled (N) tag means N users hold credentials registered with this YubiKey. Not enrolled means no user has registered the device yet. |
Batch | The ZIP file name for bulk-imported serials. Empty for manually added serials. |
Added | The date the serial was added to the inventory. |
Above the table, the Source filter lets you narrow to bulk-imported or manually added serials. The search box accepts partial matches on serial number or description.
See which users hold credentials on a YubiKey
Click an Enrolled (N) status tag to open the Enrolled Users popover for that YubiKey. The popover lists each user who holds a credential enrolled with the device, with columns for Name, Username, and Unique ID.
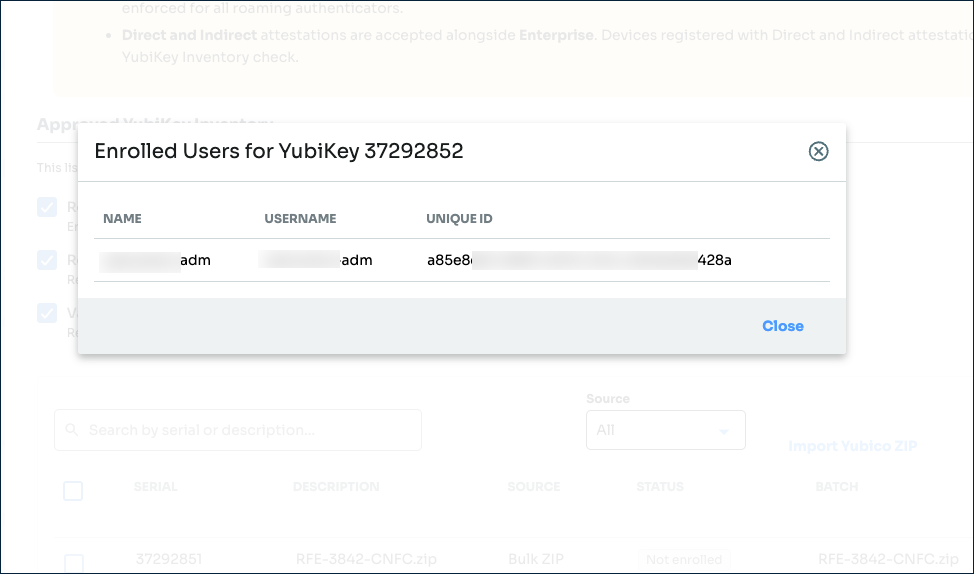 |
Use this view before removing a serial from the inventory. If Re-check serial at every login is on, removing the serial revokes every credential listed in the popover at the next login. Confirm that those users have an alternative authentication method, or notify them in advance.
Add YubiKeys to the inventory
You can add YubiKeys in bulk from a Yubico-supplied ZIP, or one at a time.
Import a Yubico ZIP
Use this option for batches of YubiKeys procured from Yubico under Enterprise Attestation. Yubico delivers the batch as a ZIP archive of attestation certificates. SecureAuth parses the archive and extracts each device's serial number and certificate.
In the Approved YubiKey Inventory panel, click Import Yubico ZIP.
Click Choose ZIP file and select the Yubico-supplied archive.
Click Upload.
SecureAuth processes the archive and adds each serial to the inventory. Serials appear in the table with Source set to Bulk ZIP and Batch set to the ZIP file name.
Add a serial manually
Use manual entry when you receive YubiKeys outside a bulk delivery, such as a single replacement key for one user.
In the Approved YubiKey Inventory panel, click + Add Serial Number.
Enter the YubiKey's Serial number. YubiKey serials are 7 to 10 digits.
Enter a Description that identifies the device. For example,
Production keys batch 2025-Q1or the assigned user's name.If Validate certificate chain against Yubico root is on, click Choose certificate file and select the attestation certificate file Yubico provided for this device. SecureAuth rejects the entry if the certificate chain does not reach the configured Yubico root.
Click Add Serial.
Remove a YubiKey from the inventory
Removing a serial revokes future use of that YubiKey for FIDO2 authentication in your tenant.
If Re-check serial at every login is on, every credential enrolled with the removed YubiKey is revoked at the next login attempt.
If Reject enrollment when a serial isn't in the inventory is on, the YubiKey cannot be used to register new credentials.
To restore access without making users re-enroll, add the serial back to the inventory. Existing credentials become usable again at the next login.
Confirm affected users before you remove a serial
If the YubiKey is currently enrolled, the Status column shows Enrolled (N). Click the tag to see which users will lose access when the serial is removed. Notify those users or confirm they have an alternative authentication method before you proceed.