Delegated Admin Portal
The SecureAuth Connect delegated admin portal (also called the B2B portal) is where organization administrators manage their own organization. Partner and customer administrators use it to invite users, reset passwords, deactivate accounts, and grant administrator roles to their own staff. They never see the admin console or other organizations.
Delegated Admin Portal Overview
 User management
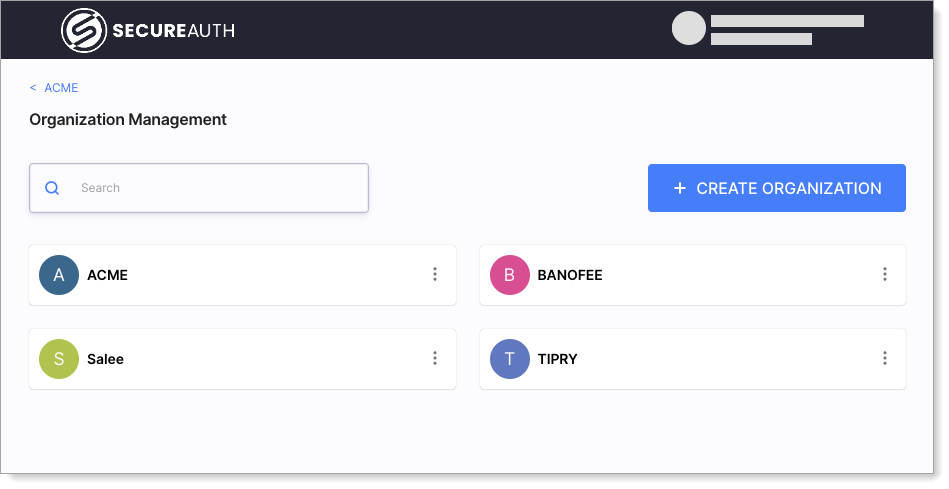 Organization management
You can delegate organization administration to your partners or customers and let them manage their own users and administrators. Sign-in settings stay with you unless you grant the Admin (admin) role.
Who uses the portal
| User | Role | What they manage |
|---|---|---|
| Partner or customer administrator | Organization Admin (manager), User Manager (user_manager), or Admin (admin) on one organization. The user is stored in that organization. | Their own organization and its suborganizations. |
| Your own staff | Business Admin (business_admin) tenant role. The user is stored in the tenant administrator pool. | All organizations in the tenant, including creating new ones. |
Roles have the same names in the portal and the admin console. For what each role can and cannot do, see Organization administrator roles and permissions.
Open the portal
The portal URL is the organization issuer URL followed by /b2b. The issuer URL is https://{tenant-id}.{region-id}.connect.secureauth.com/{tenant-id}/{organization-id}, returned as issuer_url when you create the organization through the API.
https://{tenant-id}.{region-id}.connect.secureauth.com/{tenant-id}/{organization-id}/b2b
Send this URL to the organization administrators. They sign in with the account they activated from their invitation email.
Business Admins (business_admin) use the portal of the admin workspace, https://{tenant-id}.{region-id}.connect.secureauth.com/{tenant-id}/admin/b2b. A Business Admin who signs in to the admin console is redirected to the portal. A Super Admin (admin) can open it with the Business Admin Mode switch in the profile menu of the admin console.
What the portal shows
The left navigation depends on the role of the signed-in administrator:
- Organization Details: View the organization details. Administrators with the Admin (
admin) or Organization Admin (manager) role can edit its custom attributes. - Sign-in and SSO: Identity providers for the organization. Shown only to administrators who can view identity providers: the Admin (
admin) and Auditor (auditor) roles on the organization, and the Super Admin (admin) and Auditor (auditor) tenant roles. - Suborganizations: Shown only to Business Admins (
business_admin) and other administrators who can list or create organizations in the tenant. - Users: Users, groups, and user populations of the organization.
Invite a user
Invite users so they set up their own credentials. You never handle their passwords.
- Go to Users and click CREATE USER.
- Enter the email address and the other required attributes.
- If the user population allows passwords, a Mode option appears. Keep Send invitation selected.
- Optionally, select roles for the user. See Grant administrator roles.
- Click Create.
The user is created with status new, shown as Invite Sent, and receives an activation email. After they follow the link and set up credentials, their status changes to active.
The activation link is valid for 7 days by default. To change this, a tenant or workspace administrator opens the organization user population in the admin console, selects the Sign-in and Sign-up tab, and sets Verification Code Settings > Activation OTP > Time To Live. If a link expires, use Resend Activation Email (see Manage existing users).
To change the email text and branding, edit the Activate Account With Link email template. See Configure email message templates.
Invite many users at once
Import a CSV file to invite up to 100 users at a time. Each row creates one user with status new, the same as CREATE USER.
- Go to Users and click IMPORT USERS.
- Select the CSV file and click Import.
The file follows these rules:
-
The file name ends in
.csv. -
The first row has the column names, separated by commas, in any order. Column names aren't case-sensitive: an exact match wins, and a different case is accepted when it matches only one column. A UTF-8 byte order mark at the start of the file is fine.
-
Every row needs at least one identifier value:
email– The activation message goes by email.mobile(phoneworks the same) – The activation message goes by SMS. Write the number with a leading+and the country code, for example+15125550100. If a row has bothemailandmobile, the activation message goes by SMS.uid– A username. No activation message.external– An ID from another system, such as a badge or HR number. No activation message.
Identifier values stay text, so a
uidof00123stays00123. -
Attribute columns start with
payload.(profile attributes),metadata.(administrative metadata), orbusiness_metadata.(business metadata). Metadata columns are imported only if you can set that metadata, and the dialog lists only the prefixes you can use. Every required attribute needs a column. Other columns are ignored. -
Each identifier column and each attribute column can appear only once (
Emailandemailcount as the same column), and a file can't have bothmobileandphone. A file that breaks this rule is rejected. -
Up to 100 users per file. Values can't contain commas or quotes. Object and array attributes can't be imported.
For a user population whose schema has a department attribute, a file looks like this:
email,mobile,payload.department
ana.lee@partner.example,,Sales
ben.ortiz@partner.example,+15125550123,Support
Users with only uid or external values get no activation message and can't sign in until an administrator adds an email address on the user's page and sends the activation message from there. When the import finishes or stops, the dialog names these users, up to 10, and gives the number of any others. Import doesn't assign roles.
If the user population requires administrative or business metadata that you can't set when you create users, the dialog shows Import isn't available for this user population and lists the required fields. Make those fields optional in the population metadata schemas, or import the users from the admin console.
If a row fails
Problems with the whole file, such as a missing required column or a row without an identifier value, are reported before any user is created. After that, rows are imported in order, and row numbers match your spreadsheet (the column names are row 1). If a row fails, the import stops. The error names the failed row and the rows whose users were created. If the user in the failed row was created but the activation message wasn't sent, or their metadata wasn't saved, the error says so and what to do for that user. The dialog then clears the selected file: fix the file, remove the rows that were already imported, and import it again.
Other ways to add many users
- CSV import in the admin console. A tenant or workspace administrator opens the organization in the admin console, goes to Users, and clicks IMPORT USERS. The dialog and file rules are the same, and
metadata.andbusiness_metadata.columns are always imported. - A script against the API. For each user, call Create user with status
new, then Send activation message. See Add the first organization administrator for request examples. - Migration with existing credentials. To move users with their passwords from another system, see Migrate users to Identity Pools.
- Provisioning from the partner directory. See Configure inbound SCIM provisioning, or connect the partner identity provider so users are created when they first sign in.
Approve users
SecureAuth has no approval queue for users. There is no step where an administrator approves a self-registered user. A user has one of these statuses:
| API status | Shown in the portal as | Meaning |
|---|---|---|
new | Invite Sent | Created and invited, not activated yet. Can't sign in. |
active | Active | Can sign in. |
inactive | Inactive | Can't sign in. The user and their data are kept. |
deleted | Deleted | Can't sign in. The user record and its identifiers are kept. |
To control who gets access to an organization, keep self-registration off and invite users instead. In the admin console, open the organization user population, select the Sign-in and Sign-up tab, and under Sign-up > Registration Modes, clear Self Registration. For more on registration options, see User registration overview.
Manage existing users
Open the menu next to a user in the Users list, or open the user profile.
| Action | What it does |
|---|---|
| Resend Activation Email | Sends a new activation email to a user with status new. Earlier activation links stop working. |
| Reset Password | Sends a password reset message to the user address. |
| Set To Inactive | Blocks sign-in and signs the user out of existing sessions, without deleting the user. Use Set To Active to restore access. |
| Set To Deleted | Blocks sign-in and keeps the user record, so the email address and other identifiers stay taken. Use it when you need to keep the record. |
| Delete User | Permanently removes the user and their identifiers, so you can invite the same email address again. |
Resend Activation Email works on one user at a time. To resend to many users, call Send activation message for each user in a script.
The user profile also lets you edit attributes, identifiers and addresses, groups, and roles.
Administrators can't remove a passkey, an authenticator application, or other MFA credentials of a user from the portal. Users manage these themselves in the end user portal of their organization, at the organization issuer URL followed by /app. Depending on the sign-in methods enabled for the organization, they can change their password, add and remove passkeys, and set up a time-based one-time passcode (TOTP) authenticator.
If a user loses their only passkey or device, they sign in with another method enabled for the user population, for example password followed by an email one-time passcode, then remove the lost passkey and register a new one in the end user portal. Enable at least two sign-in methods on the user population so this recovery path exists.
What you can do for a user who can't sign in depends on what they lost:
-
The password – Use Reset Password to send them a password reset message. A reset changes only the password and leaves their second factors as they are.
-
The passkey or device that holds their second factor – A password reset doesn't help. The user can do one of the following:
- Reset the lost credential on the sign-in page with No access to passkey?, No access to TOTP?, or Lost Authenticate app?. A reset message goes to their email address or mobile number. These links don't appear when Reset Credentials Restrictions is turned on for the user population (Sign-in and Sign-up tab > Reset Credentials).
- Sign in with another second factor offered by the user population, such as an email or SMS one-time passcode.
Both ways need a working email address or mobile number. Open the user profile and, under Addresses, add or edit it. For a one-time passcode second factor, also turn on Allowed for 2FA on that address.
Grant administrator roles
Organization administrators can make other users in the organization administrators, so you don't need to handle every request.
- Go to Users and open the user.
- In the Roles field, select the role.
- Save your changes.
Which roles you can grant depends on your own role:
| Your role | You can grant and revoke |
|---|---|
Admin (admin) | Every organization role. |
Organization Admin (manager) | Organization Admin (manager), User Manager (user_manager), and User Population Manager. |
User Manager (user_manager) | User Manager (user_manager) and User Population Manager. |
User Population Manager (user_manager on the population) | None in the portal. |
The portal shows the Roles field only to administrators who can view roles on the whole organization, so a User Population Manager doesn't see it. They can grant the role on their own user population through the API with Grant identity pool role.
A Business Admin (business_admin) can grant the same roles as Organization Admin (manager), in every organization. To revoke a role, remove it from the Roles field.