Microsoft Outlook Web Access ADFS plugin integration
Multi-Factor Authentication (MFA) is an extra layer of security used when logging into websites or apps. Individuals are authenticated through more than one required security and validation procedure that only you know or have access to.
Acceptto offers a simple solution for adding MFA for ‘Active Directory™’ Federation Services (AD FS) v3.0 on ‘Windows Server™’ 2012 R2 and v4.0 on Windows™ Server 2016. With this feature, customers can use ADFS as their Identity Provider (IdP) to login to their applications and empower it with Acceptto MFA to provide a robust method of authentication. This integration guide can be extended to Microsoft Exchange versions 2013 to 2019. The Exchange Server acts as the Service Provider (SP) requesting user authentication to AD FS.
Prerequisites
Setup your ADFS server using the instructions provided in the ADFS integration guide.
One or more instances of ‘Microsoft Exchange Server™.’ Note that the steps for Exchange will need to be repeated in each instance.
One or more instances of Microsoft™ AD FS. Note that the steps for AD FS will need to be repeated in each instance.
Obtain your organization’s universal resource location (URL) for your Exchange Outlook™ Web Access (OWA) and your Exchange Control Panel (ECP).
Administrative rights to configure AD FS and Exchange.
Access to the ADFS Signing Certificate.
Configure AD FS as an Identity Provider (IdP) for Exchange
Open a PowerShell interface using a user with Administrative privileges for AD FS and Exchange.
Set the local variable $OwaUrl to your OWA URL:
$OwaUrl = ‘https://example.com/owa/’
Set the local variable $EcpUrl to your ECP URL:
$EcpUrl = ‘https://example.com/ecp/’
Create an issuance rule to authorize the users:
$IssuanceAuthRules = '@RuleTemplate = "AllowAllAuthzRule"
=> issue(Type = "http://schemas.microsoft.com/authorization/claims/permit",
Value = "true");'
Create Custom transformation rules for Active Directory users SID and Windows Account names:
$IssuanceTransformRules = '@RuleName = "ActiveDirectoryUserSID" c:[Type == "http://schemas.microsoft.com/ws/2008/06/identity/claims/windowsaccountname", Issuer == "AD AUTHORITY"] => issue(store = "Active Directory", types = ("http://schemas.microsoft.com/ws/2008/06/identity/claims/primarysid"), query = ";objectSID;{0}", param = c.Value); @RuleName = "ActiveDirectoryUPN" c:[Type == "http://schemas.microsoft.com/ws/2008/06/identity/claims/windowsaccountname", Issuer == "AD AUTHORITY"] => issue(store = "Active Directory", types = ("http://schemas.xmlsoap.org/ws/2005/05/identity/claims/upn"), query = ";userPrincipalName;{0}", param = c.Value);'Note: if you need different transformation rules, see the Microsoft document about supported claims at https://docs.microsoft.com/en-us/windows-server/identity/ad-fs/technical-reference/the-role-of-claims
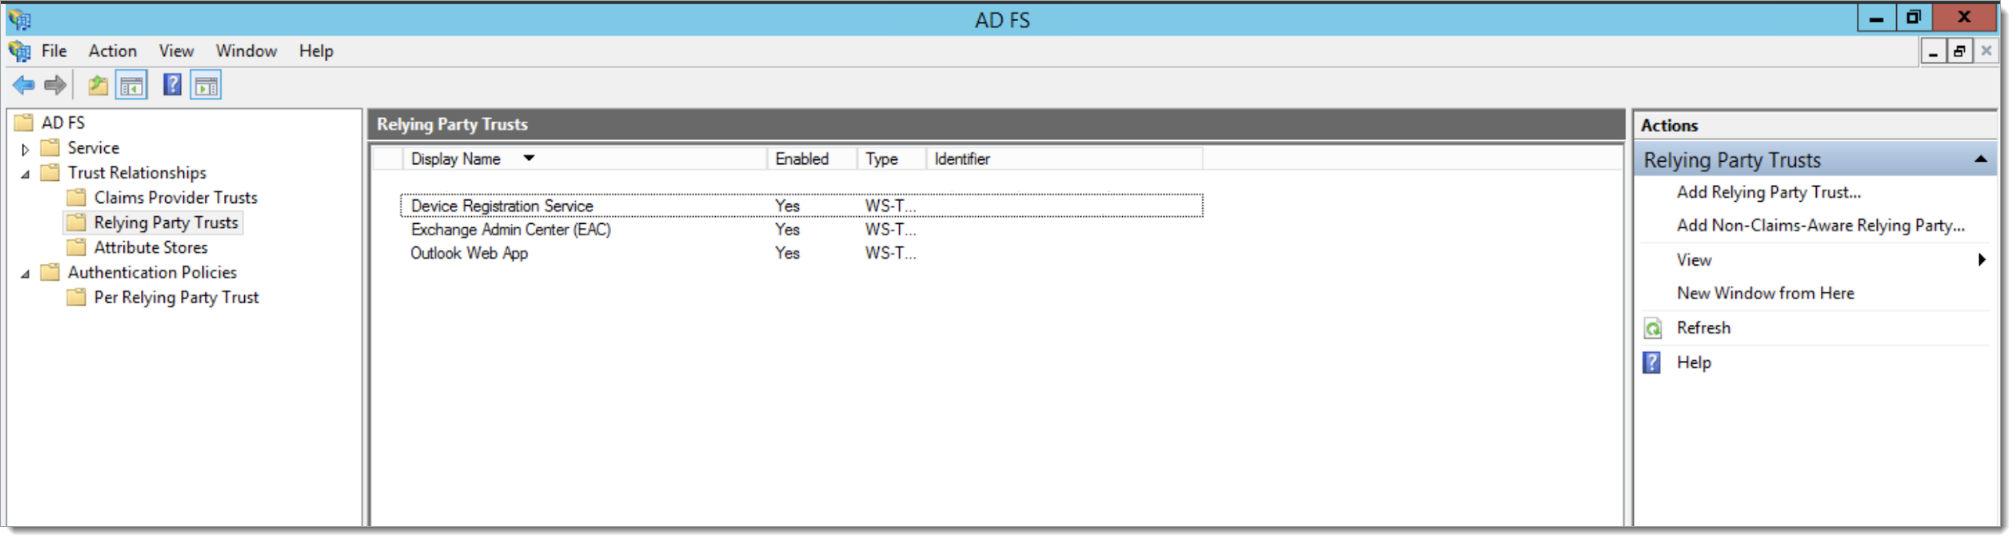
Create rules for OWA:
Add-ADFSRelyingPartyTrust -Name 'Outlook Web App' -Enabled $true -WSFedEndpoint $ OwaUrl -Identifier $ OwaUrl -IssuanceTransformRules $IssuanceTransformRules -IssuanceAuthorizationRules $IssuanceAuthRules
Create rules for ECP:
Add-ADFSRelyingPartyTrust -Name Exchange Admin Center' -Enabled $true -WSFedEndpoint $ EcpUrl -Identifier $ EcpUrl -IssuanceTransformRules $IssuanceTransformRules -IssuanceAuthorizationRules $IssuanceAuthRules
Get the fingerprint of the certificate used to sign tokens in AD FS; you need this to configure Exchange:
Get-AdfsCertificate -CertificateType "Token-Signing"
Configure Exchange as a Service Provider (SP)
Open the Exchange Management Shell.
Populate the variable for the OWA and ECP URLs:
$OwaUrl = ‘https://example.com/owa/’
$EcpUrl = ‘https://example.com/ecp/’
Configure the ADFS trust URL. Note that if you change the default endpoint from ‘adfs/ls’ you need to change it here as well:
$ADFS = ‘https://example.com/adfs/ls’
The ADFS certificate used to sign the tokens obtained in step 8 of the AD FS section in this document:
$certificate = ‘thefingerprint’
Setup the array of URLs that are going to be subject to AD FS authentication:
$urls = @($OwaUrl, EcpUrl)
Apply the configuration to your Exchange organisation:
Set-OrganizationConfig -AdfsIssuer $ADFS -AdfsAudienceUris $urls -AdfsSignCertificateThumbprint $certificate
Configure the Exchange ECP directory to use AD FS for authentication:
Set-EcpVirtualDirectory -AdfsAuthentication $true -BasicAuthentication $false -DigestAuthentication $false -FormsAuthentication $false -WindowsAuthentication $false
Configure the Exchange OWA directory to use AD FS for authentication:
Set-OwaVirtualDirectory -AdfsAuthentication $true -BasicAuthentication $false -DigestAuthentication $false -FormsAuthentication $false -WindowsAuthentication $false -OAuthAuthentication $false
Configure AD FS to use Acceptto Multi-Factor Authentication
Open the AD FS management console.
Navigate to the Authentication Policies > Multi-Factor Authentication and click on Edit.
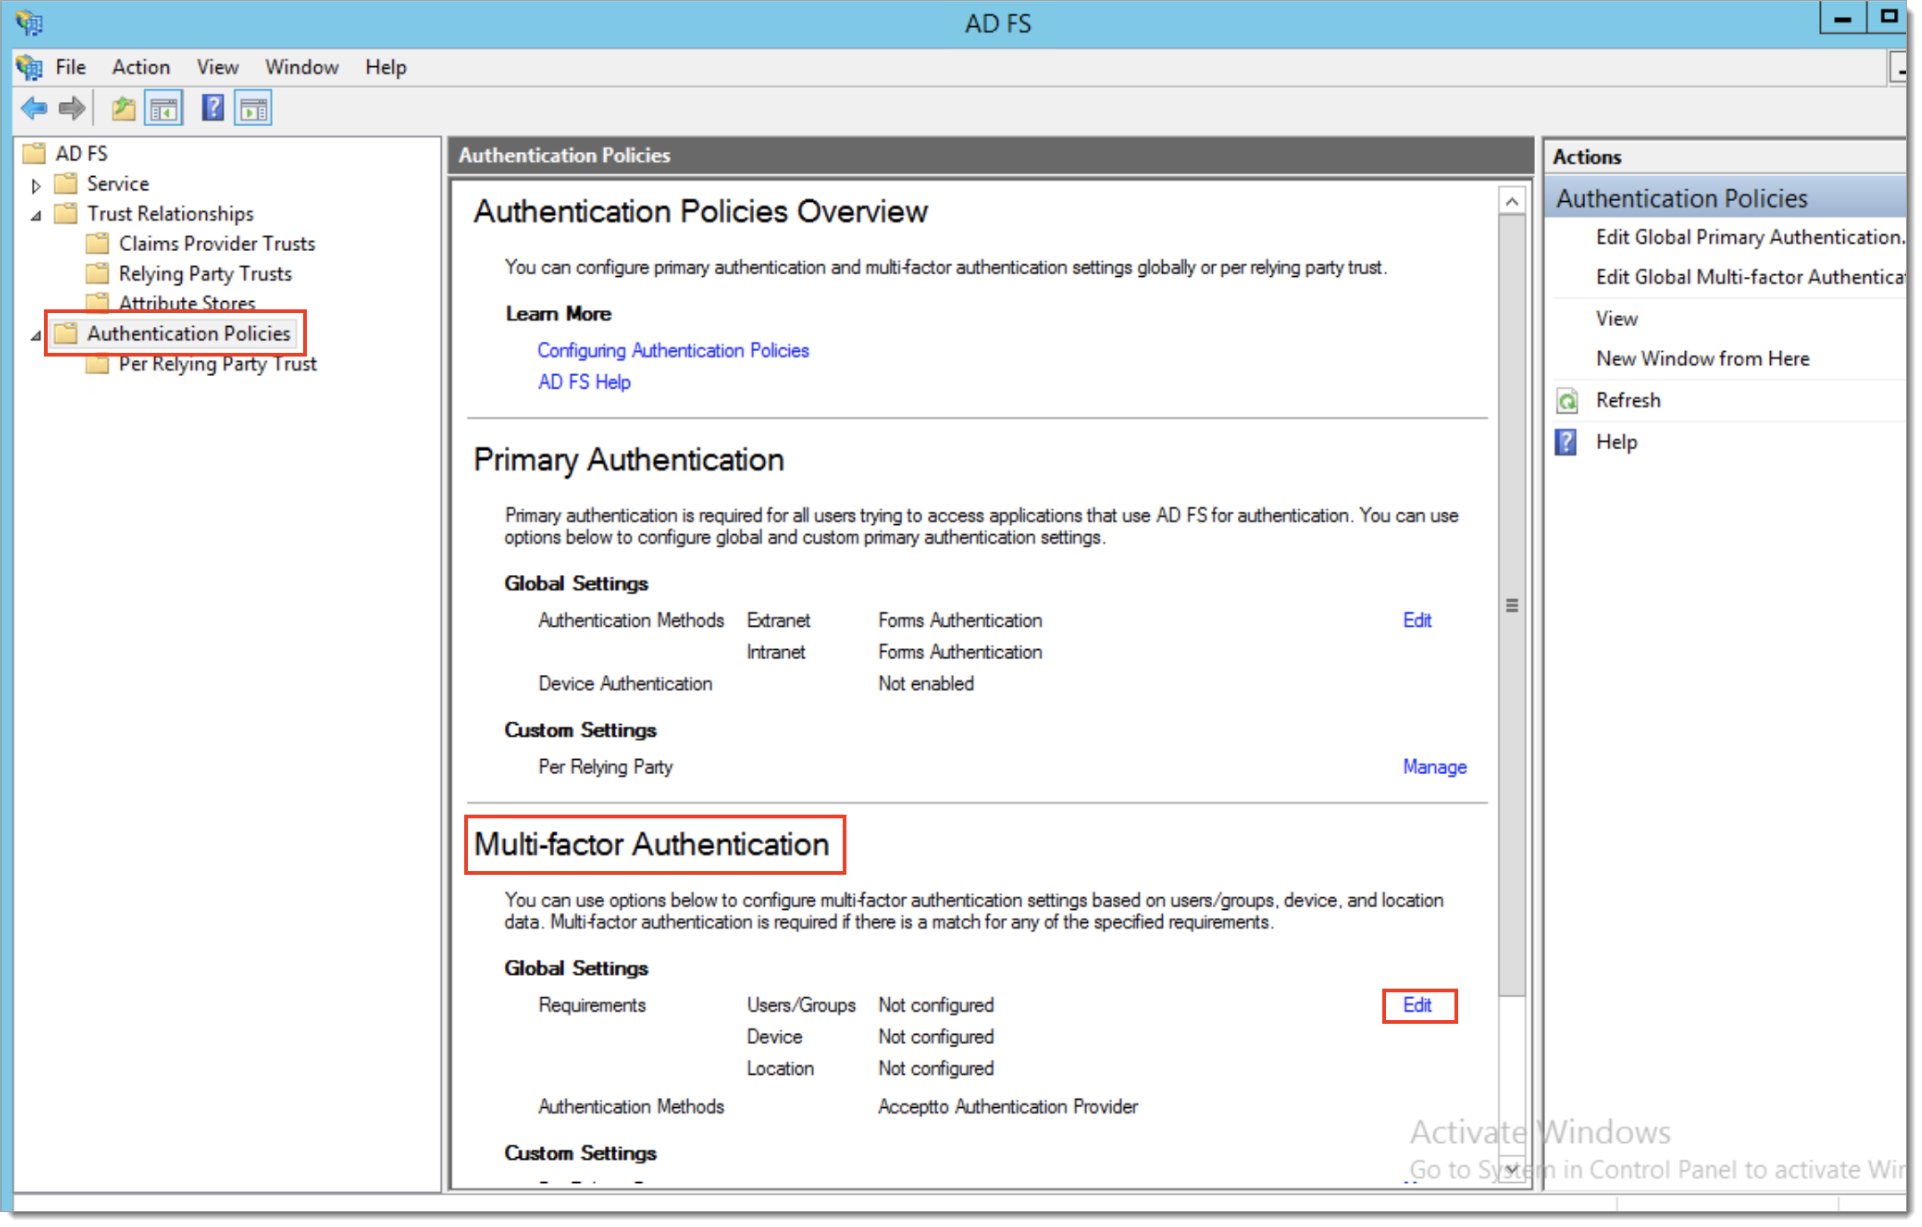
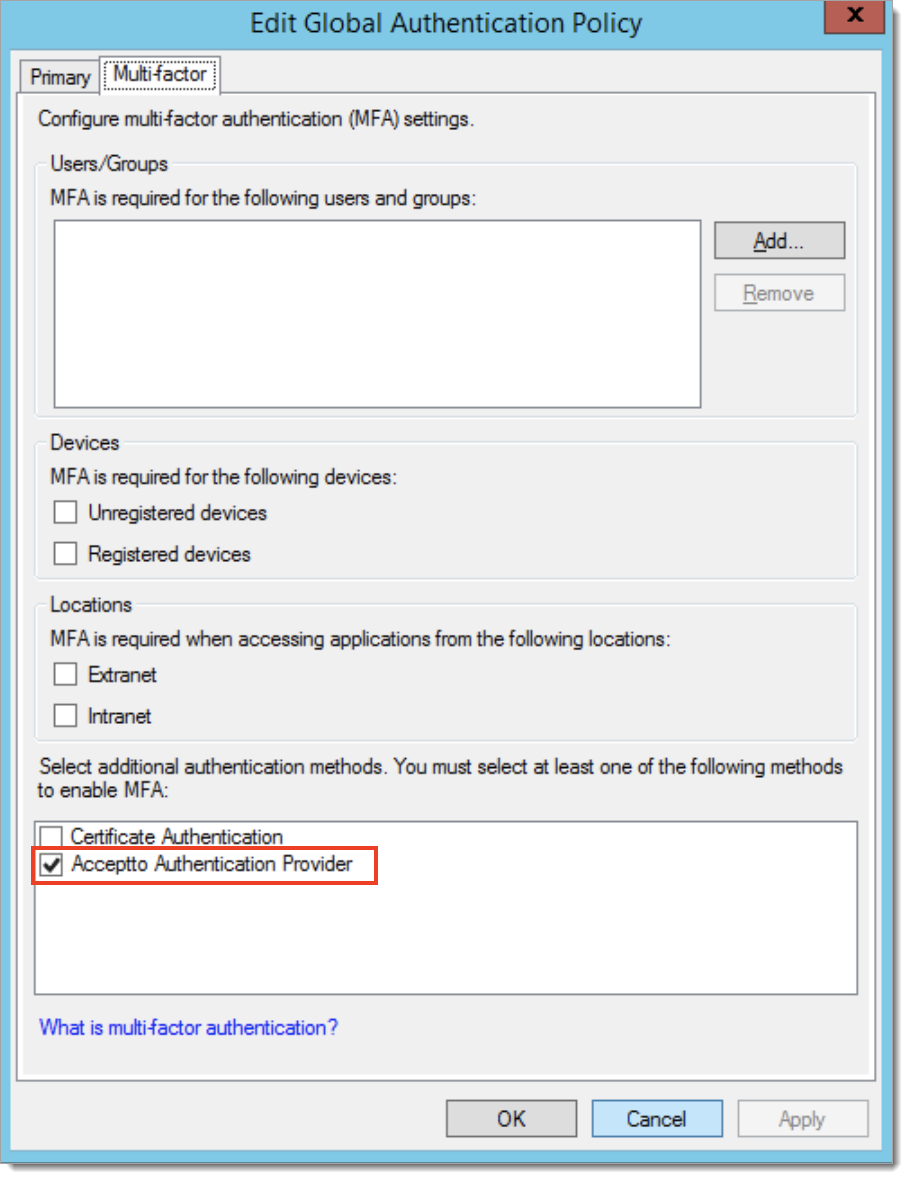
The Multi-Factor Authentication configuration dialog appears, make sure that you have the Acceptto Authentication Provider. Optionally you may configure users and groups that you want to add to this policy.
Test your application integration
Open a web browser and access
https://example.com/owaThe browser redirects to your ADFS server, after typing in the Active Directory user and password, select continue. The It’sME mobile application will receive a push notification, approve the notification.
The Outlook Web Access page should open.
Open a web browser and access
https://example/ecpThe browser redirects to your ADFS server, after typing in the Active Directory user and password, select continue. The It’sME mobile application will receive a push notification, approve the notification.
The Exchange Administration Control Panel page should open.
If you receive a notification such as WrongAudienceUriOrBadSigningCert, check that the URLs entered in the variables OwaUrl and EcpUrl precisely match the addresses used to access your Exchange OWA and ECP webpages. See Configure Exchange as a Service Provider (SP) for more detail.
Support
If you have questions or need assistance, contact SecureAuth Support.
Sales
Want to learn more about our MFA solutions? Contact our Professional Services for a demo today.
Disclaimer
All product names, trademarks, and registered trademarks are the property of their respective owners.
All company, product, and service names used in this document are for identification purposes only. The use of these names, trademarks, and brands do not constitute an endorsement by the SecureAuth Corporation.
Outlook, Exchange, Microsoft, Windows, ‘Windows Server,’ and 'Active Directory' are either registered trademarks or trademarks of Microsoft and/or one or more of its subsidiaries in the United States and/or other countries.