CyberArk Password Vault and AIM integration
This guide helps you connect a CyberArk Password Vault Server and CyberArk Application Identity Manager (AIM) credential provider with SecureAuth® Identity Platform. It lets the Identity Platform automatically fill in service account passwords from the CyberArk Password Vault, without storing them. You need to integrate AIM with the CyberArk Password Vault, so you can get the password from the Password Vault server.
AIM gets the service account password for CyberArk Vault when a user authenticates to a data store (like Active Directory). With this application configuration, it can manage password resets, unlock accounts, device self-enrollment, and self-provisioning without independent of help desk.
Prerequisites
Identity Platform 19.07 or later
Have an integrated data store in the Identity Platform
CyberArk Password Vault Server 9.2 or later
CyberArk AIM version 9.5 or later, installed on the Identity Platform
CyberArk AIM configuration
Notice
For the CyberArk Credential Provider installation instructions, see the CyberArk Credential Provider and Application Server Credential Provider Implementation Guide
Here's a quick outline of of configurations you will need to make in the CyberArk Password Vault Web Access admin console:
Applications: Add application and define application ID
Log in to the Password Vault Web Access (PVWA) Admin Console with permissions to manage applications. For example, Manage Users authorization.
On the Applications page, click Add Application.
Enter the following configurations. Enter the unique Name of this application – SecureAuth-IdP – to be used as the application identifier (appid).
Name
Enter unique name of this application. This will be used as the application identifier (appid).
For example, SecureAuth-IdP
Description
Descriptive information about this application.
Business owner
Enter the contact information for the owner of this application.
Location
From the list, specify the location of this application in the Vault hiearchy.
Note: If you don't choose a Location, it adds the application in the Location of the user who creates this application.

Click Add.
Next, you will need to define the authentication details.
On the Authentication tab, select the check box for Allow extended authentication restrictions.
This allows an unlimited number of machines and Windows domain OS users on a single application.
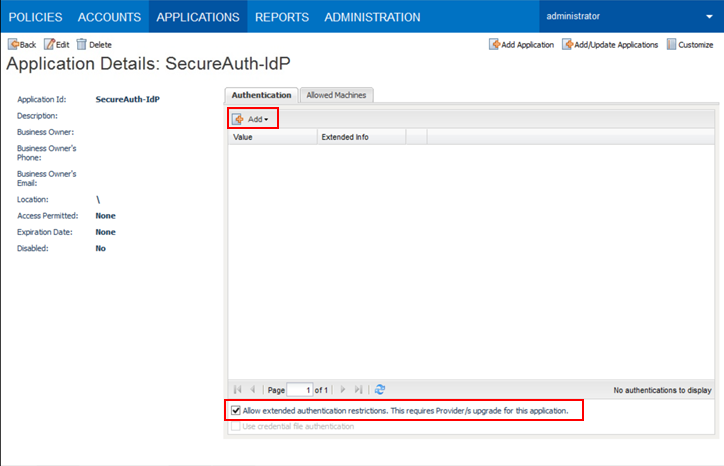
Click Add. Choose characteristics from the list to define.
These details are specific information about the application. The Credential Provider will use them to check the application's password.
Tip
To add more security, use the IP address of the SecureAuth IdP appliance that has the AIM Credential Provider installed.
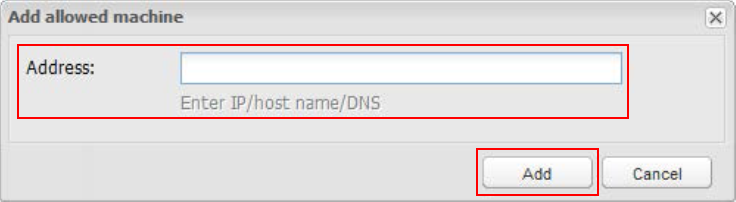
Select the Allowed Machines tab. Provide information for the Credential Provider.
This is to make sure that only applications on specified machines can access passwords.
Click Add.
The Add allowed machine window appears.
Enter the Address (IP / host name / DNS) of the SecureAuth IdP appliance on which AIM is installed.
Click Add.
The IP address appears on the Allowed Machines tab.
Policies: Provision accounts and set permissions to access the Password Safe
In this section you will need to provision accounts and then set permissions to access the Password Safe.
Provision accounts
The application needs access to specific accounts. These accounts can be existing or new ones provisioned in the CyberArk Vault. The access is necessary for the application to effectively carry out its tasks.
Make sure this user account has authorization in the Password Safe to Add accounts.
To provision privileged accounts required by the applications, use one of two methods in the Password Safe.
Manually – Add each account and specify all account details
Automatically – Use the Password Upload feature to add multiple accounts
Notice
Refer to CyberArk Privileged Account Security Implementation Guide for more information about adding and managing privileged accounts
Set permissions to access the Password Safe
Once privileged accounts are managed by CyberArk Vault, set up access to the Safes for the application and CyberArk Application Password Providers serving the application.
You will need to add the Credential Provider and application users as members of Password Safes. You can do this in one of two ways:
Manually add them on the Safes tab
Use a .CSV file that includes the Safe names to add multiple applications
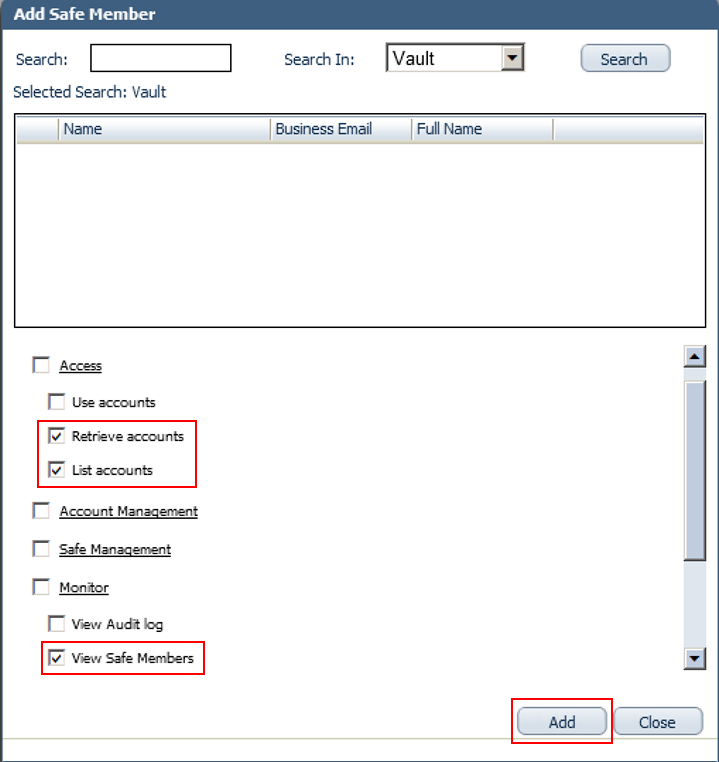
Add the Provider user as a Safe Member with authorization to:
Retrieve accounts
List accounts
View Safe Members
Notice
To install multiple Providers in this integration, create a group for the Providers. Then, add that group to the Safe with authorization for the options listed in the previous step.
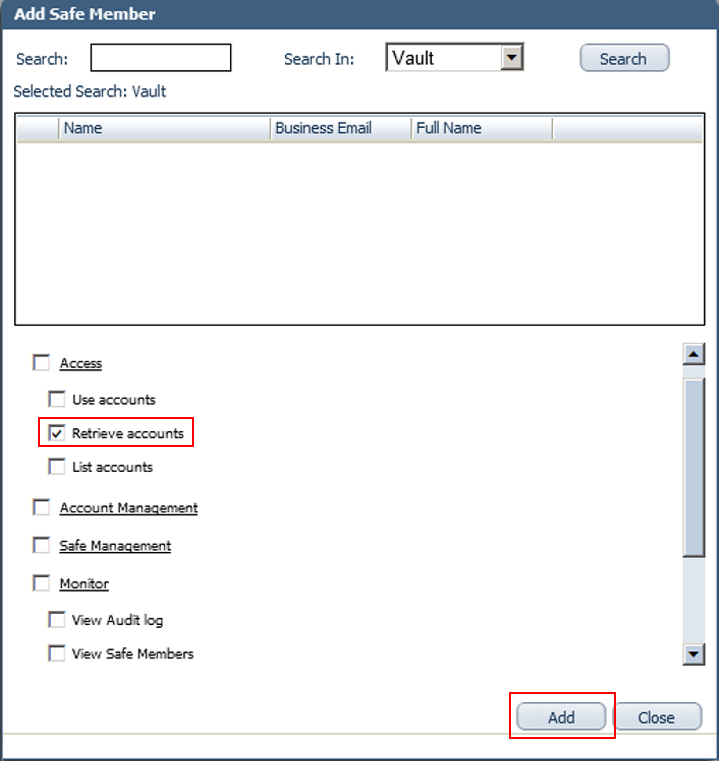
Add the application (for example, SecureAuth-IdP) as a Safe Member with authorization to Retrieve accounts.
If the environment is configured for dual control:
In PIM-PSM environments (v7.2 and earlier). If the Safe needs confirmation from authorized users before retrieving passwords, use the Access Safe without Confirmation setting. This allows the Provider user and the application to access the Safe without confirmation.
In Privileged Account Security solutions (v8.0 and higher), the Provider can access the Safe without confirmation, so there's no need to set permission for Access Safe without Confirmation.
If you configure Safe for object level access, make sure both the Provider user and the application have access to the password(s) to retrieve.
Notice
Refer to CyberArk Privileged Account Security Implementation Guide for more information about configuring Safe Members
Identity Platform configuration
In this section, you'll configure the data store connection settings to use CyberArk Vault for credentials. Most data store connections in the Identity Platform support the CyberArk Vault connection. Supported data stores include Active Directory, AD LDS, ASP.NET, LDAP, eDirectory, Oracle DB, and SQL Server.
On the left side of the Identity Platform page, click Data Stores.
Add or edit a data store.
To add a data store, click Add a Data Store.
To update an existing data store, from the Actions menu, click View Summary.
In the data store settings, go to the Connection Settings > Credentials section.
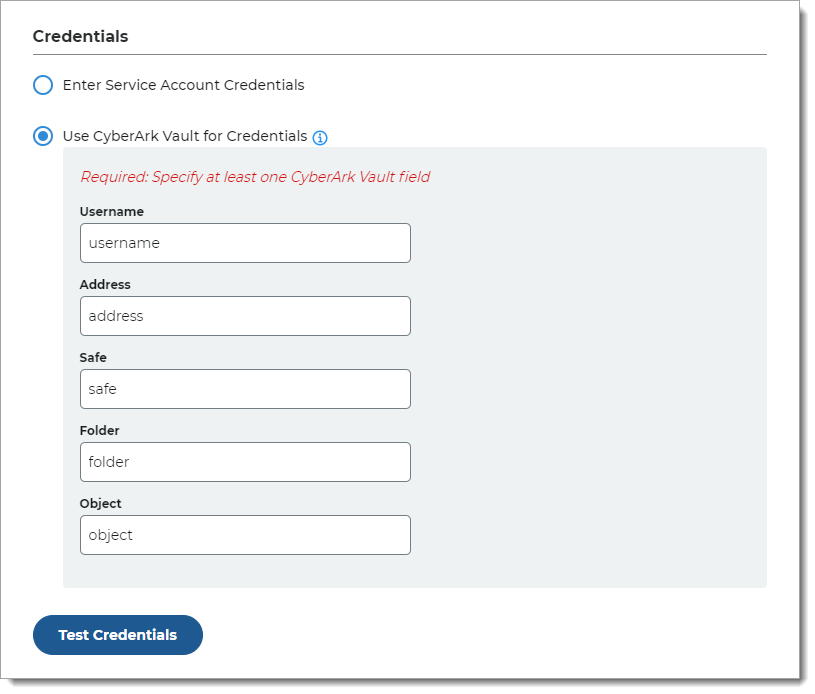
Choose Use CyberArk Vault for Credentials and provide the service account log in credentials.
Use CyberArk Vault for Credentials
With this option, enter at least one field for the service account login:
Username – User name of machine to be scanned by CyberArk Application Identity Manger (AIM). This information appears on the Account Details page of the CyberArk Password Vault Web Access (PVWA) Admin Console
Address – Address of machine to be scanned by AIM
Safe – Name of Access Control Safe where credentials are stored
Folder – Name of folder where account resides (by default, it its the root folder)
Object – Unique identifier Object name for the account
Test the data store connection by clicking Test Credentials.
Save your changes.