Multi-factor app enrollment QR code configuration
Use this guide to create an app enrollment page with a QR code workflow for end users to connect to their profile in the following ways to enroll and provision any of the following:
SecureAuth Passcode app to receive one-time passcodes (OTPs) on their desktop
SecureAuth Authenticate app to receive one-time passcodes (OTPs) on their mobile device
SecureAuth Authenticate app to receive time-based one-time passcodes (OATH TOTPs), Push Notification one-time passcodes (OTPs), Push-to-Accept, and Symbol-to-Accept login requests on their mobile device
Once provisioned to use SecureAuth Passcode and SecureAuth Authenticate, the passcode and login requests from the app is used to validate the end user attempting to log in to a protected resource.
For supported versions of mobile apps, OTP clients, desktop browsers, and paired smartwatches, see the SecureAuth compatibility guide.
Prerequisites
SecureAuth® Identity Platform (formerly SecureAuth IdP) 19.07 or later
Identity Platform realm or integrated application with the following tabs configured:
Overview
Data / Directory integrations
Workflow
Multi-Factor Methods
Note
You can use the existing SecureAuth998 realm, which by default is configured for Multi-Factor App Enrollment (URL) and modify it for QR code provisioning.
Or, create a new realm for QR code provisioning, and leave the SecureAuth998 for URL provisioning, which provides both URL and QR code provisioning options to end users.
If you want to use mobile redirect to SecureAuth998 realm, do not use the Mobile Enrollment and Validation option as the Integration Method on the Workflow tab.
Identity Platform configuration
Go to the Data tab.
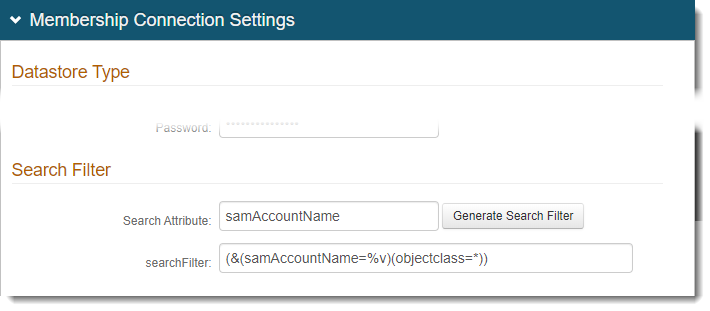
In the Membership Connection Settings section, set the following:
Note
This step is only for LDAP directories.
To use a different directory (SQL, ASPNET, Oracle, and so on), then the stored procedures for these fields must be mapped to Properties in the next step.
Search Attribute
Set to the directory field. For example, sAMAccountName.
Note
The Search Attribute directory field must be the same in the Multi-Factor App Enrollment realm and all realms using Time-based Passcodes for Multi-Factor Authentication.
searchFilter
This field is populated when you click the Generate Search Filter.
To use UserPrincipalName (UPN) in the searchFilter, include samAccountName with UserPrincipalName.
For example: (&((samAccountName=%v)(UserPrincipalName=%v)(objectclass=*)))
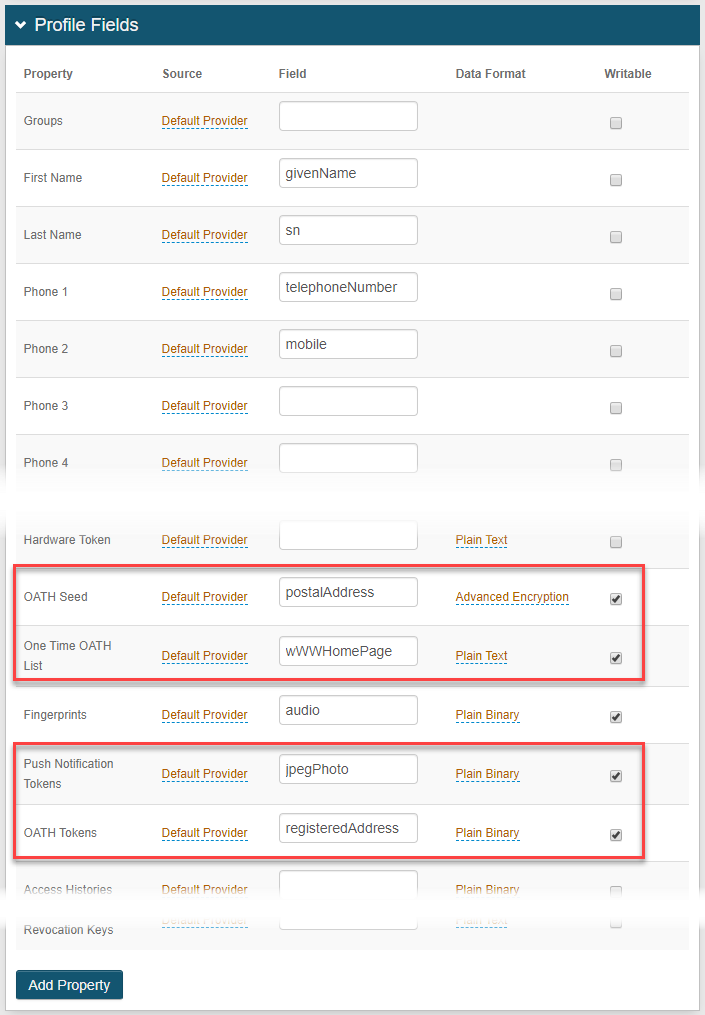
In the Profile Fields section, map the following Properties to data store fields and select the Writable check box:
OATH Seed
This property is only required if OATH Seed (Single) is selected in the Multi-Factor App Enrollment section on the Post Authentication tab.
Note
Map this property to a directory field that meets the following requirements:
DirectoryString (syntax: 2.5.5.12)
Upper Range of at least 4096
Supports Advanced Encryption, as selected from the Data Format options
For Active Directory data stores, you can use the postalAddress field.
One Time OATH List
The One Time OATH List temporarily stores a Time-based Passcode in the directory until the configured expiration to ensure that the OTP is used only once throughout its validity.
Note
To use this feature, map this property to any directory field that is a DirectoryString.
For Active Directory data stores, you can use the wWWHomePage field (among many others).
Push Notification Tokens
This property is required to enable the use of Push Notifications or Push-to-Accept / Symbol-to-Accept requests.
This property can be stored as plain binary or in JSON format, and has distinct requirements for the LDAP directory attribute mapped to the property based on the Data Format selection.
Note
For plain binary, map this property to a directory field containing the Push Notification Token and meets the following requirements:
Length: 4096 minimum
Data Type: Octet string (bytes)
Multi-valued
For JSON, map this property to a directory field containing the Push Notification Token and meets the following requirements:
Length: 4096 minimum
Data Type: DirectoryString
Multi-valued
For typical Active Directory integrations, the Data Format is plain binary and uses the jpegPhoto field.
OATH Tokens
This property is required if OATH Token (Multi) is selected in the Multi-Factor App Enrollment section on the Post Authentication tab.
This property can be stored as plain binary, in JSON, or JSON encrypted format, and has distinct requirements for the LDAP directory attribute mapped to the property based on the Data Format selection.
Note
For plain binary, map this property to a directory field that meets the following requirements:
OctetString (syntax: 2.5.5.10)
Upper Range of at least 4096
Multi-valued
For JSON or JSON encrypted, map this property to a directory field that meets the following requirements:
DirectoryString (syntax: 2.5.5.12)
Upper Range of at least 4096
Multi-valued
For typical Active Directory integrations, the Data Format is plain binary and uses the registeredAddress field.
Note
If the DirectoryString data type is not present, you can use UnicodeString, as long as it meets other requirements for the attribute.
For SQL, ASP.net, and Oracle data stores, only the plain binary Data Format is supported for OATH Tokens and Push Notification Tokens properties (configured on the Data tab). For ODBC data stores, these two properties are not supported.
For a full list of data mapping requirements, see Active Directory attributes mapping to profile properties reference.
Save your changes.
Go to the Post Authentication tab.
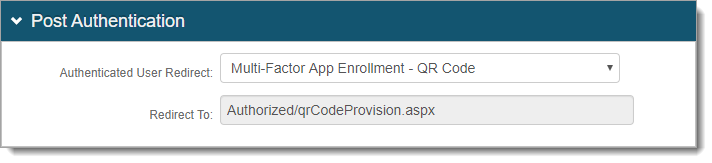
In the Post Authentication section, set the following:
Authenticated User Redirect
Set to Multi-Factor App Enrollment - QR Code.
Redirect To
This field is auto-populated with an URL, which appends to the domain name and realm number in the address bar. For example, Authorized/OATHProvision.aspx.
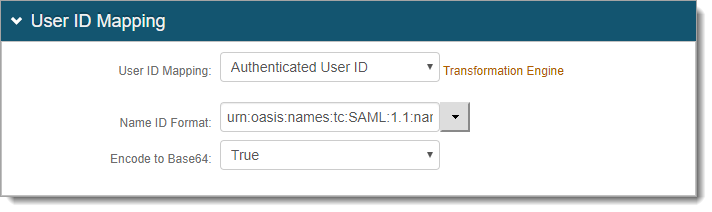
In the User ID Mapping section, set the following:
User ID Mapping
Set to Authenticated User ID.
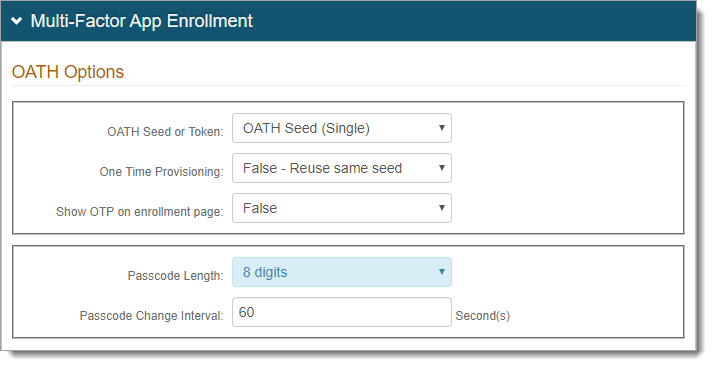
In the Multi-Factor App Enrollment section, in the OATH Options subsection, choose which provisioning method you want to use:
Select OATH Seed (Single) to provision user devices with a single seed generating time-based passcodes / push notifications across multiple devices,
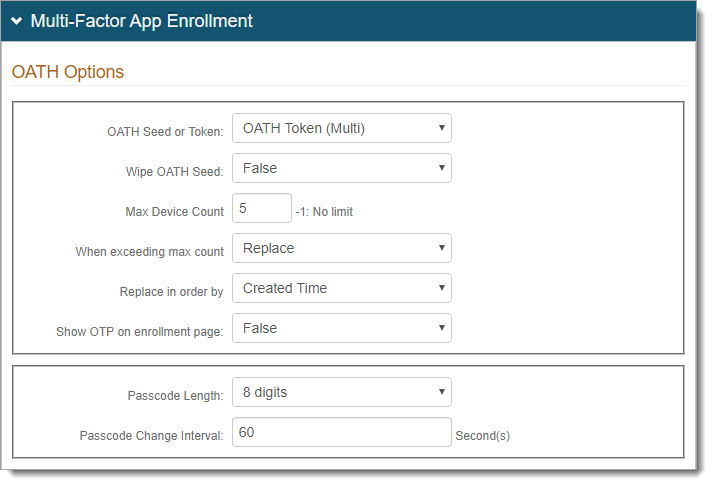
Select OATH Token (Multi) to provision user devices with multiple tokens on a single device; each token containing a distinct OATH seed.
If you selected OATH Seed (Single) set the following:
Note
It is recommended to use the OATH Token (Multi) option instead of OATH Seed.
SecureAuth has deprecated OATH Seeds in favor of OATH Tokens, however this option still available. The seed is converted to a token and there are some prerequisites for this to happen. Both OATH Seed and OATH Tokens must be mapped in the Directory Property mapping. For more information, see How to convert an OATH Seed to an OATH Token.
One Time Provisioning
Select one of these options:
False - Reuse same seed – Use one seed with multiple devices. For example, each newly provisioned device reuses the same seed
True - Generate new seed – Restricts the use of time-based passcodes to one device at a time. For example, each newly provisioned device gets a new seed that disables the use of the old seed
Show OTP on enrollment page
Indicate whether to show the OTP on the app enrollment page.
Passcode length
Set the number of digits in a time-based passcode (6 or 8 digits).
Passcode Change Interval
Set the time in seconds for which a time-based passcode is valid.
If you selected OATH Token (Multi) set the following:
Wipe OATH Seed
Select one of these options:
False – Continue use of the already-provisoned deviceds (pre-SecureAuth IdP 8.1)
True – Delete the existing OATH seed and use only an OATH token
Max Device Count
Set the number of accounts / OATH tokens allowed per user profile.
Set to -1 if there is no limit.
When exceeding max count
When a max device count is specified, select one of the following options when max count is reached:
Replace – Allow replacement of accounts / OATH tokens
Don't replace – Requires manual removal of accounts
Replace in order by
To replace an account / OATH token due to exceeding maximum device count, choose the replacement method:
Created Time – Replace the oldest account / OATH token with the newest one
Last Access Time – Replace the least frequently used account / OATH token with the newest one
Show OTP on enrollment page
Indicate whether to show the OTP on the app enrollment page.
Passcode length
Set the number of digits in a time-based passcode (6 or 8 digits).
Passcode Change Interval
Set the time in seconds for which a time-based passcode is valid.
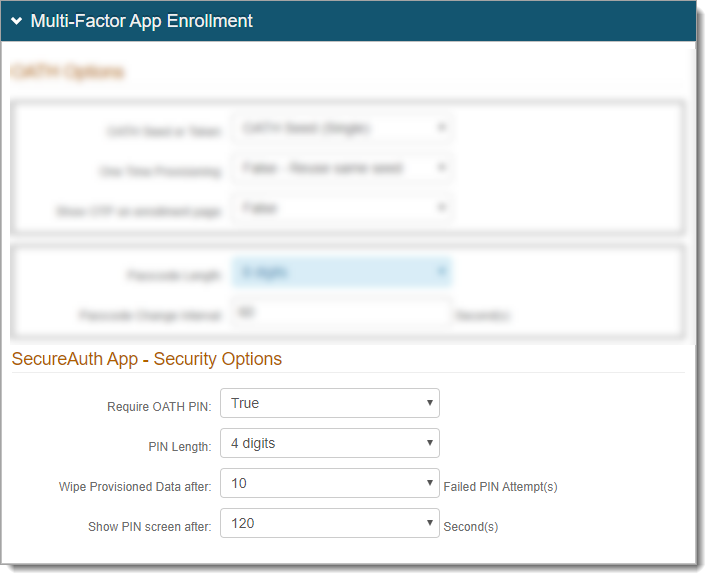
In the SecureAuth App - Security Options subsection, set the following:
Require OATH PIN
Note
This feature is applicable only on SecureAuth IdP 9.3 and later AND SecureAuth Authenticate app version 5.3 and later for iOS and Android.
Select one of these options:
True – To view the time-based one-time passcode (TOTP) on the Authenticate app, require users to provide a PIN or biometric ID (fingerpint)
False – PIN is not required to view the TOTP on the Authenticate app
PIN Length
Set the number of digits in the PIN (4, 6, 8, or 10 digits).
Wipe Provisioned Data after
Set the number of failed PIN attempts allowed before the application data is removed and requires re-enrollment.
Show PIN screen after
Set the time in seconds allowed for app to remain idle before the PIN is required (30, 60, 90, 120, or 180 seconds).
Save your changes.
Optional: In the Forms Auth / SSO Token section, to configure the token and cookie properties for this realm, click the View and Configure FormsAuth keys/SSO token link.
For more information about configuring cookie or token settings, see Configure token or cookie settings.

Change time length availability of QR code scan
By default, the availability of the QR code scan is set to 10 minutes. To change this setting, do the following:
Edit the web.config file. Go to D:\SecureAuth\SecureAuth# on the appliance (on-prem and hybrid).
To change this setting on the Identity Platform cloud instance, contact SecureAuth Support.
Change the following entry in the web.config file:
<add key="QRDeviceEnrollmentValidityThreshold" value="10" />Note
It is recommended to set this to the same value as the session timeout.
Save the file.