Login for Mac v20.09.02 configuration guide
Updated January 12, 2021
Login for Mac, available in SecureAuth IdP v9.2+ and the SecureAuth® Identity Platform v19.07+, adds SecureAuth’s multi-factor authentication to the Mac desktop and remote server login experience.
Release highlights
An enhancement was added so that push-to-accept works with Login for Mac version 20.09.02 in the SecureAuth Identity Platform version 20.06+ cloud model.
Read on to learn more about the new feature in Login for Mac version 20.09.01.
Integrate a pre-login questionnaire
You can integrate a questionnaire that your organization has created and then configure Login for Mac so that end users are redirected to the questionnaire before logging in. For example, organizations might create a COVID-19 health questionnaire and then integrate it so end users must fill it out before logging into Login for Mac. End users' answers can help to perform additional risk analysis.
This feature is supported in Identity Platform version 19.07 or later.
Customers create a questionnaire, which can be any web application that can run on a supported web browser.
See the Release notes to learn more.
Disclaimers
The Identity Platform does not currently support duplicate usernames in multiple data stores. Login for Mac will not authenticate end users if their usernames are duplicated across multiple data stores.
Customers who want to use the pre-login questionnaire must create the questionnaire themselves. SecureAuth does not host this document; rather, SecureAuth enables customers to integrate their own questionnaire with the Identity Platform version 19.07+ and Login for Mac version 20.09.01+.
Login for Mac supports the samAccountName login name format if using Microsoft Active Directory; in this use case, userPrincipalName (UPN) is not supported.
UPN is supported at login if running Login for Mac with a non-AD profile store containing OATHSeed/OATHToken/PNToken. In this use case, samAccountName is not supported, so the multi-factor authentication lookup will fail and the user will be unable to use other multi-factor authentication methods.
Prerequisites
Administrator: Setup requirements
If you want to set up biometric authentication for your end users to authenticate by using face (iOS) or fingerprint recognition, the following are required:
SecureAuth® Identity Platform v19.07 or later
2019 theme (see Setting the default theme for new realms)
Biometric identification configuration mode is enabled. (Authentication > Multi-Factor Methods > Authentication Apps > Configuration mode > Biometric identification > set check box)
Download and install the SecureAuth Authenticate app:
iOS – https://itunes.apple.com/us/app/secureauth-otp/id615536686
Android – https://play.google.com/store/apps/details?id=secureauth.android.token&hl=en_US
For more details, see the Prerequisites topic in the SecureAuth Authenticate mobile app document.
When upgrading to the Identity Platform v19.07 or later, end users who already use the SecureAuth Authenticate app must reconnect their accounts to add the ability to accept biometric push notifications to use face (iOS) or fingerprint recognition through the mobile app.
If you will customize the Login for Mac experience by setting or changing configuration options, see the Login for Mac configuration options section to download a PDF with all available options.
If you use a load balancer:
When you use Push-to-Accept, Symbol-to-Accept, or Link-to-Accept MFA methods with Login for Mac, you must enable session persistence ("sticky sessions") on the load balancer to maintain state with the Identity Platform. Login for Mac supports cookie-based persistence only.
Setup requirements
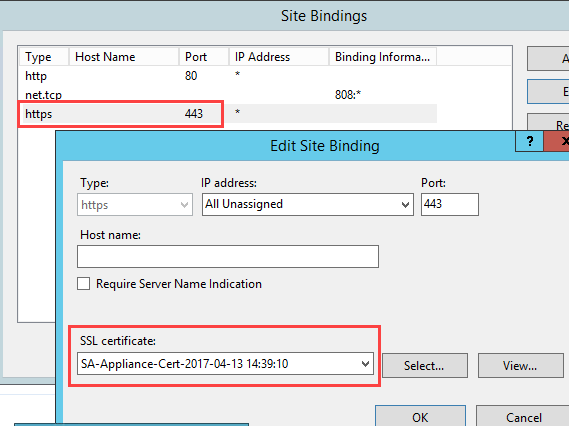
Ensure SecureAuth IdP v9.2 or later is running and is using a SHA2 or later third-party publicly trusted certificate bound to Microsoft Internet Information Services (IIS). For example, in the IIS Management Console's Default Web Site section, check the Site Bindings section to ensure the https/443 type and port settings have a valid and trusted SHA2 certificate selected in the SSL certificate field. The following example shows the SSL connection being terminated on the SecureAuth server.
Alternatively, you can also terminate the SSL connection on the load balancer, and then your publicly-trusted certificate will reside on the load balancer.
Note
Do not remove the SecureAuth certificates from the certificates console or the SecureAuth appliance will no longer function.
Create a new realm or access an existing realm on which more than one multi-factor authentication is required.
Note
Do not configure this realm for single sign-on.
Configure these SecureAuth IdP Web Admin tabs: Overview, Data, Workflow, Multi-Factor Methods, Post Authentication, and Logs.
Ensure target end user machines are running any of the following, minimum supported OS versions:
macOS 10.13: High Sierra (Lobo)
macOS 10.14: Mojave (Liberty)
macOS 10.15: Catalina
See SecureAuth compatibility guide for OS and SecureAuth Identity Platform version support information.
User account and Mac workstation requirements
The end user Active Directory profile must be accurately configured on the Mac so that the endpoint can retrieve the AD end user profile during the login process.
In an enterprise WiFi environment, before setting up Login for Mac on end user workstations, the system level policy must be configured to allow the Mac to connect to the enterprise WiFi. This setup lets Login for Mac obtain the OATH seed which is used to authenticate the end user.
If an end user is already using a YubiKey device for YubiKey multi-factor authentication on a SecureAuth IdP realm, the OATH seed and associated YubiKey device must be removed from the end user's account to prevent a conflict when the end user attempts to use a YubiKey device for HOTP authentication. (See the steps under "End user multi-factor authentication" in the YubiKey HOTP Device Provisioning and Multi-Factor Authentication Guide to remove the YubiKey device from the user account profile.)
Note
If an end user is disabled on Active Directory, the local account will not know the history of the AD account, and the user will not be able to log on the Mac.
End user account and Mac workstation requirements
Important
Before installing Login for Mac
Your local username and password on the Mac must be the same as your Active Directory username and password. If you are using a different local username than your Active Directory username, contact your IT department to synchronize the IDs.
If the IDs are synchronized, be sure you can log on the Mac before installing Login for Mac.
First-time usage requirements
End users can log in without second-factor authentication for the number of days set by the administrator. This allows end users to log in with a password only so they can set up their two-factor authentication methods before they must authenticate to access their device. After end users set up 2FA, the following is the authentication workflow.
Login for Mac requires end users to use one OATH-based method (i.e., TOTP, YubiKey), if at least one method is available to end users. If at least one OATH-based method is not available to end users, they can use any other available method, but offline login will not be available.
To meet this requirement, end users must use one of the following accounts provisioned with a SecureAuth IdP realm that enables their device to generate timed passcodes for multi-factor authentication:
SecureAuth Authenticate App on a phone or tablet or
YubiKey HOTP or TOTP security key. Refer to the YubiKey HOTP Device Provisioning and Multi-Factor Authentication Guide or the YubiKey OATH-TOTP Device Provisioning and Multi-Factor Authentication Guide to ensure all requirements are met. To ensure that supported YubiKey devices are used, see the "YubiKey" section of the SecureAuth compatibility guide.
Thereafter, end users can use Login for Mac to log in when working online and offline.
Additionally, consider the following requirements for end users:
If using face recognition, available for iOS mobile phones only, end users must complete the following:
Enable their iOS mobile phone Face Recognition setting
Download and set up the SecureAuth Authenticate App
Sites upgrading from SecureAuth v9.2 to the Identity Platform v19.07: End users who already use the Authenticate app and want to add the ability to accept biometric push notifications to use face (iOS) or fingerprint recognition must first reconnect the account for their mobile device.
If using fingerprint recognition, end users must complete the following:
Enable their iOS or Android mobile phone Fingerprint setting
Download and set up the SecureAuth Authenticate App
End users who already use the Authenticate app and want to add the ability to accept biometric push notifications to use face (iOS) or fingerprint recognition must first reconnect the account for their mobile device.
Classic Experience Web Admin configuration
Use the following sections to set up Login for Mac with SecureAuth IdP version 9.2 or 9.3.
If your team will set up and use Login for Mac with the cloud or hybrid model of SecureAuth Identity Platform version 19.07 or later, see SecureAuth Identity Platform configuration.
Data tab
Create a realm and configure a data store on the Data tab.
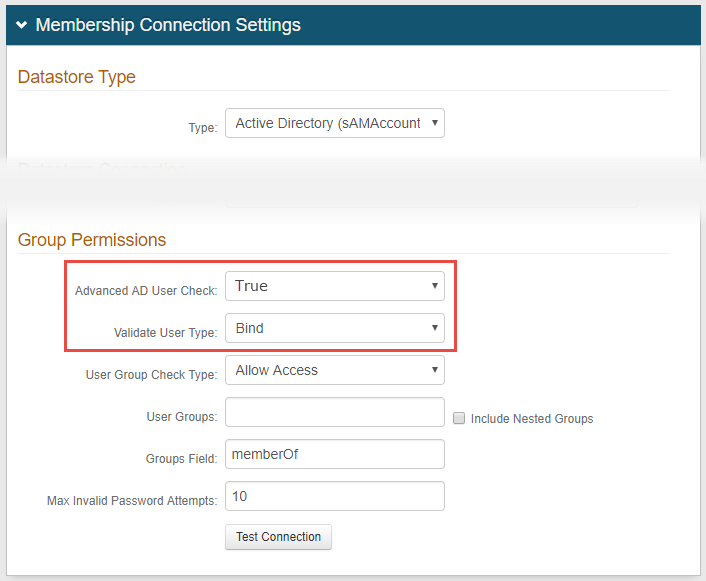
In the Membership Connections Settings section, under Group Permissions, select True from the Advanced AD User Check dropdown.
Select Bind from the Validate User Type dropdown.
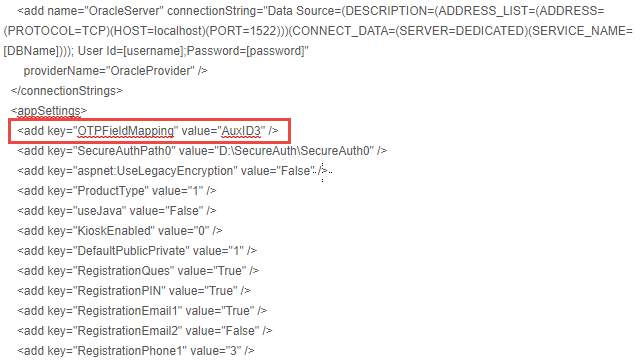
In the Profile Fields section, enter adminDescription in an unused Aux ID field—Aux ID 3 in this example—and make the field Writable.
You must specify an auxiliary ID (AUX ID) to communicate with the Identity Platform to validate one-time passcodes (OTPs) from email, phone calls, SMS, Helpdesk, and Notification Passcode.
If using a single OATH seed for end user multi-factor authentication (see sample Post Authentication page image), then map Fields to OATH Seed and OATH Tokens Properties, as shown in the Profile Fields image below.
Note
See image from Post Authentication page showing Single OATH Seed setting...
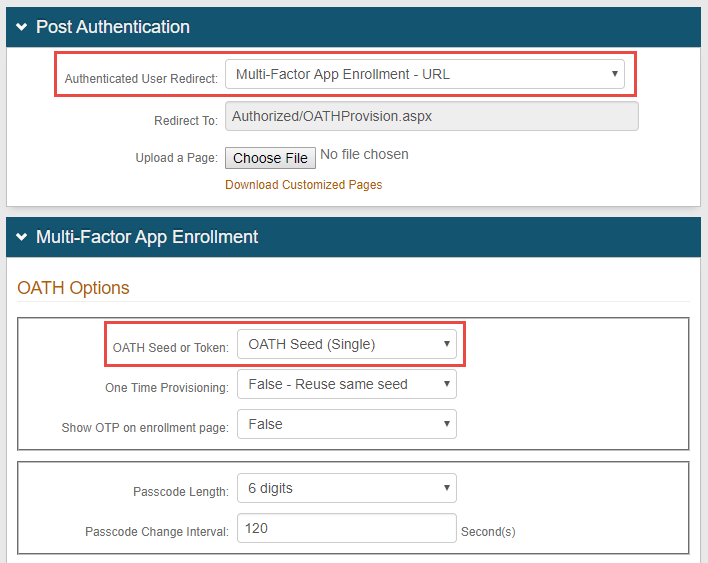
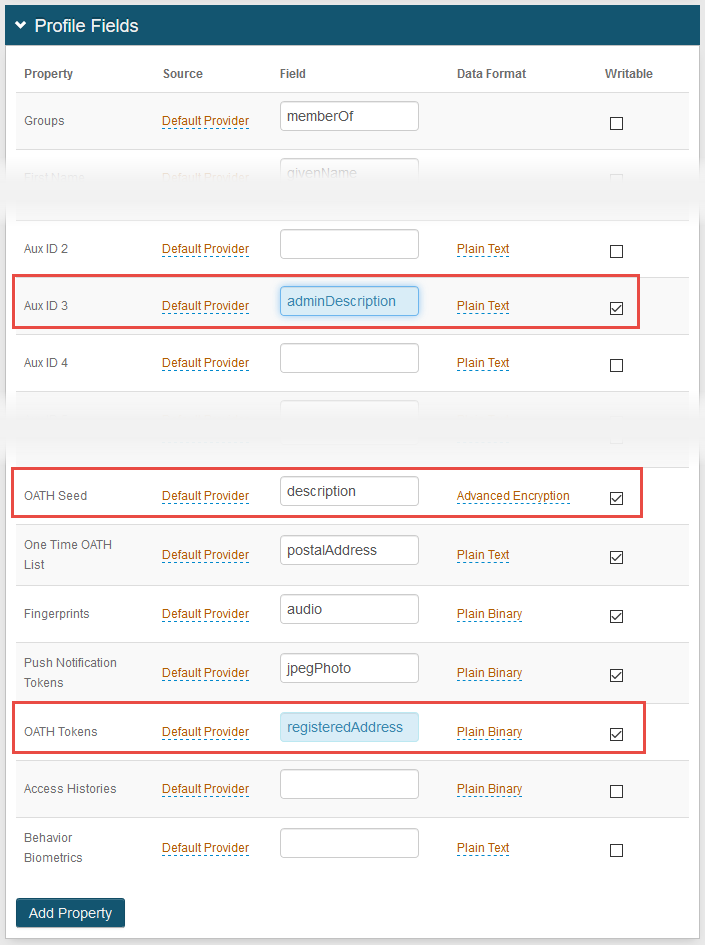
SecureAuth recommends setting OATH Tokens. If OATH Tokens is not set, users might receive a failure message when attempting to authenticate by using TOTP after their device wakes from sleep mode while online. The failure occurs because a second factor method is sent at different times between the device being connected to the internet and disconnected from the internet, which causes the timed passcodes to be out of sync.
Click Save.
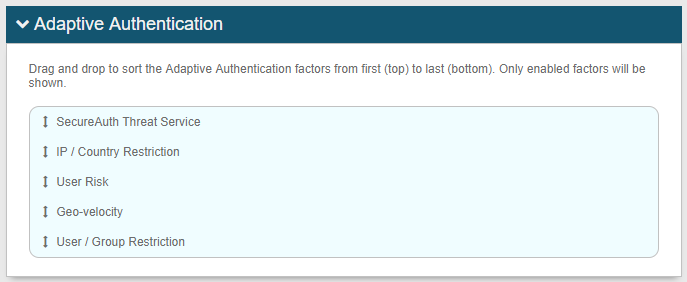
Optional: Adaptive Authentication tab
Use Adaptive Authentication to control the user login experience and to mitigate security risks.
The order of priority to handle user authentication login requests using Adaptive Authentication is as follows:
A. Threat Service
B. IP whitelist / blacklist
C. Geo-location (redirect option not available)
D. Geo-velocity (redirect option not available)
E. User / Group (redirect option not available)
Note
See Group Bypass configuration notes in the Login for Mac Installer configuration section for information about using Adaptive Authentication with the group bypass feature.
 |
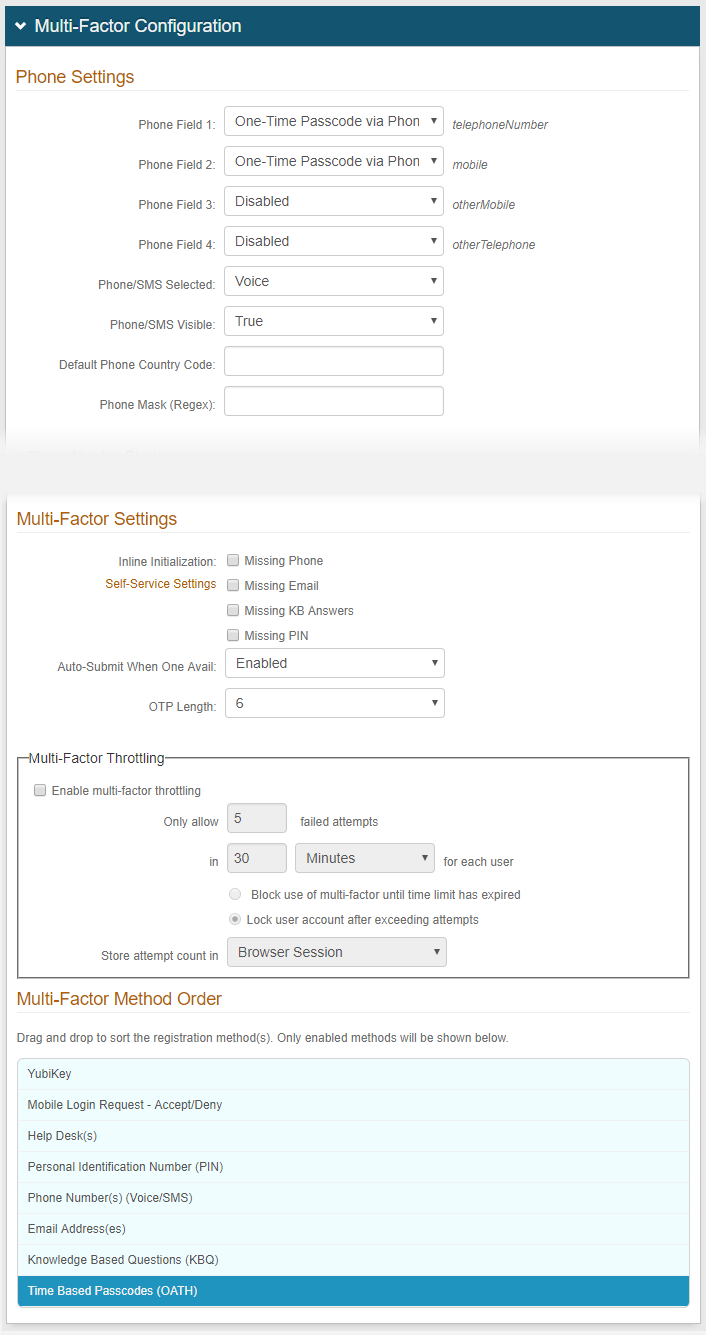
Multi-Factor Methods tab
In the Multi-Factor Configuration section, configure the multi-factor authentication methods you want enabled.
Click Save.
Optional: Security Questions setup
Set up Security Questions so users can authenticate by answering knowledge-based questions (KBQ). Security Questions gives users the option to log into devices without requiring a phone or token.
Contact SecureAuth Support for the Knowledge-based Authentication (KBA / KBQ) as 2-Factor Authentication Method Configuration Guide to set up knowledge-based questions for end users.
Optional: Integrate the pre-login questionnaire
After you create a questionnaire, you can integrate it with the Identity Platform and Login for Mac. End users will then see the questionnaire and provide answers prior to logging into Login for Mac
Integrate the pre-login questionnaire by using the Adaptive Authentication tab in a SecureAuth Identity Platform Classic Experience realm. In the following steps, the images show a fictitious company called Acme that has set up a COVID-19 form to check employee health.
Add or clone a realm in the SecureAuth Identity Platform Classic Experience.
In the Overview tab, change the realm description in the Details section and the page header in the Look and Feel section, then save your changes.
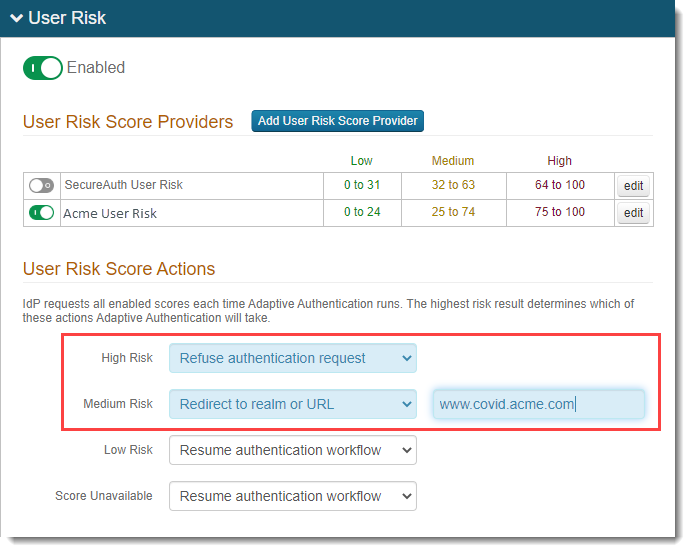
In the Adaptive Authentication tab, in the User Risk section, do the following:
Set the user risk to Enabled by moving the slider to green.
Add a risk provider by clicking the Add User Risk Score Provider button.
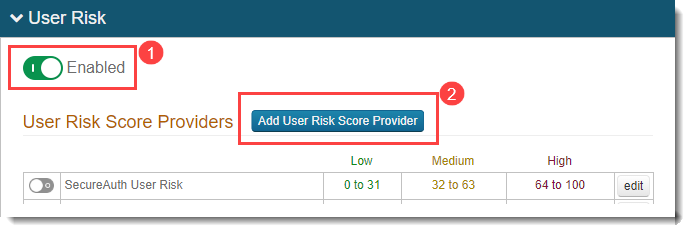
Add the risk score settings, then save your changes.
Disable other risk providers in the User Risk Score Providers table by moving the sliders to gray.
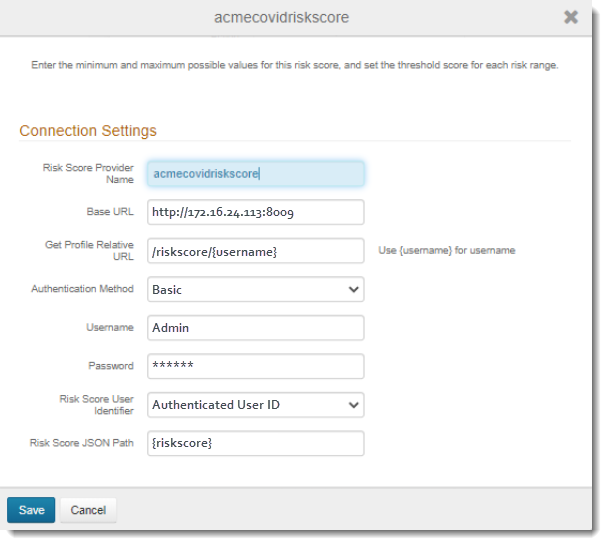
Edit the new risk provider by selecting the Edit (pencil) icon to the right of the name.
Specify weighting for each minimum, medium, high, and maximum event. The system uses the configured weighting to compute the end user’s risk score.
Adjust the risk score levels by moving the sliders or setting the threshold score for each range, as the red arrows show in the following image, then save your changes.
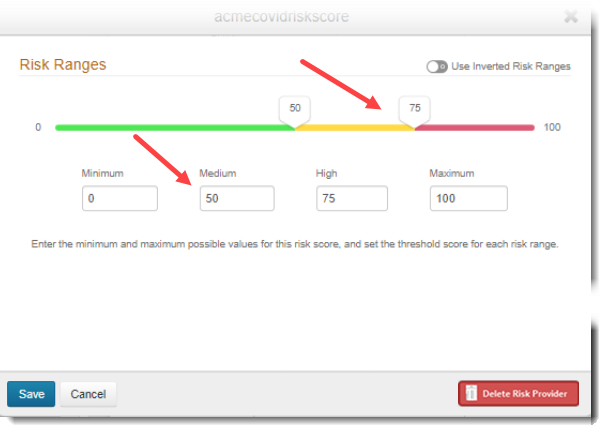
Set the user risk levels.
High Risk: Represents the highest level of risk. Set Refuse authentication request to keep end users with high risk levels from logging in. For example, if your questionnaire asks health-related questions and the end user's answers show that they are ill, the risk level will be high and the end user will not be allowed to log in.
Medium Risk: For a medium risk level, set Redirect to realm or URL, so end users with medium risk levels are redirected to the realm or URL with the questionnaire you have set up. End users will need to fill out the questionnaire, and based on their answers, can or cannot log in.
Low Risk: For a low risk level, set Resume authentication workflow so end users can bypass the questionnaire and log in.
Score Unavailable: If a risk score is not available, for example, the risk provider is unavailable to provide a score, set the appropriate action for end users.
To read detailed descriptions of each user risk score action, see Risk check actions. To read detailed descriptions about configuring user risk scores, see SecureAuth User Risk score provider configuration.
Save your changes.
You also must add two attributes in the config.json file, later in the pre-installation steps. See Optional: Enable redirect to questionnaire before logging into Login for Mac.
System Info tab
Open the web.config file, located at D:\SecureAuth\SecureAuth1 on the appliance, and decrypt the web.config file.
Add the following line under <appSettings>:
<add key="OTPFieldMapping" value="AuxID#" />In this example, AuxID3 is used because this Property was selected and configured on the Data tab in step 4. (Recall that you must specify an auxiliary ID (AUX ID) to communicate with the Identity Platform to validate one-time passcodes (OTPs) from email, phone calls, SMS, Helpdesk, and Notification Passcode.)
Save the changes before exiting from the file.
API tab
In the API Key section, click Generate Credentials.
The API ID and API Key are required and used in the config.json file for all scenarios of using this product.
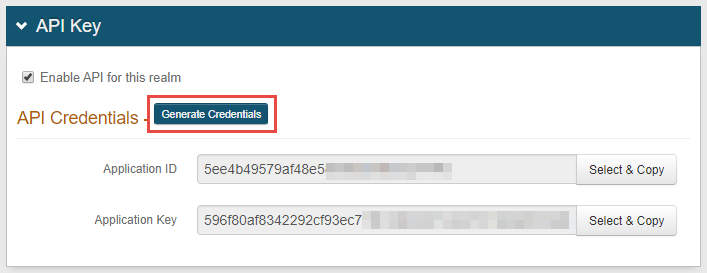
In the API Permissions section, select Enable Authentication API.
NOTE: It is not recommended to enable Identity Management options since the password reset function uses an IdP realm or third party password reset URL—not the Identity Management API.
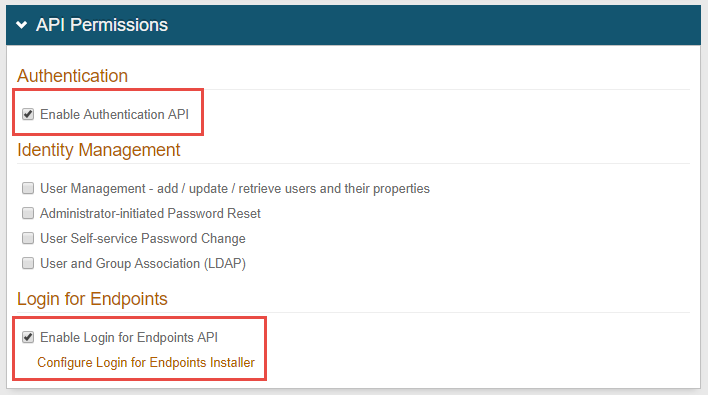
Click Save after the configuration is complete.
Select Enable Login for Endpoints API, and then click Configure Login for Endpoints Installer.
SecureAuth Identity Platform configuration
Use the following sections to set up Login for Endpoints with the cloud and hybrid model of SecureAuth Identity Platform version 19.07 or later.
If your team will set up and use Login for Endpoints with SecureAuth IdP version 9.3, see Classic Experience Web Admin configuration.
You will configure the Identity Platform and the Classic Experience to use Login for Endpoints. If your team wants to use biometric identification (face (iOS only) or fingerprint recognition), you must complete the following set up. Only the Identity Platform v19.07 and later supports biometric identification; additionally, you must use the 2019 theme (see Setting the default theme for new realms). You will set up the authentication API in the Classic Experience; this is necessary until feature parity is achieved with the Identity Platform.
Prerequisites
The following steps must be completed before you can set up MFA methods; some steps are specific to cloud and they are called out accordingly. Most active sites will have performed the first two steps already and can begin at "Set up a policy."
Cloud: Download and install the SecureAuth Connector on your Mac data store server to begin the Identity Platform deployment.
See Data Stores for a discussion and prerequisites. See Install the SecureAuth Connector for prerequisites and steps.
In Map Data Store Properties, enter adminDescription in an unused ID field—Aux ID 3 for endpoints—and set the data format to plain text. Later in these steps, you will map this field to the OTP Validation Property, which is used for end user authentication.
Set up a policy
Policies in the Identity Platform allow you to define rules to authenticate and block your users to certain applications. See How policies are used in the Identity Platform to learn about policies.
If you have an existing policy or default policy that will meet your security needs, you can use that policy; otherwise, you can set up a new policy specifically for endpoints.
Set up a policy for Login for Mac.
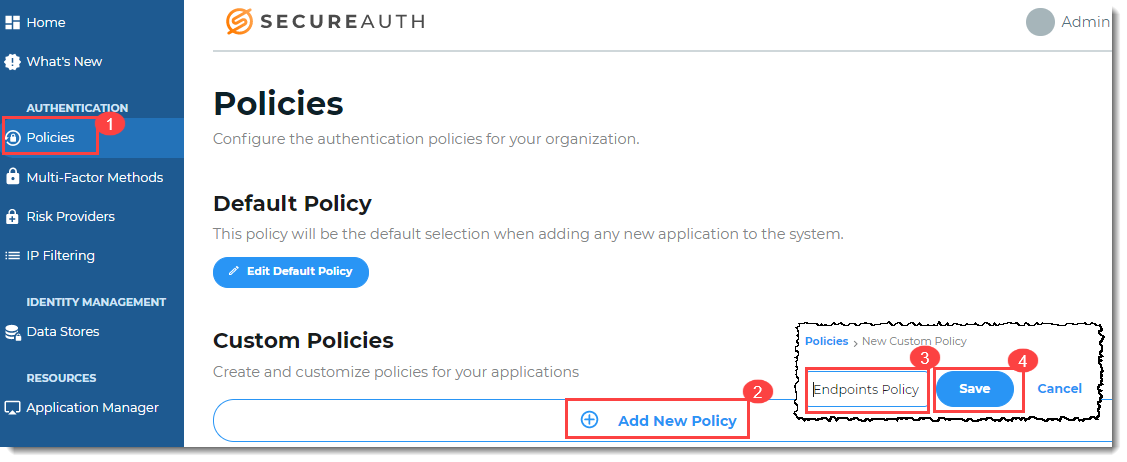
On the left side of the Identity Platform page, click Policies. Click Add New Policy and give the policy a name. Add a minimum of two authentication rules.
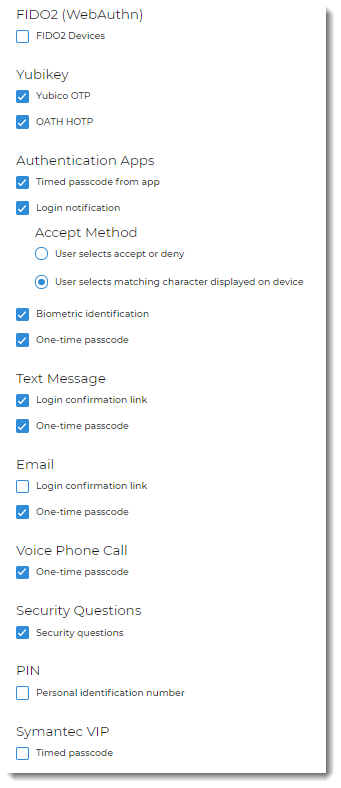
Select the MFA methods that you want to enable for the new Login for Mac policy that you created in the previous step. The MFA methods will be available to your end users as their end user login workflow experience.
Open the policy you created in the previous step and select the Multi-Factor Methods tab. Define the login workflow and multi-factor methods settings for the policy and save the choices. The following image shows the available MFA methods available in Login for Mac.
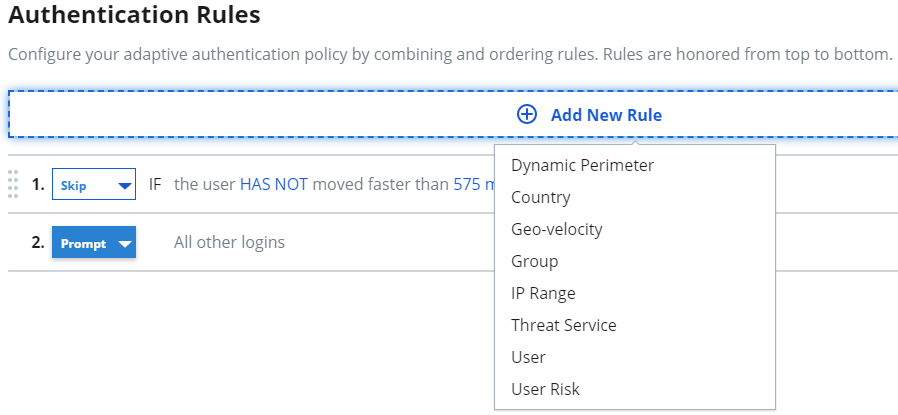
Optional: Set up rules to prompt or skip MFA when end users authenticate by comparing rules like their country, group access, and more.
On the policy page, select the Authentication Rules tab. See Adaptive authentication rules settings in a policy to learn more about setting rules.
If you make changes, be sure to save the changes.
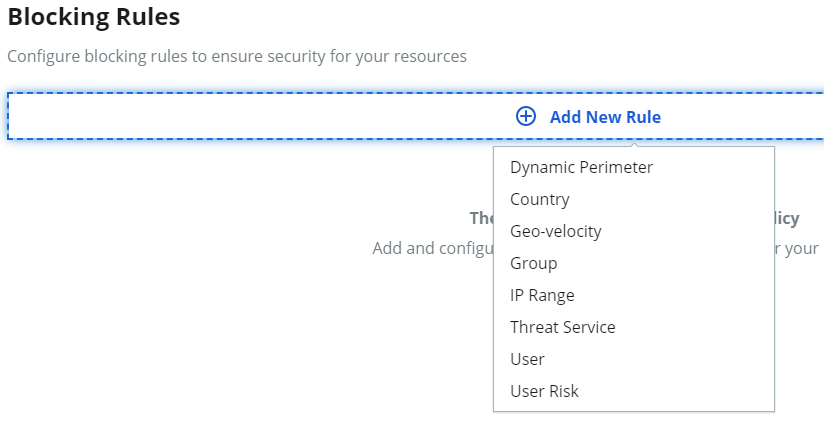
Optional: Set up rules to evaluate behaviors that will cause an end user to be blocked from authenticating in. such as IP range, group access, and more.
On the policy page, select the Blocking Rules tab. See Blocking rules settings in a policy to learn more about rules.
If you make changes, be sure to save the changes.
Save the policy.
Add an application
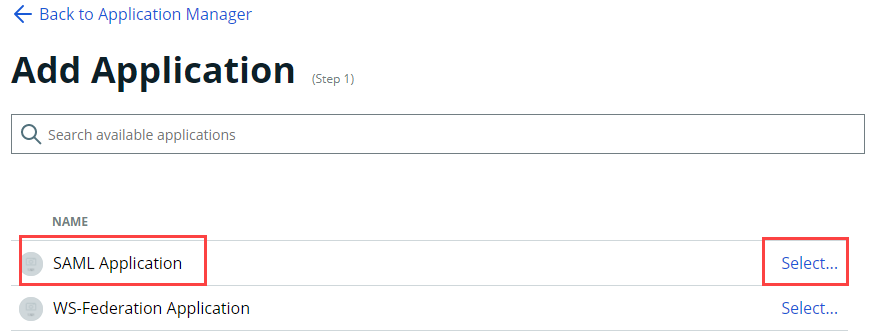
Use the Application Manager tool to select an application template from over 500 applications in the library, then use the common components to customize each new application integration. See Application Manager overview to learn more.
Add a Security Assertion Markup Language (SAML) application. Later, you will edit the SAML application in the Classic Experience to work with Login for Mac.
On the left side of the Identity Platform page, click Application Manager and then click Add an Application. On the list of applications, select SAML Application.
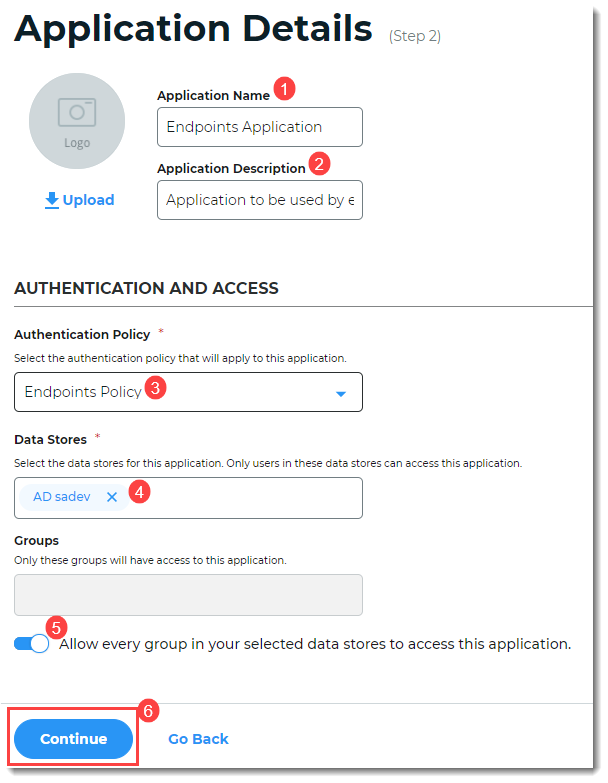
On the Application Details screen, set up the application to be used by endpoints products, such as Login for Mac.
Provide a name for the application.
Provide a description for the application.
Select the name of the policy you created previously.
Select the data store for this application.
Select the user groups that can access to this application. Hint: Admins typically select Allow every group in your selected data stores to access this application. Additionally, you can add specific user groups only; for example, to let a test group use it for a short time period before adding more or all groups.
Click Continue.
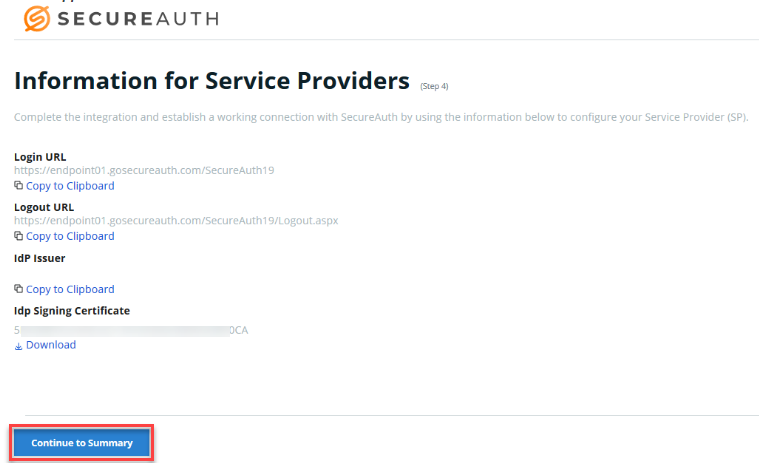
On the Connections Settings screen, under IdP Signing Certificate, click Select Certificate. Select an IdP signing certificate. (You do not need to set up anything else on the page. You are setting up a realm to add endpoints options in the Classic Experience.)
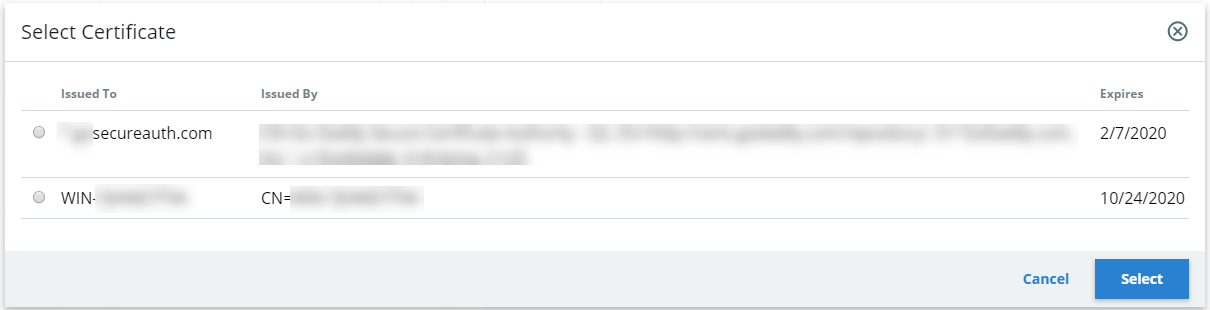
The IdP-initiated signing certificate integrates the SAML application with IdP so that the login process starts at the Identity Platform.
After end users successfully authenticate, they are asserted back to the Login for Mac application.
Add the application.
On the Connections Settings screen, at the bottom, click Add Application. You will receive a success message when the application is added.
Check the Information for Service Providers screen to ensure the information is correct, and then click Continue to Summary.
Check the summary information. If you need to edit, click the pencil icon to the right of the field to be edited. Be sure to click Update Settings in each screen that you change.
API
Set up the authentication API in the Classic Experience.
Open the Classic Experience.
On the Identity Platform page, click the Admin pull-down menu and select Go to Classic Experience.

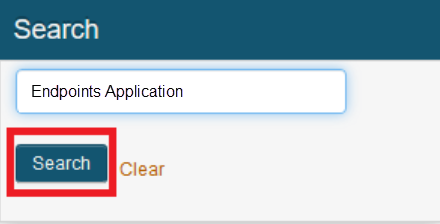
Search for the endpoints application you created previously.
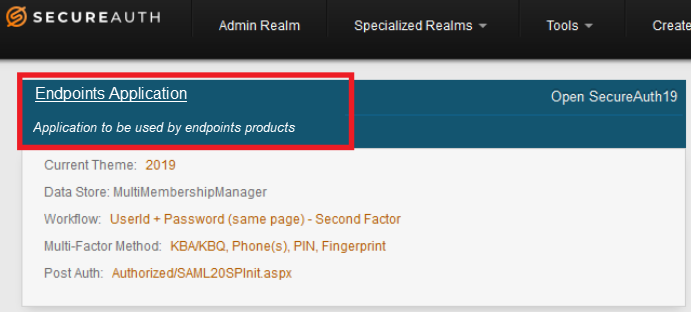
Select the application you created previously.
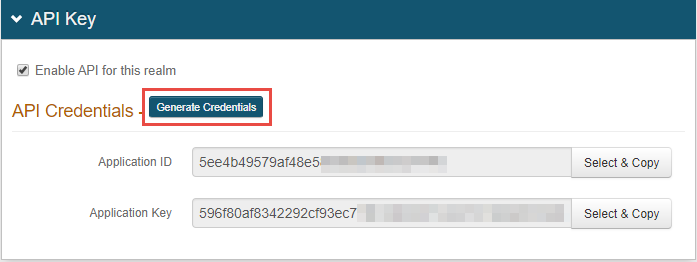
Generate API credentials.
In the Admin Overview page, click the API tab on the top menu bar.
The Application ID and Application Key are required and used in the config.json file for all scenarios using Login for Mac. The Identity Platform contains an endpoints API; the config.json file calls the Identity Platform endpoints API.
On the top section, API Key, click Generate Credentials.
Set up the authentication API for Login for Mac. In the API Permissions section, complete the following:
Select Enable Authentication API.
Add Aux ID 3 to the OTP Validation Property to map it to the setting you completed in Map Data Store Properties.
You must specify an auxiliary ID (AUX ID) to communicate with the Identity Platform to validate one-time passcodes (OTPs) from email, phone calls, SMS, Helpdesk, and Notification Passcode.
Select Enable Login for Endpoints API, and then click Configure Login for Endpoints Installer.
Click Save, located on the left side of the page, at the bottom.
Login for Mac Installer Configuration
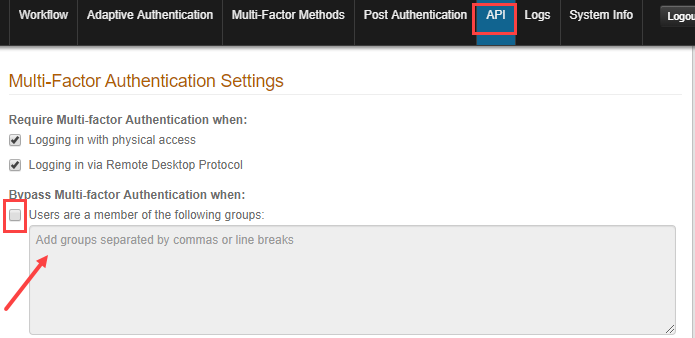
On the Login for Endpoints Installer Configuration page, select Mac OS as the Endpoint Operating System.
Enter the IdP Hostname.
Under Multi-Factor Authentication Settings, specify whether the user must use multi-factor authentication to access the Mac from a desktop or through remote access from another Mac device.
NOTE: A user group on another domain can be bypassed via the Mac authentication plugin and Pluggable Authentication Modules installed on the end user's workstation. In this scenario, the Open Directory API can be used by specifying the user group and domain.
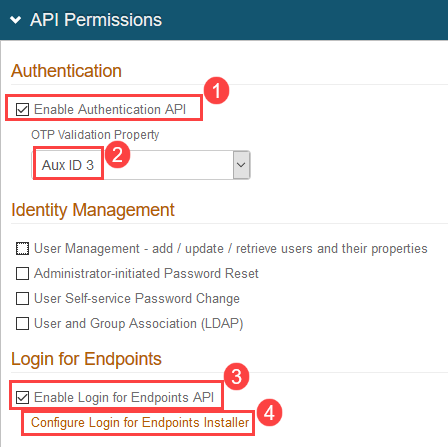
If any user group is allowed to bypass multi-factor authentication, enable the bypass option and list the user groups.
Select Users are a member of the following groups. Add the user groups in the fill-in field.
Alternatively, you can add groups manually by adding the "group_bypass" key to the config.json file, described in Optional: Add groups that can bypass MFA.
Group Bypass configuration notes:
If using Adaptive Authentication AND the group bypass feature, Adaptive Authentication takes precedence for handling the user's login request and group bypass is checked next.
Login for Mac supports the group bypass feature when users are online and offline. An internal group cache performs validations when AD is unreachable.
Users who need to log in without being prompted for additional MFA must belong to a local or domain group that is set up in the bypass option. Add local users only to the local group.
Only groups in the same domain as the computer can be bypassed.
The group specified must be a top-level group; nested groups are not supported.
If using a proxy bypass, you must configure the proxy server and proxy bypass list, which is a list of hosts to use to bypass the proxy. Proxy Server and Proxy Bypass List configuration notes:
The following order is used:
A. "proxy_server" and "proxy_bypass" configuration from config.json file. These settings are derived from entries made in the Web Admin Login for Endpoints Installer Configuration section. A "proxy_server" can be configured on the Mac OS, but if present as a root parameter in the config.json file, takes precedence over the OS setting. The format to configure the proxy is:
"http://[user[:password]@]host[:port]\"Parameters surrounded by [ ] are optional. Both "user" and "password" are not supported on HTTP clients on Login for Mac version 1.0.3 and earlier, or on 19.10 or later that choose to use the legacy HTTP client by setting"legacy_http_communication”: truein the config.json file.B. The "proxy_bypass" is a semicolon-separated list of server names or IP addresses to be excluded from proxy usage, for example: ".acme.sec;.lore.sec;.acme-ppi.com;10...;192.168".
Each item in the list must be one of the following:
* Fully-qualified domain name (FQDN)
* Full IP address
* Partial IP address with the following forms: Class A example = 10.* or Class B example = .16. or Class C example = .168.*
* Sub-domain name of a parent domain, where the parent is
" .parent.domain.name"The following is an example of a domain that uses direct communication withmail.google.com, but does not communicate withgoogle.comitself:*.google.comC. Mac proxy configuration. See the Enter proxy server settings on Mac article on the Apple website.
Click Download Installer Config to download the JSON file (config.json) that will be used with the PKG file, as described in the Installation section of this guide.
NOTE: Before installation, the config.json file must be edited if the end user is not always required to use multi-factor authentication for logging on a local console or remote console. See the Set end user access level section for access level settings and configuration.
Also in this optional section, find information about enabling multi-factor authentication when using SSH for remote login access to a Mac.
Pre-installation steps
Use the following settings to customize the Login for Mac experience.
Private keys and PAM
If you use private keys with Pluggable Authentication Module (PAM), when end users attempt to access the remote server by using Secure Socket Shell (SSH), the PAM product is not prompted and the user can gain access without using a password and second factor. To resolve this issue, complete the following:
Modify the /etc/ssh/sshd_config file by adding the following line:
AuthenticationMethods publickey,keyboard-interactive:pam keyboard-interactive:pam
If you want to allow end users to log in with their username and password only for a set number of days, see grace_period for set up and First login with password only for usage.
Verify "allow_self_signed" setting
Setting "allow_self_signed" to true should be used only in test or lab environments where the server has a self-signed certificate.
When set to
false, only valid certificates are accepted.When set to
true, all certificate validations will be turned off. The HTTP client then will accept valid certificates, self-signed certificates, expired certificates, certificates with invalid root. certificates without matching common names, etc. to establish communication.
Do not set this key to true in a production environment. In production, the key introduces critical security risks, namely the potential "Man in the middle" attack which grants users access to a system without validating their credentials, and lets unauthorized users steal OATH seeds. If the key is set to true in production, the following warning message is displayed: Warning! 'allow_self_signed' is enabled.
Find the config.json file you downloaded in step 5 of the Web Admin Configuration section of this document, and verify the setting for "allow_self_signed". You may need to change this setting based on how users will log on your environment.
Note that after installing an endpoint with "allow_self_signed" set to true, this setting remains effective until Login for Mac is uninstalled and then re-installed using a configuration file with "allow_self_signed" set to false.
Verify "version" setting
If you have set up an IdP realm to use HOTP or TOTP, set "version" to v2 in the config.json file. This keeps end users from receiving an error message that they must "change password at next login" or that their expired password fails without allowing them to change the expired password. You must also complete the settings in the Data tab.
Find the config.json file you downloaded in step 5 of the Web Admin Configuration section of this document and edit it. Find the "version" key and set it to v2, as follows:
"version": "v2",
Login for Mac configuration options
Download the following PDF document, which contains a table of all configuration options for Login for Mac. Be sure to check the configuration version listed under "conf_version," to ensure that the optional settings you want to use are supported. Login for Mac supports three configuration versions; the conf_version value (either 1, 2, or 3) defines the config.json file.
The options supported are listed in the following table. Save the PDF to a folder of your choice by right-clicking over the image and selecting Save link as.
Login for Endpoints configuration options Click link to download file.
Optional: Set end user access level
Compatible with: conf_version 1 and later
Login for Mac by default requires the end user to use multi-factor authentication to access the local console and a remote console in an SSH session.
Before installing Login for Mac on the end user's (target) machine, the config.json file must be edited if you want to change the end user's login access level setting.
Change the user's access level
Find the config.json file that you downloaded in step 5 of the Web Admin Configuration section of this document, and copy that file to the Temp folder on the target machine.
Start a text editor such as Sublime Text and edit the
access_levelin the file, changing the value to a pertinent value:0 = Multi-factor authentication always required
1 = Multi-factor authentication required for local access only
2 = Multi-factor authentication required for remote access only
3 = Multi-factor authentication never required. This setting is used by Adaptive Authentication to block a login event. A value of 3 is required if you use the install_without_idp option, which is compatible with conf_version 5 and later only.
Save the configuration.
Optional: Enable failover to one or more backup SecureAuth IdP instances
Compatible with: conf_version 2 and later
You can set Login for Mac to failover to one or more alternate IdP instances automatically if the main IdP instance fails. You can specify up to five backup instances and set the order that they are used.
Find the config.json file you downloaded in step 5 of the Web Admin Configuration section of this document and edit it.
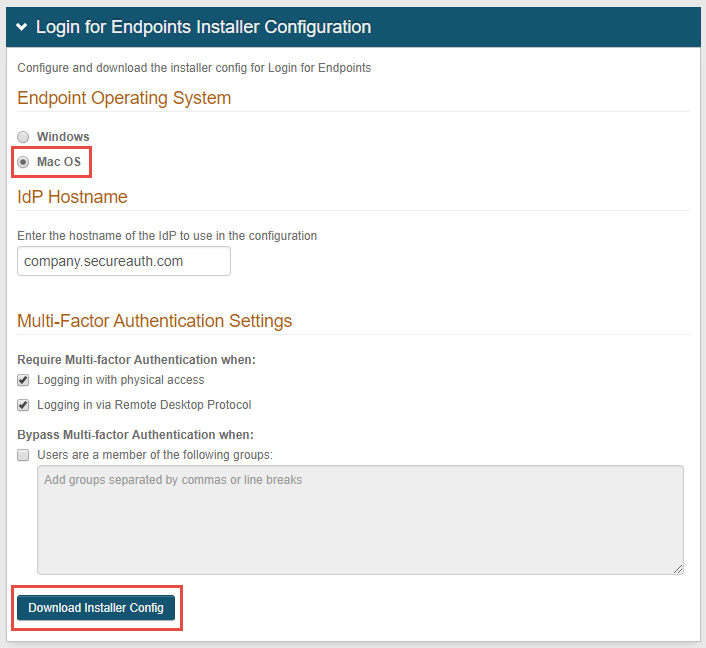
Specify the IdP instance to failover to by replacing the "api_id", "api_secret", and "host" keys with a new "apis" array.
In the config.json file, replace the "api_id" and "api_secret" keys and set the host to specify a single or multiple backup IdP instances.
To specify a single backup IdP instance, edit the file as follows:
"apis":[
    { "id":"", "secret":"", "host":"https://localhost/secureauth#" }
],
Where secureauth# is your single backup Identity Platform instance.
To specify multiple backup Identity Platform instances, edit the file as follows.
"apis":[
    { "id": "", "secret":"", "host":"https://localhost/secureauth2" },
    { "id": "", "secret":"", "host":"https://localhost/secureauth3" }
],
The backup IdP instance is chosen in the order listed in the array. An IdP instance must be online or it is ignored and the next instance is used. In the above example, "secureauth2" will be chosen first, then "secureauth3".
 |
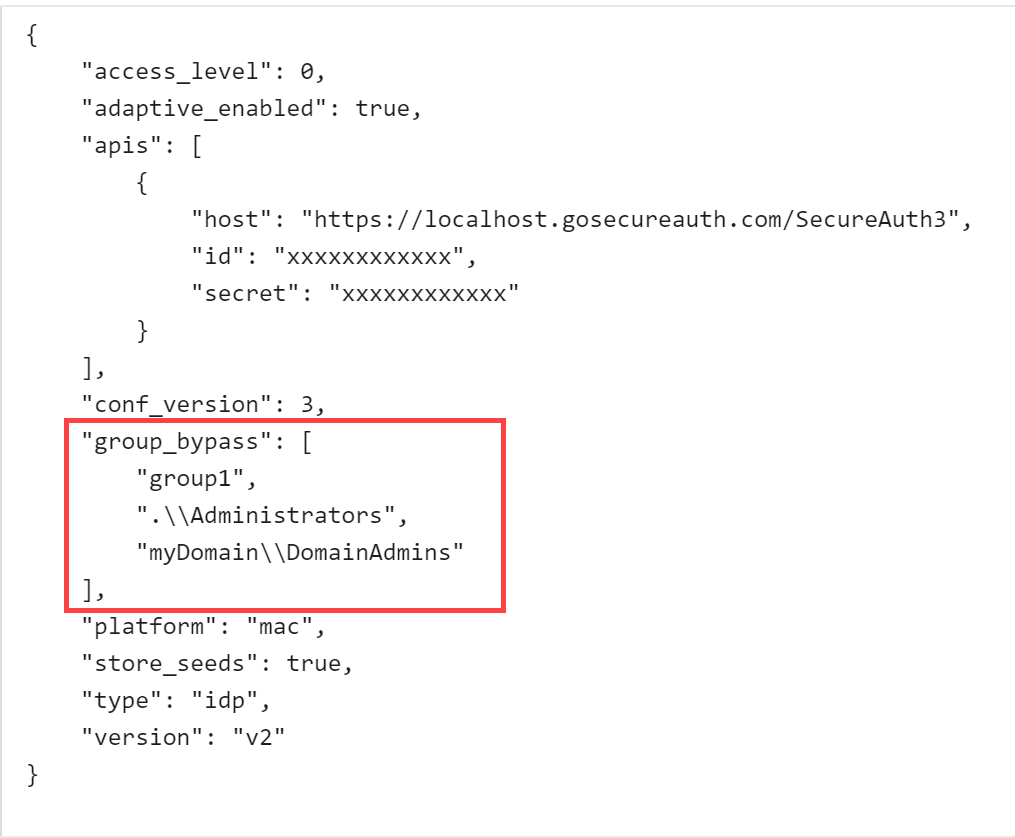
Optional: Add groups that can bypass MFA
Compatible with: conf_version 1 and later
Users who need to log in as local admins without being prompted for additional MFA must belong to a local or domain group that is set up in the config.json file, in the "group_bypass" key. Add local users only to the local group. Users in this group must including a warning stating the group names are case sensitive and need to match AD exactly.
Find the config.json file you downloaded in step 5 of the Web Admin Configuration section of this document and edit it. Add the "group_bypass" key and set it as follows:
"group_bypass" can include the following:
group name: For groups of the domain on which the machine is joined; for example, "BypassGroup"Note that group names must match Active Directory exactly.
domain\\groupname: For groups that are part of a specific domain; for example, "customerDomain\\BypassGroup"The only domain allowed on the group bypass property is the domain where the machine hosting Login for Mac is installed.
.\\groupname: For local machine groups; for example,".\\Administrators"
 |
You can also set up bypass groups in the SecureAuth IdP API page, in the Multi-Factor Authentication Settings section, described in step 4b.
Optional: Enable and use multi-factor authentication for Remote Access (SSH)
On the Mac, go to Settings, select Sharing, and then enable Remote Login.
After making this setting, SSH into the machine via ssh username@hostname– example: ssh jsmith@170.17.0.150
Enter your password, and you will be prompted for multi-factor authentication.
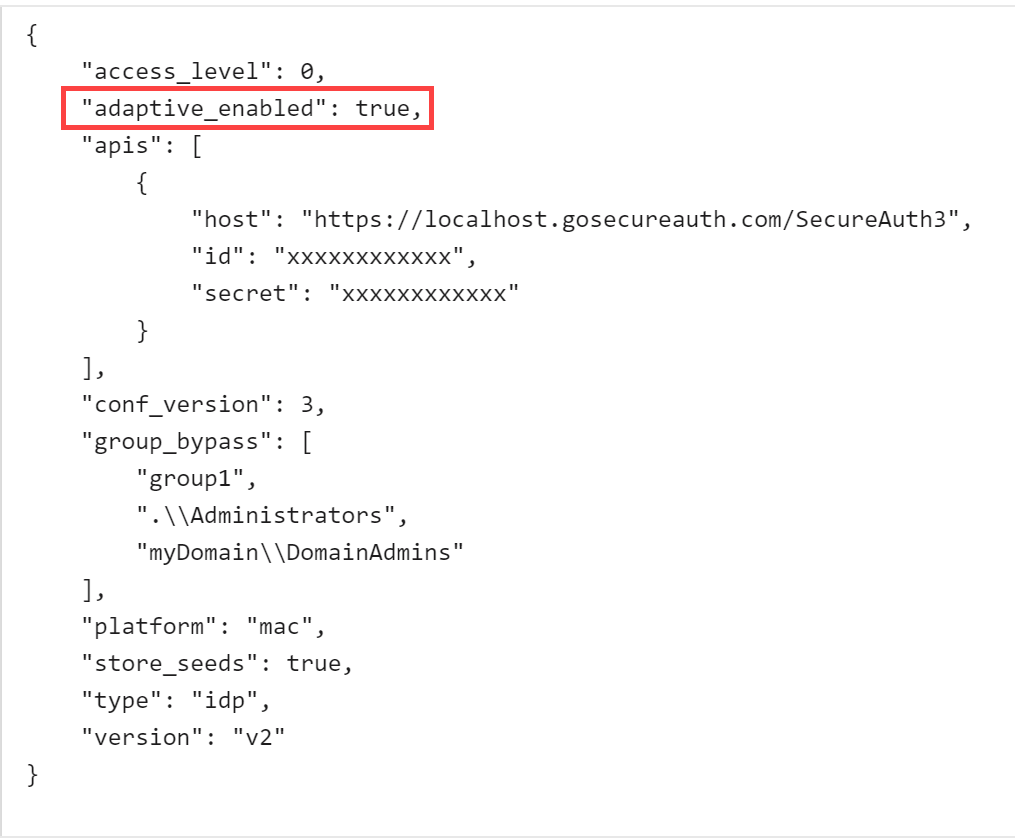
Optional: Disable Adaptive login
Compatible with: conf_version 2 and later
The adaptive_enabled key is set to true by default so that administrators can install and modify Login for Mac. Disable this key to false to ensure that an admin or other user is never restricted. This key acts similar to Adaptive Authentication settings in SecureAuth IdP, where you can restrict admins and users from logging in in several ways, for example, by username, group, IP, etc.
If the option is not set or removed, the default behavior is the same as if it were set to
true.
Find the config.json file you downloaded in step 5 of the Web Admin Configuration section of this document and edit it. Add the "adaptive_enabled" key and set it to false or reset it to true, as follows:
"adaptive_enabled": false
"adaptive_enabled": true
 |
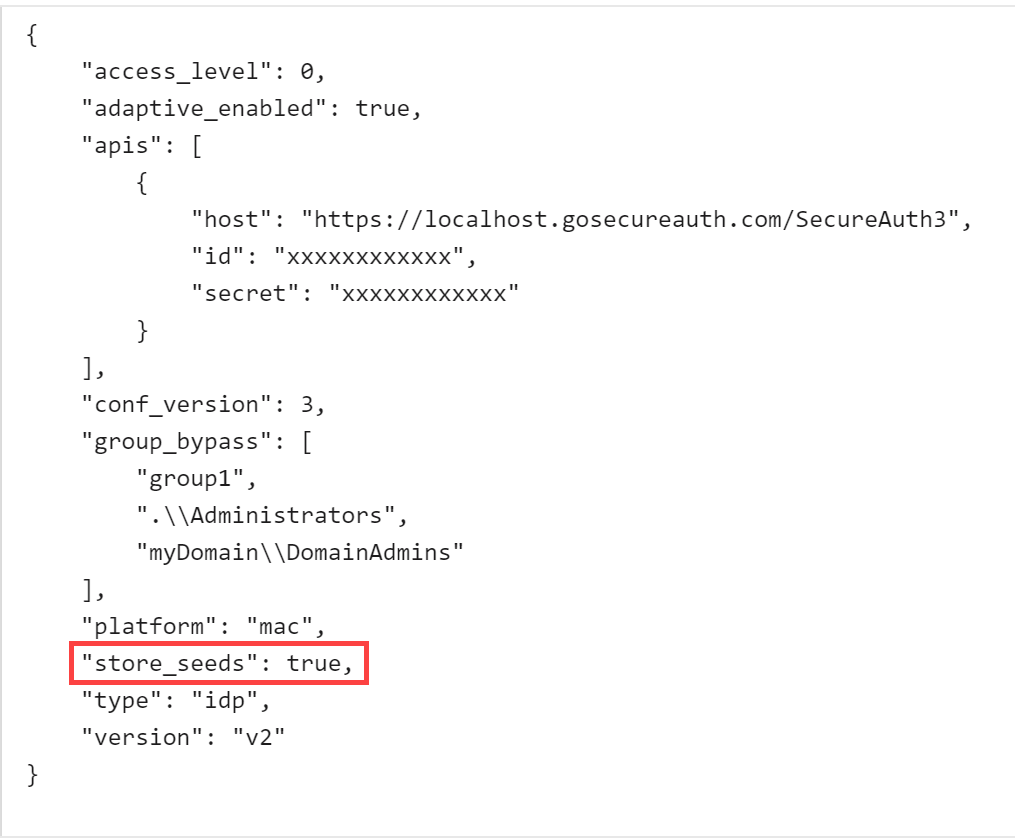
Optional: Disable OATH seed cache
Compatible with: conf_version 2 and later
SecureAuth uses OATH seeds to validate OTPs when end users log in. Most use cases require SecureAuth to store OATH seeds; if seeds are not stored, end users will not be able to log in while offline. In a scenario where, for example, a server is always online, you might not want to cache the OATH seed, to prevent the seed from leaking or being stolen.
Use the store_seeds key in the config.json file to disable the OATH seed cache, and Login for Mac will not store OATH seeds. The first-time login experience is disabled in this scenario because it is used to store OATH seeds, which are not required for this option.
The option is
trueby default.If the option is removed, the default behavior is the same as if it were set to
true.
Find the config.json file you downloaded in step 5 of the Web Admin Configuration section of this document and edit it. Add the "store_seeds" key and leave it true or set it to false, as follows:
"store_seeds": true
"store_seeds": false
 |
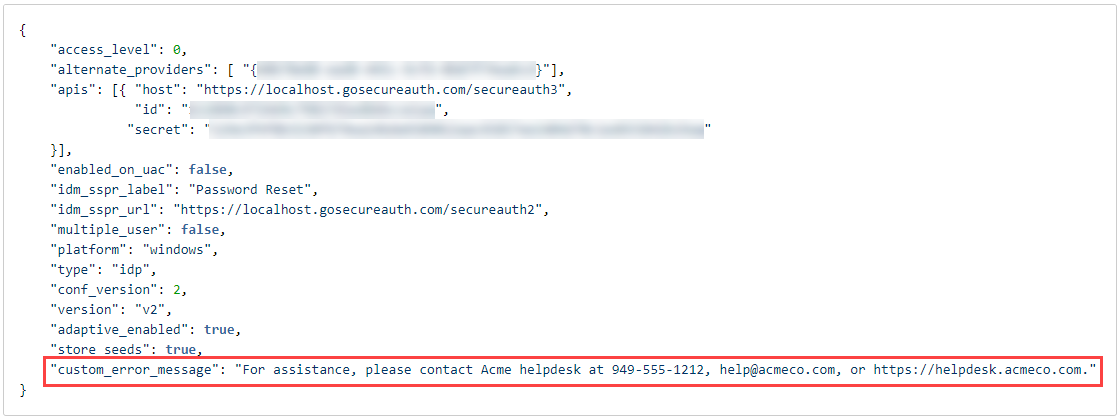
Optional: Enable custom message for end users locked out
Compatible with: conf_version 2 and later
Enable this option so that end users receive customized assistance when they are locked out of their accounts or their password or passcode is incorrect or expires. Administrators can set a custom assistance string in the config.json file to guide end users so they have next steps after an issue occurs during login.
The option must be added manually.
If the option is not added, a generic error message will be displayed.
Find the config.json file you downloaded in step 5 of the Web Admin Configuration section of this document and edit it. Add the "custom_error_message" key and enter your custom assistance message. The following message is an example:
"custom_error_message": "For assistance, please contact Acme helpdesk at 949-555-1212, help@acmeco.com, or https://helpdesk.acmeco.com."
 |
Optional: Configure number of password-only login days
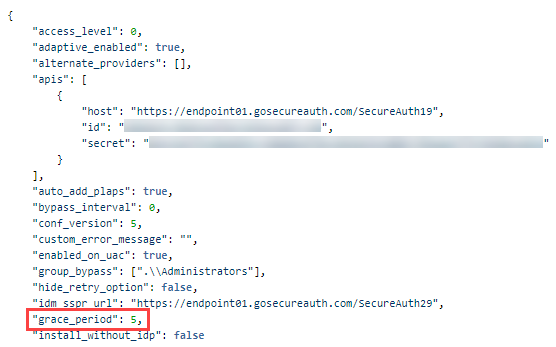
Compatible with: conf_version 5 and later
Set this option to establish the number of days that end users can log into a machine with a password only. Administrators can set a custom number of days in "grace_period" in the config.json file. After end users set up their second-factor methods, they can dismiss the password-only login screen.
The option must be added manually for each machine.
The grace_period value can be any rational number; there is no maximum. Entering 0 (zero) disables the option.
If the option is not added, end users must always authenticate with 2FA.
If end users accidentally indicate that they are ready to authenticate with 2FA when they are not, they can move back into the workflow to log in with password only.
If end users choose to proceed with 2FA, an invalid 2FA login attempt (e.g., mistyped password) will return them to a password-only login.
After end users set up 2FA, they must indicate on the UI that they no longer need to log in with a password only, which cancels password-only for the machine; otherwise, they are presented with the password-only login screen until they dismiss it permanently or reach the maximum number of days for that machine, set by the admin.
The "grace_period" option replaces the "login_attempts" option.
Login is determined in the following order:
Adaptive authentication: If set in SecureAuth IdP to block an end user, the end user cannot log in regardless of how many grace_period days are set.
Local settings: Checks, such as access_level and bypass_interval, are considered.
grace_period: If set, the number of days are considered next.
group_bypass and any second factor: These login settings are considered last.
If end users are able to log in with password-only because grace_period is set, they automatically receive a 3 minute time period to enter their password. After 3 minutes, Login for Mac checks if any settings have changed. If the previous settings are the same, end users can log in with password-only. If any of the previous settings have changed, end users are redirected to the 2FA login screen.
Find the config.json file you downloaded in step 5 of the Web Admin Configuration section of this document and edit it. Add the "grace_period" key and enter the number of password-only login days. The following number of days is an example:
"grace_period": 5
 |
Read about how this setting impacts end users in First login with password only.
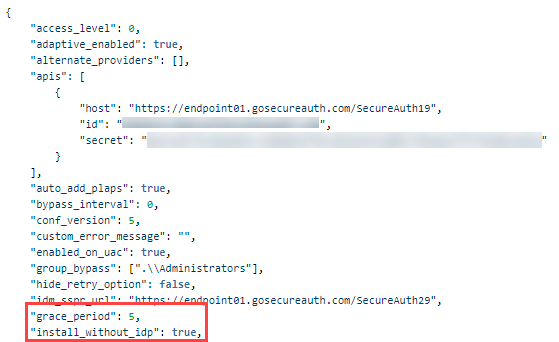
Optional: Install without connection to Identity Platform
Compatible with: conf_version 5 and later
Set this option to install Login for Mac on a machine without a connection to the Identity Platform. This option is useful if a third-party company configures machines for your end users; if the third-party company does not have connectivity to the Identity Platform, this option enables them to complete the configuration. To use this option, set "install_without_idp to true. Additionally, the administrator must set one of the following so that end users will still be able to log in if their machine is not connected to the Identity Platform:
Number of days that end users can log in with password-only in grace_periodin the config.json file OR
End user access_level to 3 in the config.json file
Without either grace_period or access_level defined, the installation will fail with the following message in the install.log file:
InstallConfiguration:[1] - JSON Validation: A valid 'grace_period' or 'access_level' attribute must be configured to use the attribute install_without_idp
After end users' machines connect to the Identity Platform, they can ignore the password-only login messages if the access_level is set to 3; or they can set up their second-factor methods, and then dismiss the password-only login screen if the grace_period was set to at least 1 day.
If end users are able to log in with password-only because grace_period is set, they automatically receive a 3 minute time period to enter their password. After 3 minutes, Login for Mac checks if any settings have changed. If the previous settings are the same, end users can log in with password-only. If any of the previous settings have changed, end users are redirected to the 2FA login screen.
Administrators must manually add the option.
This option is set per machine, not per user.
If the option is removed, the default behavior is the same as if it were set to
false.If the option is not added, machines must always be connected to the Identity Platform to install Login for Mac.
Find the config.json file you downloaded in step 5 of the Web Admin Configuration section of this document and edit it. Add the "install_without_idp" key and pair it with either the "grace_period" key or "access_level: 3" setting. The following example shows one kind of pair:
"install_without_idp": true
 |
Read about how this setting impacts end users in Login without connection to Identity Platform.
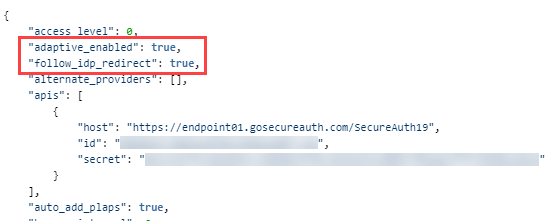
Optional: Set redirect to questionnaire before login
Compatible with: conf_version 5 and later
Set the "follow_idp_redirect" and the "adaptive_enabled" options to true to redirect end users to a questionnaire that they must answer before logging into Login for Mac.
Enabling a redirect to a questionnaire is available in the Identity Platform version 19.07 or later.
You must integrate an Identity Platform Classic Experience realm; see Integrate pre-login questionnaire.
You must set these options manually.
The questionnaire you create can be any web application that can be run on a supported web browser.
If end users submit answers to the questionnaire and have their login request denied because they entered incorrect information, they can log in again after the expiration time set by the admin has passed. This scenario can be potentially frustrating for end users; consider adding a confirmation message that is displayed when end users submit their answers, for a final chance to check their entries on the questionnaire.
End users who are offline can bypass the questionnaire by default.
If the "follow_idp_redirect" option is removed, the default behavior is the same as if it were set to
false.If the options are not both set to true, end users will not see a questionnaire before logging into Login for Mac.
To view information about end users who have their login request denied because of risk score, check the Identity Platform debug logs and the Analyze API logs.
The following workflow describes how this feature is realized for admins and end users if "follow_idp_redirect" and "adaptive_enabled" are true:
Admins can integrate their corporate questionnaire by adding a risk provider and providing a web page with the questions. When end users submit answers, the web page submits the answers to the risk provider, and the risk provider handles business requirements, such as logging the answers for compliance purposes.
End users complete authentication that validates their identity, and then see a message that states "Additional information required. Click here to proceed."
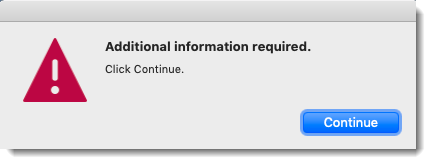
After end users click the link, they are redirected to a pop-up form in a separate browser. They fill out the questionnaire, submit it, then close the browser, which resets the login process.
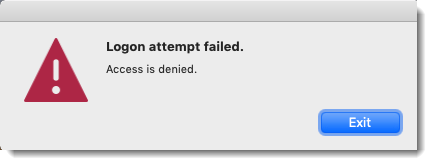
The risk provider returns a risk score, which determines if the end user is allowed to continue.
If the risk score is above the threshold, the end user login request is denied.
If the risk score is below the threshold, the end user can proceed to complete authentication as usual, such as by entering a password and fingerprint.
Find the config.json file you downloaded in step 5 of the Web Admin Configuration section of this document and edit it. Add the "follow_idp_redirect" and "adaptive_enabled" keys and set them to true, as follows:
"follow_idp_redirect": true,
"adaptive_enabled": true
 |
Installation and upgrade steps
Do not install Login for Mac version 1.0 on any MacOS Sierra machine (10.12.x) in a domain-joined system on which FileVault encryption is used on the boot volume. Doing so might render the operating system unbootable and require recovery.
Upgrade Login for Mac
Login for Mac supports upgrading from version 1.0.3 to 20.09.xx without uninstalling before installing the latest version.
Copy the JSON file to a specified folder
Find the config.json file that you downloaded in step 5 of the Web Admin Configuration section of this document.
You might have already performed this step if you changed the user's access level in the Set end user access level section above.
Copy that file to a specified folder on the target machine.
Download the Login for Mac ZIP file to the specified folder
Download the Login for Mac .zip file to the target machine.
Unzip this file which contains the SecureAuthLogin-20.09.01.pkg and SecureAuthLogin-20.09.01-Uninstaller.pkg files.
Copy these files to the same folder as the config.json file on the target machine.
Run the Login for Mac installer package
Double-click SecureAuthLogin-20.09.01.pkg to start the installation wizard for the application.
Log out of the target machine.
NOTE: After this installation, SecureAuth Login for Mac appears on the next login session.
Login for Mac error logs
Error logs are displayed in the following locations.
Information related to installation is written in the
install.logfile:/var/tmp
Information related to logging in is written in the
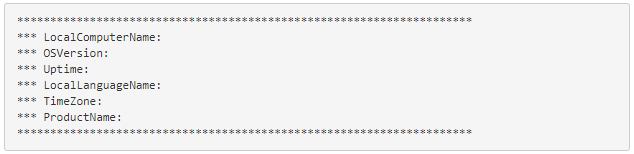
login.logfile/Library/Application Support/com.secureauth.saap
The login.log file displays system information, such as the type and version of the operating system, the version of Login for Mac your organization is running, and more as shown in the following image:
 |
After you view the login.log file, then connect later through RDP, you might notice what look like inconsistencies because the log file will have new start lines and threads. This is expected behavior because connecting through RDP causes new instances of the credential provider to be created, which causes the new start lines and threads.
Uninstallation
On the target machine, run the Login for Mac uninstaller package:
Double-click SecureAuthLogin-20.09.01-Uninstaller.pkg to start the uninstall wizard for the application, and then follow the instructions on screen.
Log files are not uninstalled; use them to assist with troubleshooting any issues with the uninstallation. After you have worked through any issues, you can delete the log files.
End user login experience
Important
The enterprise WiFi connection must be disabled on the Mac to log on to the domain. A public WiFi connection or a wired connection can be used for Internet access.
If you are included in a bypass group, you will need to wait for the network group to be fully connected before logging on.
First login with password only
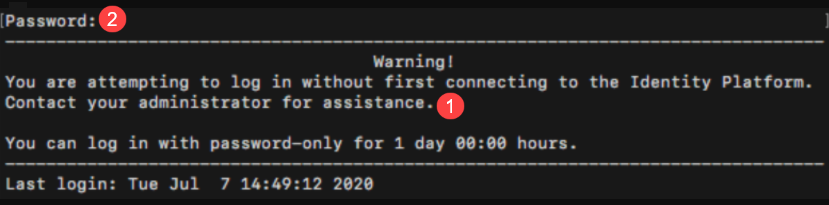
End users can log in without second-factor authentication for the number of days set by the administrator in the config.json file, in the grace_period value. This allows end users to log in with a password only (without using second-factor authentication), and typically occurs after the Login for Mac installation. End users can then access their device to set up their two-factor authentication methods, such as PIN creation and answers to Security Questions, before they must authenticate to access their device.
Use case: Password-only login is useful for one or more new employees who have been issued a laptop on their first day of employment. For example, if Login for Mac is already installed on the laptops and the admin has not set a grace_period value, new employees might not be able to log into their computer if they cannot connect to the SecureAuth Identity Platform realm to register their mobile phone or self-service page to enter a phone number.
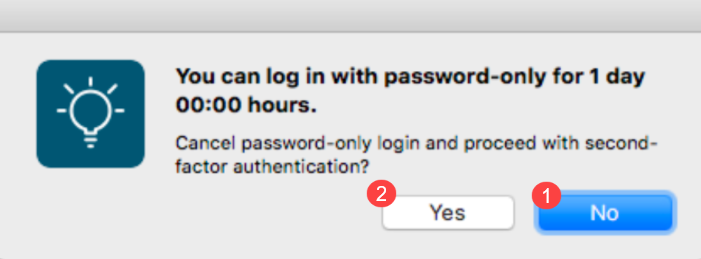
Workflow: End users are prompted to log in with their username and password only. The login screen indicates the number of days end users can continue to log in with a password only on the machine, as shown in the following image.
End users who want to log in with a password only click No next to number 1 to display the password field and log in. After end users set up their second-factor methods, they are ready to authenticate so they click Yes next to number 2, which dismisses the password-only screen and opens the 2FA login screen. Thereafter, the 2FA login screen opens for end users.
 |
If your site uses private keys with Pluggable Authentication Module (PAM), end users will see the following message when they log in with password only. End users who want to log in with a password only enter their password next to number 1 and enter No for number 2 and log in. After end users set up their second-factor methods, they are ready to authenticate so they enter Yes for number 2, which dismisses the password-only screen and opens the 2FA login screen. Thereafter, the 2FA login screen opens for end users.
 |
Login without connection to Identity Platform
End users can log in when their machine does not have a connection to the Identity Platform if the install_without_idp and grace_period or access_level options are set. This allows end users to log in with a password only (without using second-factor authentication).
Use case: Password-only login is useful if a third-party company configures machines for end users and the third-party company does not have connectivity to the Identity Platform. For example, if Login for Mac is installed on machines by a third-party without a connection to the Identity Platform, and the admin has not set the install_without_idp and grace_period or access_level values, when new employees get their machine, they will not be able to log in.
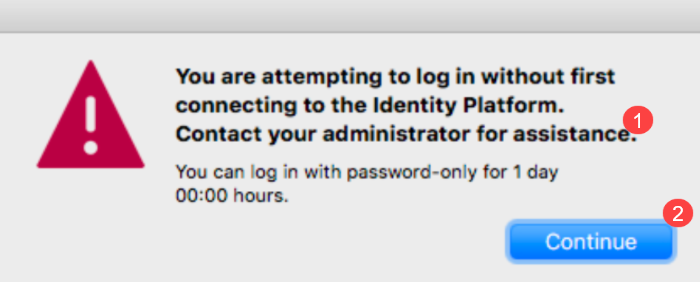
Workflow: End users are prompted to log in with their username and password only. The login screen indicates the number of days end users can continue to log in with a password only on the machine, as shown in the following images.
End users whose machines are not connected to the Identity Platform should contact the admin first so they can copy the message next to number 1 and send it to their admin. End users can then click Continue next to number 2 on the UI to display the password field or enter a password on the PAM UI and log in. After the machine connects to the Identity Platform, the 2FA login screen opens for end users so they can set up their second-factor methods and log in.
 |
If your site uses private keys with Pluggable Authentication Module (PAM), end users will see the following message when they log in with password only. The workflow is the same as in the previous "Workflow" paragraphs.
 |
First-time login experience
If the administrator has set up a mandatory questionnaire for your organization to fill out prior to logging into Login for Mac, you will log in with a username and then you will be redirected to the questionnaire. After you fill out the questionnaire and submit it, close the browser to display the second-factor authentication screen.
Enter your domain username and password on the Mac login screen.
The first time end users log in, Login for Mac shows only OATH-based methods (for example, TOTP, HOTP YubiKey), if at least one method is available to end users. If at least one OATH-based method is not available to end users, they can use any other available method. This could be a method that uses the SecureAuth Authenticate App on your mobile device or another device provisioned with the SecureAuth IdP realm to supply timed passcodes, such as an HOTP YubiKey.
If end users need to login when their machine is offline, they must choose an OATH-based method during the first login. After end users select a timed authentication option and enter their password, TOTP and HOTP passcode options will be available for them to use when logging on the machine offline.
The window pictured above appears only the first time you use Login for Mac.
End users with more than one mobile phone or YubiKey provisioned can select which device or token to use when online. When logging on the machine offline, any OATH-based method that was used online will be available for use.
If you do not have an authentication method that provides an OATH-based method, then select any other option available to you.
Optionally, check the Remember my selection box if you want to use this same authentication method the next time you log on the Mac.
Enter the passcode that appears on the device, and then click Submit.
After successfully logging on the Mac using a timed passcode, timed passcodes from that device can be used for login access when offline, i.e., when the Mac is not connected to the Internet.
Log out of the Mac.
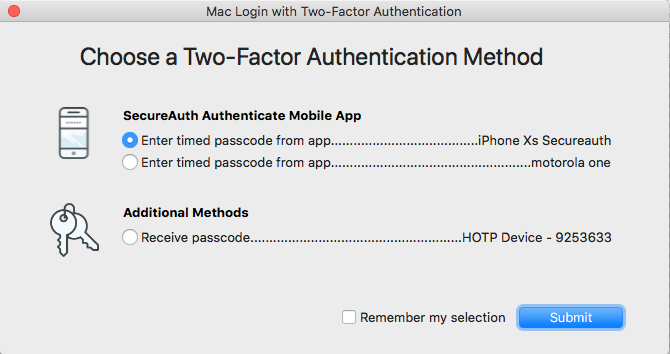
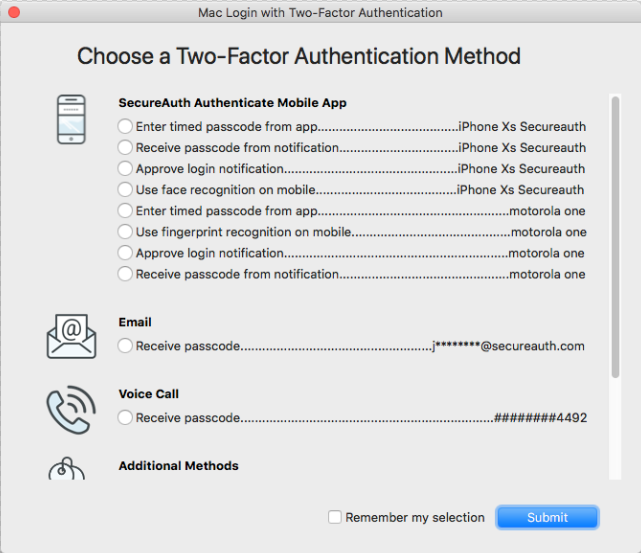
Log back on the Mac, and select an authentication option from the list of multi-factor authentication methods for which you have previously enrolled.
If your list of available authentication options is lengthy, you may need to scroll down the list if the option you want does not appear on the main page.
Optionally, check the Remember my selection box if you want to use this same authentication method the next time you log on the Mac.
Click Submit to access the Mac on the network.
No matter which option you choose, you can return to this selection window by clicking the link: I want to choose a different two-factor authentication method.
Authentication method workflows are described in the following sections.
SecureAuth Authenticate Mobile App options
The methods in this section are delivered via push notification and require the use of the SecureAuth Authenticate App.
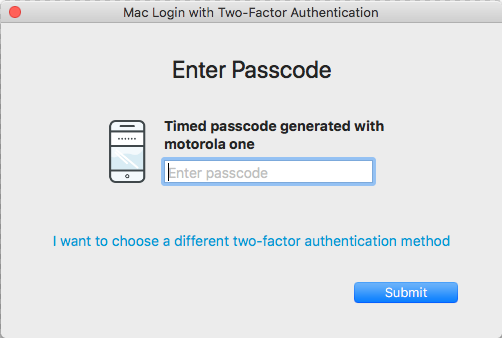
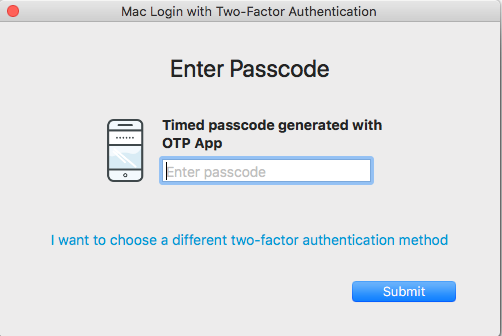
Enter timed passcode from app
This method and "Enter passcode from YubiKey" are displayed at first login, if available. If not available, all available methods are displayed.
When selecting this option, the Enter Passcode window appears.
Enter the OATH OTP from your SecureAuth OTP App.
Click Submit to log on the Mac.
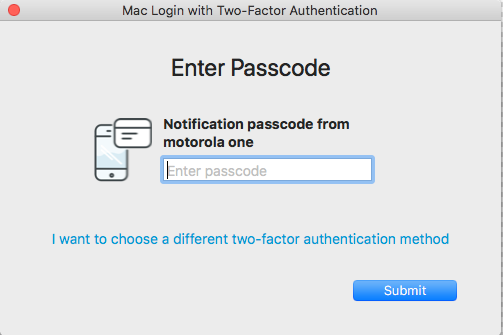
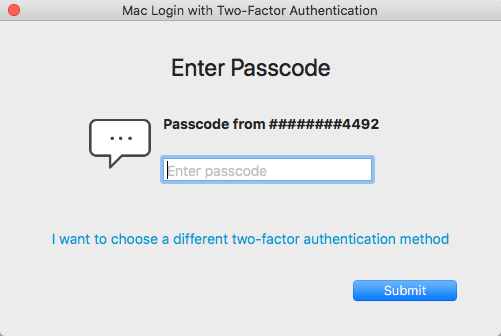
Receive passcode from notification
When selecting this option, the Enter Passcode window appears.
Enter the passcode that was sent to the SecureAuth Authenticate App on your mobile device.
Click Submit to log on the Mac.
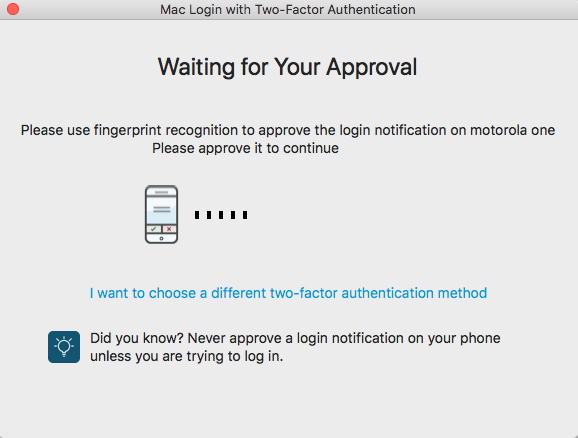
Approve login notification for fingerprint recognition
When selecting this option, the Waiting for Your Approval window appears.
Accept the login notification sent to the SecureAuth Authenticate App on your mobile device to log on the Mac.
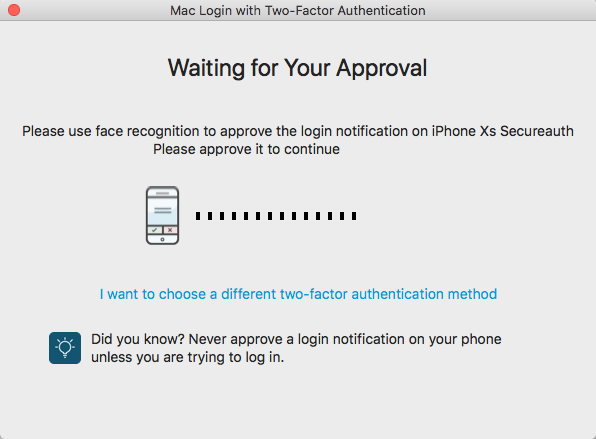
Approve login notification for face recognition
This option is available for iOS only. When selecting this option, the Waiting for Your Approval window appears.
Accept the login notification sent to the SecureAuth Authenticate App on your mobile device to log on the Mac.
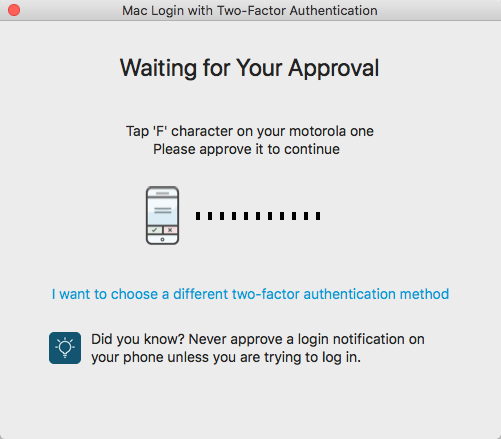
Approve login notification for Symbol-to-Accept
When selecting this option, the Waiting for Your Approval window appears.
Receive the set of 4 symbols sent to the Authenticate mobile app on your mobile device.
One symbol will display on your Mac desktop or laptop.
On the Authenticate mobile app, tap the symbol that matches the one displayed on your desktop or laptop. You are then logged on the Mac.
SMS / Text Message
Receive passcode
When selecting this option, the Enter Passcode window appears.
Enter the passcode sent via SMS to your mobile phone.
Click Submit to log on the Mac.
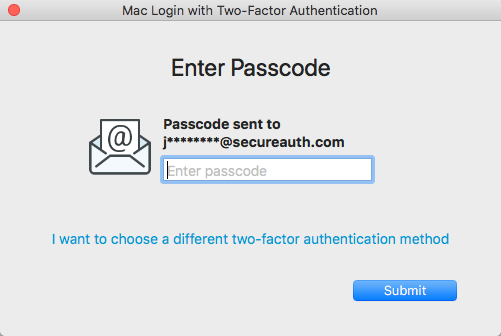
Receive passcode
When selecting this option, the Enter Passcode window appears.
Enter the passcode sent to your email address.
Click Submit to log on the Mac.
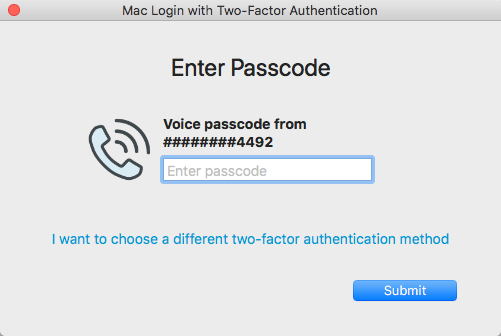
Voice Call
Receive passcode
When selecting this option, the Enter Passcode window appears.
Enter the passcode received from the phone call.
Click Submit to log on the Mac.
Additional methods
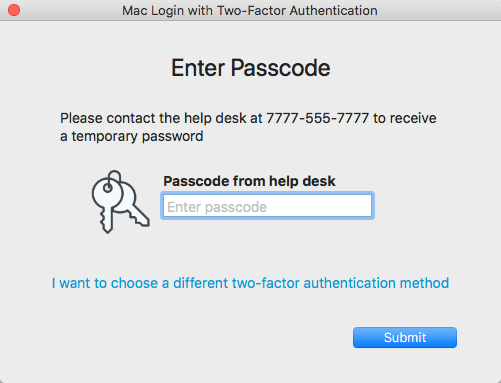
Contact the help desk
When selecting this option, the Enter Passcode window appears. (The phone number in the image below is an example only.)
If more than one phone number displays for the help desk, select the phone number to use for contacting the help desk.
Input the passcode supplied by the help desk.
Click Submit to log on the Mac.
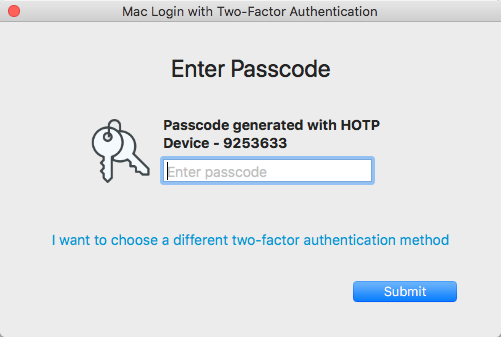
Enter passcode from token
This method and "Enter timed passcode from app" are displayed at first login, if available. If not available, all available methods are displayed.
When selecting this option, the Enter Passcode window appears.
With the YubiKey HOTP device inserted in the machine, tap or press the device to populate the passcode in the field.
Click Submit to log on the Mac.
Enter passcode from YubiKey (Yubico OTP protocol)
When selecting this option, the Enter Passcode window appears.
With the YubiKey OTP device (Yubico OTP protocol) inserted in the machine, tap or press the device to populate the passcode in the field.
Click Submit to log on the Mac.
Enter passcode from YubiKey
When selecting this option, the Enter Passcode window appears.
With the YubiKey OATH-TOTP device inserted in the machine, tap or press the device to populate the passcode in the field.
Click Submit to log on the Mac.
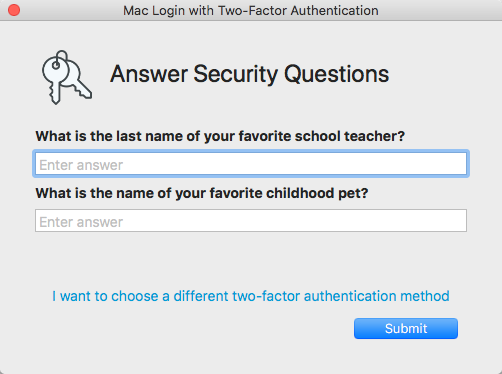
Enter answers to Security Questions
When selecting this option, the Answer Security Questions window appears.
Answer both questions with your predefined answers. You must answer both questions.
Click Submit to log on the Mac.
Troubleshooting
Use the topics in this section to help you problem-solve.
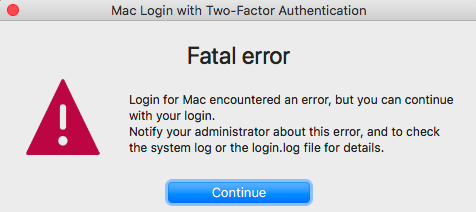
Admin needs to view log information
End users receive the following message that Login for Mac encountered an error and are guided to continue with their login. Admins are guided to check the system log or the login.log file for details.
 |
The following steps describe how to gain more information from the logs.
View further information about the error.
In Login for Mac, open the
login.logfile, located in /Library/Application Support/com.secureauth.saap. Enter the following command:log show --last [number] --predicate 'subsystem = "com.secureauth.saap"'If running a PAM product, enter the following command:
log show --last [number] --predicate 'subsystem = "com.secureauth.pam"'
where
--last [number][m|h|d] enables you to set a time period to limit the captured events from the present to the previous minutes, hours, or days. If [m|h|d] is not specified, the specified time is rendered in seconds.
Example 1: To limit the output in the log file to the last 5 minutes, use the following value: --last 5m
Example 2: To limit the output in the log file to the last 45 seconds, use the following value: --last 45
Release notes
The following sections describe the release highlights and enhancements for Login for Mac.
Release highlights
Read on to learn more about the new features in Login for Mac version 20.09 and 20.09.02 (CP-1082).
Install without connection to the Identity Platform
Configure Login for Mac so it can be installed on a machine without a connection to the Identity Platform. This is useful if a third-party company configures machines for end users and the third-party company does not have connectivity to the Identity Platform.
Set number of days to log in with password-only
You can configure Login for Mac so that end users can log into their machine with password-only for the specified number of days. This allows end users to access their device to set up their two-factor authentication methods, such as push-to-accept and answers to Security Questions, before they must authenticate to access their device.
The "grace_period" option replaces the "login_attempts" option.
Enable custom message to assist end users locked out of Login for Mac
You can configure Login for Mac so that end users receive customized assistance when they are locked out of their accounts or their password or passcode is incorrect or expires. You can set a custom message to guide end users to next steps after an issue occurs during login.
See Enable custom message to assist end users locked out.
Dashboard metrics for Login for Mac
Dashboard metrics are available for Login for Endpoints transactions. These metrics include login information for VPNs and endpoint desktop access to Windows and Mac. View metrics by selecting Home on the left side of the Identity Platform page.
Transactional logging requires SecureAuth Identity Platform v20.06 or later, using the /authenticated endpoint.
For more information, see the Authentication API guide.
Enhancements
Version: 20.09.xx
Release Date: 20.09.00: September 15, 2020; 20.09.01: October 14, 2020; 20.09.02: January 12, 2021
Compatibility: Note the following compatibility requirements:
SecureAuth IdP v9.2.x or later and the SecureAuth Identity Platform v19.07 or later
Biometric fingerprint recognition require SecureAuth Identity Platform v19.07 or later, using the 2019 theme.
Transactional logging requires SecureAuth Identity Platform v20.06 or later, using the /authenticated endpoint.
The "grace_period" option replaces the "login_attempts" option.
CP-507 | Characters in user IDs sent to Login for Mac are handled appropriately. |
CP-944 | Active Directory group bypass validations are case-insensitive for Login for Mac. (Local group bypass validations remain case-sensitive.) |
CP-950 | If a fatal error occurs in Login for Mac after end users have authenticated in, an error message with guidance text explains next steps to end users and guides admins to view logs. See Admin needs to view log information. |
CP-966 | If Login for Mac is installed and references a realm that does not have the Authentication API enabled, the installation fails. This is the appropriate behavior. |
CP-970 | Product logging is enabled by default for DEBUG; when troubleshooting product issues, Support might require that you view this log located at /Library/Application Support/com.secureauth.saap/ |
CP-971 | Log files are not uninstalled to assist with troubleshooting any issues with the uninstallation. |
CP-991 | Message improvements were added to help the user experience. |
CP-1082 | Push-to-accept works with Login for Mac version 20.09.02 in the SecureAuth Identity Platform version 20.06+ cloud deployment. If you use a load balancer, there is no cloud deployment restriction. |