Configure Identity Platform and Login for Endpoints
Updated October 2, 2023
Use the following sections to set up your endpoint product with the cloud and hybrid model of SecureAuth Identity Platform release. You will configure the Identity Platform to use Login for Endpoints.
If your team wants to use biometric identification like face (iOS only) or fingerprint recognition, you must complete the following set up. For biometric identification, you must use the 2019 theme (see Setting the default theme for new realms).
Note
The following instructions are appropriate for the three endpoint products: Login for Windows, Login for Mac, and Login for Linux. Differences will be called out according to operating system.
Prerequisites
Applies to Identity Platform releases 21.04, 22.02, 22.12, and 23.07
Data store. Have a data store integrated in the Identity Platform.
In the data store properties for your endpoint, set adminDescription in an unused ID field, like Aux ID 3 and set the data format to plain text. Later in this topic, you will map this field to the OTP Validation Property, which is used for end user authentication.
To learn more, see Data store integrations.
Authentication Policy. Have an authentication policy set up for the endpoint.
You can use a default policy, an existing policy, or set up a new policy specific for the endpoint login.
For the login workflow in a policy, make sure to select a workflow that has MFA Method in it. For example, Username & Password | MFA Method works well for most organizations.
To learn more, see Manage policies.
Set up Login for Endpoints
Use the Endpoint Details tab to set up communication between the Identity Platform and your endpoint. You will configure the endpoint authentication and access information. You will then use the Aux ID you set previously to enable communication between the Identity Platform authentication API and the endpoint.
On the left side of the Identity Platform page, click Login for Endpoint, and select the Endpoint Details tab.
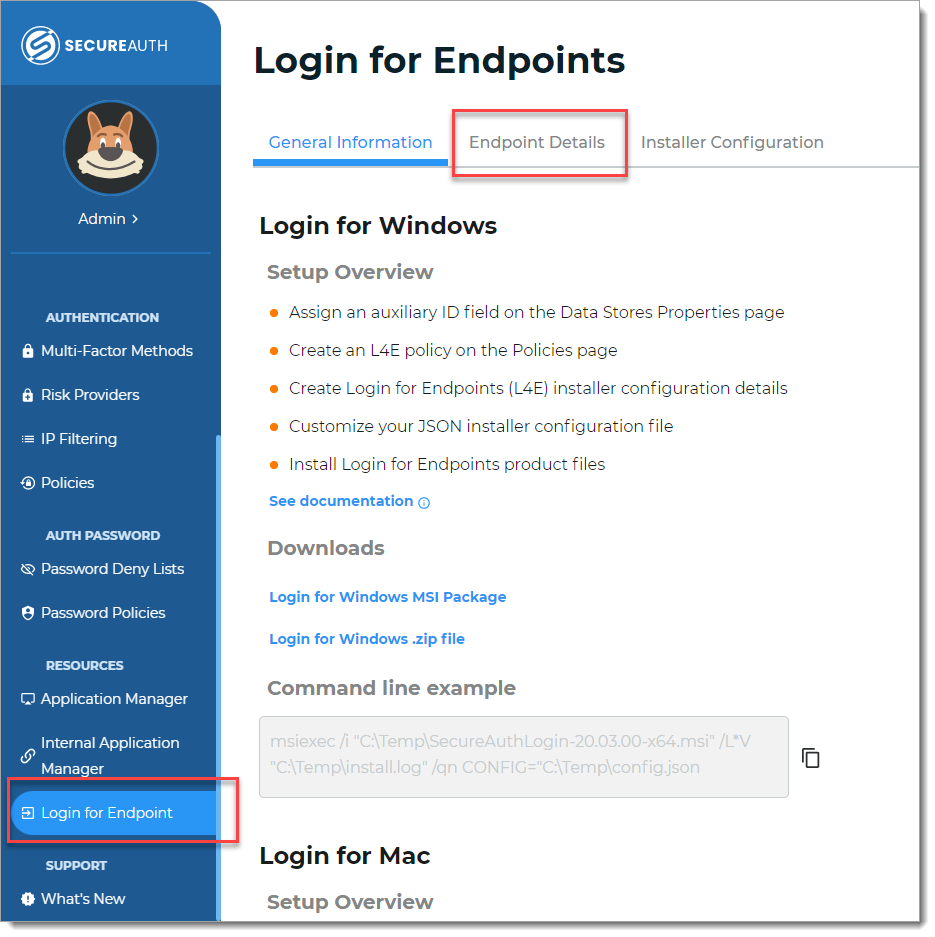
Click Add Endpoint and on the Endpoint Details page, set the following configurations.
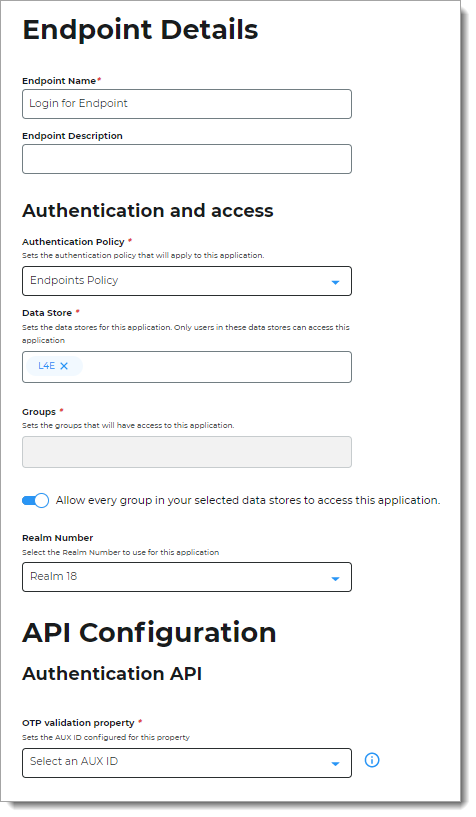
Endpoint Name
Set the name of the endpoint.
Endpoint Description
Optional. Provide a description about this endpoint.
Authentication Policy
Set the login workflow and authentication policy for the endpoint.
Data Store
Set the data store to authenticate and allow user access to the endpoint.
Start typing to bring up a list of data store names. You can enter more than one data store.
Groups
Use one of the following options:.
Slider in the On position (enabled): Allow users from every group in your selected data stores access to this application
Slider in the Off position (disabled): Enter the specific groups who are allowed access to this application.
Tip
Admins typically set it to Allow every group in your selected data stores access to this application.
Otherwise, you could add specific user groups for user testing until making the switch over to more or all groups.
Realm Number
Select the Realm Number to use for this application.
OTP validation property
Set this to the value you set in the data store AUX ID property, like Aux ID 3.
This is the Aux ID used to communicate with the Identity Platform to validate a one-time passcodes (OTP) from emails, phone calls, SMS, Help Desk, and notification passcode.
Save your changes. Do not close the page and continue with the next step.
Go to the API Configuration section at the bottom of the page.
Copy both secret keys for the Application ID and Application key. Save them in a secure location where you can find them when needed.
You cannot retrieve these API credentials again. If you lose them, you can get new secret keys from this page.
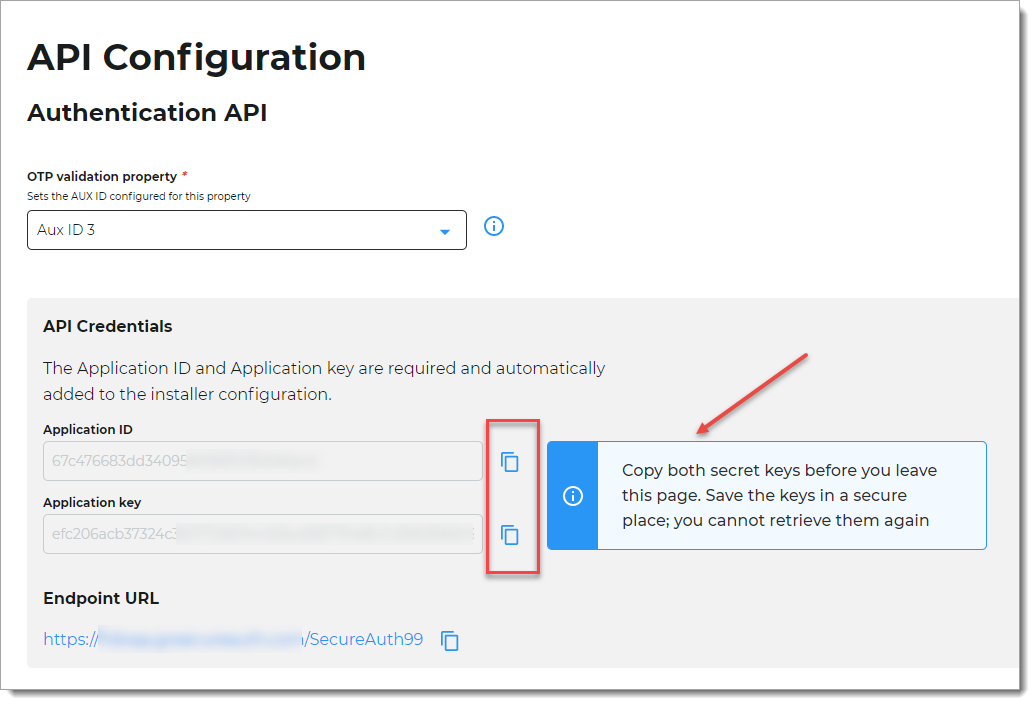
You can ignore the Endpoint URL link for now.
Close the page.
On the main Login for Endpoints page, select the Installer Configuration tab and click Add Configuration.
This is the Installer Configuration Details page where you customize the end user login experience in the installer configuration.
On the General Settings tab, set up the installer configuration for your operating system.
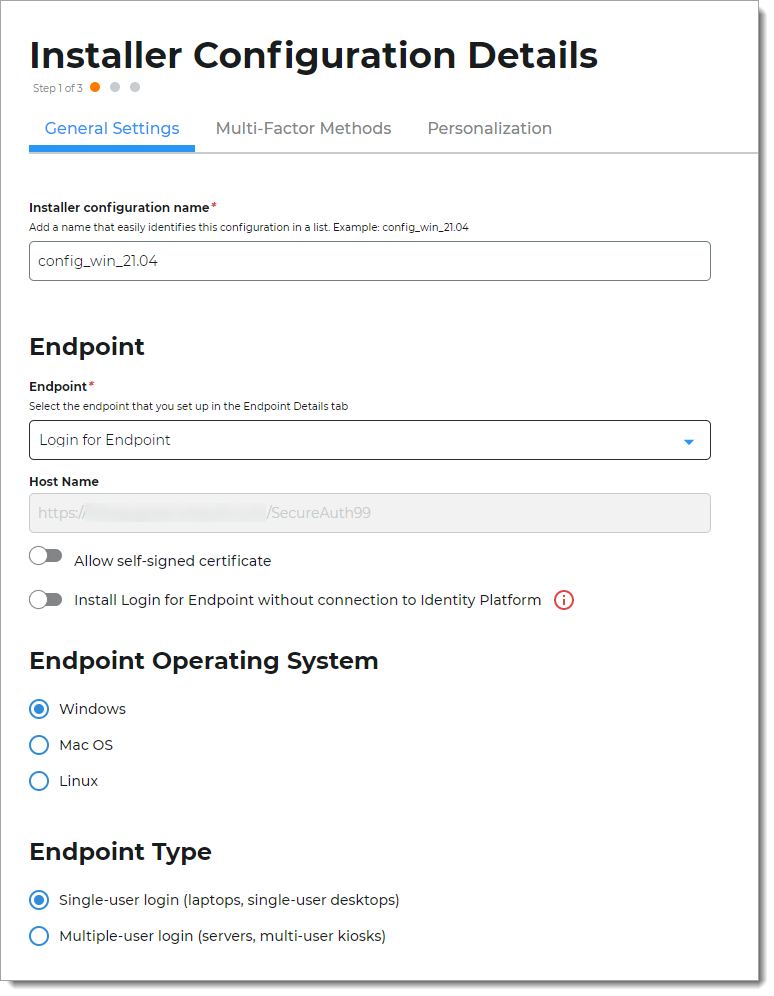
Installer configuration Name
Set the name of the installer configuration.
This name is displayed in a list that could be very long, depending on how many endpoints you set up. Be sure to use a name that is easy to identify.
Endpoint / Host Name
Set to the name of the endpoint you created on the Endpoint Details page in Step 2.
This connects the endpoint to communicate with the Identity Platform through the API.
Allow self-signed certificate
Turn on this option only in test or lab environments where the server has a self-signed certificate.
When turned on, it turns off all certificate validations. To establish communication, the HTTP client then accepts valid certificates, self-signed certificates, expired certificates, invalid root certificates, certificates without matching common names, and so on.
Do not turn on this option for production environments. In production, the option introduces critical security risks, like the potential "Man in the middle" attack which grants users access to a system without validating their credentials, and lets unauthorized users steal OATH seeds. If the option is set in production, it sends you a warning message that the option is enabled.
After installing an endpoint with this option set, it remains effective until you uninstall the endpoint. Then, reinstall the endpoint using a configuration file with this option turned off.
Install Login for Endpoint without connection to Identity Platform
Turn on this option, for example, to to allow a third-party organization to configure machines for your end users. If the third-party organization does not have a connection to the Identity Platform, this option allows them to complete the configuration.
When turned on, set the Grace Period and specify the number of days for password-only login. This setting is on the Multi-Factor Methods tab.
Alternatively, to achieve the same results for self-service password reset (SSPR) without a connection to the Identity Platform, on the Multi-Factor Methods tab, use these settings:
Clear the Grace Period check box
Select the Enable adaptive authentications check box
Clear the Logging in with physical access check box
Clear the Logging in via remote desktop protocol check box
Endpoint Operating System
Select the operating system of the endpoint:
Windows
Mac OS
Linux
Endpoint Type
Select the type of endpoint:
Single-user login (laptops, single-user desktops)
Multiple-user login (servers, multi-user kiosks)
Click Next Step.
On the Multi-Factor Methods tab, customize the login experience for your end users.
Existing customers might recognize the following options, which were set in the config.json file in previous releases.
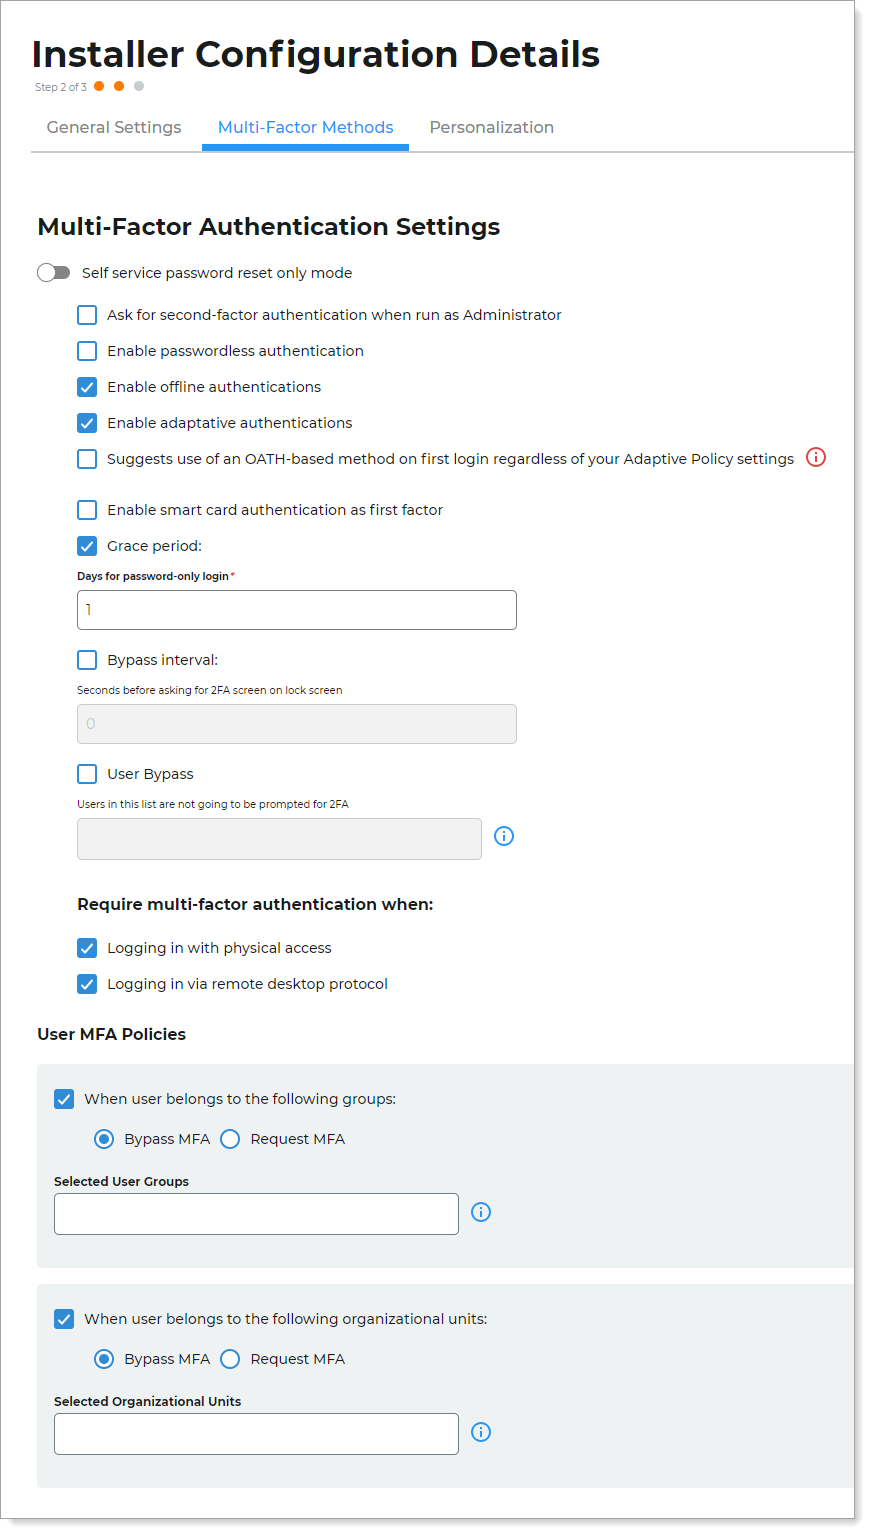
Self-service password reset-only mode
Available only for Windows endpoint
Turn on this option to set up a self-service password reset (SSPR) option for end users to select on their login screen.
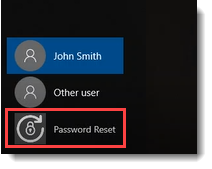
When this option is on, it deactivates all other options on the page. If you want the Password Reset link plus all the Login for Windows features (MFA, adaptive engine, etc.), configure the following:
Turn off the Self-service password reset-only mode.
Select the Enable update password link on the login interface check box and set the URL to SSPR site. (This option is on the Personalization tab, in the Password Reset section).
For the URL, specify either the SecureAuth Identity Platform realm or the web page the user can access to reset their password.
Ask for second-factor authentication when run as Administrator
Available only for Windows endpoint
Indicate whether a user who logs in with "Run as administrator" on the same machine used to log into a regular user account must authenticate again.
Select this check box – Log in with "Run as administrator" must authenticate again
Clear this check box – Log in with "Run as administrator" is not required to authenticate again
Enable passwordless authentication
Available only for Windows endpoint
Select this check box to allow end users to use a fingerprint reader to authenticate by using any enrolled fingerprint.
This is not the setting for second factor biometric authentication in the SecureAuth Authenticate app.
On Login for Windows and Login for Mac, see Use fingerprint recognition on mobile in the End user login experience topic.
On Login for Linux, see Approve login notification for fingerprint recognition in the End user login experience topic.
Enable offline authentications
Indicate whether end users can authenticate when offline.
SecureAuth uses OATH seeds to validate OATH-based methods (like TOTP or HOTP) when end users log in. Most use cases require SecureAuth to store OATH seeds, and if they are not stored, end users cannot login while offline. In a scenario where, for example, a server is always online, you might not want to cache the OATH seed. This prevents a leak or theft of the OATH seed.
Enable adaptive authentications
Indicate whether to allow adaptive authentication.
This setting acts similar to Adaptive Authentication settings in the Identity Platform. You can limit how admins and users log in in several ways, for example, by username, group, IP, and so on.
Suggests use of an OATH-based method on first login regardless of your Adaptive Policy settings
Set this option to display a message that suggests end users authenticate for the first login by using an OATH-based method, such as TOTP, HOTP, etc. This ensures that they can log in when offline.
Login for Endpoints requires end users to use one OATH-based method, if at least one method is available to end users. If at least one OATH-based method is not available to end users, they can use any other available method, but offline login will not be available.
Enable smart card authentication as first factor
Available only for Windows endpoint
If your organization has smart card authentication enabled on Windows workstations, you can select this check box to use it as the first factor in Login for Windows.
To learn more, see this Microsoft article on virtual smart cards.
Grace period
Indicate whether there is a grace period (with a set number of days) in which end users can use a password-only login to a machine.
After end users set up their second-factor methods, they can dismiss the password-only login screen.
For a detailed description with a use case, see First login with password only section in the End user login experience topic.
Bypass interval
Available only for Windows endpoint
Define whether end users must authenticate again with a second factor after a set period of time, if they lock their workstation.
Clear this check box – End users must authenticate with second factor each time they unlock their workstation.
Select this check box – End users must use second factor for their login, but do not need to authenticate again until after the set time has passed after they lock their workstation.
For example, the time is set for 32400 seconds (9 hours). The end user locks their workstation after working for 8.5 hours. That evening, the end user decides to unlock their workstation and finish a few tasks. More than 9 hours have passed, so the end user will need to authenticate with a second factor.
User Bypass
Define whether to allow specific end users to bypass second factor authentication. Usernames added to the list will not be prompted for second factor.
Clear this check box – All users must authenticate with second factor at every login.
Select this check box – Users must authenticate with second on first login. After that, users listed in the field bypass second factor on subsequent logins.
The endpoint supports the following formats:
.\\username– For local accounts. Use this format only when manually editing theconfig.jsonfile..\username– For local accounts entered through the configuration UI. The platform automatically formats this as.\\usernamein theconfig.jsonfile.username– For domain accounts on the local machine's domain. Must match the username in Active Directory.username@domain.local– For remote login (RDP, SSH, or PAM). Use UPN formats. For example,"jsmith@acme.local"
To add more than one username, press Enter after each entry.
Example (
config.json):"user_bypass":[".\\username", "username", "username@domain.local"]
Require multi-factor authentication when:
Logging in with physical access
Login for Windows and Login for Mac – Select this check box to require MFA, using a login workflow like Username & Password | MFA Method. That is, not logging in remotely.
Login for Linux – Select this check box to allow a user to log into the same machine as a different user by using
suorsudo.
Windows: Logging in via remote desktop protocol
Linux / Mac: Logging in via Remote Connection (SSH)
Windows – Select this check box to require multi-factor authentication when users log in via remote desktop protocol.
Linux / Mac – Select this check box to require multi-factor authentication when users log in through a remote console in a Secure Shell (SSH) session.
User MFA Policies - When user belongs to groups
Select this check box to bypass MFA or request MFA for users who belong to a group.
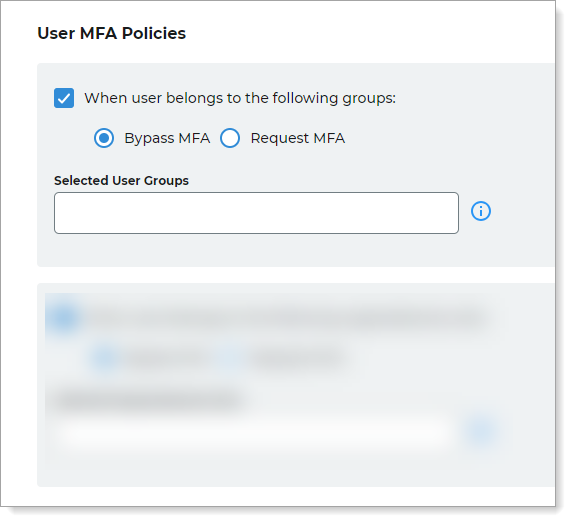
Users must belong to a local or domain group that you specify in the text box. Add local users only to the local group.
Note
If you have issues with the group bypass, make sure the global catalog on the Active Directory (located on port 3268) is open.
To add more than one group in the field, press Enter after each entry. See the following formats for group names. All endpoints support the following syntax.
Local machine groups
Format:
.\\local_groupnameExample:
.\\Administrators
Remote groups (computer domain). For remote groups of the domain on which the machine is joined.
Format:
groupnameExample:
GroupName
Remote groups (specific domain name). For groups that are part of a specific domain. You can specify this in two formats.
UPN format. Recommended format to use in all platforms.
Format:
group-name@group-domainExample:
ITAdmins@customerDomain.local
SAM format. Not recommended. We do our best effort to convert group names from SAM formats to UPN formats; however it could fail in some scenarios, mainly on macOS and Linux platforms.
Format:
domain\\groupnameExample:
customerDomain\\GroupName
Forest domain groups. You can use forest groups when they exist in the Global Catalog of a domain, like groups created as Universal Groups in Active Directory.
For example, if a computer is joined to the domain
users.customerDomain.local, a forest domain could beit.customerDomain.local.
Code example in json file to bypass MFA for users in groups:
"mfa_policies": {
        "user_groups": {
           "policy": "bypass_mfa",
           "groups": ["Domain Admins@myDomain.com", "ITAdmins@myDomain.com", ".\\Administrators"]
}
Code example in json file to request MFA for users in groups:
"mfa_policies": {
        "user_groups": {
           "policy": "request_mfa",
           "groups": ["Domain Admins@myDomain.com", "ITAdmins@myDomain.com", ".\\Administrators"]
}
User MFA Policies - When user belongs to organizational units
Available only for Windows endpoint
Select this check box to bypass MFA or request MFA for users who belong to an organizational unit.
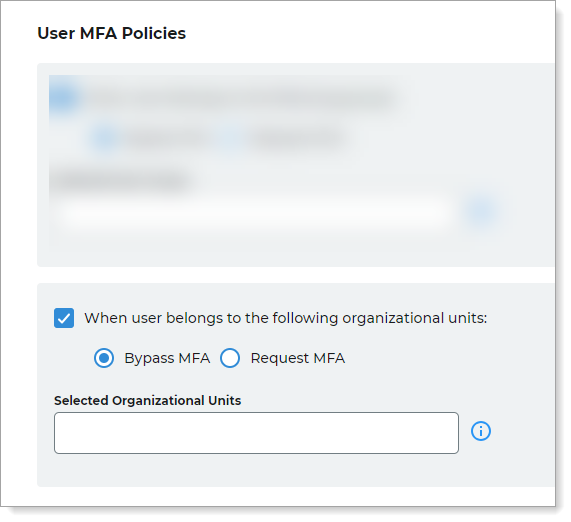
Users must belong to an organizational unit that you specify in the text box.
To add more than one organizational unit in the field, press Enter after each entry. See the following organizational unit name formats.
Organizational units
Format:
OU=users1,OU=Domain Users,DC=mydomainExample:
OU=eng,OU=it,DC=acme
Code example in json file to bypass MFA for users in groups:
 "user_organizational_units": {
           "policy": "bypass_mfa",
           "organizational_units": ["OU=eng,OU=it,DC=domain,DC=company,DC=com", "OU=developers"]
 },
Click Next Step.
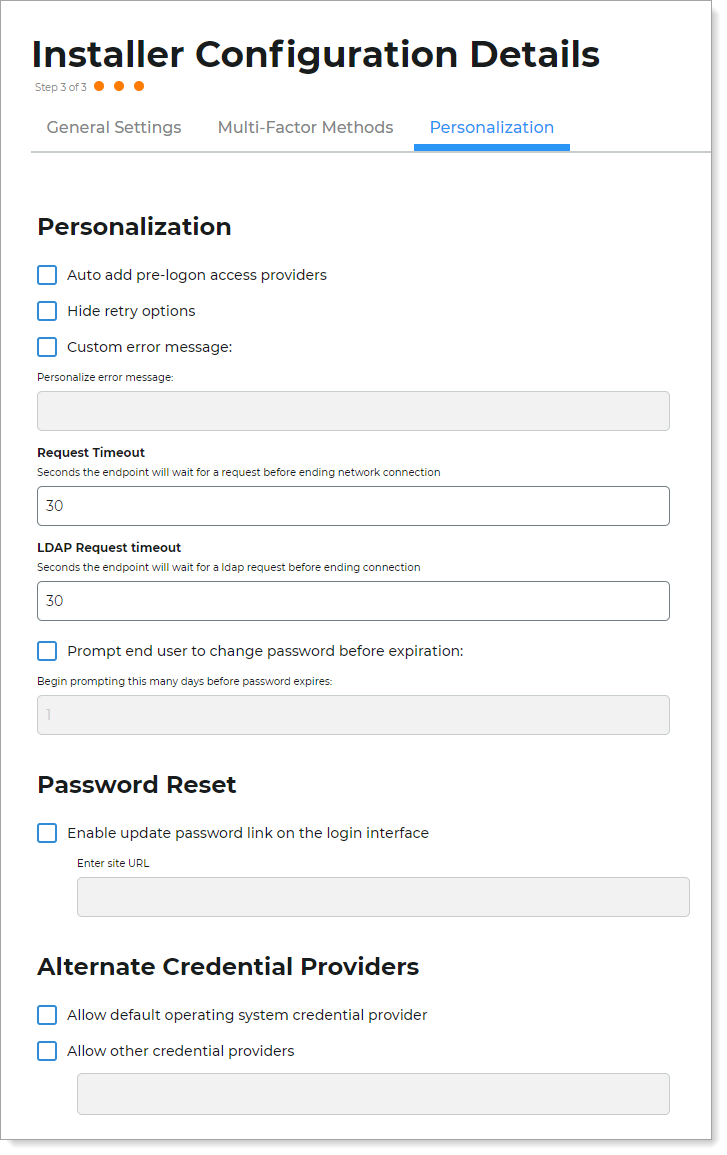
On the Personalization tab, personalize more of the user login experience.
Personalization
Auto add pre-logon access providers
Available only for Windows endpoint
Select this check box to allow a pre-login access provider so that end users can connect to VPN clients before logging into Login for Windows.
Hide retry options
Available only for Windows endpoint
Select this check box to hide the "retry the connection" button on the login screen when Login for Windows is offline.
Custom error message
Select this check box to personalize the error message for end users who are locked out of their accounts. For example, you could enter a message like the following:
"For assistance, please contact Acme Help Desk at 949-555-1212, help@acme.com, or https://helpdesk.acme.com."
Request Timeout
Set the timeout in seconds, that the Login for Endpoint waits for HTTP requests to respond. The default is 30 seconds. Use this option to reduce network wait times, because after it reaches the specified timeout value, it ends the network connection for HTTP requests.
For example, if the endpoint tries to contact the Identity Platform, and cannot for any reason, the endpoint ends the network connection after reaching the timeout value. If this timeout value is not set, the endpoint keeps trying to reach the Identity Platform.
LDAP Request Timeout
Available only for Windows and Linux endpoints
Set the timeout in seconds, that the Login for Endpoint waits for LDAP requests to respond. The default is 30 seconds. Use this option to reduce network wait times, because after it reaches the specified timeout value, it ends the network connection for LDAP requests.
For example, if the endpoint tries to contact the data store, and cannot for any reason, the endpoint ends the network connection after reaching the timeout value. If this timeout value is not set, the endpoint keeps trying to reach the data store.
Code example in json file:
"ldap_timeout": 30,
Prompt end user to change password before expiration
Available only for Windows endpoint
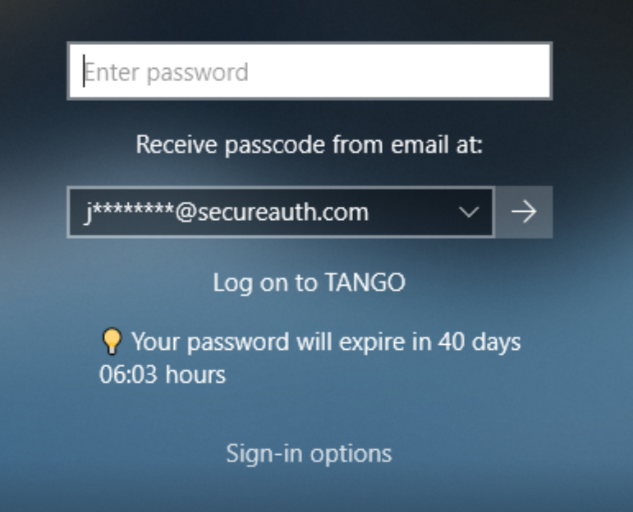
Select this check box to prompt end users to change their password before it expires in "x" number of days.
In the text box, set the number of days to warn the user before their password expires.
For example, end users will see a warning message at the login prompt similar to the following image.
Password Reset
Enable update password link on the login interface
Available only for Windows endpoint
Select this check box to set up a self-service password reset (SSPR) link for end users to select on their login screen.
In the text box, specify either the SecureAuth Identity Platform realm or the web page URL the user can access for resetting a password.
If you use this setting, you will need to clear the Self-service password reset-only mode check box on the Multi-Factor Methods tab.
Alternate Credential Providers
Allow default operating system provider
Available only for Windows endpoint
Select this check box to add the default credential provider on the login screen. This allows end users to log in by using a password and second factor with the SecureAuth credential provider. Or, they can use a password only with the default credential provider.
This option helps new teams starting out with Login for Windows to have a default credential provider option for end users to authenticate as a fallback.
Allow other credential providers
Available only for Windows endpoint
Select this check box to allow the use of non-SecureAuth credential providers and other credential providers, like card scanners. Be aware of the following, especially the first item:
This option is only recommended in test environments. This allows test users to bypass Login for Windows so they can access their machines.
Users will be able to log in without using the Login for Windows credential provider, and potentially bypass multi-factor authentication.
Since users will see their normal login prompt, they will have to manually select a different login option to use Login for Windows.
Save your changes.
Saving creates a configuration file, which contains all the customizations that you set.
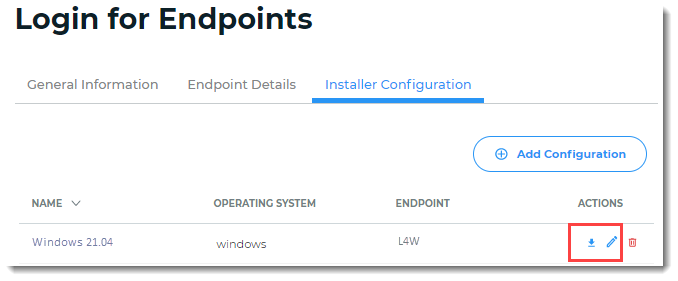
Download the configuration file, which you will need during installation. The configuration file must live in the same folder as the Login for Endpoint installer file that you will download later.
Click the download icon in the Actions column. The downloaded file is named
config.json.If you open the
config.jsonfile, it looks like the following code, depending on the OS you are using and the customizations you set:Login for Windows config.json example
{
    "platform": "windows",
    "version": "v2",
    "conf_version": 9,
    "allow_self_signed": false,
    "adaptive_enabled": true,
    "mfa_policies": {
        "user_groups": {
            "policy": "bypass_mfa",
            "groups": [
                "bypassgroup@customerDomain.local",
                ".\\LocalAdmins"
            ]
        },
        "user_organizational_units": {
            "policy": "bypass_mfa",
            "organizational_units": [
                "OU=eng,OU=it,DC=domain,DC=company,DC=com,",
                "OU=developers"
            ]
        }
    },
    "store_seeds": true,
    "custom_error_message": "",
    "install_without_idp": false,
    "suggest_first_login": false,
    "request_timeout": 30,
    "apis": [
        {
            "host": "https://idpinstance.secureauth.com/SecureAuth99",
            "id": "5357cxxxxxxxxxxxxxxxxxxxxxxxxxxx",
            "secret": "39906dxxxxxxxxxxxxxxxxxxxxxxxxxxxxxxxxxxxxxxxxxxxxxxxxxxxxxx"
        }
    ],
    "grace_period": 1,
    "alternate_providers": [],
    "multiple_user": false,
    "hide_retry_option": false,
    "bypass_interval": 0,
    "enabled_on_uac": false,
    "idm_sspr_url": "",
    "auto_add_plaps": false,
    "passwordless_enabled": false,
    "ldap_timeout": 30,
    "smartcard_authentication_enabled": false,
    "access_level": 0
}
Login for Mac config.json example
{
    "platform": "mac",
    "version": "v2",
    "conf_version": 8,
    "allow_self_signed": false,
    "adaptive_enabled": true,
    "group_bypass": ["BypassGroup@customerDomain.local", ".\\LocalAdmins"],
    "store_seeds": true,
    "custom_error_message": "",
    "install_without_idp": false,
    "suggest_first_login": false,
    "request_timeout": 30,
    "apis": [
        {
            "host": "https://idpinstance.secureauth.com/SecureAuth7",
            "id": "6bc7bxxxxxxxxcxxxxxxxxxxxx",
            "secret": "c817e6xxxxxxxxxxxxxxxxxxxxxxxxxxxxxxxxxxxxxxxxxxxxxxxxxxx"
        }
    ],
    "access_level": 0
}
Login for Linux config.json example
{
   "access_level": 0,
    "adaptive_enabled": true,
    "apis": [
        {
            "host": "https://idpinstance.secureauth.com/SecureAuth99",
            "id": "5357cxxxxxxxxxxxxxxxxxxxxxxxxxxx",
            "secret": "39906dxxxxxxxxxxxxxxxxxxxxxxxxxxxxxxxxxxxxxxxxxxxxxxxxxxxxxx"
        }
    ],
    "conf_version": 9,
    "custom_error_message": "",
    "follow_idp_redirect": false,
    "grace_period": 0,
    "install_without_idp": false,
    "lang_locale": "en_US",
    "ldap_timeout": 30,
    "mfa_policies": {
        "user_groups": {
            "policy": "bypass_mfa",
            "groups": [
                "bypassgroup@customerDomain.local",
                ".\\LocalAdmins"
            ]
        }
    },
    "platform": "linux",
    "request_timeout": 30,
    "store_seeds": true,
    "suggest_first_login": false,
    "version": "v2"
}
Note
If you need to change any of your customizations, you must change them on the Installer Configuration page and download the file again. Any change you make requires an updated
config.jsonfile downloaded to the endpoint installation folder.Do not directly edit the
config.jsonfile unless instructed by SecureAuth Support.Your Login for Endpoint (Windows, Mac, or Linux) is set up with the Identity Platform.
You are now ready to install the endpoint on the target workstation (laptop, desktop, server, etc).