OpenID Connect and OAuth 2.0 configuration
This guide outlines the configuration of the SecureAuth® Identity Platform as an OpenID Connect Provider and OAuth 2.0 Authorization Server.
Prerequisites
Any of the following Identity Platform releases with an integrated application policy and data store:
Identity Platform release 22.12 or later
Identity Platform release 22.02 with hotfix 22.02-5 or later
Identity Platform release 21.04 with hotfix 21.04-11 or later
Identity Platform release 20.06 with hotfix 20.06-16 or later
Knowledge of OpenID Connect and OAuth 2.0
Authorization code
Obtains the authorization code from the authorization endpoint and all tokens are returned from the token endpoint
Returns an authorization code that can be exchanged for an identity token and / or access token
Requires client authentication using a client ID and secret to retrieve tokens from the back end
Permits long lived access through the use of refresh tokens
Implicit
Obtains all tokens from the authorization endpoint
Requests tokens without explicit client authentication
Uses the redirect URI to verify the client identity
Is not suitable for long lived access tokens; refresh tokens not supported 'token', 'id_token', 'id_token token'
Hybrid
Obtains the authorization code and tokens from the authorization endpoint, and request tokens from the token endpoint
Lets the client make immediate use of an identity token and optionally retrieve an authorization code via one round trip to the authentication server
Used for long lived access via the use of refresh tokens
Clients using this flow must be able to maintain a secret
'code id_token', 'code id_token token', 'code token'
Authorization code
Obtains access tokens and refresh tokens
Optimized for server-side applications in which source code is not publicly exposed
Is a redirection-based flow; application interacts with the user-agent (user's web browser) and receives API authorization codes routed through the user-agent
Proof Key for Code Exchange (PKCE) support to mitigate the threat of the authorization code interception attack
Implicit
Obtains access tokens; refresh tokens not supported
Optimized for public clients operating a particular redirection URI; client secret confidentiality not guaranteed
Is a redirection-based flow; access token is given to the user-agent which passes it to the application (identity of the application is not authenticated)
Resource owner password credentials
Used as an authorization grant to obtain an access token; user provides service credentials (username and password) directly to the application for an access token
Eliminates the need for the client to store the resource owner credentials by exchanging credentials for a long-lived access token or refresh token
Should only be used on an application trusted by the user (user's desktop OS, or an application owned by the service)
Client credentials
Used as an authorization grant when the authorization scope is limited to protected resources under control of the client or the authorization server
Tokens are requested on behalf of a client, not a user, and requests are sent to the token endpoint
Refresh token
Used for obtaining a new access token after the original access token expires or becomes invalid
Issued to the client by the authorization server
Lets users request a fresh access token from the authorization server for long-lived access to APIs
Authorization endpoint | Resides on the authorization server on which the resource owner authenticates for access to the client application. | https://.../secureauth1/secureauth.aspx |
Token endpoint | Resides on the authorization server on which the client application exchanges information for an access token. | https://.../secureauth1/oidctoken.aspx |
UserInfo endpoint | Used to retrieve a user's identity information. | https://.../secureauth1/oidcuserinfo.aspx |
End session endpoint | Used to trigger a user's single sign-out by redirecting the user's browser to the end session URL. | https://.../secureauth1/oidcendsession.aspx |
Check session iFrame endpoint | Used to verify if the user's session on a server using iFrames has ended so necessary cleanup can be performed. | https://.../secureauth1/oidcchecksession.aspx |
Discovery endpoint | Used to retrieve the discovery document containing information clients might use for token validation. | https://.../secureauth1/.well-known/openid-configuration |
Token introspection endpoint | Lets the holder of an access token request token verification information from the issuing provider. | https://.../secureauth1/OAuthintrospect.aspx |
Token revocation endpoint | Revokes user access tokens and refresh tokens. | https://.../secureauth1/OAuthRevocate.aspx |
Identity Platform configuration
In the Identity Platform, go to the Classic Experience (release 20.06) or Advanced Settings (release 21.04 or later).
Go to the Data tab for the realm where you will configure OpenID Connect and OAuth 2.0.
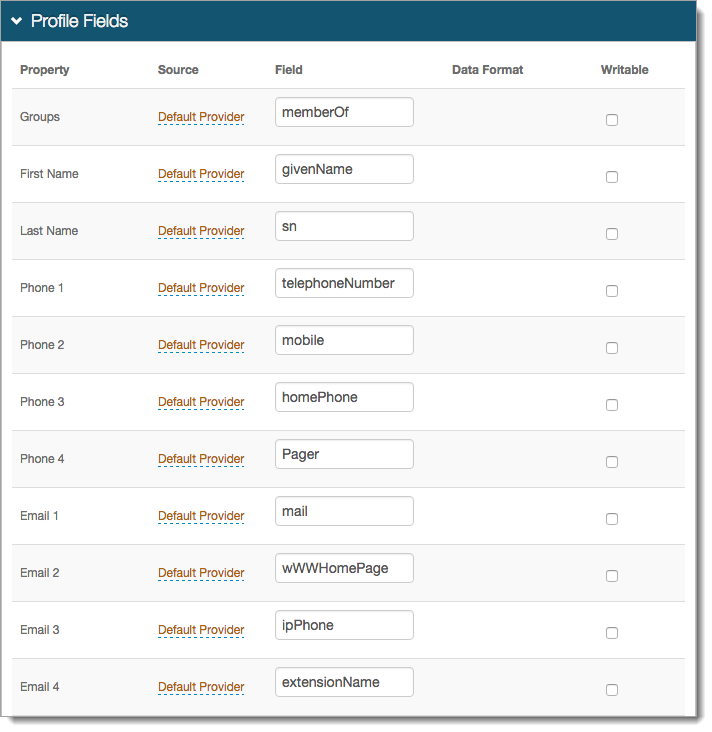
In the Profile Fields section, map the attributes from the profile fields to the Identity Platform Profile Properties that will be used as OpenID Connect Claims.
The OpenID Connect Standard Claims is supported by the Identity Platform, and can be used as a reference.
Save the configuration.
Go to the Post Authentication tab.
In the Post Authentication section, set the Authenticated User Redirect to: OpenID Connect/OAuth2.

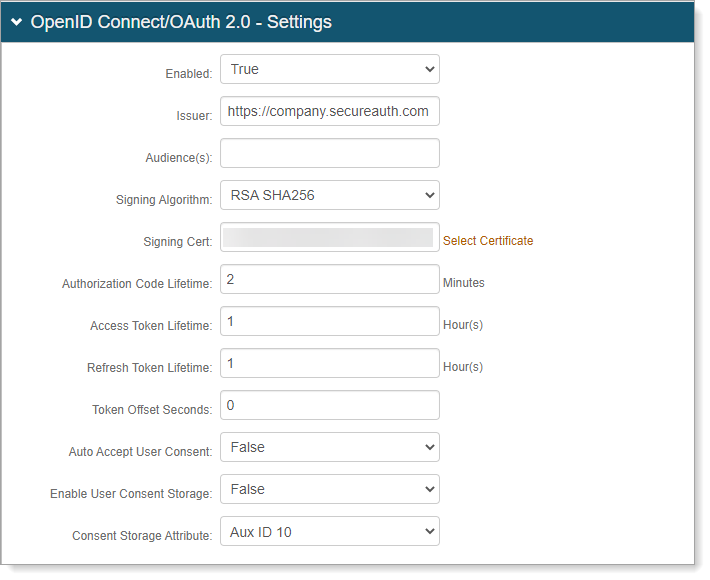
In the OpenID Connect / OAuth 2.0 - Settings section, set the following:
Enabled
Set security enhancement to enable (True) or disable (False) OpenID Connect and OAuth2 endpoints.
Issuer
Set the value used in the 'iss' claim.
Audience
Set the access token audience for OAuth 2.0 integrations. This allows you to set an audience value that is different from the Issuer value. For example, internal vs external clients. This value is unique for each realm.
Signing Algorithm
Set the signing algorithm used for signing JSON web tokens as one of the following:
RSA SHA256 uses the X.509 certificate selected for Signing Cert
HMAC SHA256 uses the client secret for signing
Signing Cert
Certificate used to sign JSON Web Tokens produced by the Identity Platform.
Authorization Code Lifetime
Length of time for Authorization Code lifetime in minutes.
Access Token Lifetime
Length of time for Access Token lifetime in hours.
The system is set with a default clock skew at 5 minutes (see https://docs.microsoft.com/en-us/dotnet/api/microsoft.identitymodel.tokens.tokenvalidationparameters.defaultclockskew?view=azure-dotnet).
For example, if you set the Access Token Lifetime with a value of .25 for an intended token expiration at 15 minutes, it will actually expire at 20 minutes due to the default clock skew.
Refresh Token Lifetime
Length of time for Refresh Token lifetime in hours.
Token Offset Seconds
Length of time for nbf (not before) claim time offset in seconds.
Auto Accept User Consent
When set to True, users are not prompted to grant consent to a client for a given request. Acceptance is assumed granted and tokens are issued.
Enable User Consent Storage
When set to True, user consent granted to a client is stored as an encrypted and compressed string value in the attribute specified at Consent Storage Attribute.
Consent Storage Attribute
Data store attribute mapped to profile Property which saves the user's consent.
Sample image from Profile Fields section of the Data tab:

For example, the Aux ID 10 field from the profile Property corresponds with the value set in the Consent Storage Attribute field. This field must be writable and support a varying character length.
Tip
The Consent Storage Attribute must be a Single-Value directory string attribute type (for example, houseIdentifier, adminDescription).
A single consent from the OIDC client starts at ~277 bytes, which means the attribute needs a minimum value of 1.
Each additional consent from an OIDC client increments by ~60 bytes.
The maximum supported value for the attribute assigned to store the User Consent depends on how many OIDC clients your organization expects end users to connect to.
Example:
"houseIdentifier" has a maximum value of 32768 bytes. so it could theoretically store 542 different consents.
(32768 minus 277, then divided by 60 = 542)
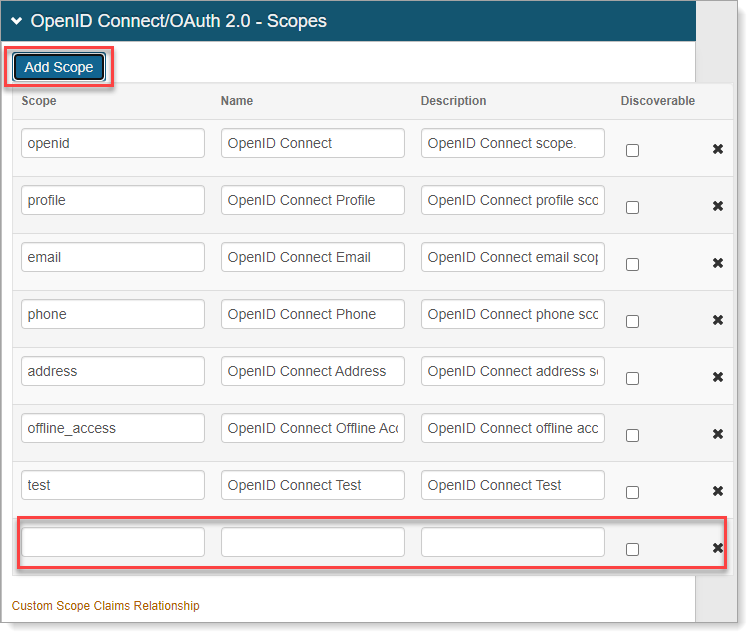
In the OpenID Connect / OAuth 2.0 - Scopes section, by default, a set of OpenID Connect scopes are preconfigured and required in certain OpenID Connect flows. To add a scope, click Add Scope and set the following:
Scope
Value passed to the endpoints during authorization requests. This value must be URL-safe and not include spaces.
Name
User-friendly display name in list of scopes from which access is requested on the user consent page.
Description
User-friendly description of scope in list of scopes from which access is requested on the user consent page.
Discoverable
When the check box is selected, the associated scope value is listed at the Discovery Configuration endpoint.
Custom Scope Claims Relationship
Optional. Click the Custom Scope Claims Relationship link to configure custom scope claims relationships.
For more information, see the Custom Scope Claims Relationship section below.
Save the configuration.
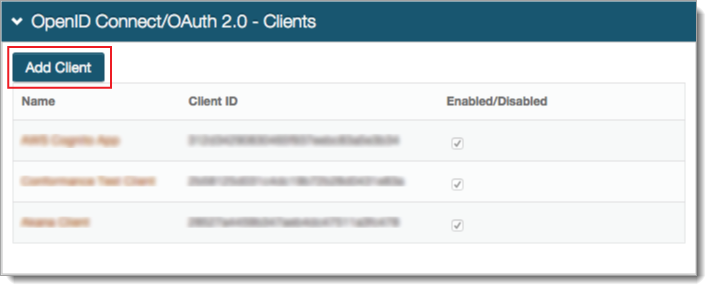
In the OpenID Connect / OAuth 2.0 - Clients section, click Add Client.
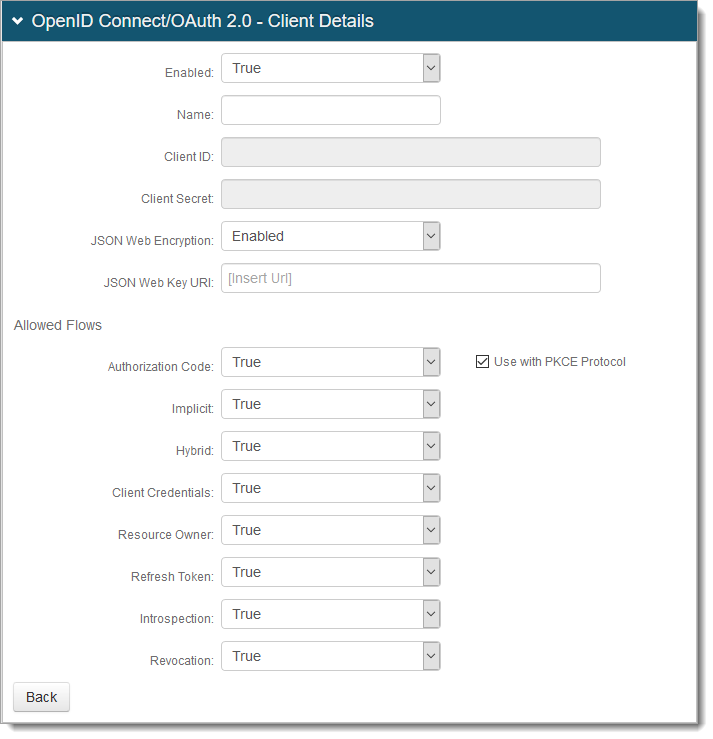
In OpenID Connect / OAuth 2.0 - Client Details, set the following:
Enabled
Security enhancement to enable (True) or disable (False) the client.
Name
User-friendly name of the client requesting access to display on the user consent page.
Client ID
Automatically created unique identifier of the client.
Client Secret
Automatically created unique secret of the client.
JSON Web Encryption
Indicate whether the JSON web encryption settings for the client is Enabled or Disabled.
JSON Web Key URI
When JSON Web Encryption is enabled for the client, enter the web key URL.
Allowed Flows section - To indicate which flows the client is allowed to use, set to True or False
Authorization Code
Indicate whether client can use the Authorization Code flow.
With the True setting, select the Use with PKCE Protocol check box to enable secure access to native and mobile apps using an Authorization Code flow with PKCE.
Implicit
Indicate whether client can use the Implicit flow.
Hybrid
Indicate whether client can use the Hybrid flow.
Client Credentials
Indicate whether client can use the Client Credentials flow.
Resource Owner
Indicate whether client can use the Resource Owner flow.
Refresh Token
Indicate whether client can use the Refresh Token flow.
Introspection
Indicate whether client can use the Introspection flow.
Revocation
Indicate whether client can use the Revocation flow.
Save the configuration.
OPTIONAL. In the OpenID Connect / OAuth 2.0 - Client Scope Restrictions section, to restrict a client from using one or more of the defined scopes, click Add Scope and add the Scope value.

Alternatively, you can select the Whitelist checkbox to allow a client to use only the defined scopes.

Note
When using a scope whitelist or blacklist, at least one scope needs to be present for the feature to be enabled. For scope whitelists, all scopes must be defined in the scope definition section.
OPTIONAL. In the OpenID Connect / OAuth 2.0 - Client Redirect URIs section, to let a client use the Authorization Code or Implicit flows, click Add Redirect URI and add the allowed URI value (must include https)

Save your edits before leaving the Clients page.
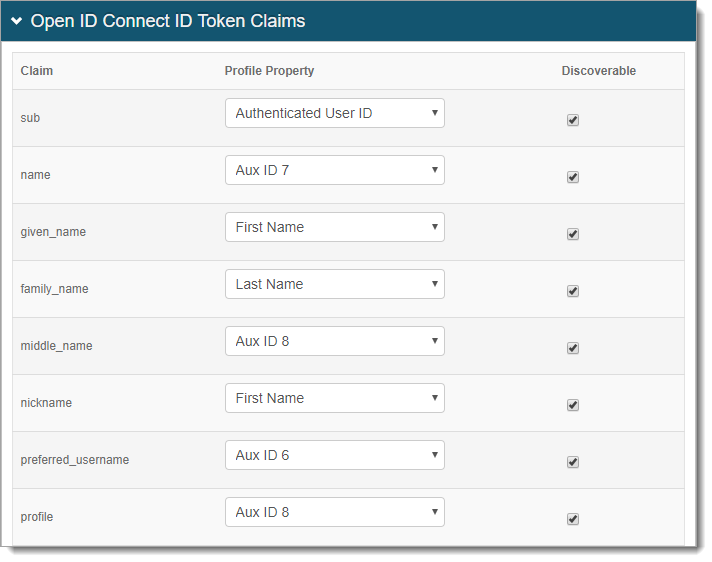
In the Open ID Connect ID Token Claims section, do the following:
Map the Claim to the Profile Property. A value of Unmapped indicates the claim will not be included in the produced JSON Web Token.
To list the associated Claim at the Discovery Configuration endpoint, select the Discoverable check box.
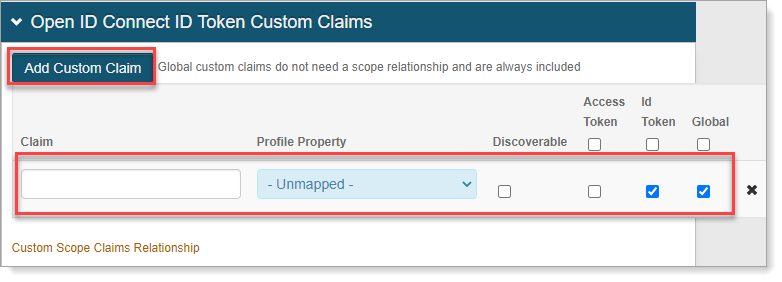
In the Open ID Connect ID Token Custom Claims section, to create Custom Claims, click Add Custom Claim and set the following:
Claim
Provide unique name for the Custom Claim.
Note
Claim names cannot include spaces.
Profile Property
Select a Profile Property to complete the mapping.
Discoverable
When the check box is selected, the associated claim is listed at the Discovery Configuration endpoint.
Access Token
When the check box is selected, the associated claim is included in the Access Tokens.
Id Token
When the check box is selected, the associated claim is included in the Identity Tokens.
By default, the Id Token and Global check boxes are selected.
Global
When the check box is selected, the associated claim is included regardless of the Scopes in the request.
By default, the Id Token and Global check boxes are selected.
Custom Scope Claims Relationship
Optional. Click the Custom Scope Claims Relationship link to configure custom scope claims relationships.
For more information, see the Custom Scope Claims Relationship section below.
Note
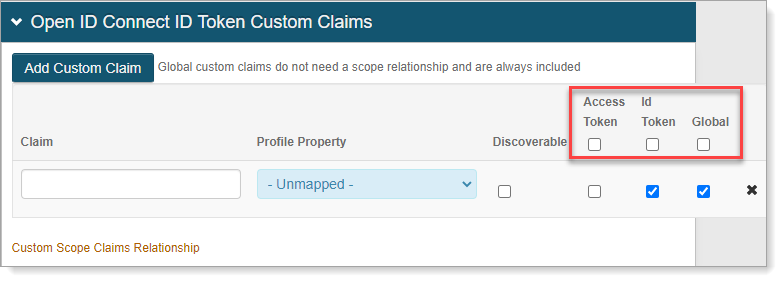
Select or clear the top level Access Token, Id Token, or Global check boxes to apply the same option to all scopes in that column.
Currently, this feature works only in release 20.06-16. It is a known bug and will be fixed in the following hotfixes:
21.04-12
22.02-7
22.12-1
Save the configuration.
Custom Scope Claims Relationship
For all custom claims, you can define a scope relationship to dynamically include in the tokens.
Note
Defined custom, non-global scopes are required to assign claim relationships.
If no custom scopes are defined, the following message appears when you click the Custom Scope Claims Relationship link:
 |
If custom scopes are defined as global scopes, the option to define a claims relationship is disabled.
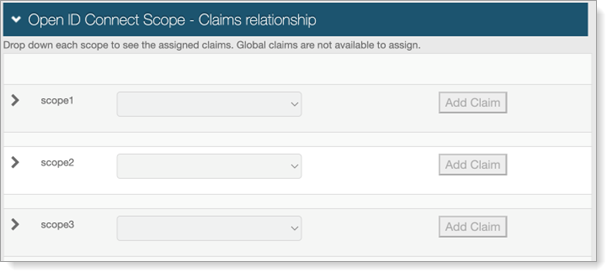 |
Click the Custom Scope Claims Relationship link in either the OpenID Connect / OAuth 2.0 - Scopes or Open ID Connect ID Token Custom Claims sections.
The Open ID Connect Scope - Claims relationship page appears.
For each scope, select the Claim to create a relationship with, and click Add Claim.
The related claim appears in the Claims list.
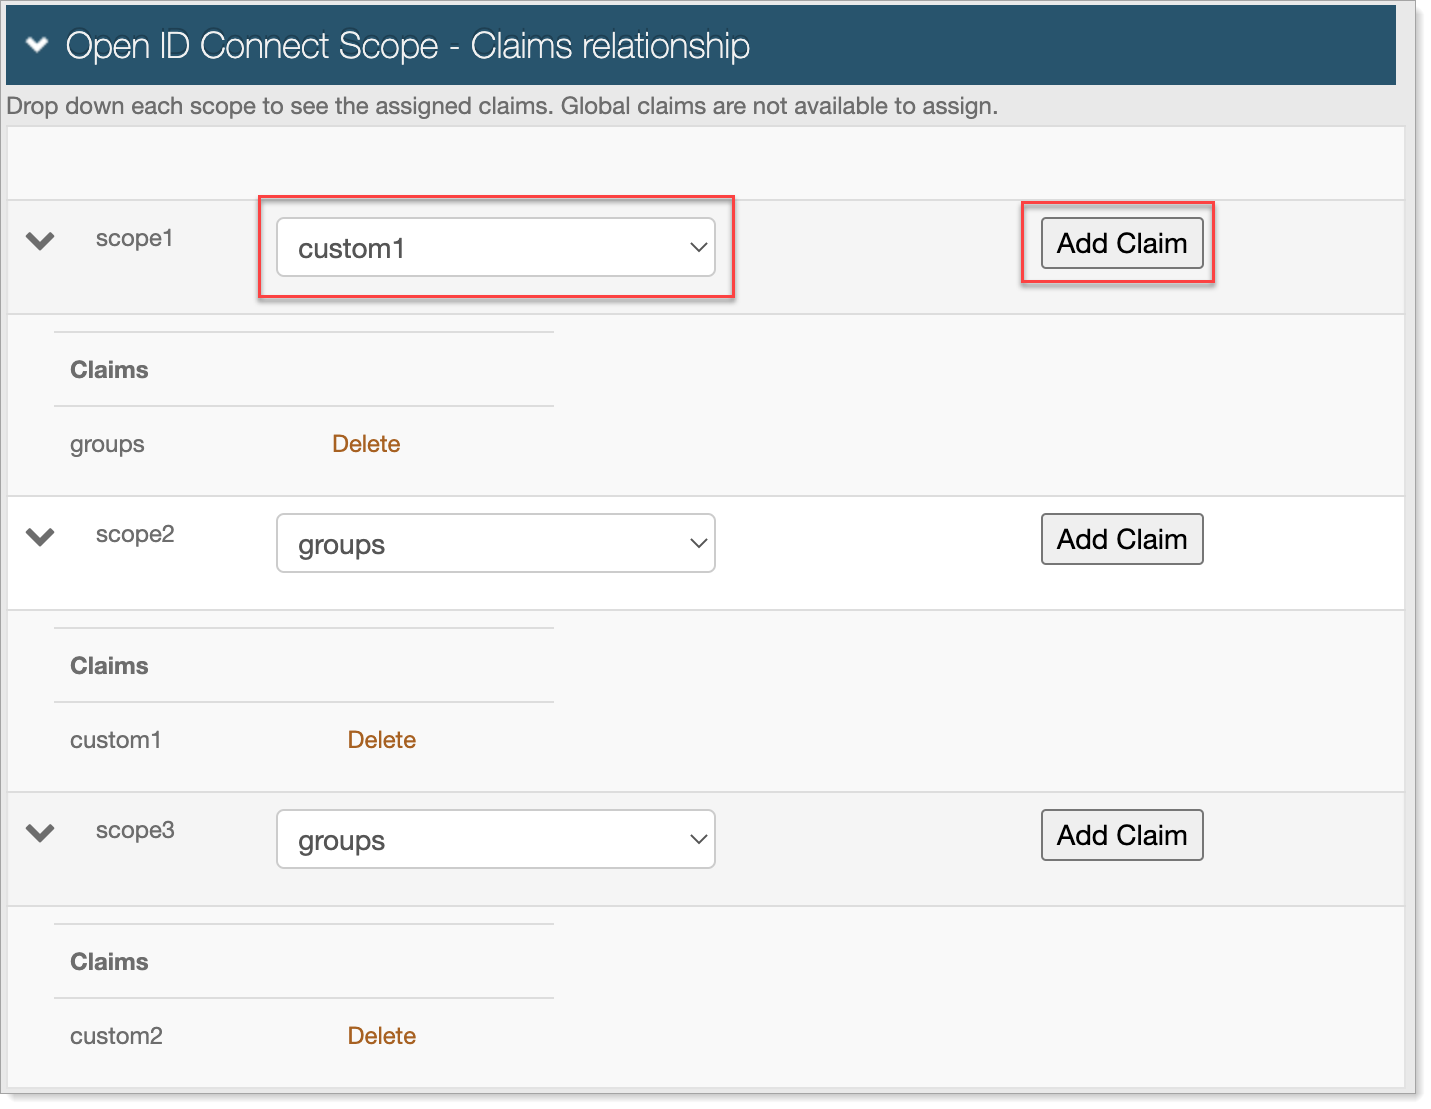
To delete a claim relationship, click the Delete link next to the claim to delete.
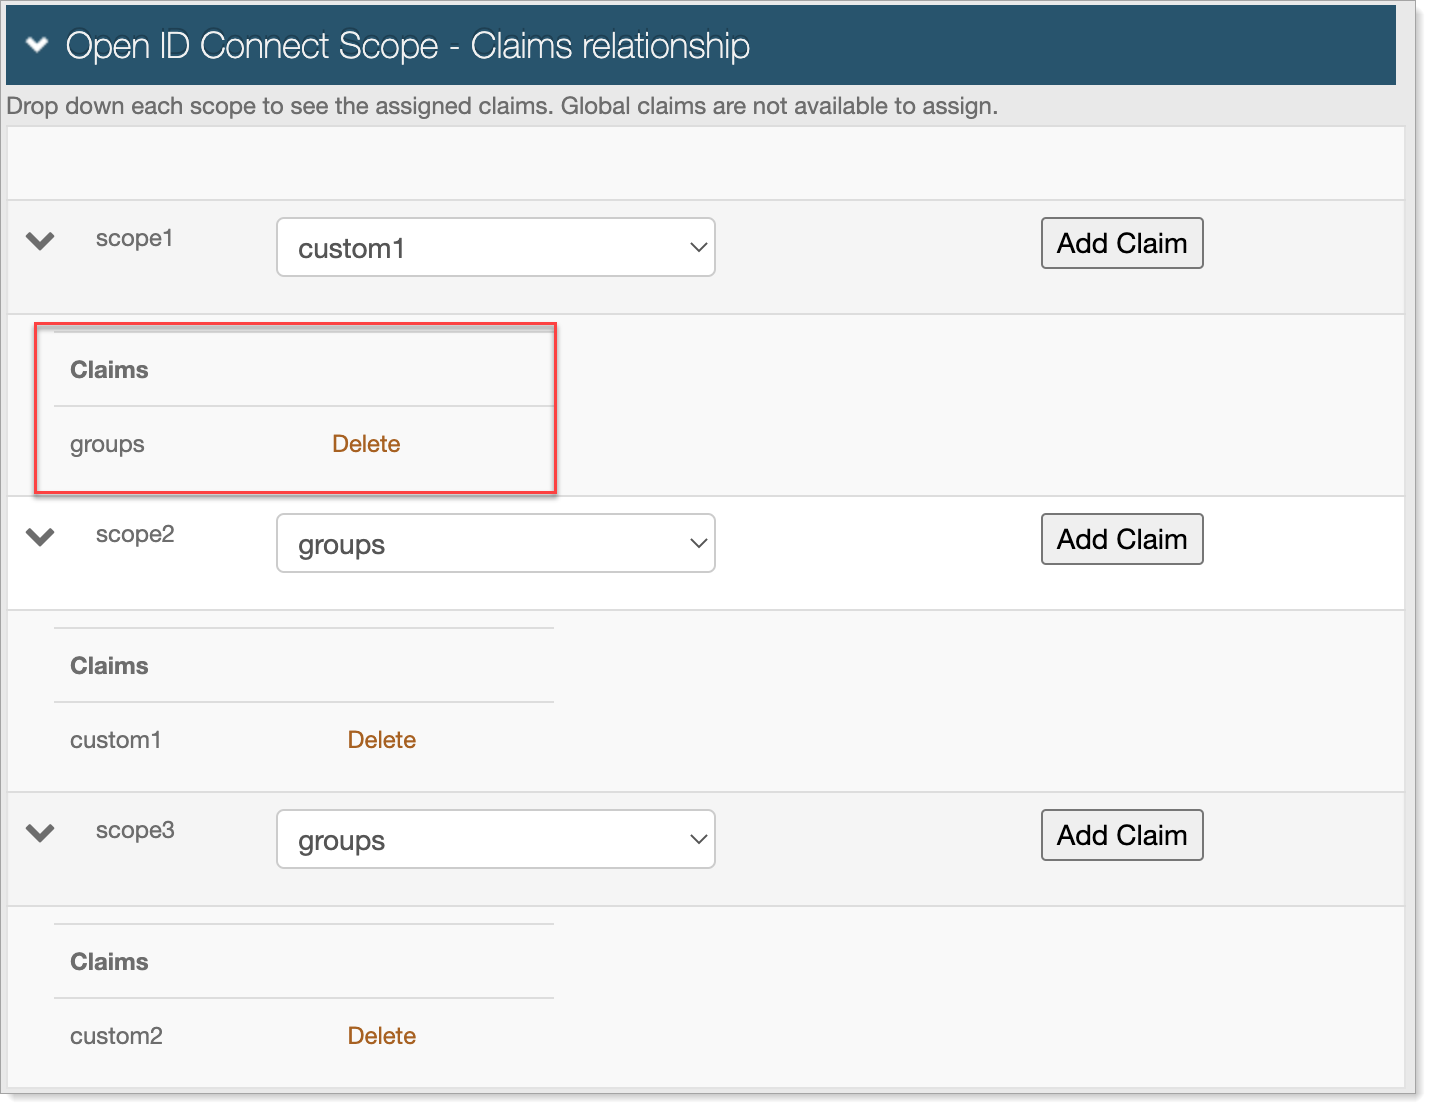
Save the configuration.
Application X configuration steps
Use the Client ID and Client Secret from the Identity Platform Web Admin to configure applications that are OpenID Connect / OAuth 2.0 ready.