SecureAuth IdP and Arculix integration (IdP Chaining)
Integrate SecureAuth® Identity Platform with Arculix to enable intelligent MFA. When you combine SecureAuth IdP and Arculix, you can improve your security posture with a passwordless continuous authentication solution.
As an IdP chaining solution, Arculix can assume the role as an IdP to authenticate users and redirect the flow back to SecureAuth IdP.
The end user login to an application starts in SecureAuth IdP. Then, it redirects the authentication process to Arculix for intelligent authentication and MFA. After verifying the user, it sends them back through SecureAuth IdP to access an application.
Note
In this chaining configuration, the login page starts with SAMLSP.aspx instead of the usual SecureAuth.aspx.
For more information, see Task F: Set Begin Site URL in SecureAuth IdP.
Prerequisites
Identity Platform release 24.04
Note
For Identity Platform releases 23.07 or earlier, see the integration guide specific to an earlier Identity Platform release number like Identity Platform 23.07.
Have an integration with a supported data store in the Identity Platform
Have MFA authentication policy set up
Have at least one application integrated and attached to the authentication policy (Resources tab)
Have a configured Arculix instance and user account with administrative privileges for Arculix
Have an integration with a supported data store in Arculix
Have an Identity Provider created in Arculix
Have a policy set up in Arculix
Base URL for your Arculix account
Note
You'll need to know the base URL to the SSO landing page for your Arculix account in this format:
https://sso.arculix.com/<yourorganization>
Note about SCIM integrations
Take note: if your application has the following configurations, you will need a specific appsetting for the user provisioning to work correctly.
SAML application with a SCIM integration in the Identity Platform
Login workflow does not require a password to create a user
To correctly provision a user through the SCIM server in the third-party application (like AWS), you will need to set the appsetting as follows:
<add key="SAMLAssertionConsumerWorkflowDestination" value="false"/>
For Identity Platform cloud deployments or any questions, contact SecureAuth Support.
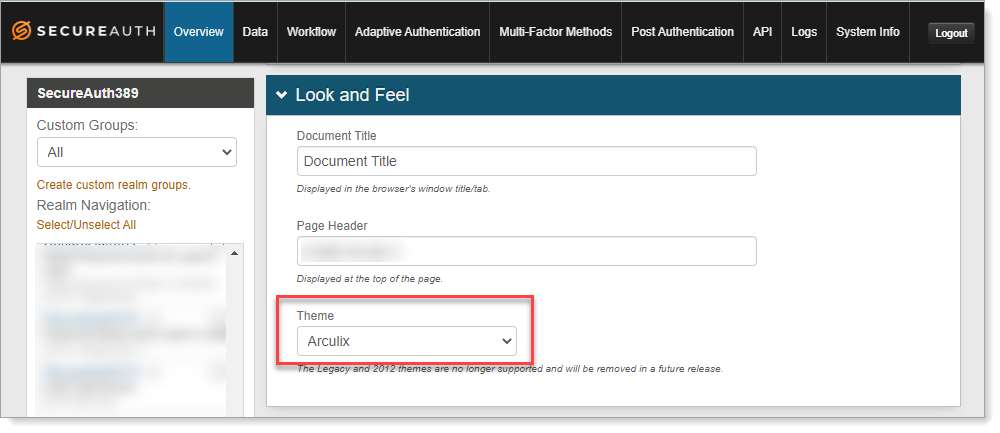
Arculix theme
A new Arculix theme is available for the end user login pages. In SecureAuth IdP, go to the Advanced Settings > Overview tab to set the Arculix theme.
Theme is available only in SecureAuth IdP release 22.12 or later.
 |
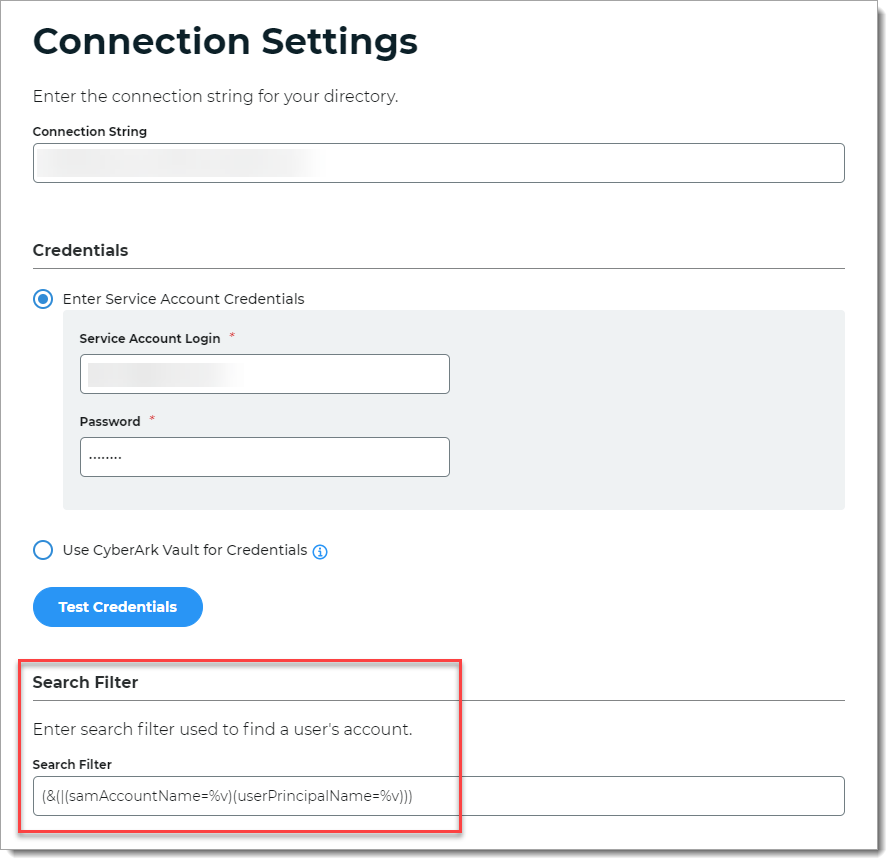
Task A: Configure your data store
In SecureAuth IdP settings for the data store, set the connection and mapping values.
In SecureAuth IdP, go to the data store settings.
This might be in the New Experience or the Advanced Settings (formerly Classic Experience), depending on where you initially added this data store.
In the connection settings for the data store, set the appropriate Search Filter.
For example, set your search attribute to use
userPrincipalName,mail, or if you have Active Directory, use(&(|(samAccountName=%v)(userPrincipalName=%v))).Note
Arculix expects the
username@domainemail format when connecting to SecureAuth IdP.Make sure the domain in the email attribute is the same as the domain set up in the data store connection setting.
The following screenshot is an example of the data store Search Filter in the New Experience.
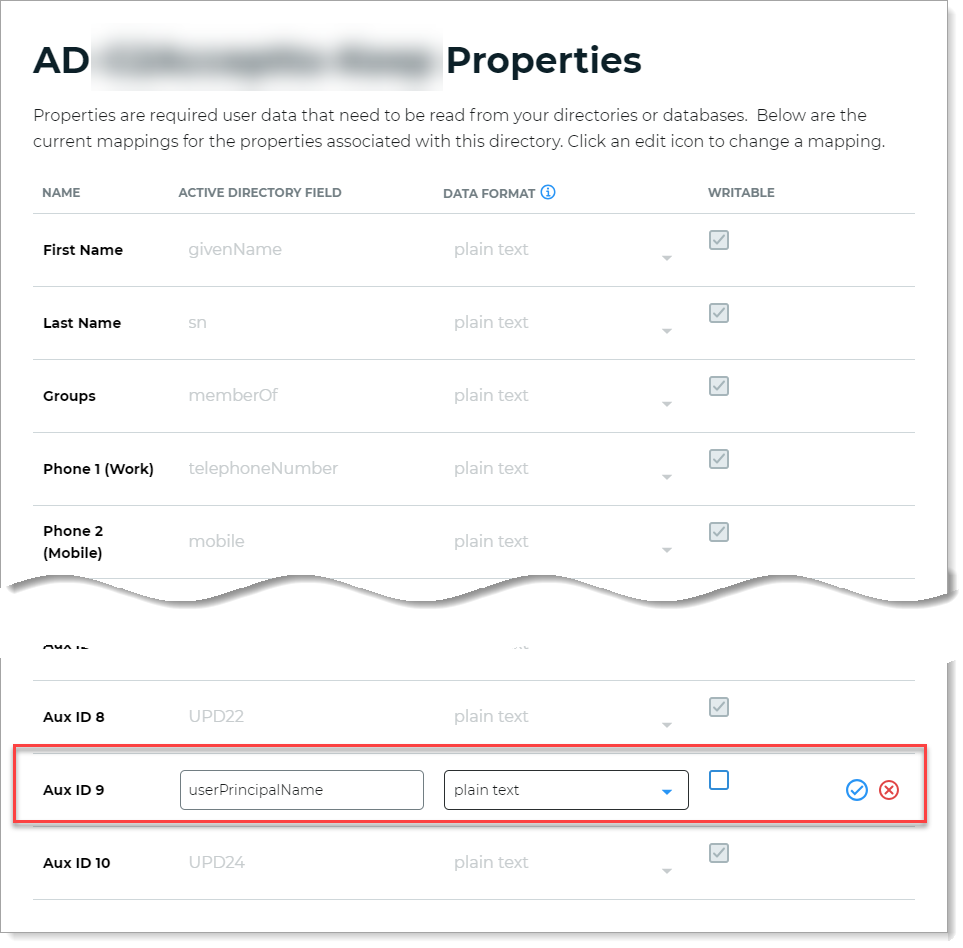
In the data store profile property settings, map the userPrincipalName search attribute from the data store to an available Aux ID field and clear the Writable check box.
For example, map userPrincipalName to Aux ID 9. This will be the "Request" in the SAML-based authentication to an external IdP like Arculix.
The following screenshot is an example of the data store mapping in the New Experience.
Save your changes.
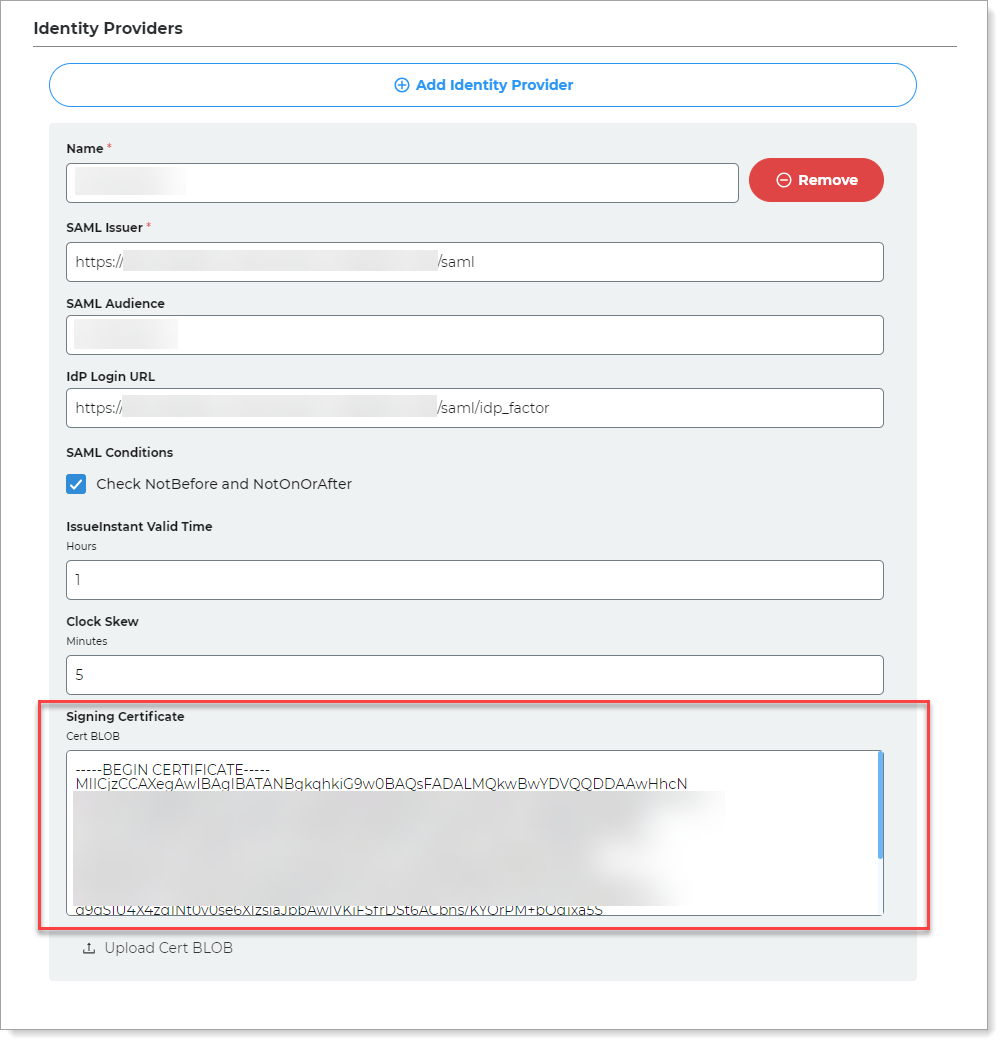
Task B: Add Arculix as an external identity provider
In SecureAuth IdP, you will delegate the SAML-based authentication to an external IdP like Arculix. In this section you will add Arculix as an IdP in the authentication policy.
Open an authentication policy and select the Login Workflow tab.
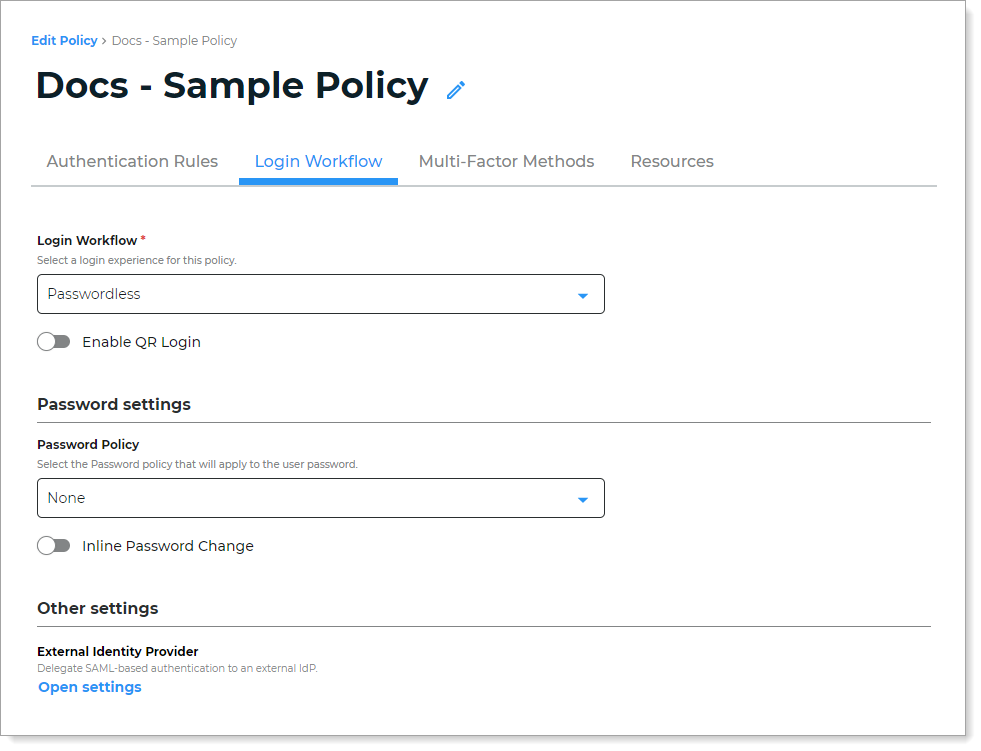
In the Other settings section, click the blue Open settings link and move the slider to Enabled.
On the External Identity Provider page, set the following configurations.
Use SecureAuth IdP as the primary IdP
Leave this check box cleared as False.
True – SecureAuth IdP validates the user login.
False – Arculix validates the user login.
User ID Mapping (Request)
Set it to where you mapped the email Search Attribute like userPrincipalName, in the data store profile properties.
For example, Aux ID 9
User ID Mapping (Response)
Set it to the mapped SAML Consumer response from Arculix, like the samAccountName or Authenticated User ID.
For example, Authenticated User ID
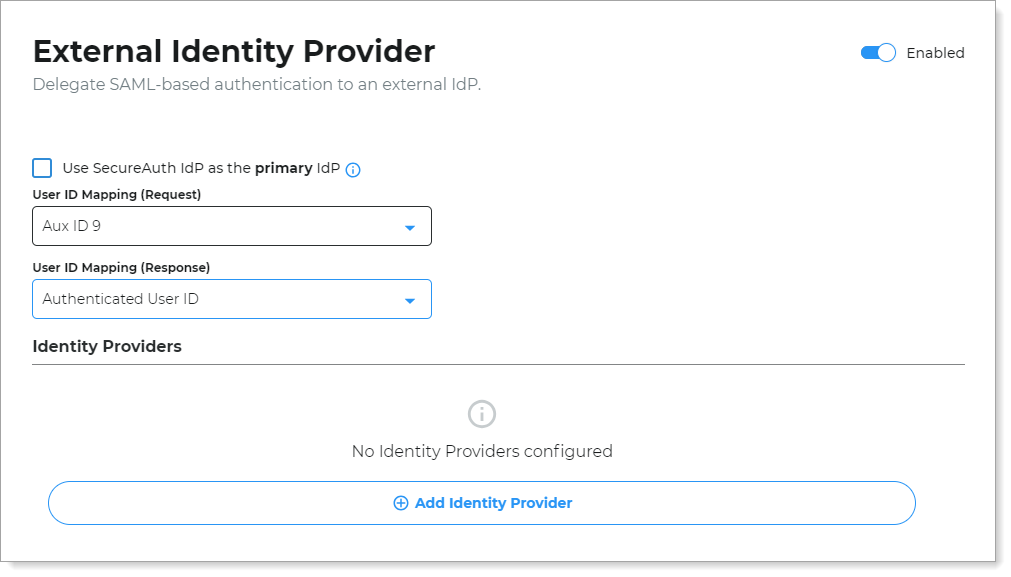
Click Add Identity Provider and set the following configurations.
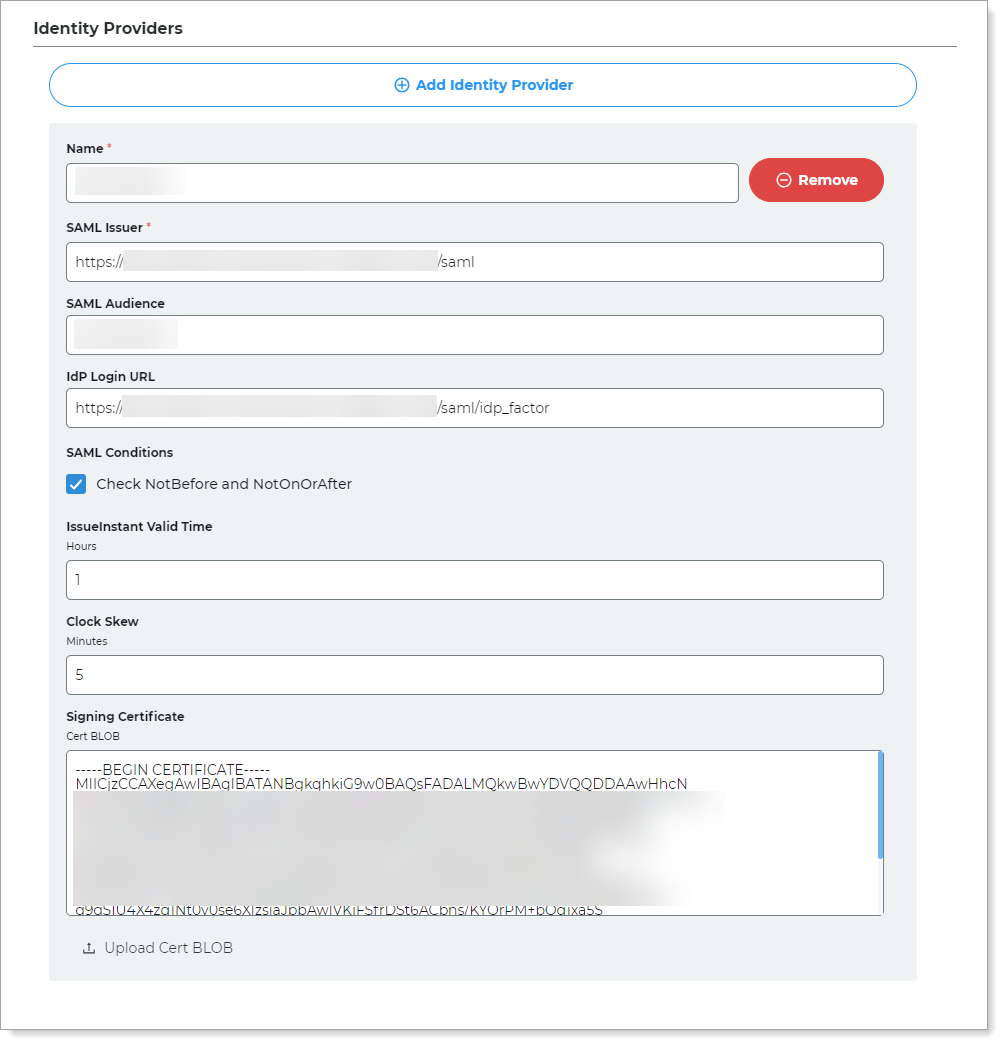
Name
Provide a descriptive name that identifies Arculix as an external identity provider.
For example, IdP-Arculix
SAML Issuer
Enter the SAML Issuer information for your organization on the Arculix side. This is your Arculix base URL followed by
/saml.You can find this in Arculix in the Identity Provider Single Sign-on URL field.
For example,
https://sso.arculix.com/<your-organization>/samlSAML Audience
Provide a descriptive name that identifies Arculix (you can use the same name as the Identity Provider Name, above).
For example, IdP-Arculix
IdP Login URL
Enter the login URL for your organization on the Arculix side. This is your Arculix base URL followed by
/saml/idp_factor.For example,
https://sso.arculix.com/<your-organization>/saml/idp_factorSAML Conditions
Select this check box. This activates the validation of time-based constraints on SAML assertions. It ensures they are only used within their valid time period of the SAML assertion. It checks:
NotBefore – Assertion is invalid if used before this time.
NotOnOrAfter – Assertion is invalid if used on or after this time.
This setting adds another layer of security. It stops the potential misuse of SAML assertions outside their intended time.
IssueInstant Valid Time
Set the number of hours during which the SAML assertion is valid.
Clock Skew
Set the number of minutes that SecureAuth IdP subtracts from the NotBefore SAML condition to account for any time differences between SecureAuth IdP and Arculix.
Signing Certificate
Paste the certificate blob from Arculix.
You can come back to this after you've completed Task D: Arculix SAML configuration as an identity provider (IdP). This is also covered in Task E: Paste Arculix certificate in SecureAuth IdP.
Save your changes.
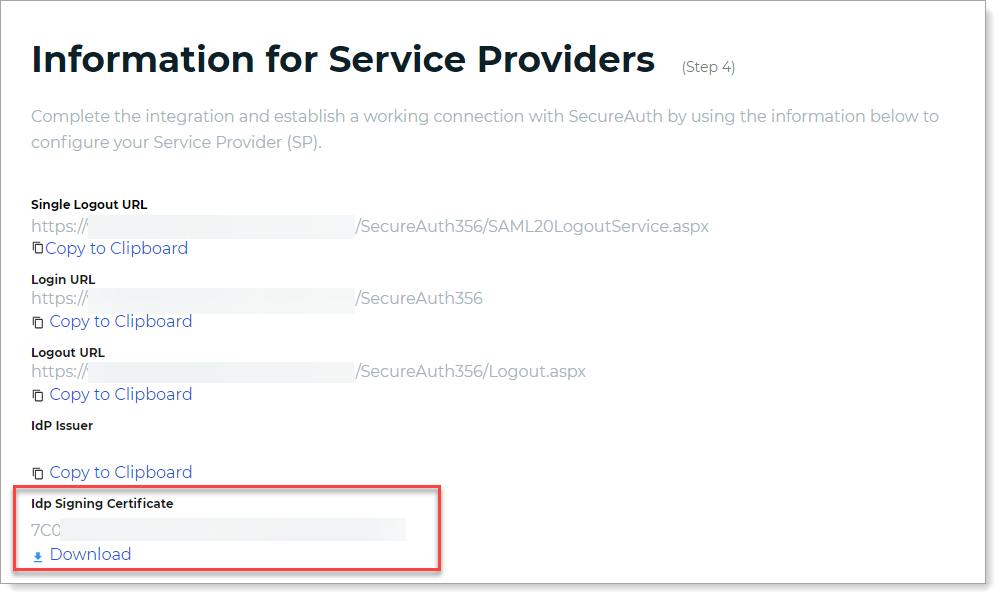
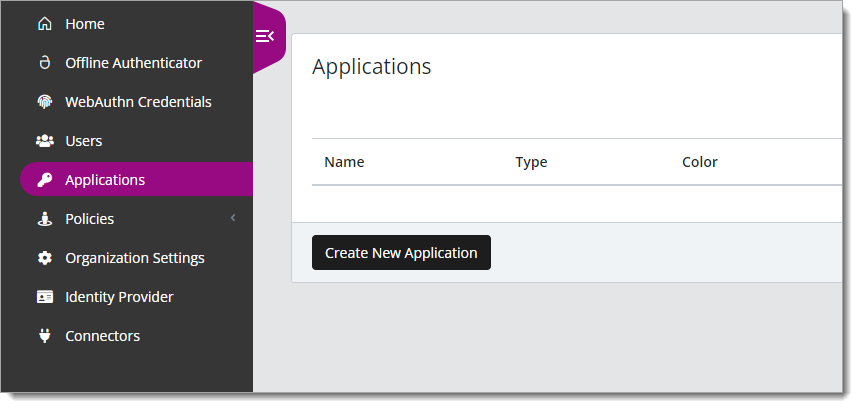
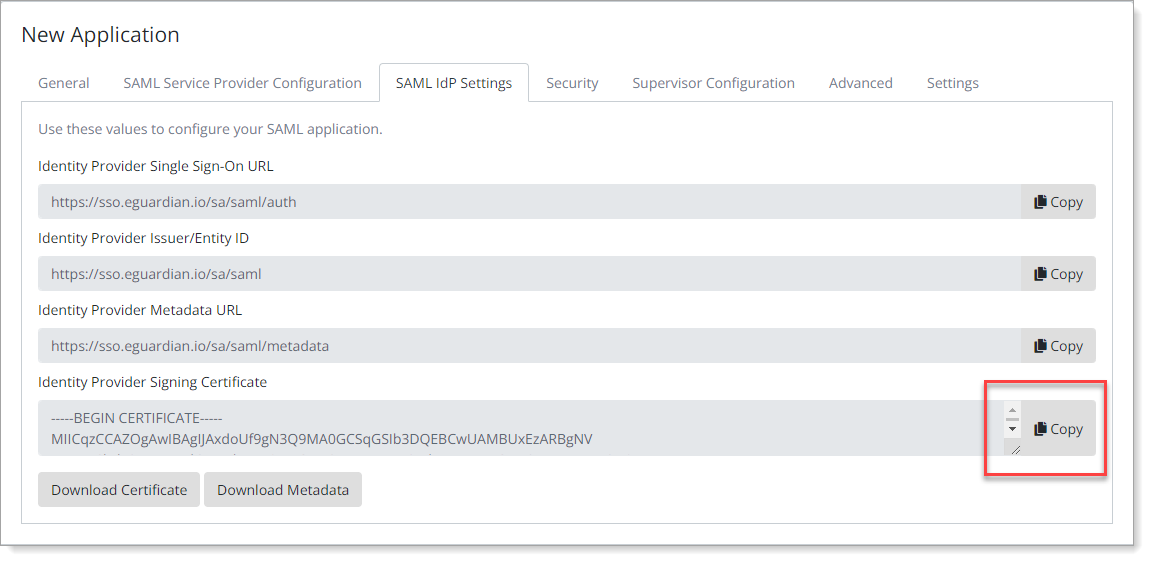
Task C: Download SecureAuth IdP metadata
You'll need to download SecureAuth IdP SAML metadata (also known as the IdP signing certificate) for the Arculix side.
In the Application Manager, click the edit pencil icon for any SAML application.
Click the Info for service providers link.
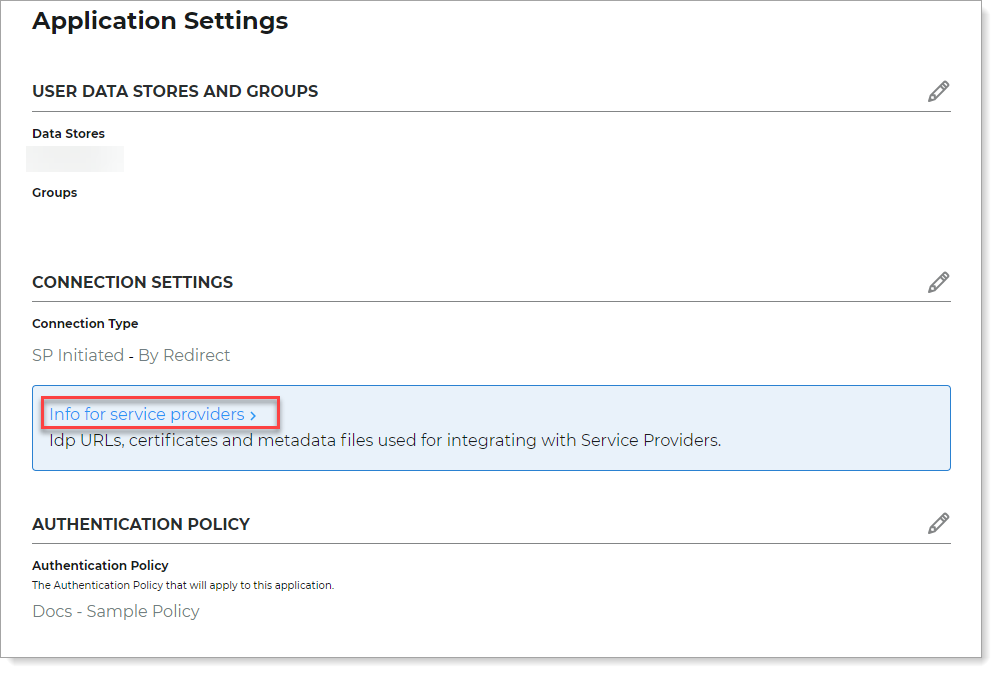
On the Information for Service Providers page,for the IdP Signing Certificate, click the Download link.
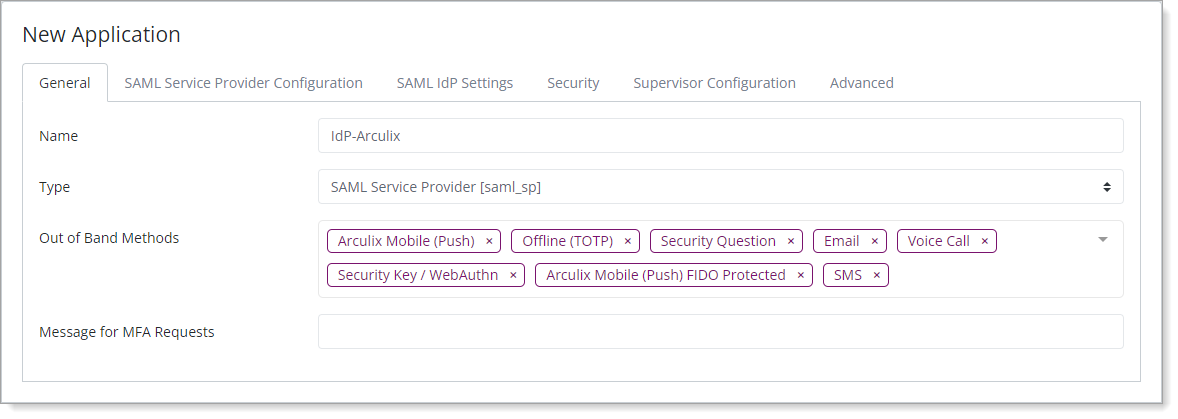
Task D: Arculix SAML configuration as an identity provider (IdP)
In Arculix, you'll add an application for SecureAuth IdP and set the SAML configuration settings. This will be the identity provider (IdP) side of the configuration.
Log in to Arculix with an administrative account and go to Applications.
Click Create New Application.
In the New Application form, on the General tab, set the following configurations.
Name
Use the same Identity Provider Name that you set up in SecureAuth IdP in the SAML Consumer section in Task B: Add Arculix as an external identity provider.
This is the name to display for push notifications, in the Admin panel, Application portal, and audit logs.
For example, IdP-Arculix
Type
Set to SAML Service Provider.
Out of Band Methods
Select the allowed authentication methods end users can choose to approve MFA requests.
For example, Arculix Mobile app (push notifications), SMS, security key, and so on.
Message for MFA Requests
(Optional) Type a message displayed to end users when sending an MFA request via push notification, SMS, or email.
Select the SAML Service Provider Configuration tab, and set the following configurations.
Upstream IdP
Leave this check box cleared.
IdP Initiated
Leave this check box cleared.
Issuer or Entity ID
Use the same Identity Provider Name that you set up in SecureAuth IdP in the SAML Consumer section in Task B: Add Arculix as an external identity provider.
For example, IdP-Arculix
Log in URL
Enter the login URL of your SecureAuth IdP server.
For example,
https://secureauth.company.com/SecureAuthThe authentication policy in SA IdP has multiple applications attached on the Resources tab. So, you do not need to add a realm number in the URL.
NameID Format
Set to Unspecified.
Name Identifier
Set to userPrincipalName.
Assertion Consumer Services (ACS) URL
Leave this field blank.
Algorithm
Set to RSA-SHA256.
Certificate
Open the SecureAuth IdP metadata file you downloaded in Task C: Download SecureAuth IdP metadata, in a text editor like Notepad.
Copy the SecureAuth IdP certificate blob, including the beginning
-----BEGIN CERTIFICATE-----and ending-----END CERTIFICATE-----like the following example.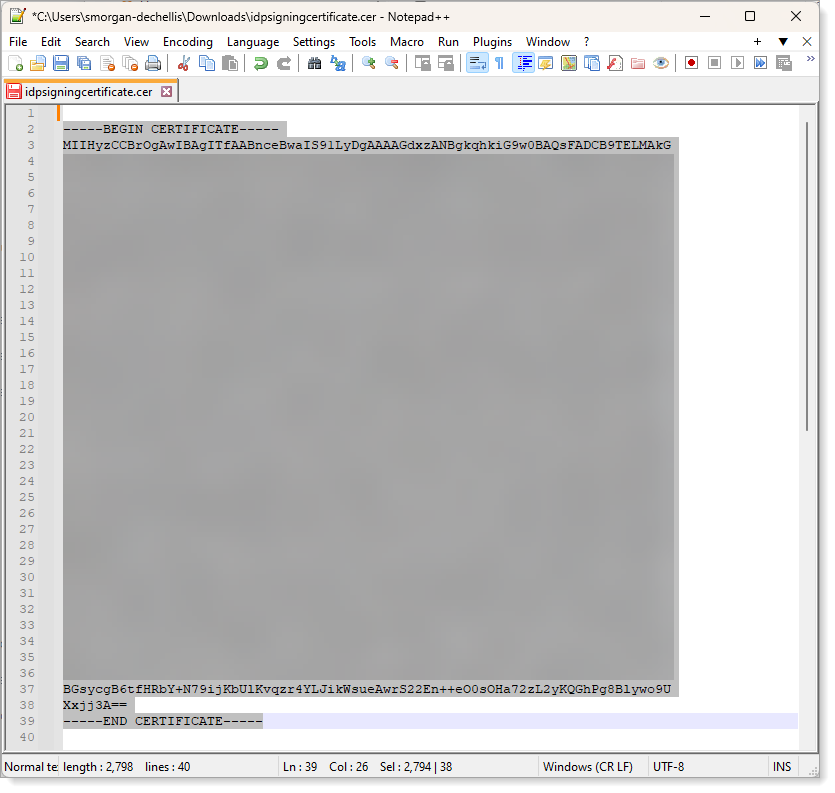
Then, in the Service Provider Certificate field, paste the SecureAuth IdP certificate blob like the following example.
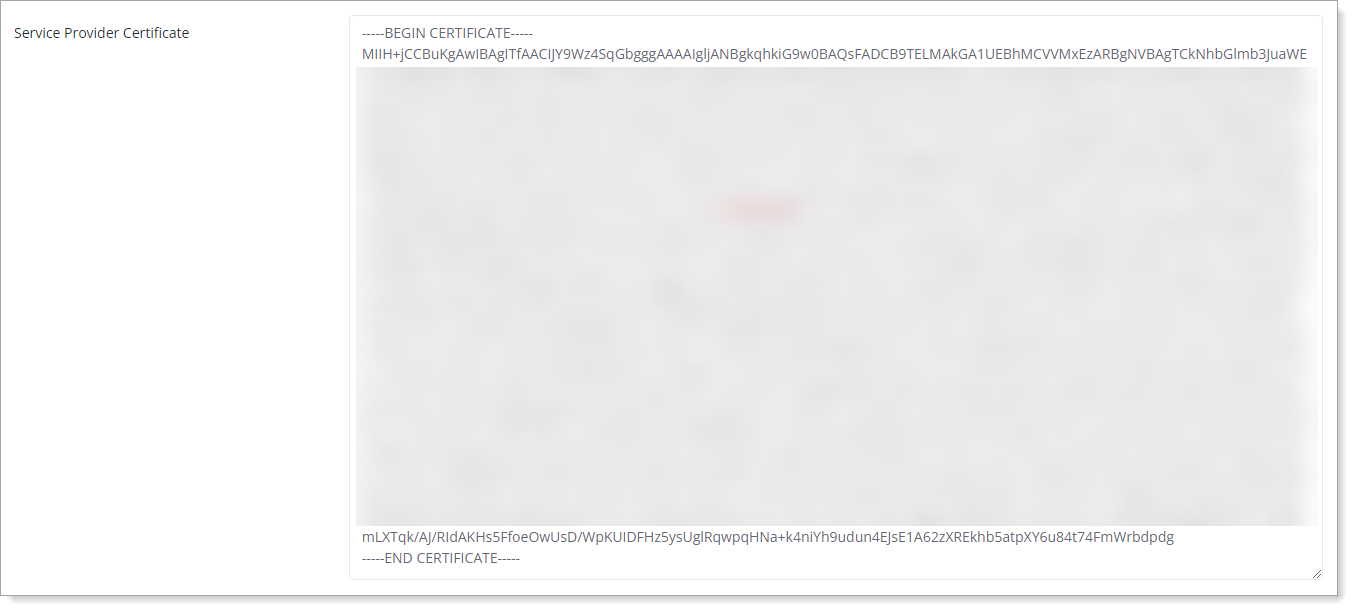
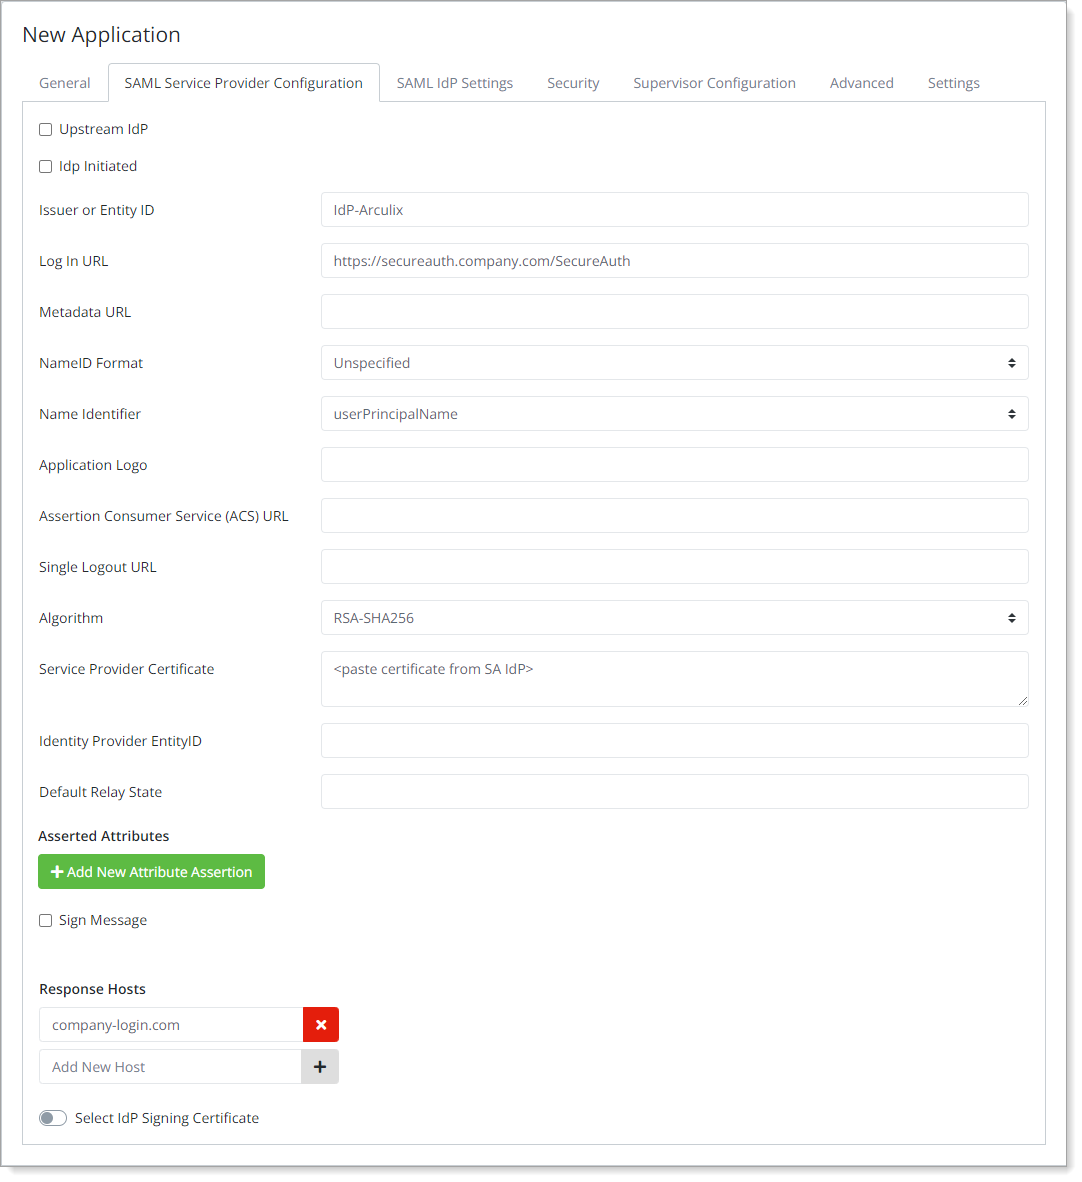
Select the SAML IdP Settings tab. Then, copy the Identity Provider Signing Certificate.
Save your changes.
Task E: Paste Arculix certificate in SecureAuth IdP
Go back to SecureAuth IdP, in the Policy > Workflow tab and open settings for the External Identity Provider.
For the Arculix identity provider certificate file you copied in Task D: Arculix SAML configuration as an identity provider (IdP), paste it in the Signing Certificate field.
Save your changes.
Task F: Set Begin Site URL in SecureAuth IdP
If you have Arculix set up as an external identity provider, you need to set the Begin Site URL for each application. These are for the applications attached to the authentication policy on the Resources tab.
Go to the authentication policy and review the list of applications on the Resources tab.
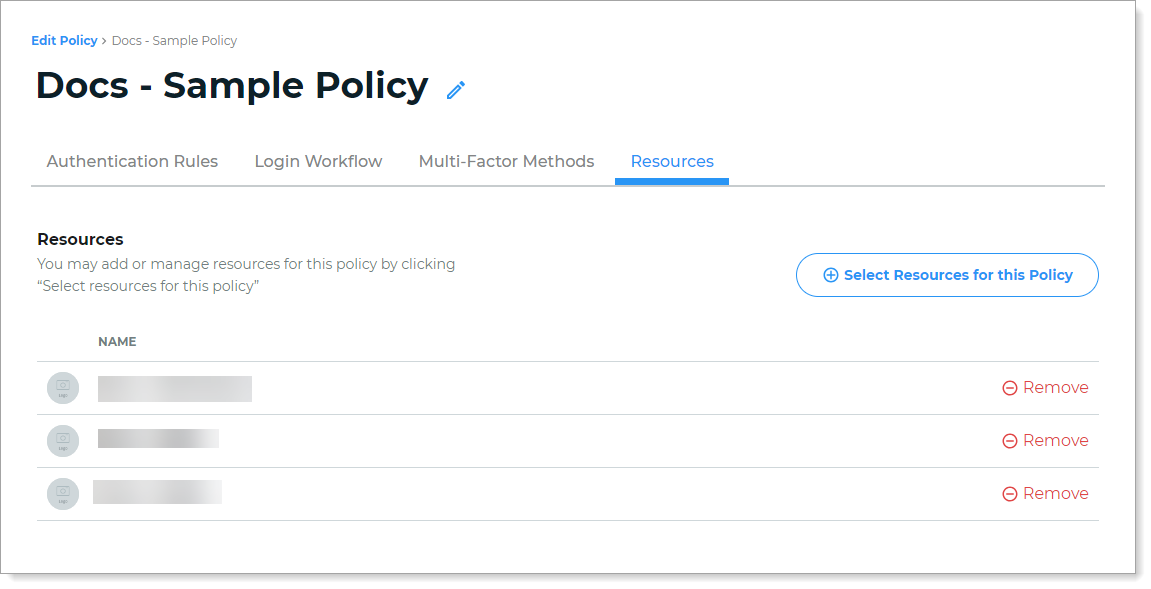
For an attached application, open the application in edit mode and go to Advanced Settings.
In Advanced Settings for the selected application, go to the Workflow tab.
Scroll down to the Custom Identity Consumer section and set the following configurations.
Receive Token
Set to Token.
Require Begin Site
Set to True.
Begin Site URL
Set to samlsp.aspx.
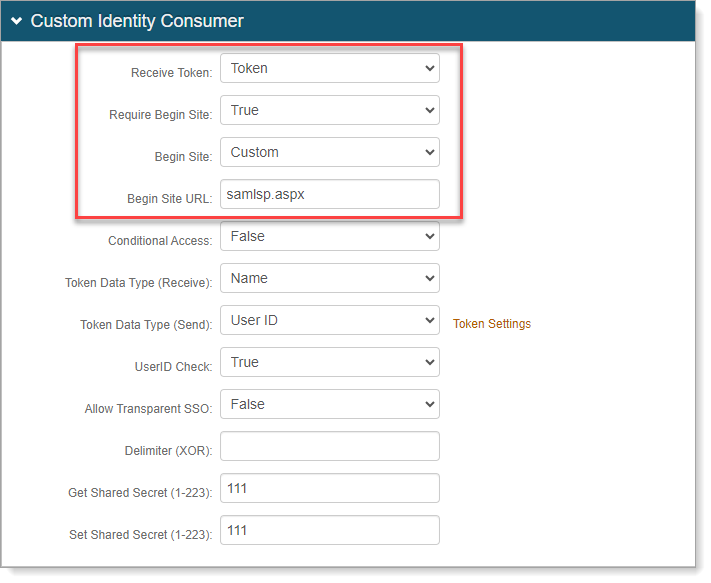
Save your changes.
Repeat the steps above for each application attached to the policy.