Build a GraphQL Client Application to Consumer Protected GraphQL API Resources Part 3
This article is part 3 of our GraphQL application protection series. In this article, we will build a GraphQL client that is capable of invoking GraphQL API calls, obtain authorized access tokens from a SecureAuth authorization server and send the authorization token to underlying GraphQL services.
Recap
In Build a GraphQL Client Application to Consumer Protected GraphQL API Resources Part 2, we built the GraphQL server with Node.js, express, graphql and loki as a built-in database for this demonstration. The goal was to build a GraphQL server and have its endpoint protected.
We then deployed this application to a native Kubernetes cluster using kind and enforced centralized and decoupled authorization without changing any business logic or code. See the previous article for all the details.
As a recap, take a peek at the diagram below as a reminder of what we built in the previous article vs. the new consumer application that we will be building in this article, and how all these pieces will eventually work together.
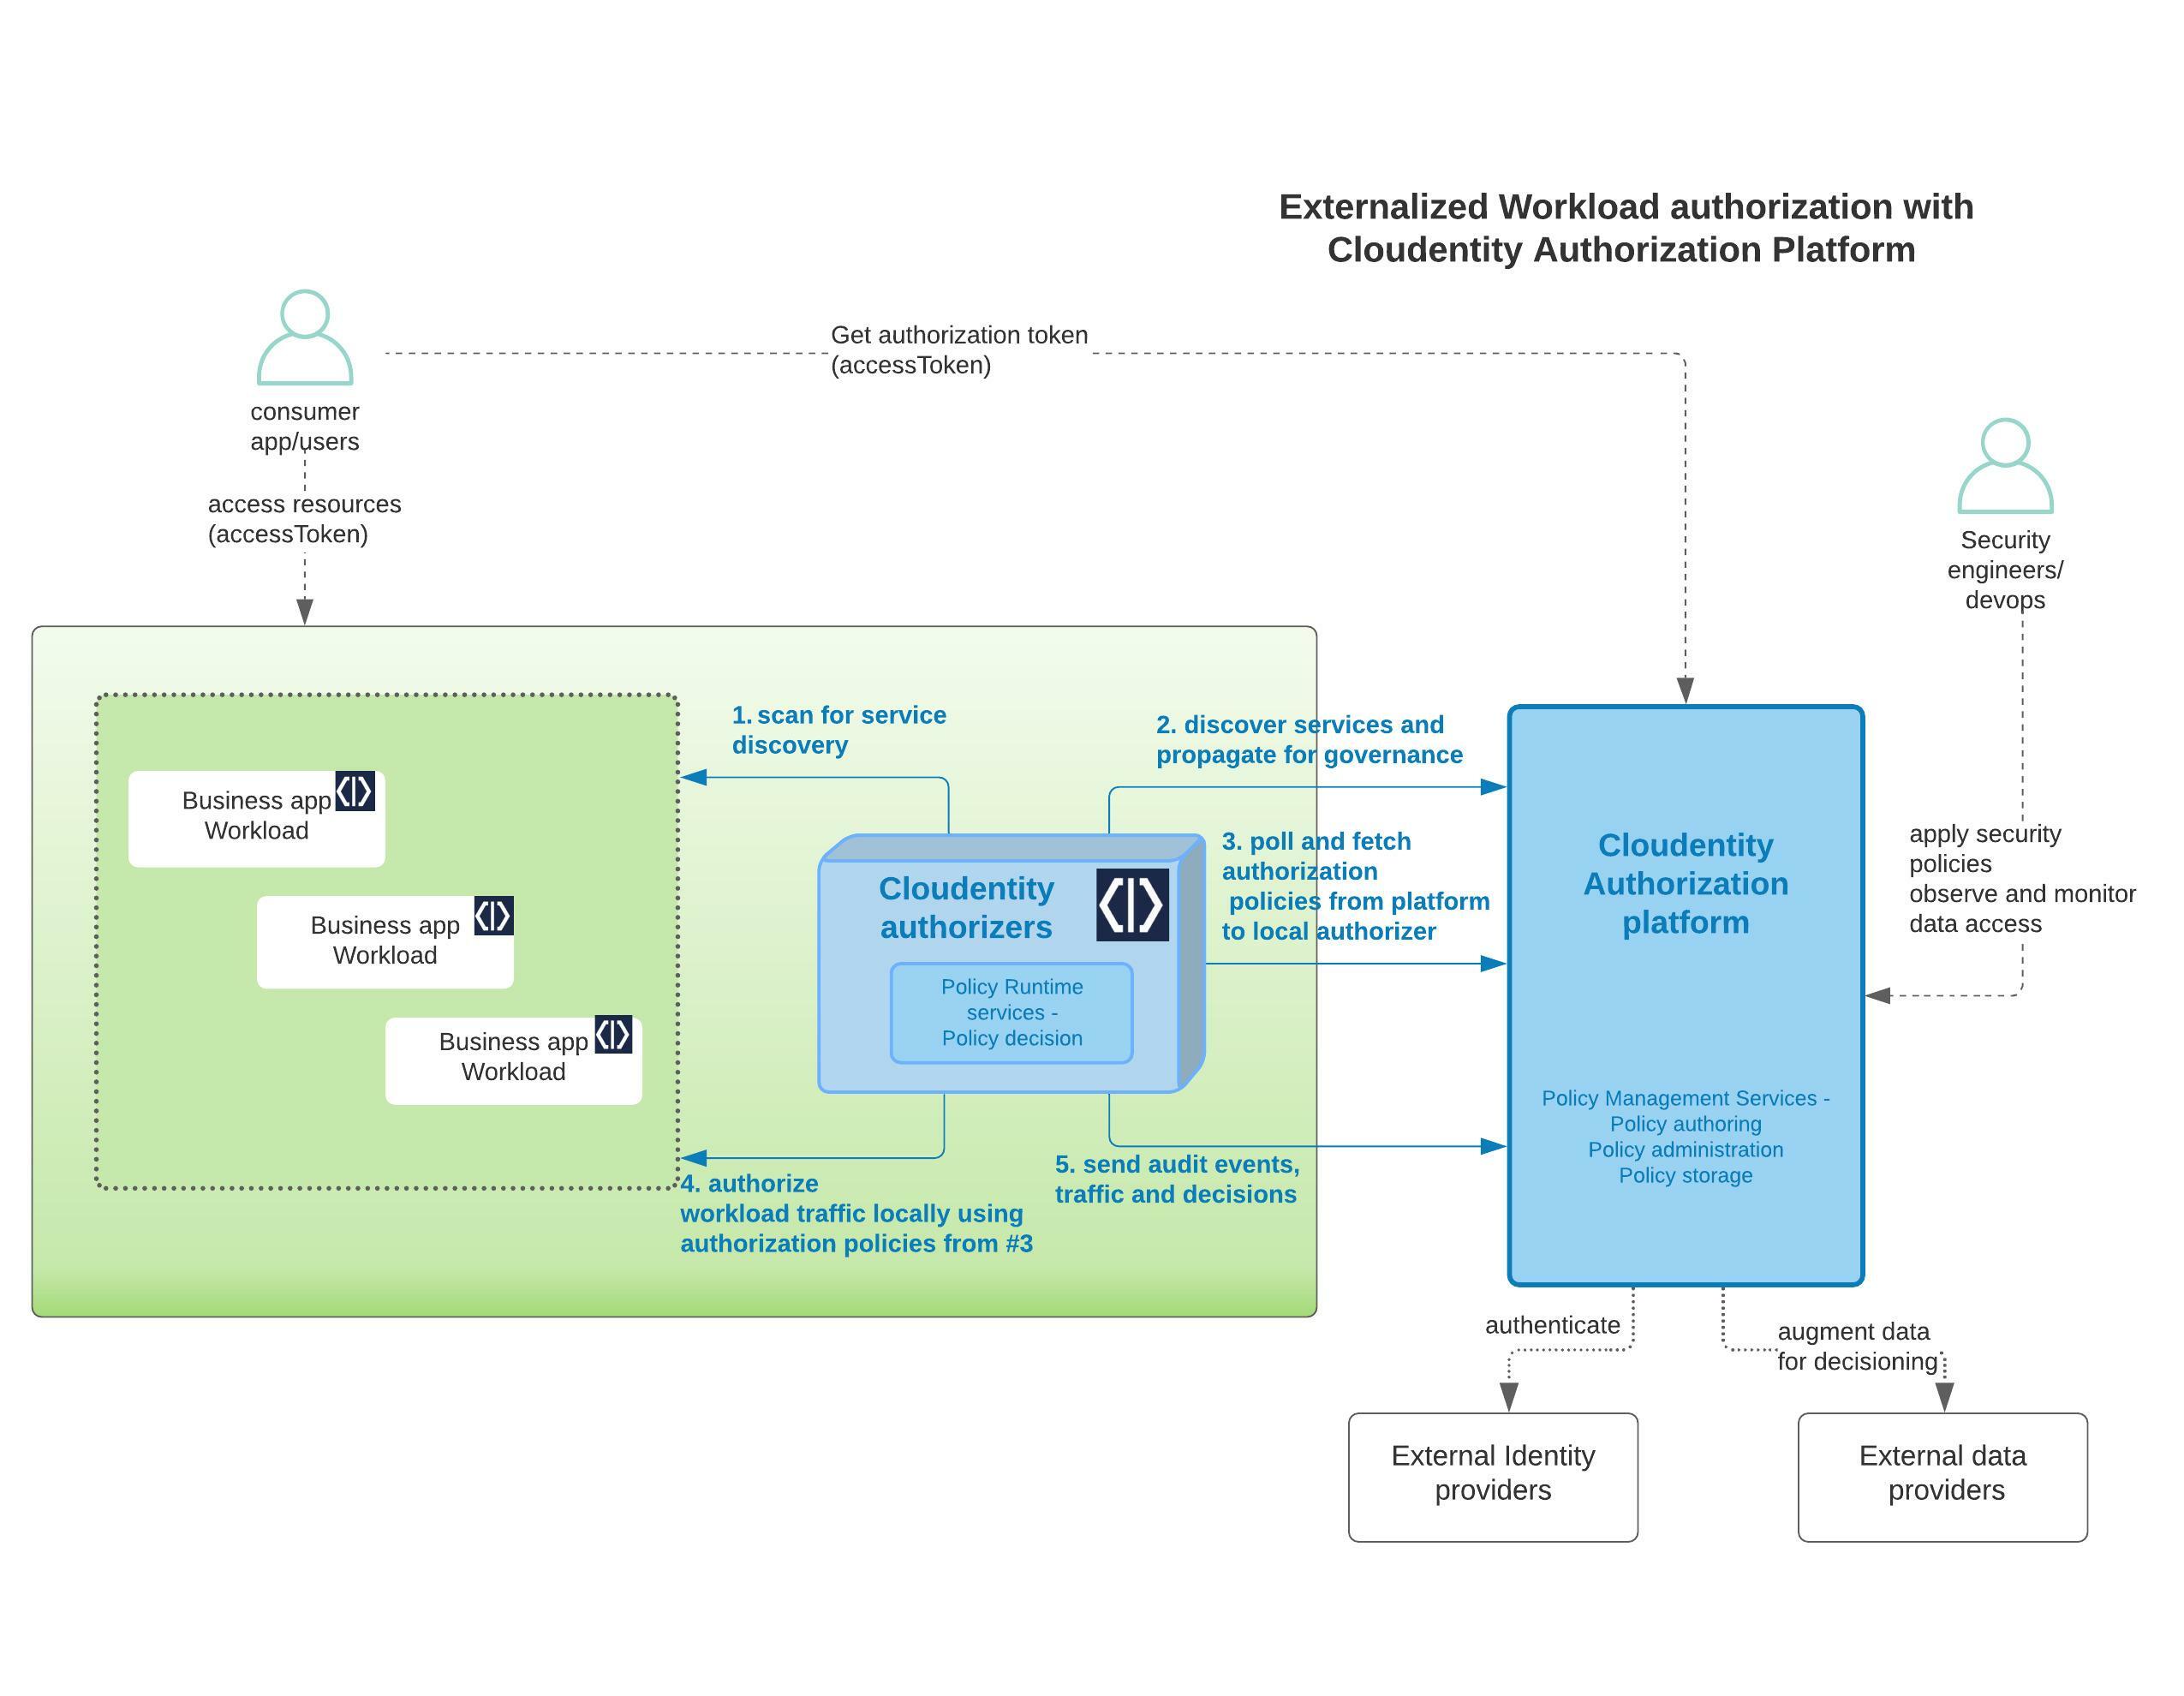 |
|
Build a Single Page React App with Node.js
We will be building a tweet-ui React based application with attached components. Full source code for this demo application can be found in the SecureAuth Samples GraphQL Demo GitHub Repository.
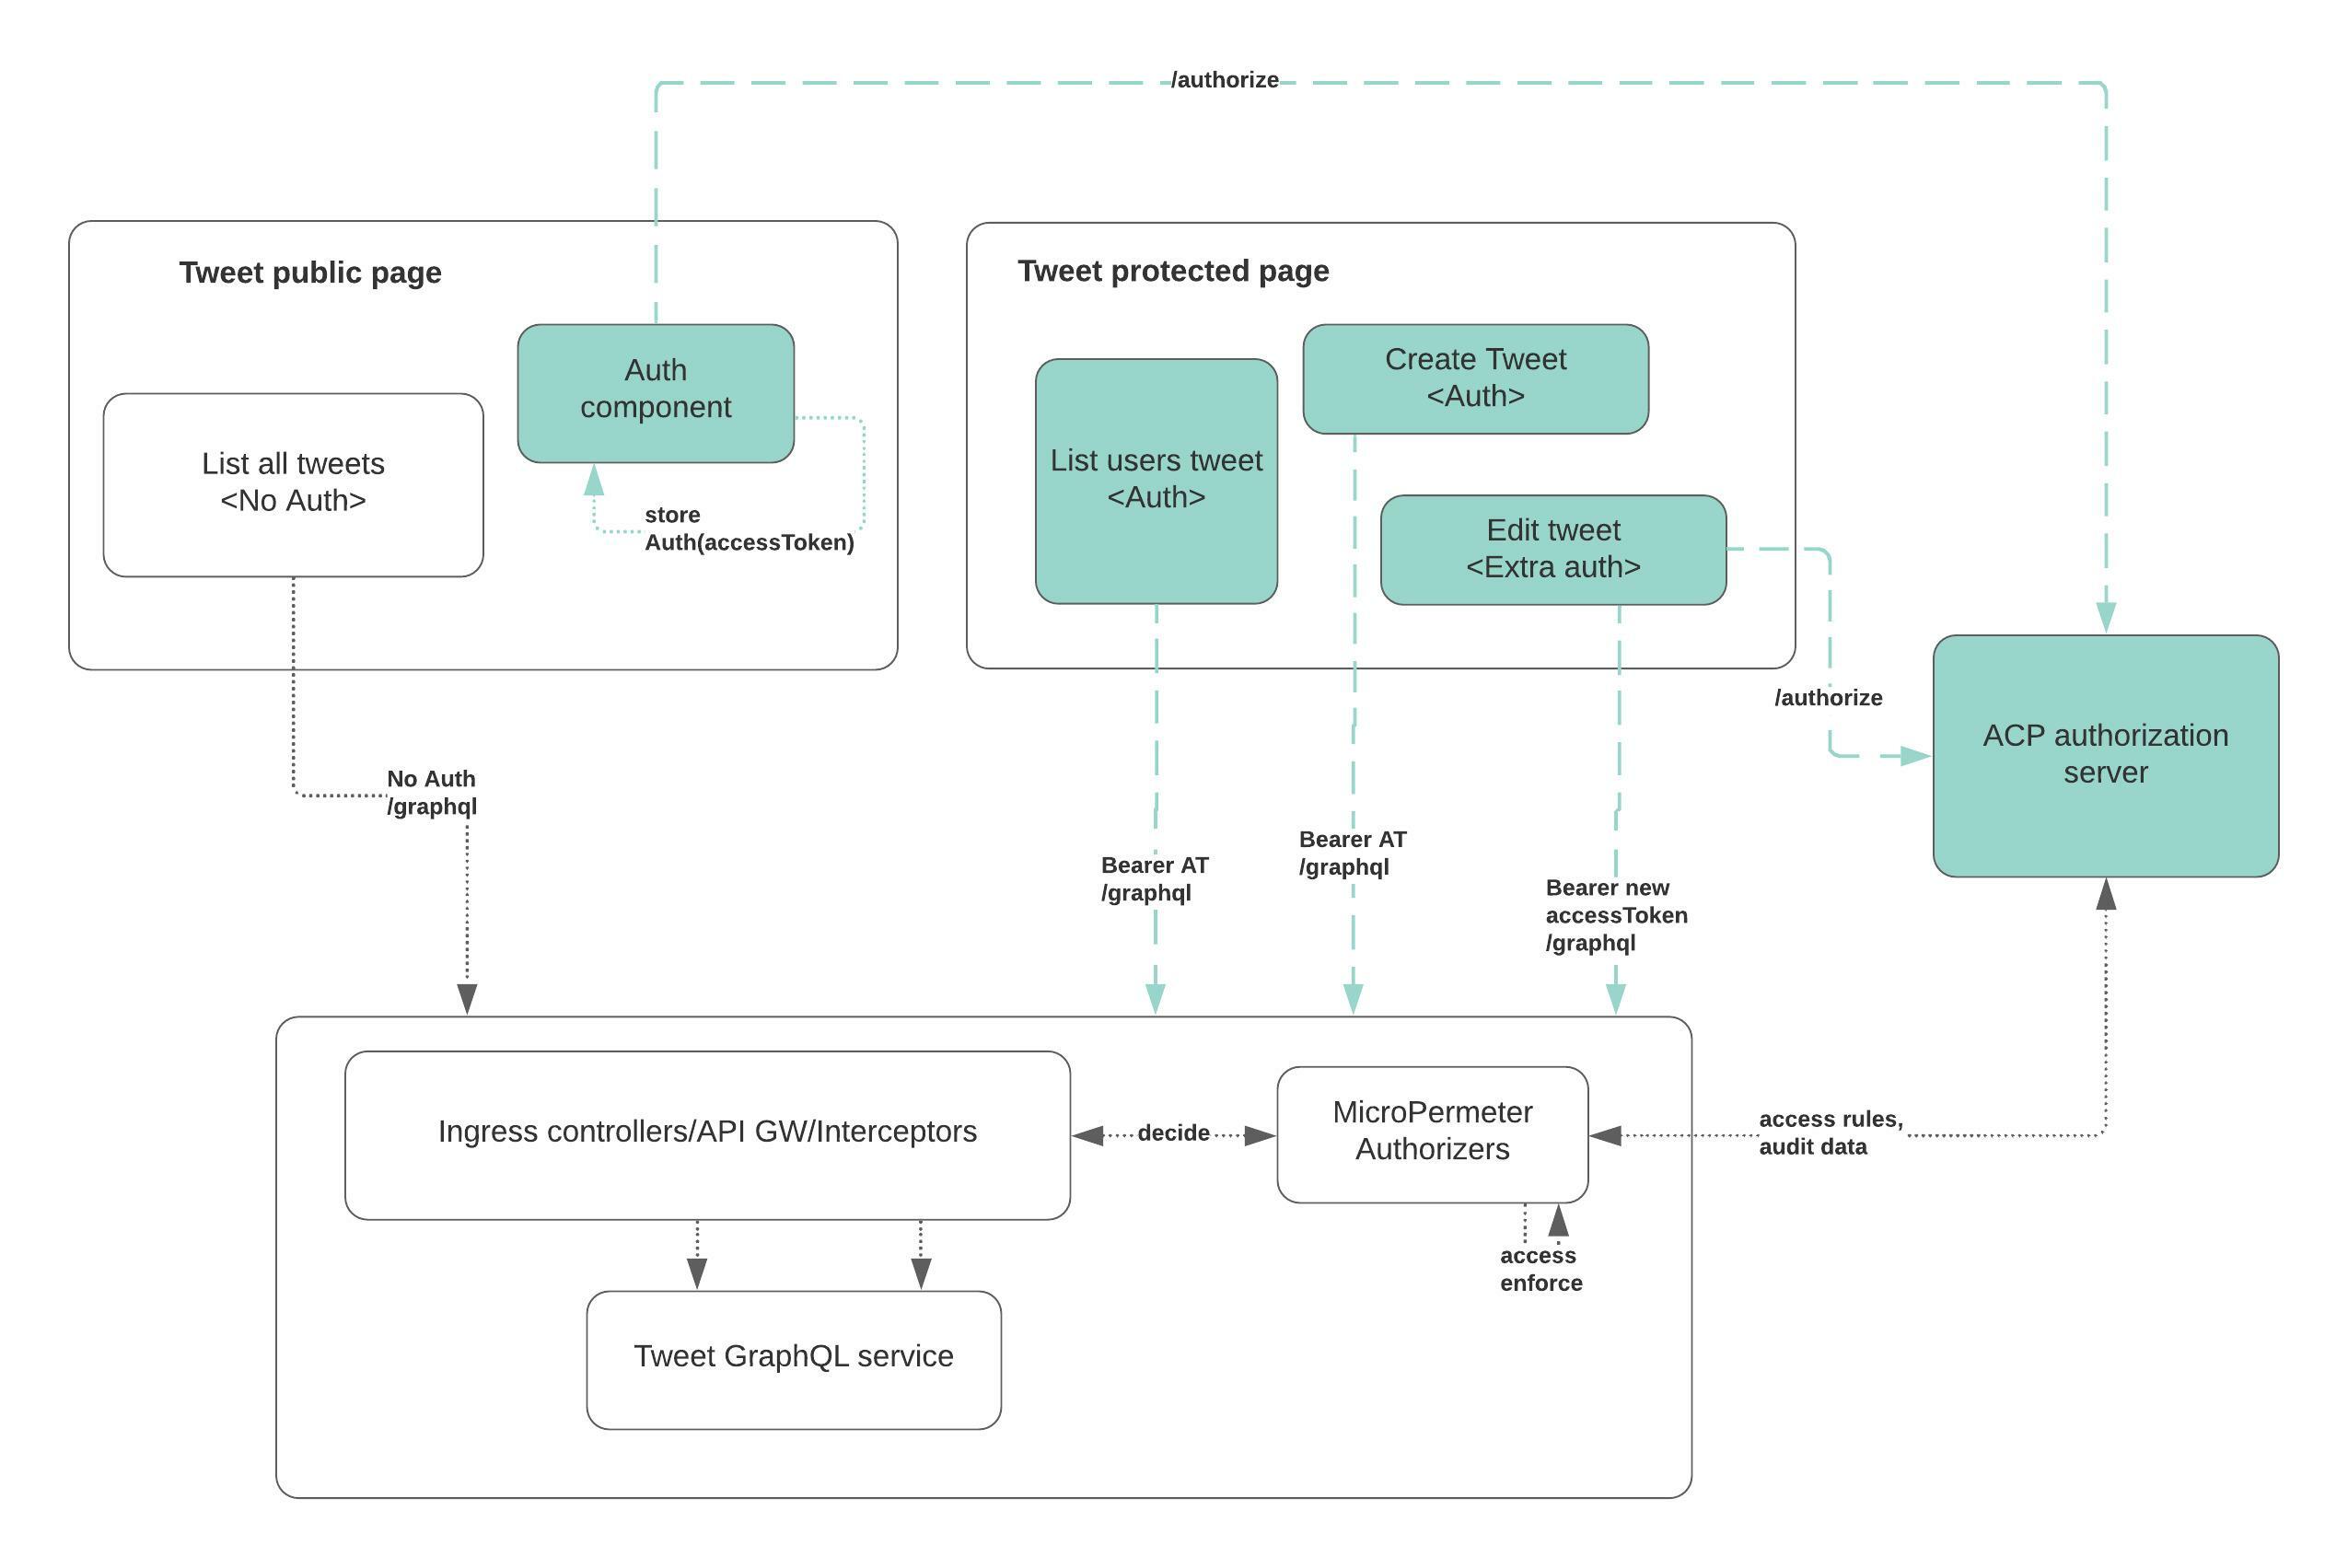 |
|
SKIP/JUMP LEVEL
In case you are not interested in building the application from scratch, you can skip some of the steps below and instead checkout/clone the attached GitHub repo
git clone git@github.com:cloudentity/ce-samples-graphql-demo.git
cd tweet-ui-graphql-react
and then jump to Register the application section.
Pre-requsisites
We will be using react for the application development.
npm - Recommended v8.3.0 +
Initialize React Application
-
Execute the following command in your terminal to create a React application:
npx create-react-app tweet-ui-graphql-react -
Install required packages
-
react - core react functions
-
oidc-client-ts - Standards-based OIDC/OAuth library to handle login flows and token management
npm install --save react-router-dom
npm install --save @apollo/client graphql@15.3.0
npm install --save @mui/material @emotion/react @emotion/styled @mui/icons-material
npm install --save oidc-client-ts
Define React components
Routing
For this react application, let's define the routing for various resources. As per this sample application, we will have:
-
A page that does not require authorization (
/page) -
An element that allows user to authorize (auth function within
/page) -
A page that requires authorization (
/usertweet) -
If there is no user authorization, the user will be redirected to
/page
In our application routing, let's define the router and the auth redirects. We will use oidc-client-ts to handle OAuth authorization (code => token exchange), redirects and token management. If the user does not have a valid session, they will be redirected to the page where they can see the authorize button and contents that do not require authorized tokens.
In the index.js file, located in the src directory of the app, we'll add:
function App() {

  const userManager = new UserManager(oidcConfig);
  const [authenticated, user] = useAuth(userManager);
  const auth = authenticated && user;

  return (
    <Router>

        <Routes>
          <Route path="/usertweet"  element={!auth ?<HomePageContent auth={auth} /> : <Navigate to='/usertweet' /> }></Route>
          </Route>
          <Route path="/"  element={!auth ? <HomePageContent auth={auth} /> : <Navigate to='/usertweet' /> }>
          </Route>
        </Routes>

    </Router>
  );
}
As you can see the public page is at HomePageContent that is served by the homepage.js. Let's dive into that snippet for some explanation.
Homepage
homepage.js contains mainly two main elements of interest other than navigation and style elements:
-
authorizebutton => Calls to the SecureAuth authorization platform to authorize the user -
Latest tweetselement => Unprotected GraphQL API call
Configure GraphQL API client
We need to configure the GraphQL API client to send in an authorization token (if available) retrieved from the browser's local storage. If not, it will make GraphQL API calls without this authorization token. More details and explanation about usage of apollo client can be found here.
import {
    ApolloClient,
    InMemoryCache,
    ApolloProvider,
    createHttpLink,
    from
  } from "@apollo/client";
  import { setContext } from '@apollo/client/link/context';
  import { onError } from "@apollo/client/link/error";

const httpLink = createHttpLink(
  {
    uri: 'graphql',
    credentials: 'same-origin'
  }
);

const authLink = setContext( (_, {headers}) => {
  // get the authentication token from local storage if it exists

 const accessTokenRaw = localStorage.getItem(authConfig.accessTokenName);
  //return the headers to the context so httpLink can read them

  return {
    headers: {
      ...headers,
      authorization: accessTokenRaw ? `Bearer ${accessTokenRaw}`: "",
    }
  }
});

//https://www.apollographql.com/docs/react/api/link/apollo-link-error/
const errorLink = onError(({ graphQLErrors, networkError }) => {
  if (graphQLErrors)
    graphQLErrors.forEach(({ message, locations, path }) =>
      console.log(
        `[GraphQL error]: Message: ${message}, Location: ${locations}, Path: ${path}`,
      ),
    );

  if (networkError) console.log(`[Network error]: ${networkError}`);
});

const client = new ApolloClient (
  {
    link: from([authLink, errorLink, httpLink]),
    cache: new InMemoryCache()
  }
);
Invoking GraphQL APIs
For invoking GraphQL APIs, we will utilize the Apollo client configured above.
import {
  useQuery,
  gql
} from "@apollo/client";

const FETCH_LATEST_TWEETS = gql `
query {
    getLatestTweets {
        id,
        content,
        author
    }
  }
`;

export function GetLatestTweets() {
  const {loading, error, data} = useQuery(FETCH_LATEST_TWEETS);

  const  [latestTweetFetchStatus, setFetchLatestTweetsStatus] = useState(false);

  if (loading) return <p>Loading..</p>;
  if (error && isError403(error)) return (

        <h2> Latest Tweets</h2>
        <p> Our systems have detected that this request is NOT authorized to see the tweets... </p>
        <p> Reason for unauthorized: </p>

);
  if (error) return (

          <h2> Latest Tweets</h2>
          <p> System connection issues ... </p>

  );

  if(!latestTweetFetchStatus && data != null && data.getLatestTweets != null) {
    setFetchLatestTweetsStatus(true);
  }

  if(latestTweetFetchStatus) {
    return (

        <h2> Latest Tweets</h2>

        {
          Object.keys(data.getLatestTweets).map((k,i) => (

                   {data.getLatestTweets[i].owner} @ {data.getLatestTweets[i].id}
                   tweeted -
                Hi {i} {k} {data.getLatestTweets[i].content}

          ))
        }

    );
  }
  return <TweetsNotAvailable />;
}
Now we have a homepage that prompts the user to authorize, resulting in an authorization token to call more resource server APIs, as well as making a call to a publicly exposed GraphQL API resource endpoint.
Getting an authorization token from SecureAuth
We will use the SecureAuth OAuth JS SDK to perform an OAuth handshake with the SecureAuth authorization platform and fetch an authorization token.
authButton.js
import { UserManager } from 'oidc-client-ts';
import oidcConfig from './oidcConfig.js';

export const AuthButton = ({auth}) => {

  const classes = useStyles();

  const handleAuth = () => {
    const userManager = new UserManager(oidcConfig);
    userManager.signinRedirect();
  };

  const buttonOnClick = () => {
    handleAuth();
  }

  return (

      <Stack className={classes.mainSection} direction="column" justifyContent="center" alignItems="center">
        <p>If you want to see more than this, we need to identity and authorize you further.
        <h3>Let's get you in there!</h3>
        </p>
        <Tooltip title="This will intiate OAuth authorization request with SecureAuth ACP" placement="top">
          <Button className="AuthenticateButton" variant="contained" onClick={() => buttonOnClick()}>Authorize</Button>
        </Tooltip>
      </Stack>

  );

}
- Proxy to eliminate CORS error
By default you will run into CORS error as the GraphQL APIs are served on a different host/port. To eliminate this, we will use the react dev proxy to proxy all requests to the GraphQL API server.
package.json
{
  "proxy": "http://localhost:5001",
}
Register the Application in SecureAuth Authorization Platform
To consume any resources protected by the SecureAuth authorization server, the consuming applications must first register themselves in the SecureAuth authorization platform. As a quick reminder, we will be using open standard based OAuth flows for all these integrations.
Get into the SecureAuth portal and register a single page client application. Follow this SecureAuth article to register a client application in the SecureAuth authorization platform.
Now that we have a registered client application, we will feed that into the configuration settings for the application we have been building.
The oidcConfig.js file contains the configuration required to handshake with the SecureAuth authorization platform to obtain an access token to consume resources on behalf of an end user. The oidc-client-ts library uses the authorization code grant with PKCE flow to get the access token. Read more about the OAuth PKCE flow.
const oidcConfig = {
    authority: 'https://rtest.connect.secureauth.com/rtest/ce-dev-playground-integrations', // Your SecureAuth OIDC issuer URL
    client_id: 'c7e6u0eer3qh0m4pggig',
    redirect_uri: 'http://localhost:3000/',
    post_logout_redirect_uri: 'http://localhost:3000/',
    silent_redirect_uri: window.location.href + '/silent', // optional, for silent token renewal
    response_type: 'code',
    scope: 'openid profile email',
};

export default oidcConfig;
Now that we have everything configured and ready to go, let's run the application and test it out.
Run the Application
To run the application, use the following command in your terminal:
npm start
The application will be available under the following URL:
http://localhost:3001
Modify Authorization Policies
Modify authorization policies attached to the GraphQL constructs to see how client data access can be dynamically controlled.
Exercise for the readers
Now you can play around with various policies protecting the GraphQL API resources and see how the application handles various pieces and responds. We hope this was an educational journey to clearly understand how the SecureAuth authorization solution can be used easily to solve the complex authorization requirements within your organization. Feel free to contribute any modifications to the demo applications and concepts back to repo for new readers to explore and understand. Happy learning!
Conclusion
This wraps up the tutorial for a sample GraphQL client server application protected using the SecureAuth Authorization platform. In this series, you will have accomplished the following things:
-
Develop a simple GraphQL service
-
Protect the GraphQL service API resources with the SecureAuth Authorization Platform
-
Develop a simple GraphQL client application
-
Fetch authorization tokens from the SecureAuth Authorization Platform and pass from the client app to the protected server resource
-
Dynamically change the protected server resource policy in SecureAuth to control client app GraphQL API data access