OIDC overview
Understand OpenID Connect (OIDC), an extension of the OAuth authorization framework. Learn its roles, flow, and examples.
What is OpenID Connect?
Open ID Connect (OIDC) is an authentication protocol on OAuth 2.0. It verifies user identities via an Identity Provider (IDP) and complements OAuth 2.0, which focuses on authorization.
The IDP sends user authentication details in a JWT token called an ID token.
OIDC provides both an ID token and an access token. The ID token proves authentication, while the access token allows secure API access. Use the ID token only for authentication; rely on access tokens for accessing APIs.
SecureAuth, a certified Open ID provider, supports various use cases, including Financial APIs.
OIDC flow
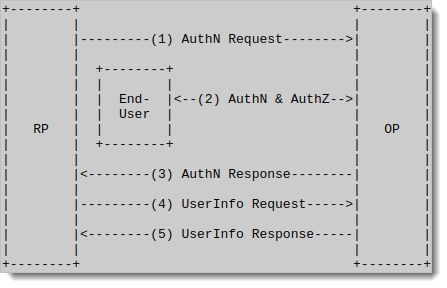
The OIDC flow is similar to OAuth 2.0 but adds an ID Token.
 |
Definitions:
Relying Party (RP) is the application or service that relies on an OpenID Provider (OP) to authenticate users and verify their identities
OpenID Provider (OP) is a trusted service (SecureAuth) that handles user authentication and provides identity information to RPs.
Authentication Request: The client application (RP) asks the OpenID Provider (OP) to authenticate the user.
User Authentication and Consent: The OP verifies the user’s identity and gets their consent to share data with the application.
Authentication Response: The OP sends the application an ID token (user identity) and, optionally, an access token (API access).
User Info Request: The application uses the access token to ask the OP for more user details.
User Info Response: The OP sends additional user data (like name or email) to the application.
Here’s a detailed example of the flow using Auth0 as the Identity Provider (IDP):
Client application requests an authorization code from SecureAuth.
SecureAuth forwards the request to Auth0 IDP.
Auth0 authenticates the user and asks for consent.
Auth0 issues the authorization code to SecureAuth.
SecureAuth requests tokens from Auth0 using the code.
Auth0 issues the tokens to SecureAuth.
Optional. SecureAuth retrieves user info from Auth0; only when the Get user info option is selected in the connector.
Optional. SecureAuth asks the user for consent to share data with the Client; unless the client is trusted or the requested scopes were previously granted.
SecureAuth issues the authorization code to the Client application.
Client application requests tokens from SecureAuth using the code.
SecureAuth issues tokens to the Client application.
ID Token
OIDC issues an ID Token during the authorization flow..
The ID Token is a JSON Web Token (JWT) that contains claims with user and session details related to authentication.
Example ID Token:
{
   "iss": "https://server.example.com",
   "sub": "24400320",
   "aud": "s6BhdRkqt3",
   "nonce": "n-0S6_WzA2Mj",
   "exp": 1311281970,
   "iat": 1311280970,
   "auth_time": 1311280969,
   "acr": "urn:mace:incommon:iap:silver"
  }
Required claims:
iss: Identifies the token issuer (OpenID Provider)sub: Uniquely identifies the user within the issueraud: Specifies the token’s audience (the client application). Must contain the OAuth 2.0client_idexp: Shows when the token expiresiat: Indicates when the token was issued
Requesting an ID Token
Add scope=openid to the authorization request to get an ID Token.
To request additional user details, include more scopes (for example, profile, email).
Scope | Claims |
|---|---|
|
|
|
|
| email, email_verified |
After the user approves the scopes, the ID Token includes the requested claims, which are also available through the /userinfo endpoint.
OIDC Providers
SecureAuth integrates with various Identity Providers (IdPs), including OIDC, SAML, custom providers, or SecureAuth Identity Pools.
Supported OIDC providers with connection templates include:
Auth0
AWS Cognito
Azure AD
Azure B2C
Entrust
GitHub
Okta
Keycloak
You can also use the Generic OIDC connector to connect any OIDC-compliant provider.