Cloud: Getting started
The SecureAuth® Identity Platform features a simplified user interface to help administrators install and configure the security environment that is right for teams in their organization. The following administrator workflow is for organizations starting a SecureAuth cloud deployment.
Administrator workflow
Administrators can use the following workflow to set up the Identity Platform. The workflow gives context and descriptions for the tasks to be performed, and provides links to topics that describe prerequisites, detailed steps, or detailed use cases and scenarios to help you understand each piece of the workflow and how the pieces fit together.
Before you begin
You will work with a SecureAuth Project Manager to determine your organization's needs, based on your chosen SecureAuth package. Some considerations include the MFA methods your teams will use, how single sign-on will work for applications, the levels of identity management to be set, and the kind of end user self-service experience you want for your teams.
To simplify the setup, the Identity Platform user interface (UI) contains onscreen assistance to guide you to achieve your goals. Examples of onscreen assistance are delineated with red arrows in the following image.
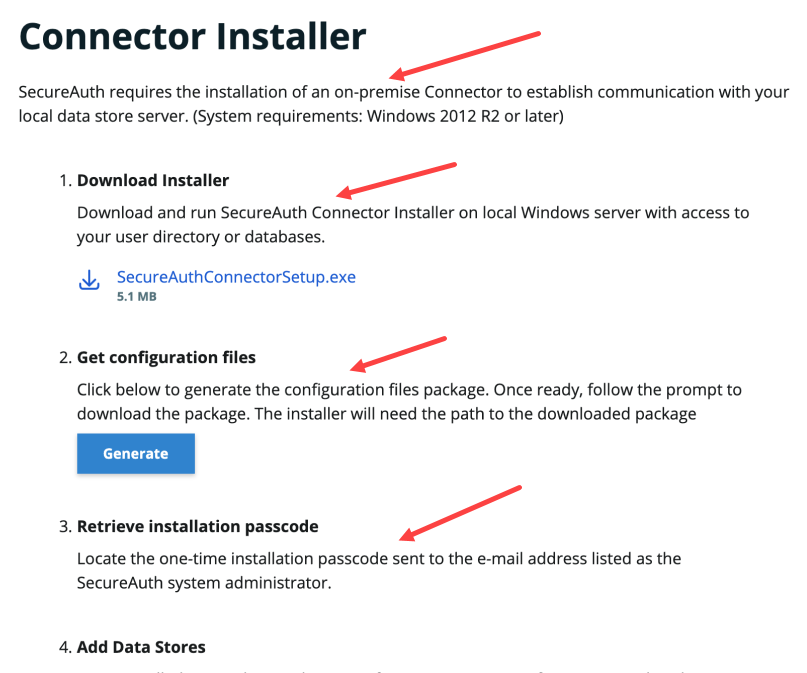 |
Deploy the Identity Platform
After you and your Project Manager have completed detailed discussions about your organization's security needs, you are ready to begin deploying the Identity Platform. Your Project Manager will gather a contact email so that a temporary admin account can be set up for you.
Tip
Use the following steps as a checklist to be completed. Each step contains links connecting you to more detailed steps. To keep this document open and at the correct step, open links in a new tab: click the mouse wheel over the link (Windows) or press Control and click the mouse button over the link (Mac).
You will receive an email with a unique username and password specific to your organization. Follow the instructions to log into the Identity Platform with your unique credentials. After logging in, check the email associated with the admin account. Obtain a configuration passcode in the email and use it to authenticate in.
These credentials give you temporary access to the Identity Platform to complete some key setup steps. You will work with a Project Manager in a later step to configure permanent administrator access.
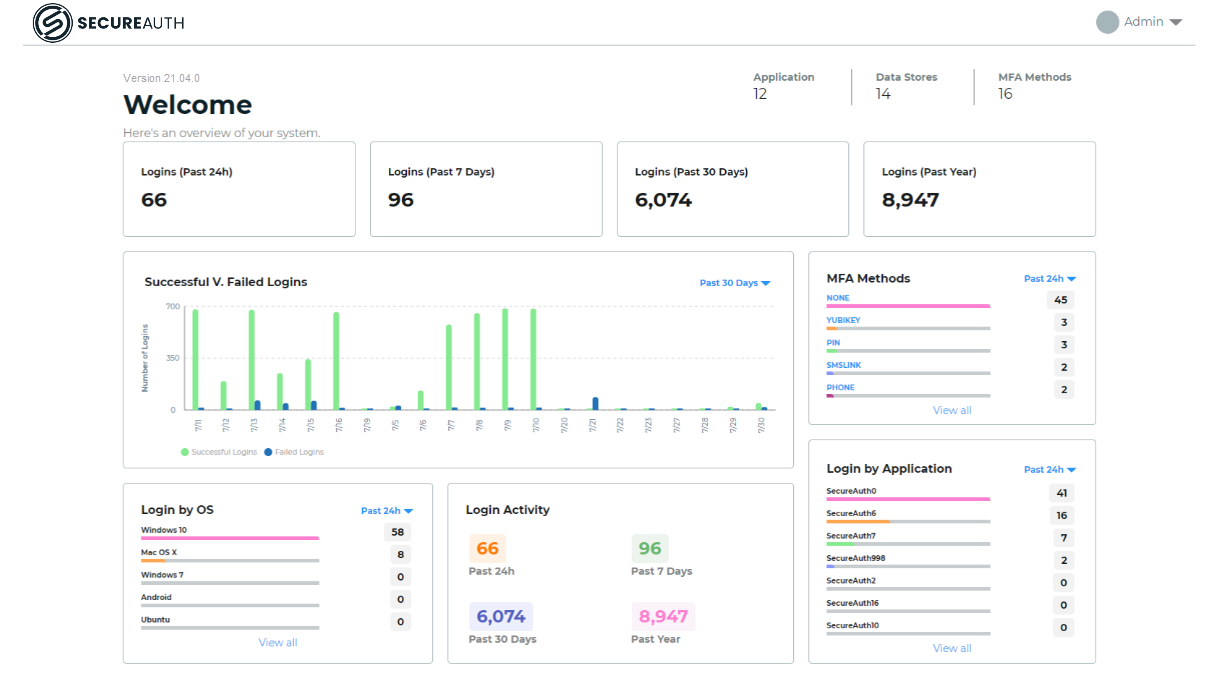
After logging in, you will see the Identity Platform homepage. The intelligence dashboard provides real-time visibility to key metrics of your system. When you log in for the first time, your dashboard might not show any data until data transactions move through the system.
Download and install the SecureAuth Connector on your Windows data store server.
You must first install and set up an on-prem SecureAuth Connector to establish communication between the Identity Platform and your data store.
See Data Stores for a discussion and prerequisites. See Install the SecureAuth Connector for prerequisites and steps.
Set up and manage user identity information by adding a data store to the Identity Platform. The SecureAuth Connector communicates with the data store and the Identity Platform to ensure that users logging into an application have access.
See Data store integration overview to select the appropriate data store (Active Directory, Microsoft SQL Server, Microsoft Entra ID, Oracle Database, Generic LDAP connections, NetIQ eDirectory) and to follow steps to integrate the data store with the Identity Platform.
Optional: Modify the data store integration settings and mapped properties. You might edit data stores, for example if you need to change the name of your data store.
Configure permanent administrator access to the Identity Platform.
Your Project Manager will assist you during this process.
Set up the global Multi-factor Authentication (MFA) methods available for you to provision and globally define for your organization.
Log into the Identity Platform using the credentials you set in step 4 and the second factor you set up with the Project Manager.
In the Identity Platform, click Multi-Factor Methods on the left side of the page.
Under Method configuration, edit a method by clicking the pencil icon on the right side of the page.
See Global multi-factor authentication methods for steps.
Configure the Policies to be used for your organization. SecureAuth recommends using the default policy for a general level of authentication security for your organization. The default policy applies to most of your authentications. If you require different levels of authentication security, you can customize the default policy or add a new policy.
View policies by clicking Policies on the left side of the page.
To edit the default policy, click Edit Default Policy.
To create a custom policy, click Add new Policy.
Use the natural language rules-based UI to set or modify the policy rules.
Policies consist of authentication rules, which you can define to authenticate users to and block users from certain applications.
The following examples describe scenarios around why and how you would create different access to applications.
Scenario 1: You are setting up a policy for surgeons in a hospital who need to access a surgical software application during surgical procedures. You create a rule to prompt for authentication if a user is NOT in the surgeon group (defined in Active Directory). Because of that rule, surgeons do not have to log into the surgical software application to access it. (This scenario assumes that surgeons will have logged into the hospital network during their pre-op procedures.)
Scenario 2: You have a range of users–from a carpenter who needs to log into a time sheet application to clock in and out to a manager who needs to log into the same application to check employee hours and move the time sheets along to payroll. Each group needs to see different information with different access in the same application.
Instead of creating a policy, you could use the Application Manager to add another instance of the time sheet application and give it a unique name or the same name and a unique description, then add the appropriate data store groups in the appropriate application instance to customize access.
When creating a policy, consider the following:
Understand the security posture of your organization. For example, what is the criteria that would make the organization certain that the person who is attempting to log in is really that person? Would the user be required to be at the company office? Would criteria include the kind of information that is being accessed? To support the security posture of your organization, you can set the following rules in a policy:
Authentication Rules: What are the authentication rules? What criteria do you want to ask your end users to provide to log in? In what situations do you want people to be prompted for MFA? Authentication rules are honored in order from top to bottom. Be sure to consider order when creating a policy.
You can also set up blocking rules, which block end users from logging into an app. Blocking rules are analyzed first in a policy.
Multi-Factor Methods: Which MFA methods should end users be able to use?
Resources: Which applications do you want to keep end users from accessing? Which applications do you want the policy to apply to?
Returning to the surgeon scenario, consider the rules set up for the policy in the following image:
If user's ID is not surgeons, then prompt for MFA.
If the user's Threat Service level is extreme or high, prompt for MFA.
If the user's User Risk level is high, prompt for MFA.
If the user has moved faster than 575 mph, prompt for MFA. (This is the Geo-velocity authentication option; it is a default rule and all packages have it.)
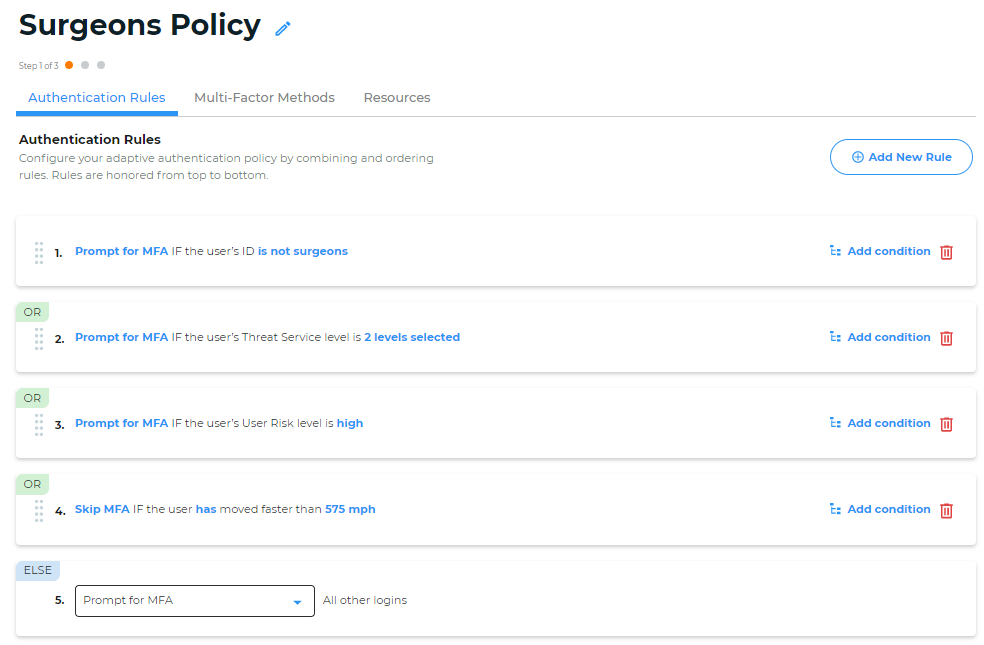
In this scenario, the authentication rules settings mean that higher risk surgeons would still need to log in, but lower risk surgeons would not need to log in.
Learn about How policy rules are used to understand the default policy rules, such as User, Threat Service, etc. See Manage policies to create a policy and define its rules.
Add and manage applications for your organization by clicking Application Manager on the left side of the page. Use the Application Manager to add an application, such as Salesforce, Microsoft Office 365, and many more, and set security for the application.
See Scenario 2 for an example to set up an application for different kinds of end user access.
See Application Manager to add and set up applications.
If you want to see what end users will need to set up to use MFA for logging in, see the SecureAuth Onboarding Toolkit.
This downloadable toolkit includes email templates and end-user experience setup steps for you to customize to prepare your end users for the changeover to 2FA.
End-user workflow
End users can use the MFA methods that you have enrolled them in to log in with a desktop or mobile app.
Before logging in, end users must define answers to security questions, set up a YubiKey device, register a phone number to receive a call or text to obtain passcodes, or set up other MFA methods that allow them to log in. They can follow instructions customized by the administrator and sent to them in email.