Configure SecureAuth RADIUS settings
In this task, you'll configure the SecureAuth RADIUS Server Settings tab. This starts the process to set up the communication between SecureAuth RADIUS Server and the RADIUS client.
You can also optionally configure the Syslog settings.
SecureAuth RADIUS Server settings
Open the SecureAuth RADIUS admin console and select the Settings tab.
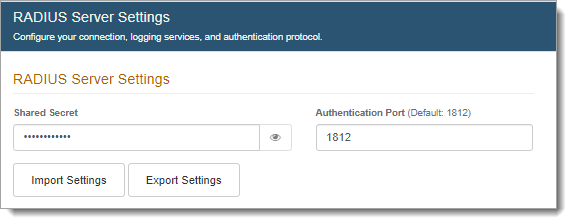
In the RADIUS Server Settings section, input the same Shared Secret you entered on the management console of the RADIUS client.
The Authentication Port number 1812 appears by default.
Note
If you entered a shared secret on the RADIUS Clients page, it is used by default even if you enter a shared secret on the RADIUS Server Settings page.
The following chart describes the difference in setting a shared secret on the RADIUS Server Settings page compared to setting it on the RADIUS Clients page.
RADIUS Server Settings page
RADIUS Clients page
Shared secret is set globally and is used in the connection between SecureAuth RADIUS and all RADIUS clients by default.
Shared secret is used in the connection between SecureAuth RADIUS and the selected RADIUS client only.
This shared secret overwrites the global shared secret set in the RADIUS Server Settings page.

Create and enable a firewall rule to allow port 1812 to communicate using User Datagram Protocol (UDP). The RADIUS Server uses port 1812 for authentication requests.
For more information, see How to configure the Windows Server 2019 Firewall.
Optional. Click Import Settings to import a .cfg file with configured settings from an existing SecureAuth RADIUS Sever to quickly add configurations.
To learn more, see Export or import the SecureAuth RADIUS configuration.
Caution
Importing a .cfg file overwrites the configuration on the Settings, IdP Realms, and RADIUS Clients tabs of the SecureAuth RADIUS admin console. This action cannot be reverted.
Optional. Click Export Settings to download the SecureAuth RADIUS Server settings as a .cfg file to backup the SecureAuth RADIUS Server or to simplify creating a new SecureAuth RADIUS Server later.
To learn more, see Export or import the SecureAuth RADIUS configuration.
Optional Syslog settings
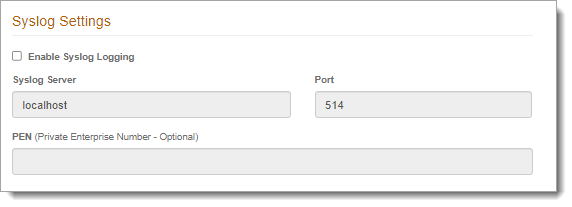
In the Syslog Settings section, select the check box to Enable Syslog Logging.
The standard Syslog Protocol RFC5424 is supported.
Set the following configurations:
Syslog Server
Enter the Syslog Server IP address.
Port
The Syslog Port number 514 appears by default.
PEN (Private Enterprise Number)
Optional. Enter the Private Enterprise Number (PEN).

PEAP Settings
Install the x64 version of Microsoft Visual C++ runtime (Redistributable for Visual Studio 2012 Update 4) on the Windows Server where SecureAuth RADIUS is installed.
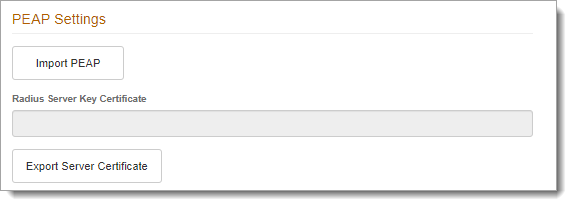
In the PEAP Settings section of the SecureAuth RADIUS admin console, click Import PEAP.

Set the following configurations:
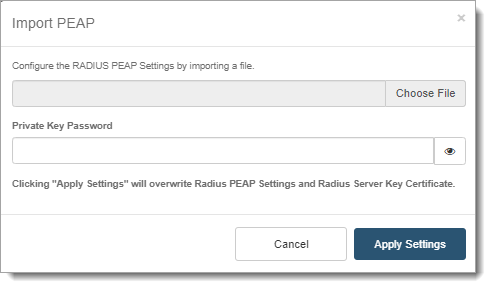
Configure the RADIUS PEAP Settings by importing a file
Upload a Private Key PFX file.
Generate this Private Key PFX file with the certificate signing entity of your choice.
Private Key Password
Enter the Private Key Password configured for the .PFX file.

Click Apply Settings.
The RADIUS Server Key Certificate information appears and identifies the SecureAuth RADIUS server .PEM certificate.
Click Save after all server entries are made.
Export SecureAuth RADIUS Server certificate
This certificate ensures communication between a VPN and SecureAuth RADIUS. If the SecureAuth RADIUS Server certificate has been uploaded to this server, the Export Server Certificate link is active.
Click Export Server Certificate to download the .PEM certificate. This self-signed certificate must be imported to the Trust Store on the VPN client installed on the end user's device.
Note
SecureAuth Identity Platform server certificates are not exported with this utility.