Password Reset page configuration
The Identity Management (IdM) tool contains the Password Reset page function.
You can configure the Password Reset page to allow end users to reset passwords and unlock their own accounts. and administrators to reset and update passwords, and unlock accounts.
There are three password reset mode methods:
Enforce mode – Useful for most Active Directory and LDAP use cases. This mode enforces password history requirements like not using a previous password or does not allow frequent password updates.
Administrative mode – Useful for SQL-type data stores, in a Help Center environment, and if your data store supports password history checks.
Administrative mode with history check – Useful for SQL-type data stores, in a Help Center environment, and if your data store does not support password history checks.
This topic covers how to set up the Password Reset page using any of the above password reset modes.
Prerequisites
SecureAuth® Identity Platform release 21.04
Data store added to the Identity Platform
Data store must have a service account set with write privileges to modify. This is needed to change user passwords.
If using an Active Directory, open the following outbound ports for password modification:
139 – DFSN, NetBIOS session service, NetLogon
445 – SMB / CIFS, DFSN, LSARPC, NbtSS, NetLogonR, SamR, SrvSvc
464 – Kerberos change / set password
(Optional) To use the Administrative Reset with History Check password reset mode, open the following outbound port for password modification:
636 – SSL Outbound Port
(Optional) Configure Google Workspace (formerly G Suite) to synchronize directory passwords
Configured user authentication policy
Step A: Add and configure Password Reset page
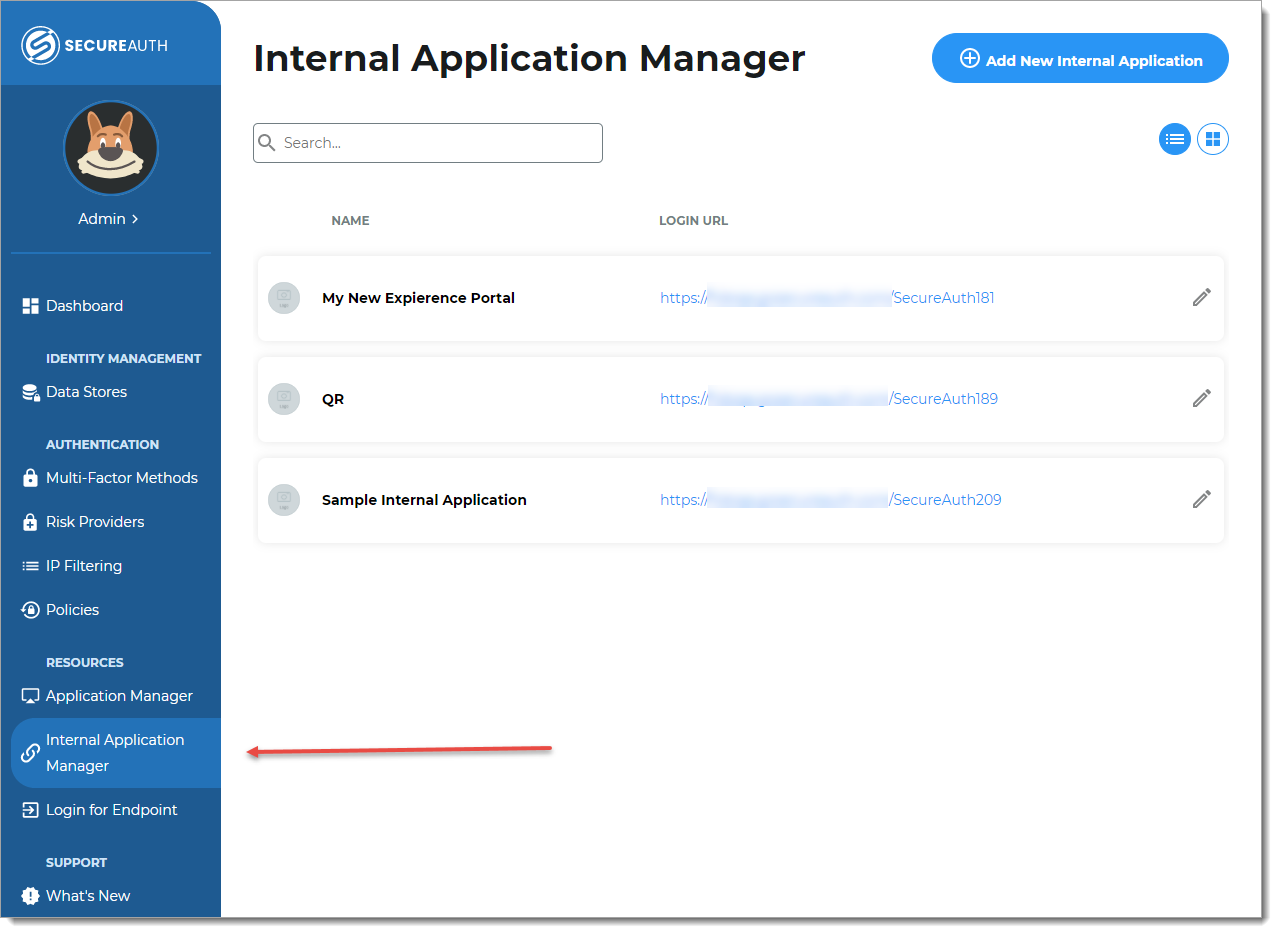
Use the Internal Application Manager to add and configure the Password Reset page.
On the left side of the Identity Platform, click Internal Application Manager.
Click Add New Internal Application.
The New Internal Application page displays.
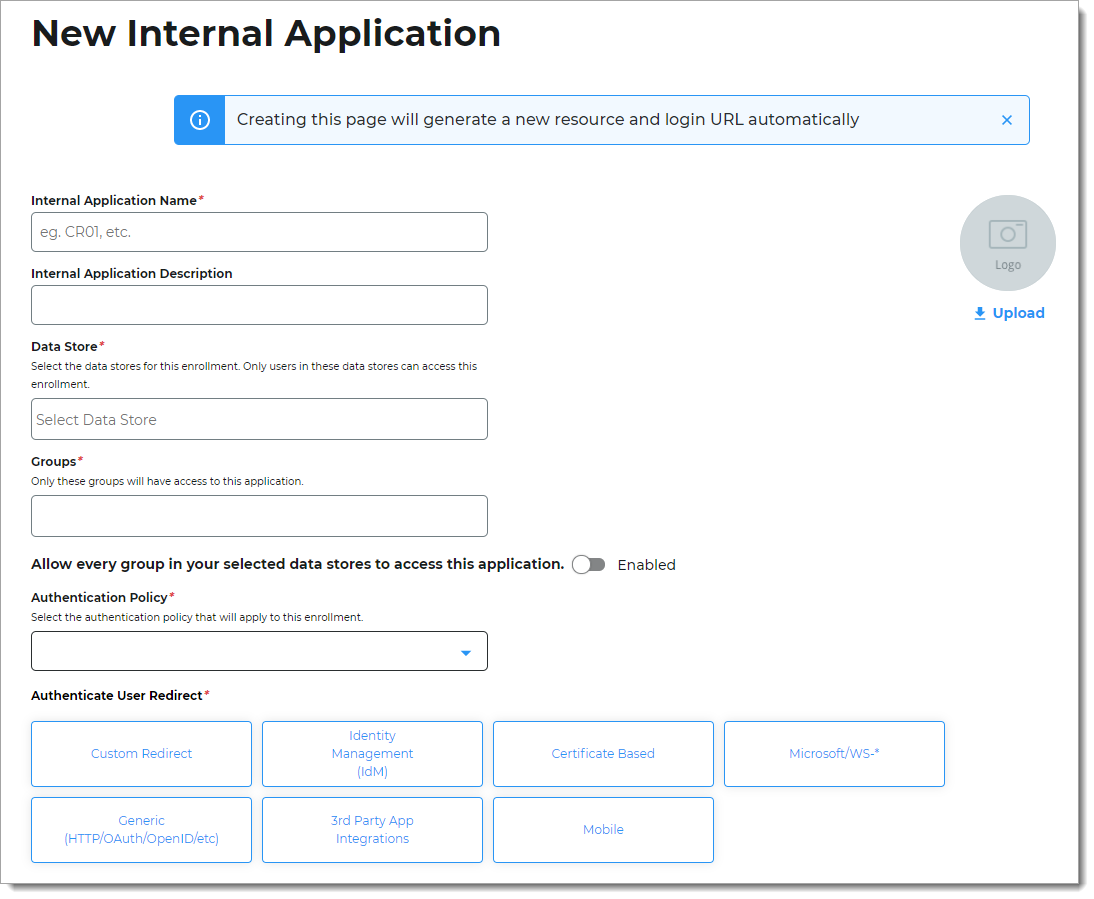
Set the following configurations:
Internal Application Name
Set the name of the Password Reset page.
This name is shown on the page header and document title of the end user login pages.
Note
If you change this name, it will overwrite any value that is set on the Overview tab in Advanced Settings.
Internal Application Description
This is an internal description not shown to end users.
Identity Source
Enter the data store to authenticate and allow user access to the Password Reset page.
Groups
Use one of the following options:
Slider in the On position (enabled): Allow users from every group in your selected data stores access to the Password Reset page.
Slider in the Off position (disabled): Enter the specific groups who are allowed access to the Password Reset page.
Authentication Policy
Select the user authentication policy for the Password Reset page.
Authenticate User Redirect
Select the Identity Management (IdM) category.
Identity Management (IdM)
Select Password Reset.
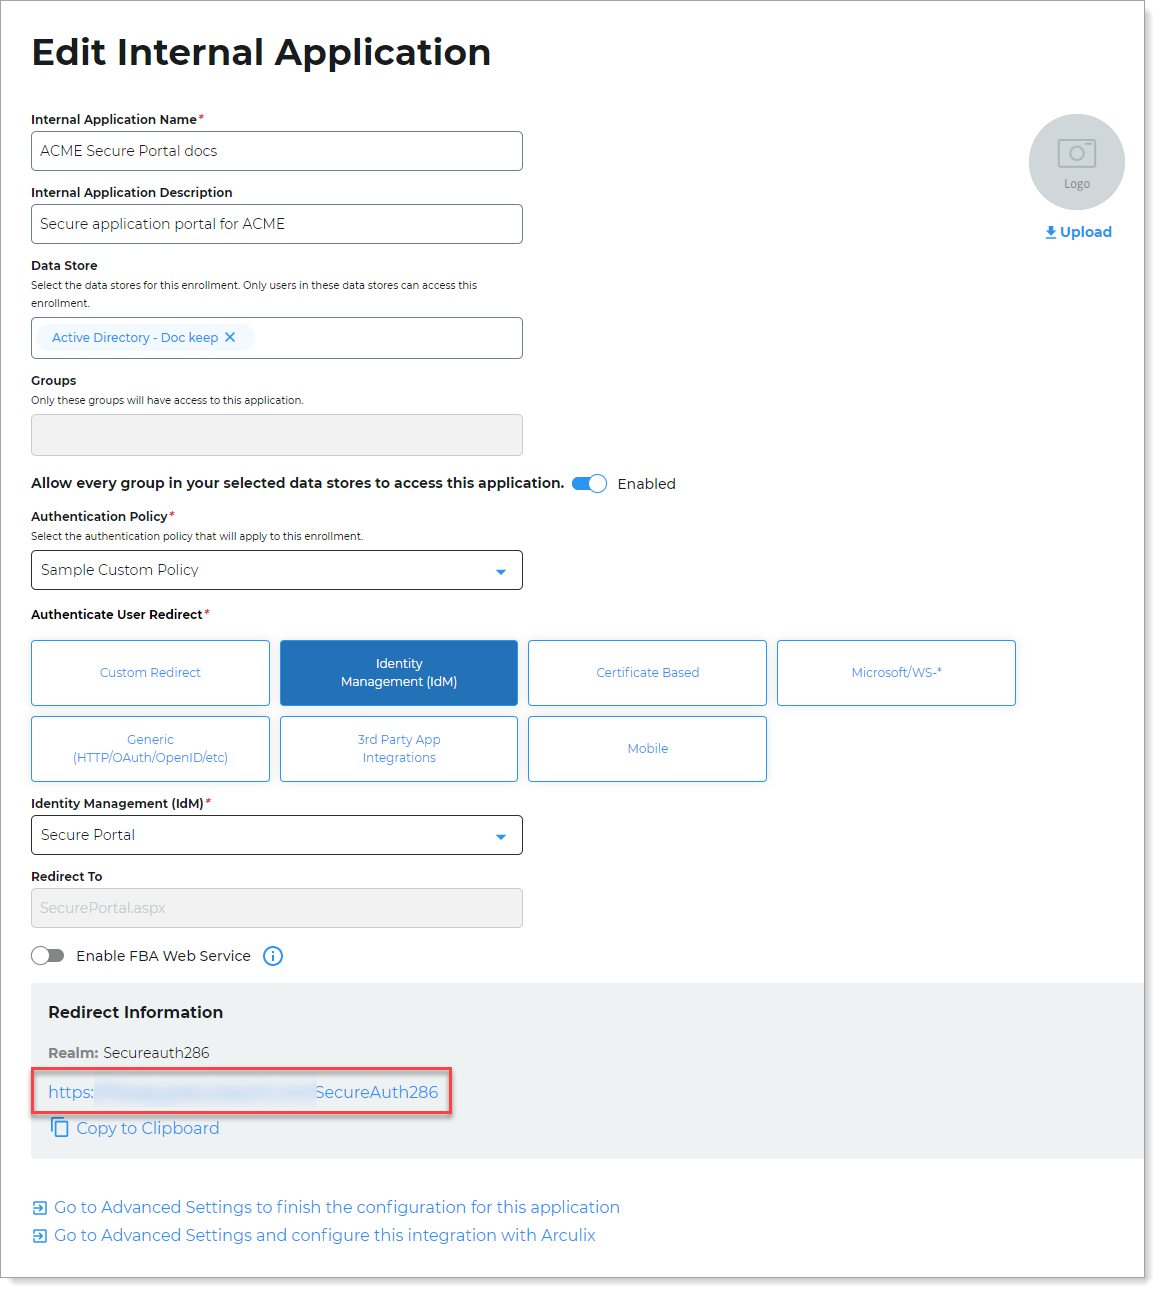
Redirect To
This field is automatically populated by the selection of Password Reset as an internal application.
This is the page the end user lands on after login.
Click Create Connection.
This creates a new internal application with an attached user authentication policy from the New Experience.

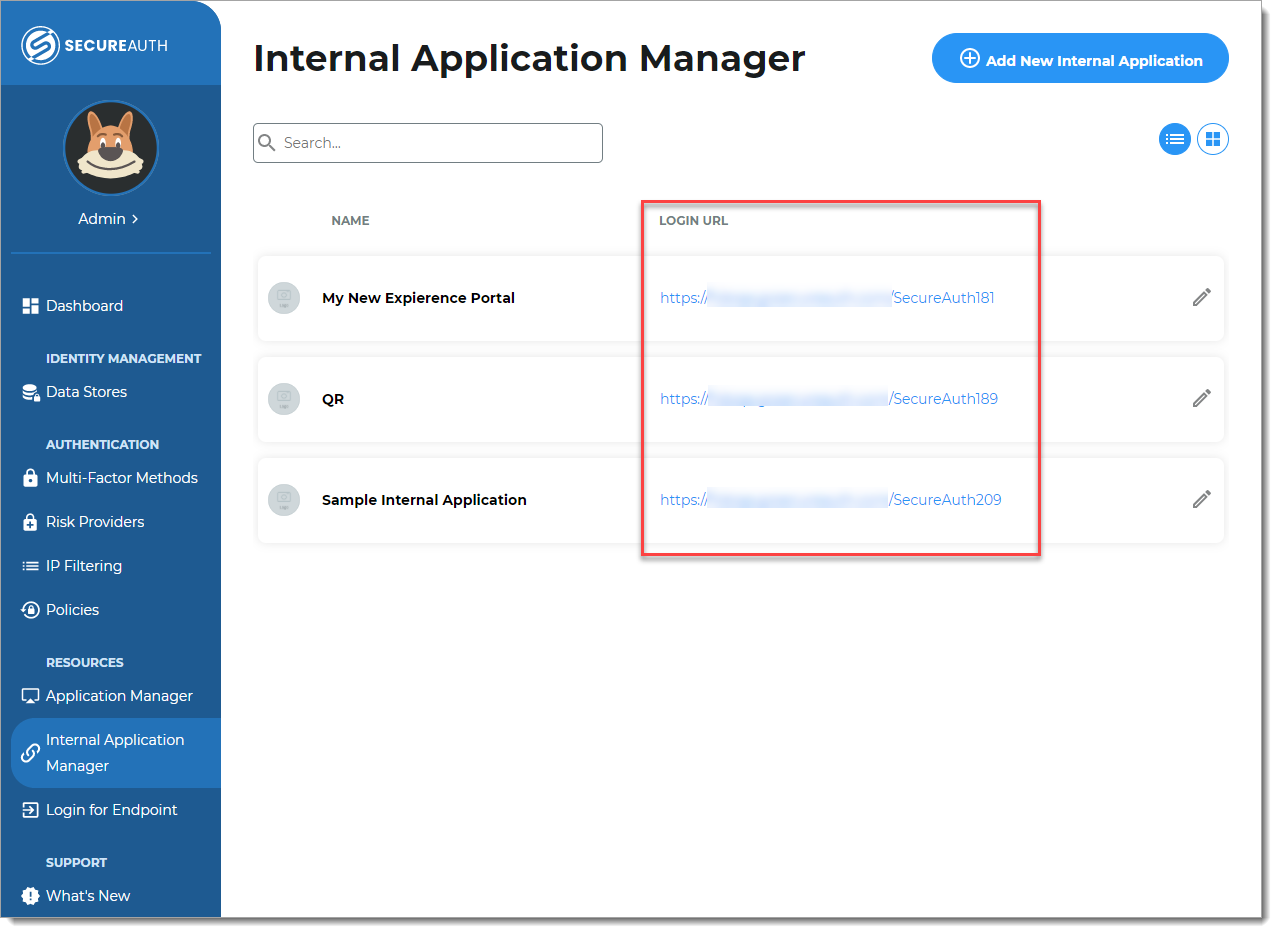
Copy the login URL for your end users to access the Password Reset page.
You'll need this information to share with your end users.
You can find this on the main Internal Application Manager page or when you edit the Password Reset configuration in the Redirect Information section.
Step B: Finish configuration in Advanced Settings
Continue to Advanced Settings to finish the Password Reset page configurations. Use the configuration option that best fits the needs of your organization.
To complete the Password Reset page configuration in Advanced Settings, do one of the following:
At the top of the page, click the link in the green confirmation message.
At the bottom of the page, click Go to Advanced Settings... link.
The link takes you to the Post Authentication tab in Advanced Settings.
In the Password Reset section, click the Configure password reset page link.

In the Password Reset Functions section, set the Password Reset Mode to one of the following options:
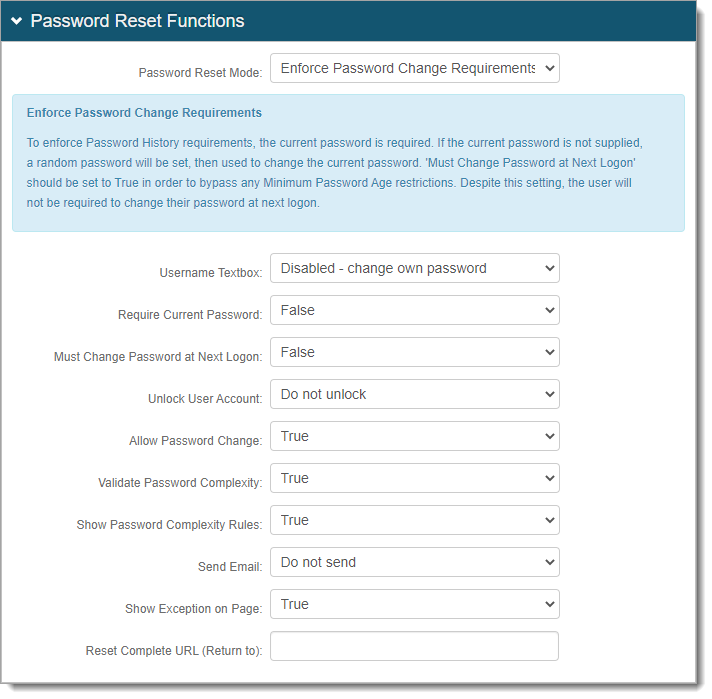
Enforce Password Change Requirements (Enforce mode) – To enforce password history rules, it must use the current password. If the current password is not given, a random password is set, then used to change the current password.
Note: Use this option for Active Directory and LDAP directory types and must have password history checks.
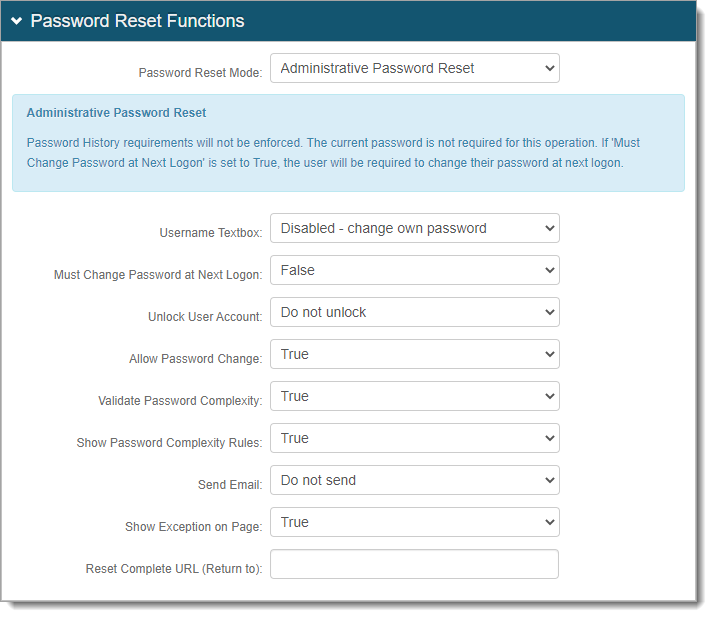
Administrative Password Reset (Admin mode) – This does not enforce password history rules. The current password is not required for this rule.
Note: Use this option for SQL directory types and do not need or support password history checks.
Administrative Reset with History Check (Admin mode with history check) – Enforces password history rules and does not require current password. This mode is not guaranteed to work with non-AD LDAP data stores. For Active Directory, you need to open SSL outbound port 636.
Note: This is not supported for eDirectory.
Continue with the rest of the configuration settings.
If you selected Password Reset Mode = Enforce Password Change Requirements, set the following.
Username Textbox
Set to Disabled - change own password.
The username search box does not display and the user can change their own password.
Require Current Password
Set to True. Otherwise, if using eDirectory, set to False.
Must Change Password at Next Logon
To bypass password age restrictions, set to True.
Unlock User Account
Set to Do not unlock.
Allow Password Change
Set to True.
Validate Password Complexity
Set whether the Identity Platform adheres to the password complexity requirements in the data store. The rules set in the Password Complexity section should mirror what is set in the data store.
True – Identity Platform checks with the data store to make sure the password is valid before updating the password value.
False – User can give any password value regardless of whether it meets the password rules in the data store.
Note
If the password rules in the Identity Platform are more strict than the rules in the data store, then it follows the Identity Platform password rules to allow a successful password change.
If the password rules in the Identity Platform are less strict than the data store, then it follows the data store password rules to allow a successful password change.
If the password change does not meet the data store rules, the realm errors out and does not allow a password change.
Show Password Complexity Rules
Set whether to show the password rules to the user (True / False).
This field works when the Validate Password Complexity option is set to True.
If set to True, configure the password rules in the Password Complexity section.
Send Email
Set whether to send an email notification of a changed password to the user.
Select the Identity Platform email profile property mapped to the email data store field like Email 1 through Email 4, or use Do not send.
Show Exception on Page
Set to True to display the reason why a password change is not accepted.
The error message comes from the data store, based on its password complexity rules.
Reset Complete URL (Return to)
Optionally set whether to redirect the user to a specific URL after changing their password.
If you selected Password Reset Mode = Administrative Password Reset, set the following.
Username Textbox
Set to Disabled - change own password.
The username search box does not display and the user can change their own password.
Must Change Password at Next Logon
Set to False.
Unlock User Account
Set to Do not unlock.
Allow Password Change
Set to True.
Validate Password Complexity
Set whether the Identity Platform adheres to the password complexity requirements in the data store. The rules set in the Password Complexity section should mirror what is set in the data store.
True – Identity Platform checks with the data store to make sure the password is valid before updating the password value.
False – User can give any password value regardless of whether it meets the password rules in the data store.
Note
If the password rules in the Identity Platform are more strict than the rules in the data store, then it follows the Identity Platform password rules to allow a successful password change.
If the password rules in the Identity Platform are less strict than the data store, then it follows the data store password rules to allow a successful password change.
If the password change does not meet the data store rules, the realm errors out and does not allow a password change.
Show Password Complexity Rules
Set whether to show the password rules to the user (True / False).
This field works when the Validate Password Complexity option is set to True.
If set to True, configure the password rules in the Password Complexity section.
Send Email
Set whether to send an email notification of a changed password to the user.
Select the Identity Platform email profile property mapped to the email data store field like Email 1 through Email 4, or use Do not send.
Show Exception on Page
Set to True to display the reason why a password change is not accepted.
The error message comes from the data store, based on its password complexity rules.
Reset Complete URL (Return to)
Optionally set whether to redirect the user to a specific URL after changing their password.
If you selected Password Reset Mode = Administrative Reset with History Check, set the following.
Username Textbox
Set to Disabled - change own password.
The username search box does not display and the user can change their own password.
Must Change Password at Next Logon
Set to False.
Unlock User Account
Set to Do not unlock.
Allow Password Change
Set to True.
Validate Password Complexity
Set whether the Identity Platform adheres to the password complexity requirements in the data store. The rules set in the Password Complexity section should mirror what is set in the data store.
True – Identity Platform checks with the data store to make sure the password is valid before updating the password value.
False – User can give any password value regardless of whether it meets the password rules in the data store.
Note
If the password rules in the Identity Platform are more strict than the rules in the data store, then it follows the Identity Platform password rules to allow a successful password change.
If the password rules in the Identity Platform are less strict than the data store, then it follows the data store password rules to allow a successful password change.
If the password change does not meet the data store rules, the realm errors out and does not allow a password change.
Show Password Complexity Rules
Set whether to show the password rules to the user (True / False).
This field works when the Validate Password Complexity option is set to True.
If set to True, configure the password rules in the Password Complexity section.
Send Email
Set whether to send an email notification of a changed password to the user.
Select the Identity Platform email profile property mapped to the email data store field like Email 1 through Email 4, or use Do not send.
Show Exception on Page
Set to True to display the reason why a password change is not accepted.
The error message comes from the data store, based on its password complexity rules.
Reset Complete URL (Return to)
Optionally set whether to redirect the user to a specific URL after changing their password.

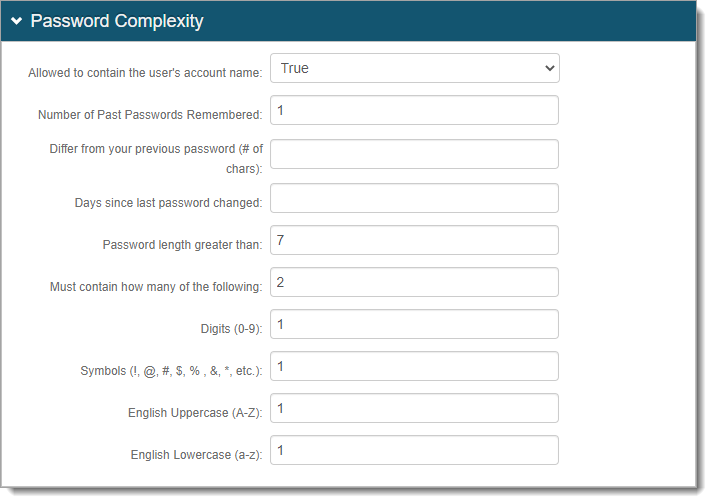
In the Password Complexity section, configure the password rules that mirror the password complexity rules set in the data store.
To display the password rules on the page, set Show Password Complexity Rules to True.
Note
If the Identity Platform does not have password complexity rules turned on, the password rules from the data store takes place.
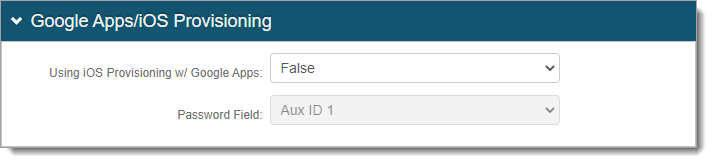
In the Google Apps / iOS Provisioning section, set whether to enable iOS provisioning with G Suite and allow synchronization of password changes.
For more information, see iOS G Suite Provision Configuration Guide.
Save your changes.