Device Recognition
Device Recognition is included, out-of-the-box with SecureAuth® Identity Platform. This heuristic-based authentication enables end users to securely access resources without requiring additional one-time passwords (OTPs) for multi-factor authentication (MFA).
While Device Recognition does not require anything to be stored, it can store a credential in the device, which increases the security as there is now something client-side and something server-side that must match for a successful authentication.
End users enroll for device / browser profiles by successfully authenticating through the Identity Platform realm, and the profiles can be instantly revoked at any time by the administrator or the end user.
Device Recognition works on any mobile or desktop device and can be configured to ensure that only the actual end user is obtaining access into the target resource.
Definitions
The Identity Platform can collect client-unique information (profiles) from the end user's device or browser.
For desktop browsers, there are two options:
- No Cookie
Information sent from the browser is collected in the Identity Platform, without delivering or registering any information at the client side, such as HTTP headers and cookies.
- Cookie
Information sent from the browser is collected in the Identity Platform, in addition to registering a cookie at the client-side to increase security.
For mobile devices (iOS and Android), the Identity Platform has the following method to collect information:
- Cookie
Information sent from the browser is collected in the Identity Platform, in addition to registering a cookie at the client-side to increase security.
After a successful multi-factor authentication, the profile is created, and then accepted and stored in the user account in the directory.
When the end user logs in again to the Identity Platform using the same device (or browser), the current client-unique information (a new profile) is collected and compared with the previously registered profiles for authentication.
When an existing profile matches the current profile with an acceptable Authentication Threshold score, the end user is not prompted for multi-factor authentication.
When the device recognition cookie is used as part of the device recognition workflow, it restricts the user to have one device profile per browser in which the cookie lives.
Prerequisites
Have iOS or Android mobile devices, or desktop devices with a browser
Create a New Realm or access existing realm(s) on the Identity Platform Web Admin to which Device Recognition is applied (Realm A in the Identity Platform configuration)
Optional. Create a New Realm or access an existing realm in the Identity Platform Web Admin that is configured for the Account Management Page (help desk) to enable administrator device / browser profile revocation (Realm B in the Identity Platform configuration section)
Optional. Create a New Realm or access an existing realm in the Identity Platform Web Admin that is configured for the Self-service Account Update (end user self-service) to enable end user device / browser profile self-revocation (Realm C in the Identity Platform configuration section)
Configure the following tabs in the Web Admin before configuring for Device Recognition (and Account Management Page and Self-service Account Update):
Overview
Data
Workflow
Multi-Factor Methods
Post Authentication – the target resource or post authentication action must be defined (see Realm B and Realm C for specific Post Authentication configurations for Account Management Page and Self-service Account Update)
For API configuration information, see Device Recognition authentication API guide.
Identity Platform configuration
The following configuration steps are for any and all realms using Device Recognition.
Important! To retain your configurations, be sure to click Save often, before leaving a tab page. Once you leave that tab, any unsaved changes are lost.
Steps 1-2 are required for all realms in this guide (Realm A, Realm B, and Realm C)
Go to the Data tab.
Note
The following step is for LDAP data stores only (AD and others).
If using a different directory (for example, SQL), then the Property needs to be configured as a stored procedure in the data store.
Note: For SQL, ASP.net, and Oracle data stores, only the Plain Binary Data Format is supported and for ODBC data stores, Device Recognition is not supported
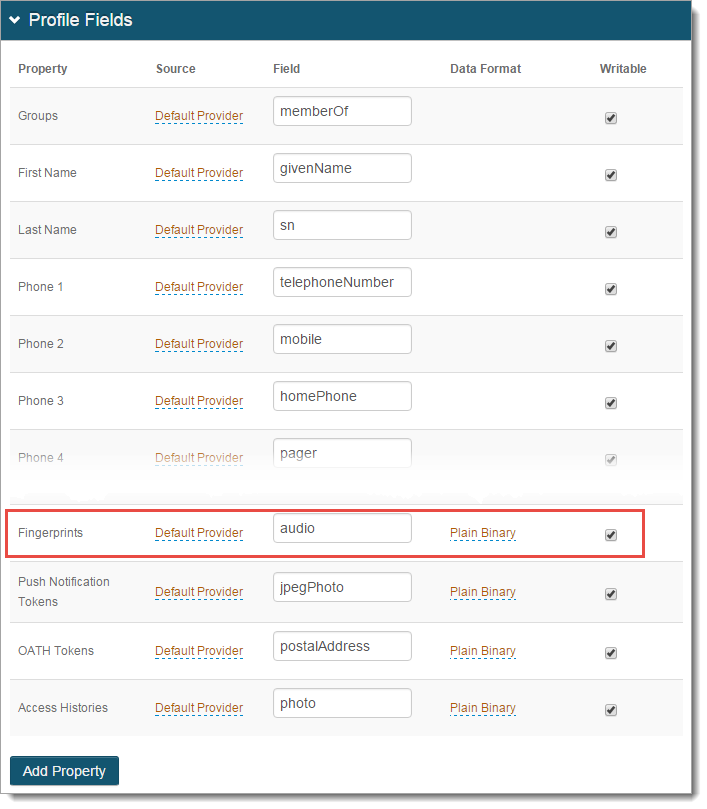
In the Profile Fields section, map a directory field to the following Property:
Fingerprints
In typical AD deployments, set this field to audio and use the Plain Binary data format.
Select the Writable check box.
Note
For the LDAP directory attribute mapped to the Property based on the Data Format selection (Plain Binary or JSON), there are distinct requirements for the directory field that contains the device / browser profile information:
Plain Binary requirements:
Length – 8 kB minimum per Device / Browser Profile; and if the Total FP Max Count is set to -1, then the size must be unlimited
Data Type – Octet string (bytes)
Multi-valued
JSON requirements:
Length – No limit / undefined
Data Type – DirectoryString
Multi-valued
Click Save.
Go to the Workflow tab.
In the Device Recognition Method section, set the following:
Integration Method
Set to Certification Enrollment and Validation.
Client Side Control
Set to Device/Browser Fingerprinting.

In the Workflow section, set the following:
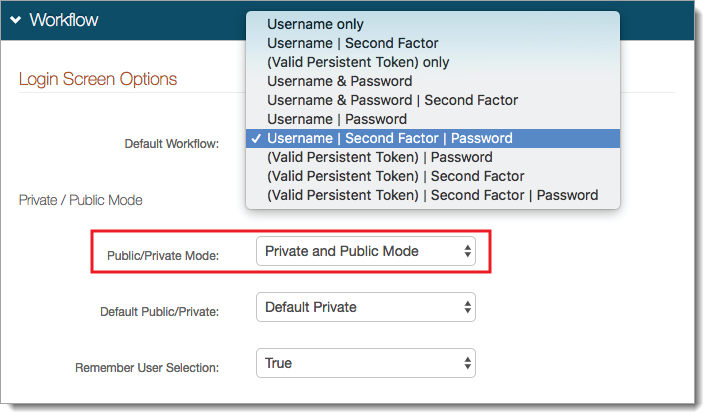
Default Workflow
Set the login workflow for the end user login.
If you select the (Valid Persistent Token) only option:
Then, a persistent token (for example, device / browser profile is required to access the target resource.
To redirect the end user to enroll for a persistent token to gain access, provide the realm URL to another Identity Platform realm. Go to the Workflow tab, in the Workflow > Redirects section and set the realm URL (for example, /Realm#) in the Invalid Persistent Token Redirect field.
Public/Private Mode
This generates a device / browser profile in this realm and checks for existing profiles.
Set to Private and Public Mode or Private Mode Only.
Default Public/Private
On the client-side page shown to the end user, select which option is to be selected by default.
To ensure that profiles are generated and checked in the realm, it is recommended to set to Default Private.
Remember User Selection
On the client-side page shown to the end user, to automatically select the Private or Public option, based on the previous selection by the user, set to True.
In the Browser / Mobile Profiles section, set the following:
Browser Profile Settings
FP mode
By default, this is set to Cookie. This Indicates whether to deliver a cookie to the browser after authentication – Cookie or No Cookie.
Cookie name prefix
Keep or change the default cookie name.
The cookie name appears as Cookie Name Prefix + company name + hashed value of user ID.
Cookie length
Set the length of time in hours, the cookie is valid. For example, 72 hours.
Match FP ID in cookie
By default, this is set to True. This requires the profile ID to presented and then matched to a profile ID in the directory with an acceptable Authentication Threshold score.
Otherwise, if set to False, it does not require ID matching between the cookie and the stored profile.
Authentication threshold (%)
Set the Authentication threshold to a percentage number between 90 and 100.
Update threshold (%)
Set the Update threshold to a percentage number just below the Authentication threshold. This number must be less than the number set in the previous field.
For an explanation of thresholds, see the following Profile Comparison Score information.
Mobile Profile Settings
FP mode
Set to Cookie to deliver a cookie to the mobile device after authentication.
Note
The Mobile App setting has been deprecated.
Cookie name prefix
Keep or change the default cookie name.
The cookie name appears as Cookie Name Prefix + company name + hashed value of user ID.
Cookie length
Set the length of time in hours, the cookie is valid. For example, 72 hours.
Match FP ID in cookie
By default, this is set to True. This requires the profile ID to presented and then matched to a profile ID in the directory with an acceptable Authentication Threshold score.
Otherwise, if set to False, it does not require ID matching between the cookie and the stored profile.
Skip IP Match
If an exact IP address match is not required for profile comparison, set to True. Otherwise, to require an exact match, set to False.
Authentication threshold (%)
Set the Authentication threshold to a percentage number between 90 and 100.
Update threshold (%)
Set the Update threshold to a percentage number just below the Authentication threshold. This number must be less than the number set in the previous field.
For an explanation of thresholds, see the Profile Comparison Score information above.
Other Settings
FP expiration length
Set the number of days the profile is valid.
For example, when set to 10 days, the user's profile expires in days, no matter how often it is used.
Set to 0 for no expiration.
FP expiration since last access
Set the number of days a profile is not used since the last access; to which the profile no longer valid.
For example, when set to 10 days, the user's profile expires when it hasn't been used since it was last employed.
Set to 0 for no expiration.
Total FP max count
Set the maximum number of profiles that can be stored in a user's account at a given time.
A typical configuration would limit a profile storage maximum from five to eight profiles.
Set to -1 for no limit on profile storage maximum.
When exceeding max count
If the Total FP max count is set to a number other than -1, set to one of the following:
Allow to replace – Enable replacement of an existing profile with a new one.
Not Allow to replace – Profiles cannot be automatically replaced. With this option, the user or administrator must manually remove stored profiles from the user profile on the Self-service Account Update or Account Management (Help Desk) page.
Replace in order by
If a maximum is set in the Total FP max count and Allow to replace is selected when exceeding the maximum count, set to one of the following:
Created Time – Enable replacement of the oldest stored profile with the new one.
Last Access Time – Enable replacement of the most recently used profile with the new one.
FP's access records max count
Set to the number of access history entries stored in each profile. Recommended setting is 5.
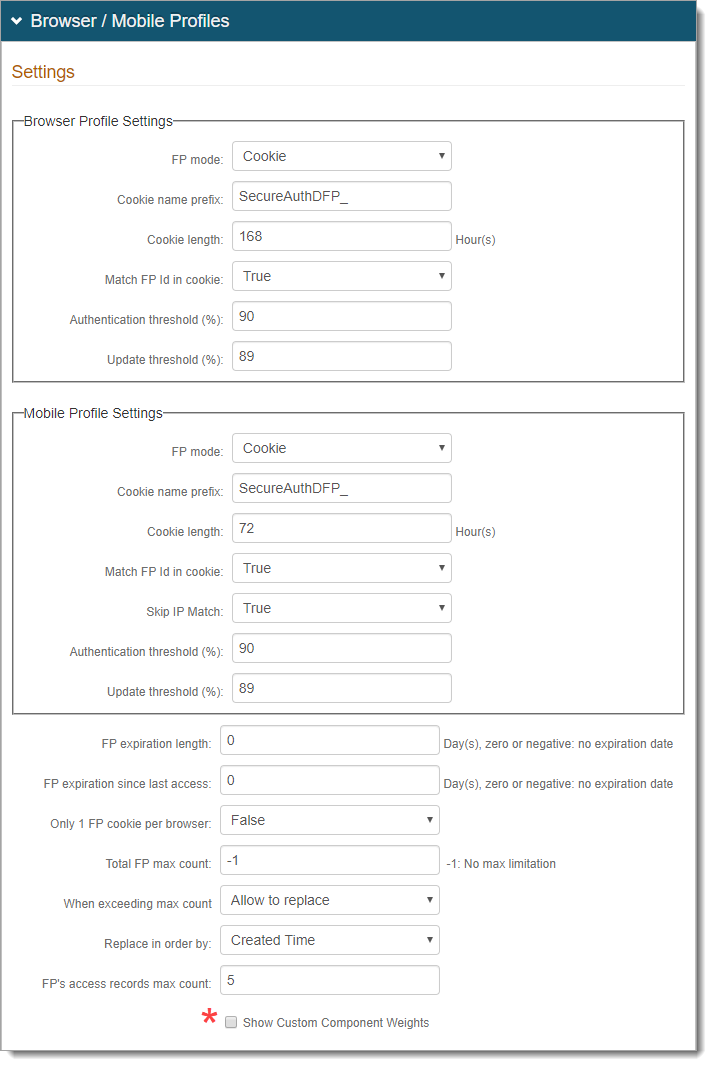
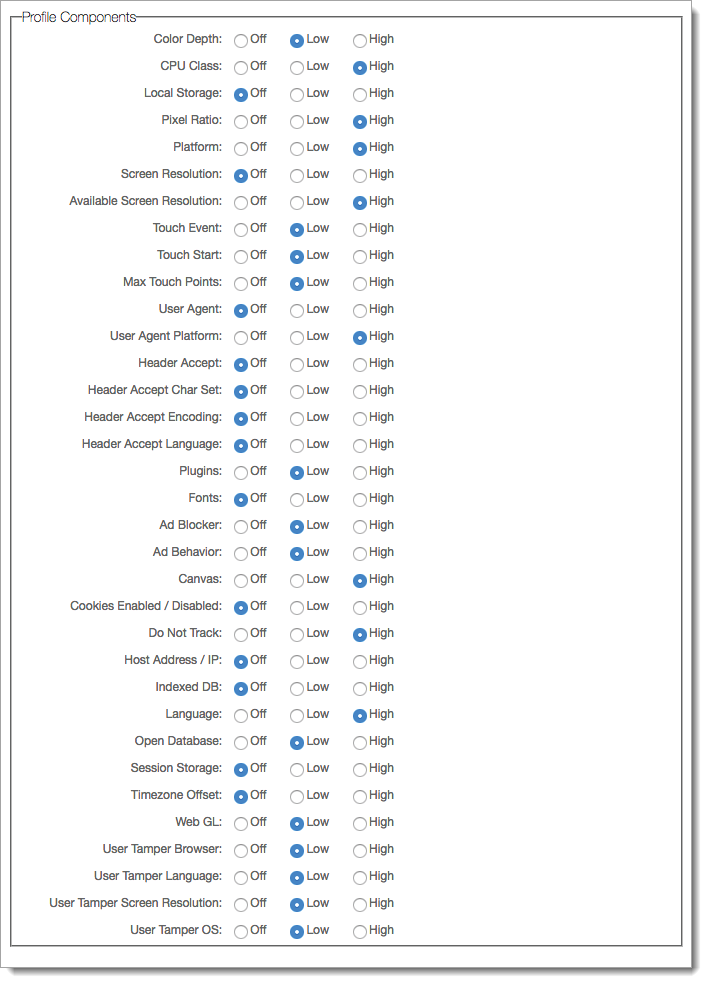
To modify the Profile Component default weight values, select the *Show Custom Component Weights check box.
Set the components based on how profiles should be analyzed against the Thresholds:
Off – Not considered in profile analysis
Low – Profile analysis is low; small changes do not drastically change profile Component is considered in profile analysis with low effect (small changes do not drastically change profile)
High – Profile analysis is high; significant change could drastically change profile, requiring new profile for device / browser
Note
As an administrator, you can view mismatched components in the Audit log. For example:
<Message>Fingerprint Mismatch: Field=PixelRatio, Weight=8.888889%</Message>
Note: The logs show mismatched components only when the device / browser profile score is higher than the Update Threshold score and is less than 100 percent.
For specific component information, expand the following link.
Click Save.
Go to the System Info tab.
In the Plugin Info section, set the Java Detection field to False.
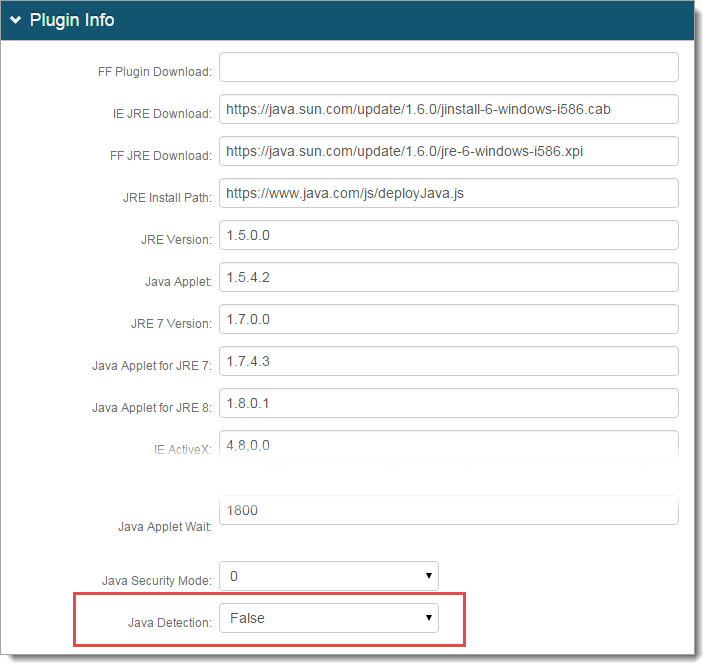
Click Save.
These are optional configuration steps to enable administrator (help desk) revocation of user device / browser profiles. This realm must be set up for the Account Management Page post authentication action.
For more information, see Account Management page configuration.
Go to the Data tab.
For Realm B, follow configuration step 2 as described in the Realm A section above.
Note
The directory attribute used for device / browser profiles (for example, audio) must be the same across all the Identity Platform realms using Device Recognition to ensure consistency.
Click Save.
Go to the Post Authentication tab.
In the Post Authentication section, set the following:
Authenticated User Redirect
Set to Account Management.
Redirect To
An unalterable URL Authorized/ManageAccounts.aspx, is auto-populated in this field, which appends to the domain name and realm number in the address bar.

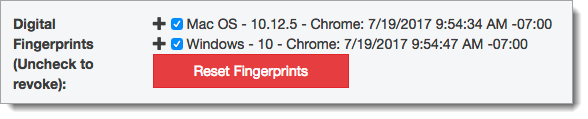
In the Identity Management section, click the link for Help Desk to enable or disable help desk functions.

On the Help Desk configuration page, set Digital Fingerprints to Show Enabled.
This shows the function on the help desk page and to enable changes (revocation).
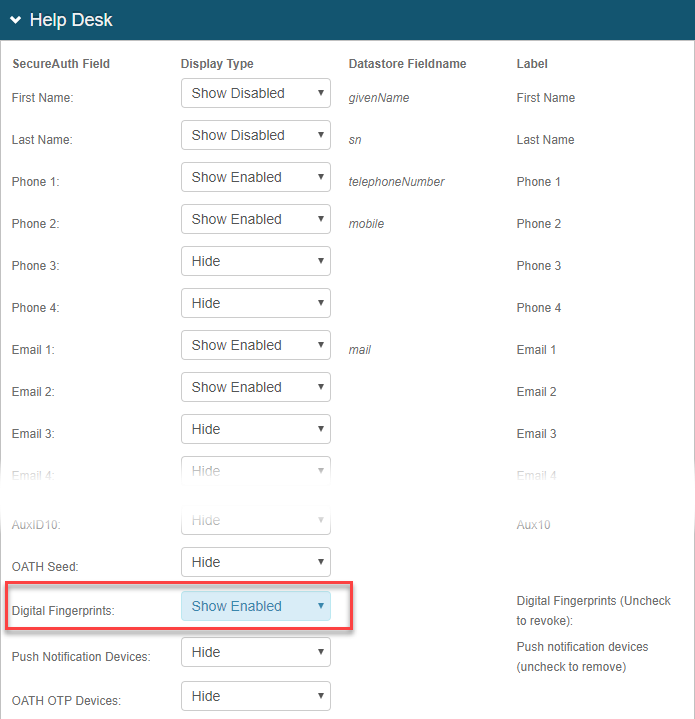
Click Save.
These are optional configuration steps to enable end user self-service revocation of device / browser profiles. This realm must be set up for the Self-service Account Update post authentication action.
For more information see Self-service Account Update page configuration.
Go to the Data tab.
For Realm C, follow configuration step 2 as described in the Realm A section above.
The directory attribute used for device / browser profiles (for example, audio) must be the same across all the Identity Platform realms using Device Recognition to ensure consistency.
Click Save.
Go to the Post Authentication tab.
In the Post Authentication section, set the following:
Authenticated User Redirect
Set to Self Service Account Update.
Redirect To
An unalterable URL Authorized/AccountUpdate.aspx, is auto-populated in this field, which appends to the domain name and realm number in the address bar.

In the Identity Management section, click the link for Self Service to enable or disable help desk functions.

On the Self Service configuration page, set Digital Fingerprints to Show Enabled.
This shows the function on the self service page and to enable changes (revocation).
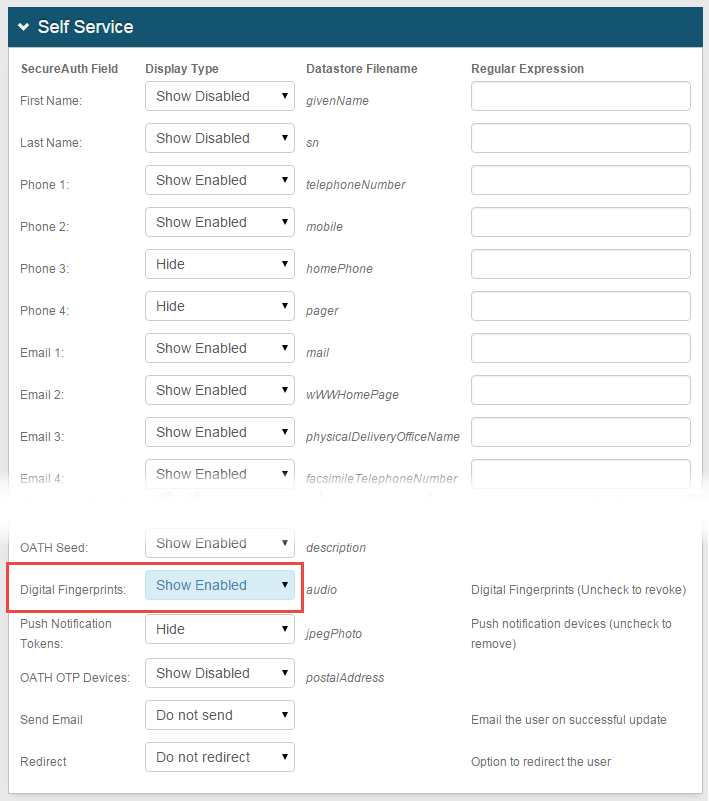
Click Save.
