Air-gapped deployment installation guide
Applies to: Air-gapped deployments
This guide walks you through installing the air-gapped components for SecureAuth Identity Platform (IdP) on a server that has no internet connectivity. The air-gapped installer deploys on-premises FIDO and Mobile Services along with the database they depend on, so that organizations operating in regulated or security-sensitive environments can run SecureAuth IdP without any outbound connection to SecureAuth cloud services.
After installation, your air-gapped deployment supports:
FIDO2 authentication – Configure FIDO2 in the new admin experience and let end users manage their FIDO keys from the post-authentication page.
TOTP multi-factor authentication – Enroll and verify second-factor sign-ins with time-based one-time passwords.
Latest IdP release – The installer ships with the most recent SecureAuth IdP release, so your deployment receives current security patches and product improvements without needing to pull updates from the internet.
For a broader description of the air-gapped deployment model, the architecture, and the planning steps, see the Air-gapped deployment overview.
Prerequisites
This guide applies to SecureAuth IdP release 24.5.0.1 or later.
Confirm the following before you start. The installer assumes a baseline IdP environment and a few Windows components are already in place; missing any of them stops the installer early or causes the deployed application to fail at startup.
System requirements
Component | Requirement |
|---|---|
Operating system | Windows Server 2016 or later |
Web server | Internet Information Services (IIS) installed and running |
SecureAuth IdP | Version 24.5.0.1 or later, already installed and operational |
Database | PostgreSQL (installed automatically by the air-gapped installer) |
IIS module | Microsoft HttpPlatformHandler. Download it from iis.net. The application is hosted out-of-process behind IIS, so this module must be present before the installer deploys the site. |
Installer | The air-gapped installer package ( |
Pre-installation checklist
Before launching the installer, verify the following:
SecureAuth IdP version 24.5.0.1 (or later) is installed and operational on the target server.
IIS is installed and running.
The Microsoft HttpPlatformHandler IIS module is downloaded and installed.
The air-gapped installer package has been transferred to the target server, for example by USB drive or secure file transfer, to a local directory.
You have local administrator privileges on the target server.
Note
Starting with release 26.1.0, the air-gapped installer includes automated PostgreSQL installation and configuration, removing the need to set up the database by hand. PostgreSQL is installed with SecureAuth-approved defaults. If your organization manages its own PostgreSQL instance, you can use that instead. See Run the air-gapped installer.
Install the air-gapped components
Run the following sections in order. The installer performs database setup, extracts the application bundle, and deploys the site under IIS in a single run.
Open an administrator command prompt
The installer registers Windows services, writes to protected directories, and updates IIS. These actions require elevated privileges, so the installer must run from a Command Prompt that was started as Administrator.
Click the Windows Start menu.
Type
cmdin the search bar.Right-click Command Prompt and select Run as administrator.
Click Yes on the User Account Control (UAC) prompt if it appears.
Note
Important: Run the installer only from an elevated Command Prompt. Running without administrator privileges causes the installation to fail.
Navigate to the installer directory
Use the cd command to change into the directory where you placed the air-gapped installer package. For example:
D:\> cd 0.1.3
Replace the path with the actual location of the installer on your server.
 |
Navigating to the installer directory in Command Prompt
 |
Command Prompt ready in the installer directory
Run the air-gapped installer
The installer supports two PostgreSQL deployment options. Pick the one that matches how your organization wants to manage the database.
Option A: Automatic installation | Option B: Bring your own PostgreSQL (recommended) |
|---|---|
The installer handles the full PostgreSQL installation and configuration: binary extraction, data directory initialization, service registration, and database creation. Use this option when you do not have a separate database team or existing PostgreSQL footprint. Use the AirgapInstaller.exe --action install -ip | Install and manage PostgreSQL independently, then provide its connection string to the installer. Use this option when your organization has database standards (backup, monitoring, patching, hardening) it wants to apply. Use the AirgapInstaller.exe --action install -cs "Host=<host>;Port=<port>;Database=<db>;Username=<user>;Password=<pass>" |
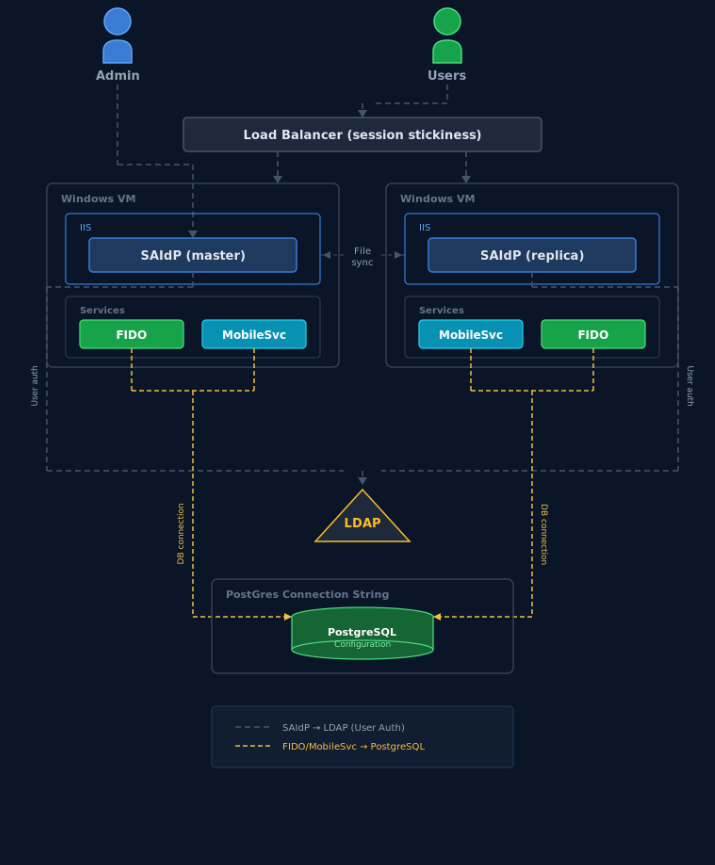 |
Option B architecture diagram
Note
Important: When using Option B (-cs), confirm that your PostgreSQL instance is already running and reachable before you launch the installer. The connection string must include valid Host, Port, Database, Username, and Password values. The installer skips the PostgreSQL setup steps and connects directly to your existing database.
Command parameters
Parameter | Description |
|---|---|
| Specifies that the installer should perform a fresh installation. |
| Enables interactive PostgreSQL installation. The installer automatically installs and configures PostgreSQL, prompting you for passwords and host configuration. |
| Provides an existing PostgreSQL connection string. Use this flag when you have already installed and configured PostgreSQL. Format: |
The rest of this guide documents the Option A (-ip) workflow. If you are using Option B (-cs), the installer skips the PostgreSQL setup steps below and goes straight to extracting the application bundle and configuring IIS.
 |
Running the air-gapped installer command
Interactive PostgreSQL setup
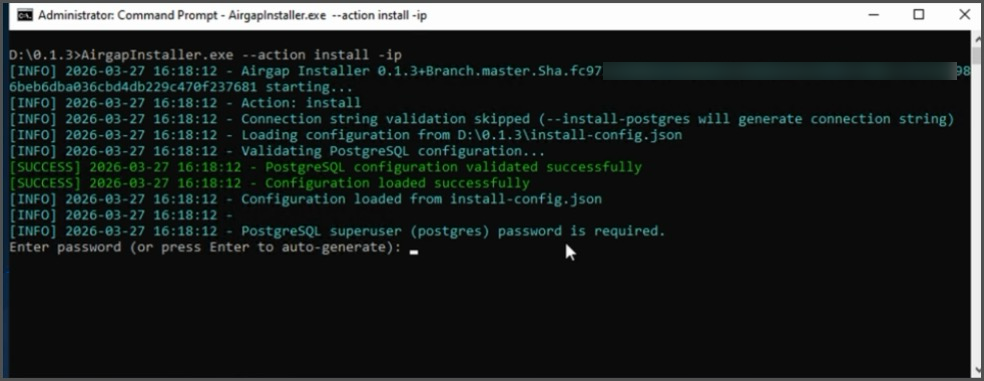
The first time you run the installer with -ip, it loads its configuration and steps you through PostgreSQL setup interactively. This section describes what to expect and what each prompt controls, so that you can answer them with the right values for your environment.
Step 1: Configuration loading and password setup
The installer validates its configuration file and prompts you to set passwords for two accounts:
The PostgreSQL superuser account (
postgres), used for administering the database.The application database user (
sa_admin), used by SecureAuth IdP to connect to the database.
For each account, enter a custom password or press Enter to auto-generate one. Auto-generated passwords are shown on screen, so capture them before continuing.
 |
Configuration loading and password prompts
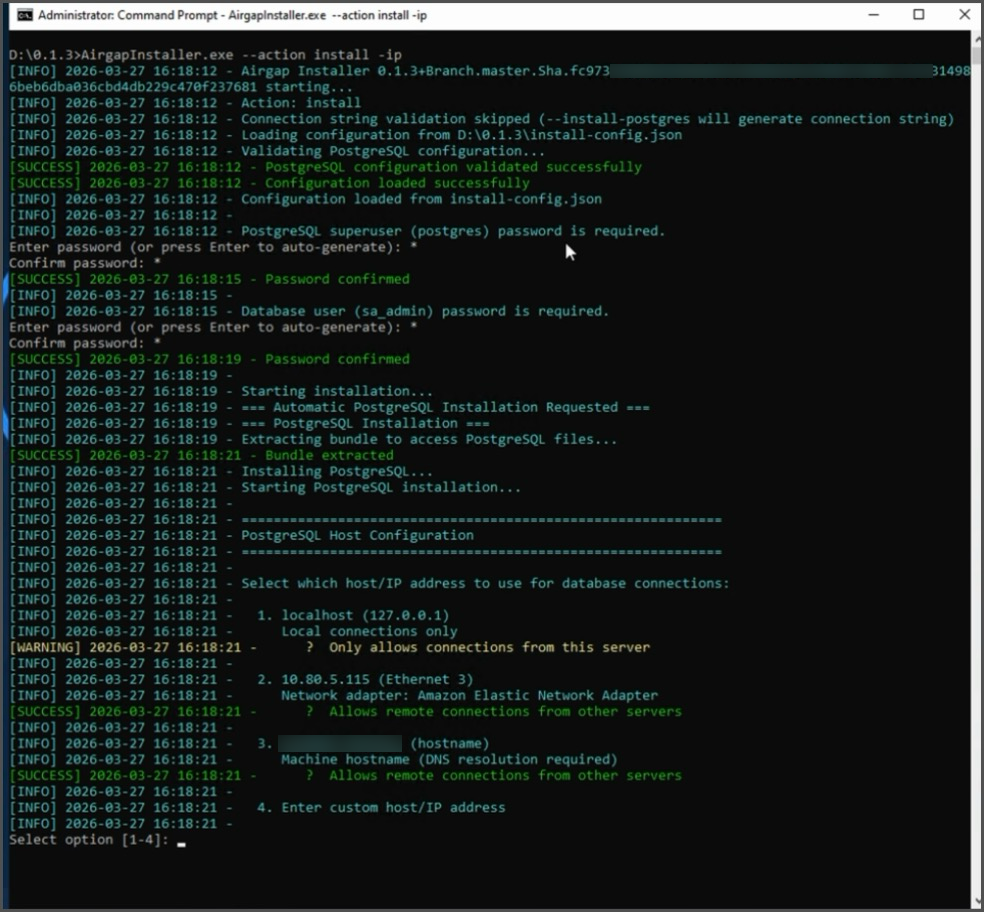
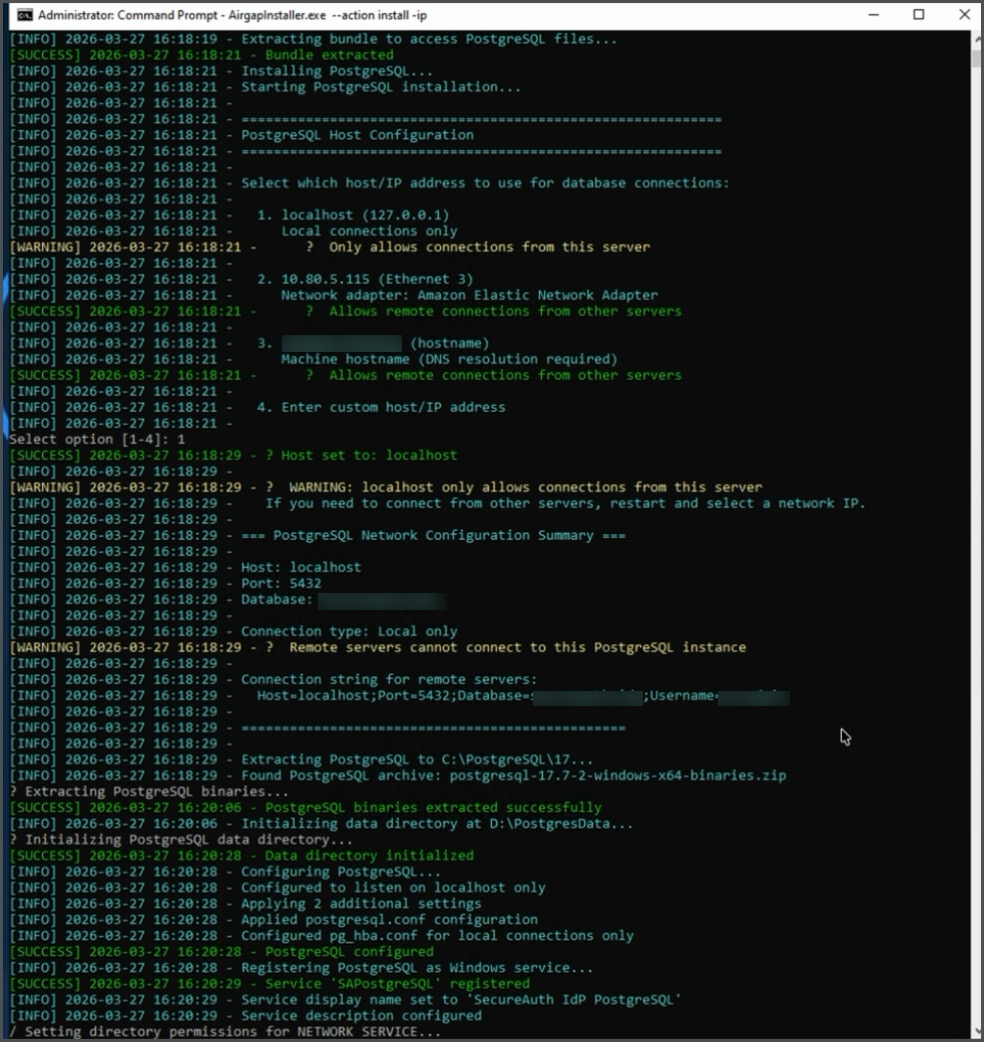
Step 2: PostgreSQL host configuration
The installer presents a host/IP selection menu that determines which clients can connect to the new PostgreSQL instance. Available options:
localhost (127.0.0.1) – Allows connections only from this server.
Network adapter IP – Allows remote connections from other servers through the selected network adapter.
Machine hostname – Allows remote connections from other servers and relies on DNS resolution.
Enter custom host/IP address – Specify a custom hostname or IP address.
After you select an option, the installer displays a PostgreSQL network configuration summary showing the host, port, database name, connection type, and final connection string. Review the summary before continuing, because changing the host later requires you to restart the installer.
 |
Host configuration menu and network configuration summary
Note
Important: If you select localhost, remote servers will not be able to connect to this PostgreSQL instance. If you need to connect from other servers, restart the installer and select a network IP or hostname.
Step 3: PostgreSQL installation and initialization
Using the values from steps 1 and 2, the installer extracts the PostgreSQL binaries, initializes the data directory, applies SecureAuth-validated postgresql.conf and pg_hba.conf configurations, and registers PostgreSQL as a Windows service. No input is required during this step; the goal is a fully configured database service ready to accept connections.
 |
PostgreSQL binary extraction, data directory initialization, and service configuration
Step 4: Database creation and connection verification
The installer starts the PostgreSQL service, creates the secureauth_idp database and the sa_admin user, validates the connection, and then begins extracting the SecureAuth application bundle. A failure here usually points to a host or password mismatch from earlier steps.
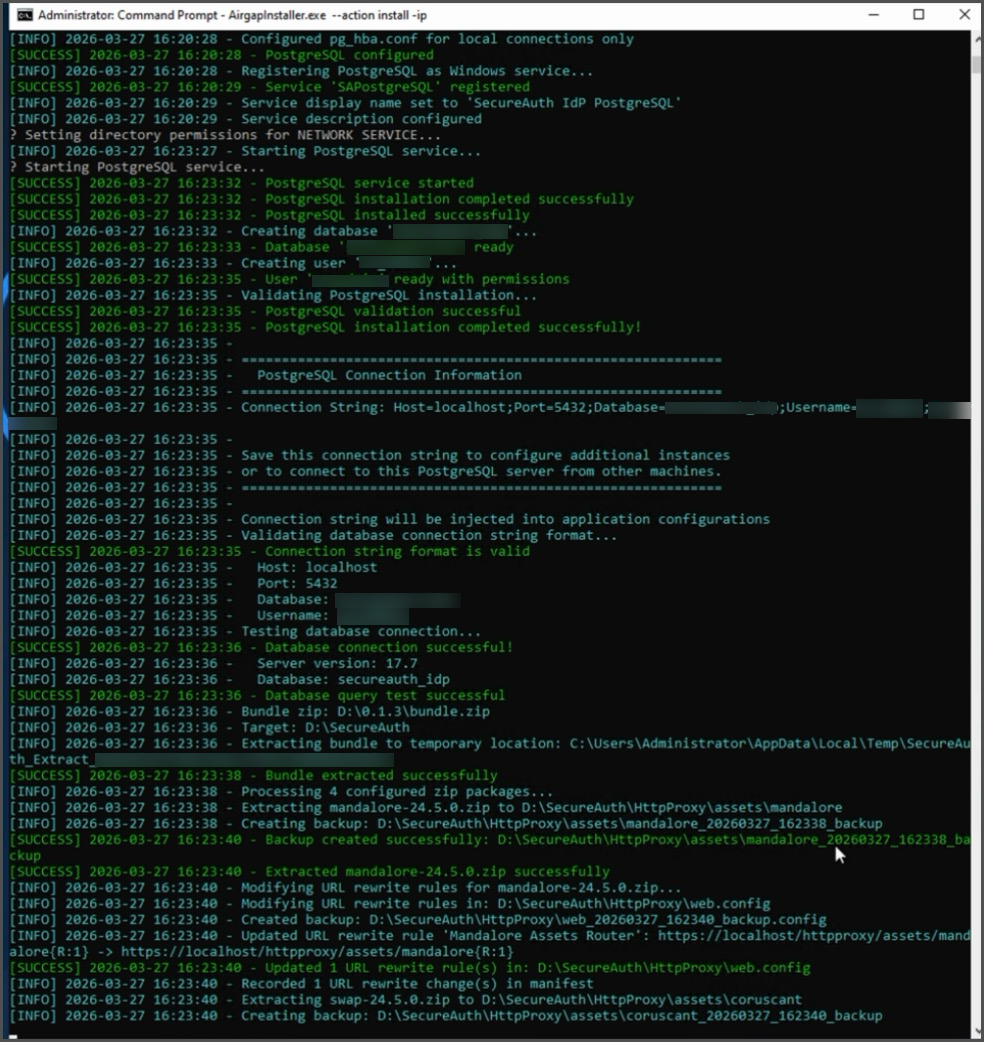 |
PostgreSQL service started, database created, connection verified, and bundle extraction
Step 5: Application configuration and completion
In the final phase, the installer configures IIS application pools, sets environment variables, deploys the web configuration files, and applies application settings. When the installer finishes, control returns to the command prompt and the SecureAuth site is hosted under IIS using the database created in the previous steps.
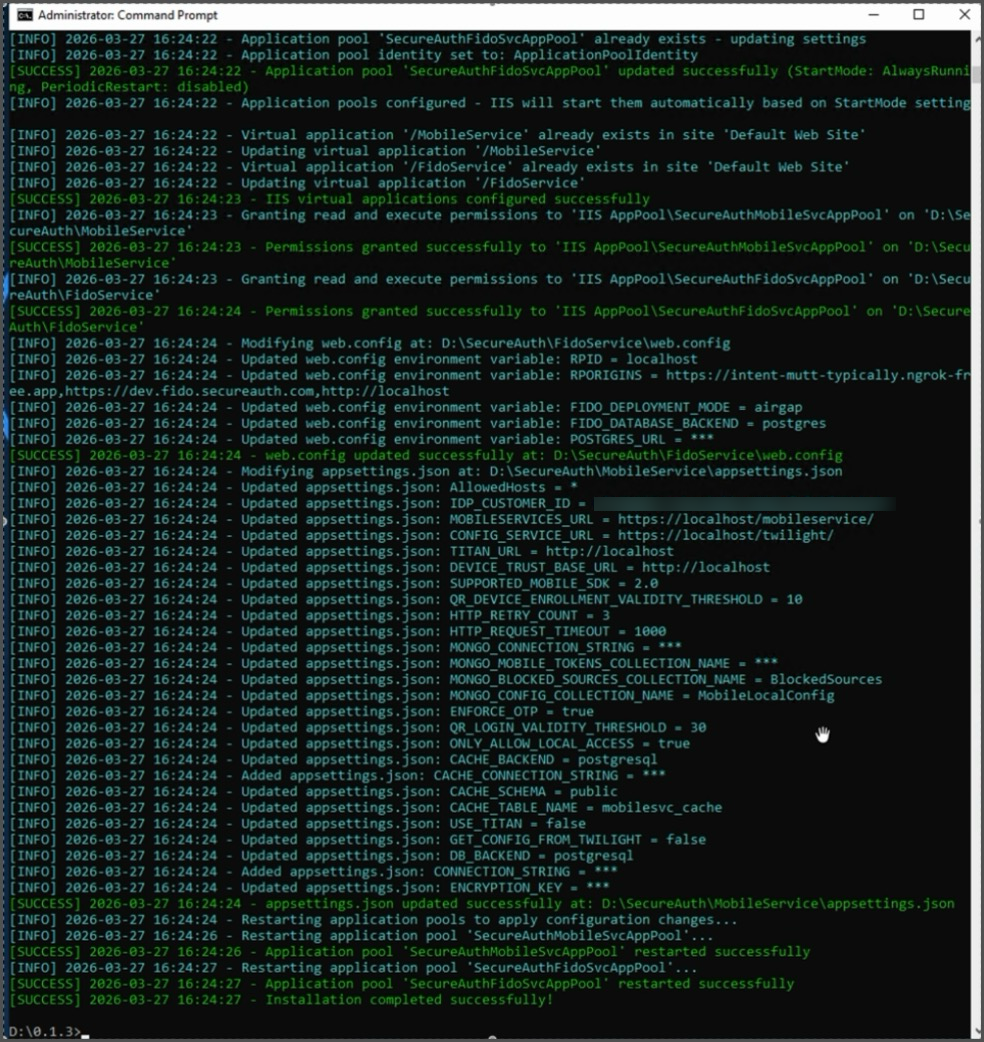 |
Final application configuration and deployment completion
Restart IIS
IIS caches site bindings and application pool configuration. Restarting it after the installer completes ensures the new application pool, environment variables, and configuration files are picked up before users connect.
iisreset
Wait for the confirmation message indicating that IIS has been restarted before continuing to verification.
Verify the installation
After the installer completes and IIS restarts, run the following checks to confirm the deployment is healthy. These checks cover the web tier, the database tier, and the two authentication features the air-gapped solution adds.
Verify IIS is running – Open IIS Manager and confirm that the SecureAuth application pool and site are started.
Verify PostgreSQL connectivity – Confirm that the PostgreSQL service is running and that the application can connect using the connection string from installation.
Access the admin console – Open a browser on the server and go to the SecureAuth admin interface to confirm that the application loads.
Test FIDO2 configuration – Go to the FIDO settings in the admin experience and verify they are accessible and configurable.
Test TOTP MFA enrollment – Enroll a test user with TOTP MFA to verify that the enrollment workflow is functioning.
Troubleshooting
If the installer fails or the deployed application does not start, use the matrix below to localize the problem before contacting SecureAuth Support.
Issue | Resolution |
|---|---|
Installer fails with a permission error | Confirm that the Command Prompt is running as administrator. Right-click Command Prompt and select Run as administrator. |
Database connection fails | Verify the connection string values (host, port, database name, username, password). Confirm that the PostgreSQL service is running and reachable from the server. |
IIS does not restart | Run |
HttpPlatformHandler not found | Download and install the HttpPlatformHandler module from iis.net before running the installer. |
Application does not load after install | Verify that the IIS application pool identity has read and write access to the application directory. Check the application event logs for startup errors. |
Quick reference
For experienced administrators, the full installation reduces to the three commands below for each option.
Option A: automatic PostgreSQL
D:\> cd <installer-directory>
AirgapInstaller.exe --action install -ip
iisreset
Option B: existing PostgreSQL
D:\> cd <installer-directory>
AirgapInstaller.exe --action install -cs "Host=<host>;Port=<port>;Database=<db>;Username=<user>;Password=<pass>"
iisreset