.NET custom applications integration using Windows Identity Foundation
Use this guide to integrate SecureAuth® Identity Platform and enable advanced identity capabilities to your internal applications.
Prerequisites
Visual Studio Identity and Access Tool plug-in for Windows Identity Foundation
Your application must be configured for .NET Framework 4.5 or later
Valid SSL certificate on the application server (not required, but ensures no end user error messages in the browser)
Identity Platform configuration
In the Advanced Settings (formerly Classic Experience), go to the Post Authentication tab.
In the Post Authentication section, set the Authenticated User Redirect to WS-Federation Assertion.

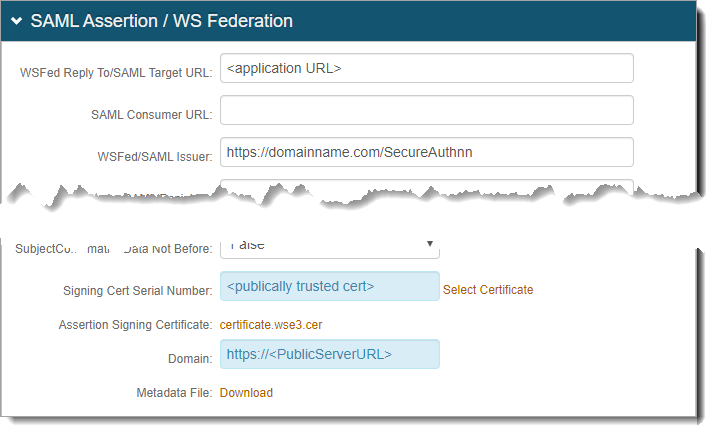
In the SAML Assertion / WS Federation section, set the following:
WSFed Reply To/SAML Target URL
Set to the URL of the .NET application.
WSFed/SAML Issuer
Set to the URL (including realm number) of the Identity Platform realm.
Signing Cert Serial Number
Click the Select Certificate link to select the appropriate publicly trusted SSL / signing certificate.
Domain
Provide the domain in order to download the Metadata File to send to the application.
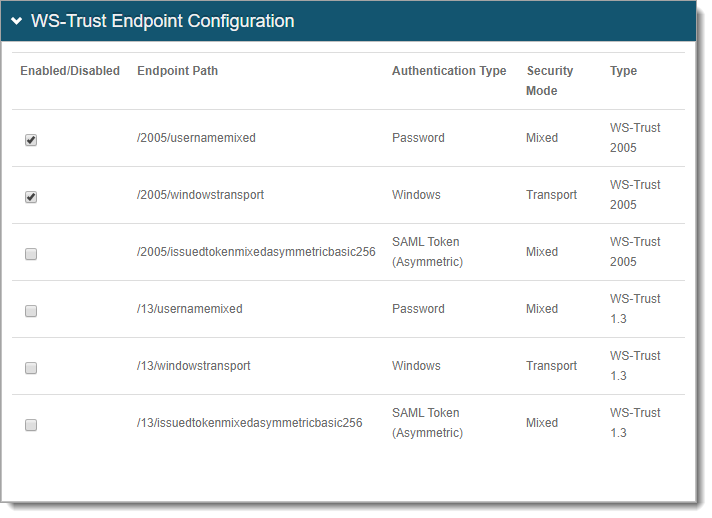
In the WS-Trust Endpoint Configuration section, click the View and Configure WS-Trust endpoints link.
Note
Windows transport endpoint works only if the Identity Platform realm is configured for Windows single-sign on (SSO). To learn more, see one of the following topics:
For SecureAuth IdP version 9.2 or 9.3 or Identity Platform release 19.07, 20.06, or 21.04, see Windows desktop SSO configuration.
For Identity Platform release 22.02, see Windows SSO integration guide.

The WS-Trust Host Name and WS-Trust Endpoint Configuration sections appear.
In the WS-Trust Host Name section, set the Host Name to the fully qualified domain name (FQDN) of the Identity Platform appliance. For example, secureauth.company.com.

In the WS-Trust Endpoint Configuration section, select the following check boxes to enable the following Endpoint Paths:
/2005/usernamemixed
/2005/windowstransport
Save your changes.
Visual Studio configuration
After installing the Identity and Access tool plugin for the Windows Identity Foundation, open the application project.
Right-click the project and choose Identity and Access Control.
Set the following:
Enter the path to the STS metadata document
Set to
https://<SecureAuthServerAddress>/<SecureAuthRealmNumber>/FederationMetadata/2007-06/FederationMetadata.xmlEnter the APP ID URI (realm) of your application
Set to
https://<SecureAuthServerAddress>/<SecureAuthRealmNumber>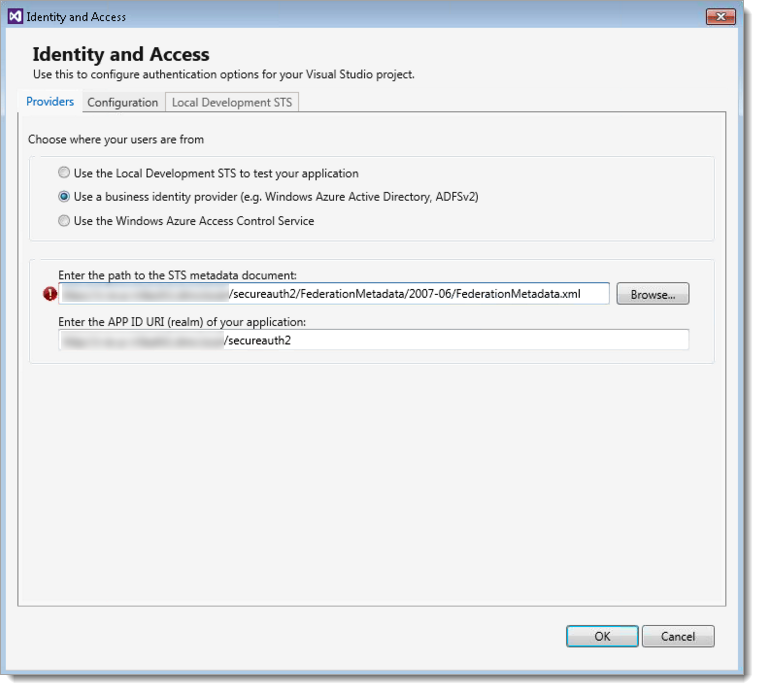
Click OK.
The .NET project is now set up to use WS-Federation for federation/SSO.
Next steps
Test the workflow by going to the URL of your application. From there, you are redirected to the Identity Platform for authentication and then redirected back to the application after a successful log in.
Tips and warnings
To enable Deep Linking for this application, remove the WS-FED Reply from the web.config file in the .NET application that was created.
To troubleshoot any issues, verify the Issuer is the same on the Identity Platform as in the web.config file for the .NET application.