Install Login for Linux - Advanced configuration
This topic describes how to install Login for Linux product on different versions of Linux.
Download and install
Login for Linux is shipped as a self-extracting installation package. The installation process will copy required files to the appropriate directories and create the database with the default configuration.
From the SecureAuth product downloads page, download the Login for Linux installer
.runfile.Ensure that you can execute the
.runfile.$ chmod +x SecureAuthLoginForLinux-23.09.02.run
Add the
config.jsonfile to the same folder to which you copied the installer.Open a terminal window then change the directory to the path where you copied the installer and the
config.jsonfiles.Login as root then run the installer.
$ sudo ./SecureAuthLoginForLinux-23.09.02.run
The installer will automatically back up the following files:
/etc/pam.d/sshd/etc/pam.d/su/etc/pam.d/sudo/etc/ssh/sshd_config
If you make your own backups, the preceding four files are the ones modified in the following configurations.
You can now configure your Linux operating system using either configuration method:
Advanced configurations in Linux
The following subsections describe how to enable SecureAuth Pluggable Authentication Module (PAM) on the supported Linux distributions for Red Hat Enterprise Linux, Amazon Linux, Debian, and Ubuntu.
Caution
We recommend that you leave another root shell while setting up this configuration in the Linux operating system. This prevents administrator lockouts before completing system testing.
Red Hat Enterprise Linux (RHEL)
The following configuration instructions were tested on Red Hat Enterprise Linux versions 7.9, 8.x, 9.x, and CentOS 7.
We'll cover the following configurations:
ssh connections
su authentication
sudo authentication
GNOME Display Manager (GDM) authentication
polkit authentication
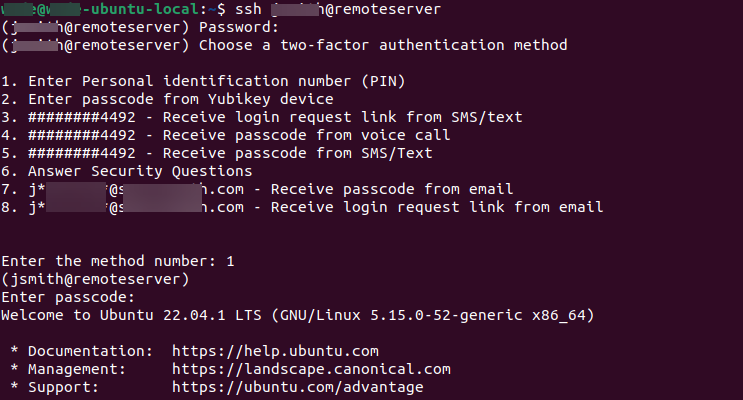
Do the following on a sudo shell.
To enable the SecureAuth PAM module, open the
/etc/pam.d/sshdfile.Search for
auth substack password-auth. Then, add the following line below it:auth required /usr/local/lib/pam/pam_sa_authenticator.so try_first_pass
To integrate Login for Linux into SSH logins, edit the
/etc/ssh/sshd_configSSH daemon configuration file.Next, to enable SecureAuth PAM, add the following key:
UsePAM yes
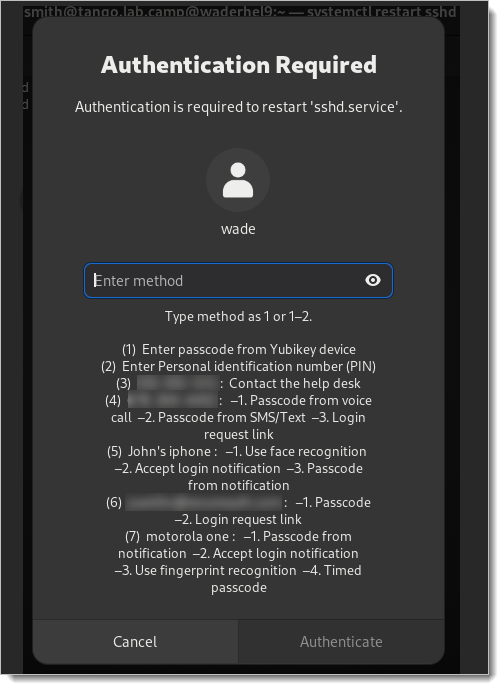
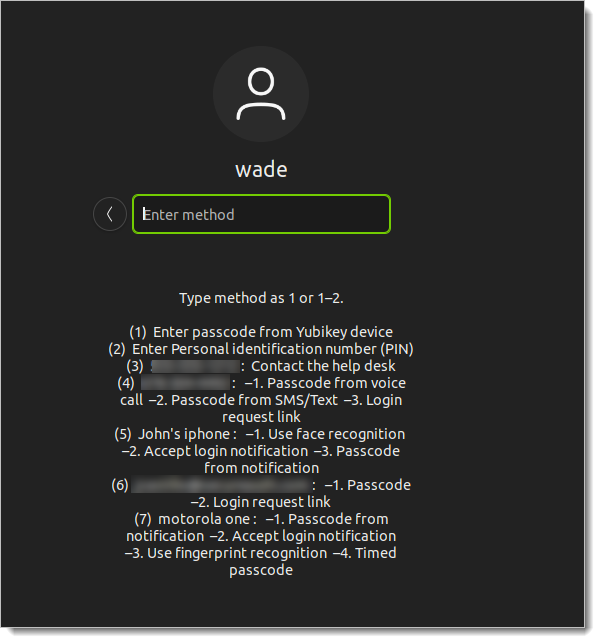
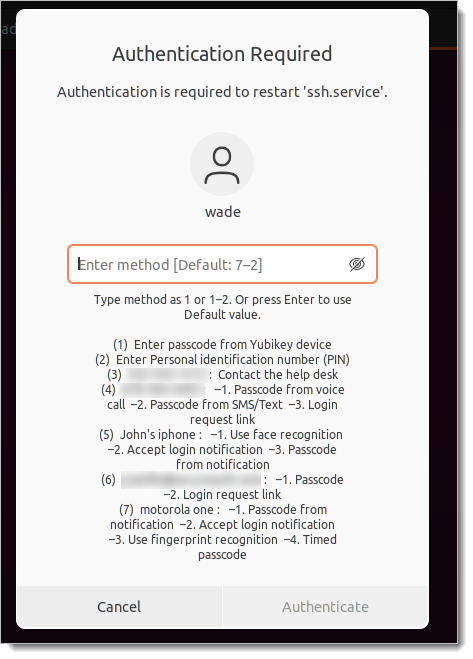
Select the SSH authentication method you require from the following configuration options:
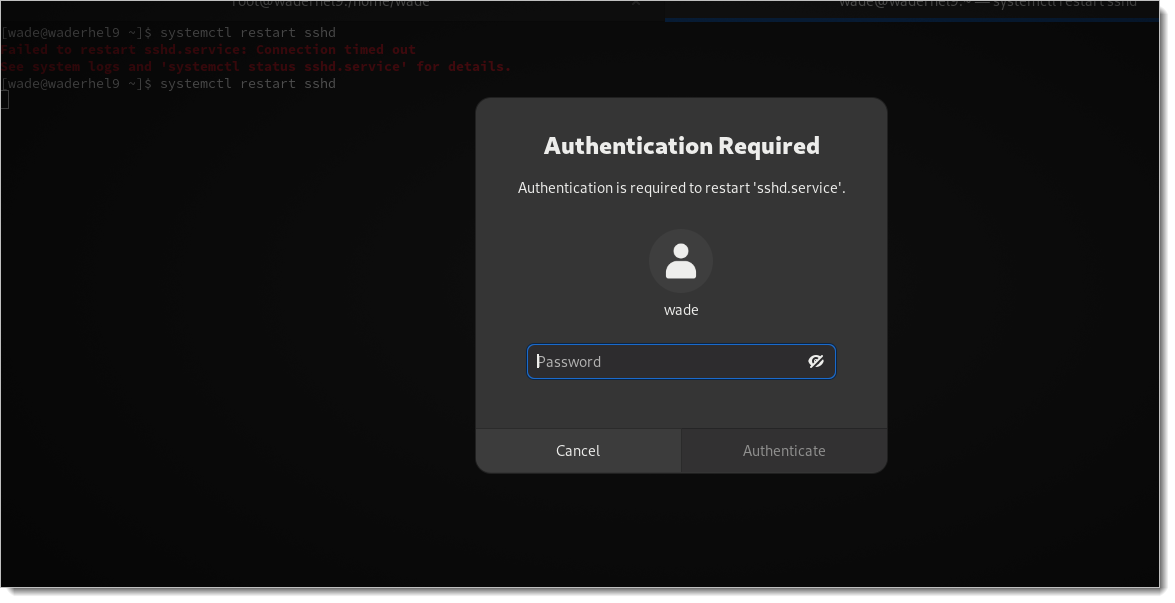
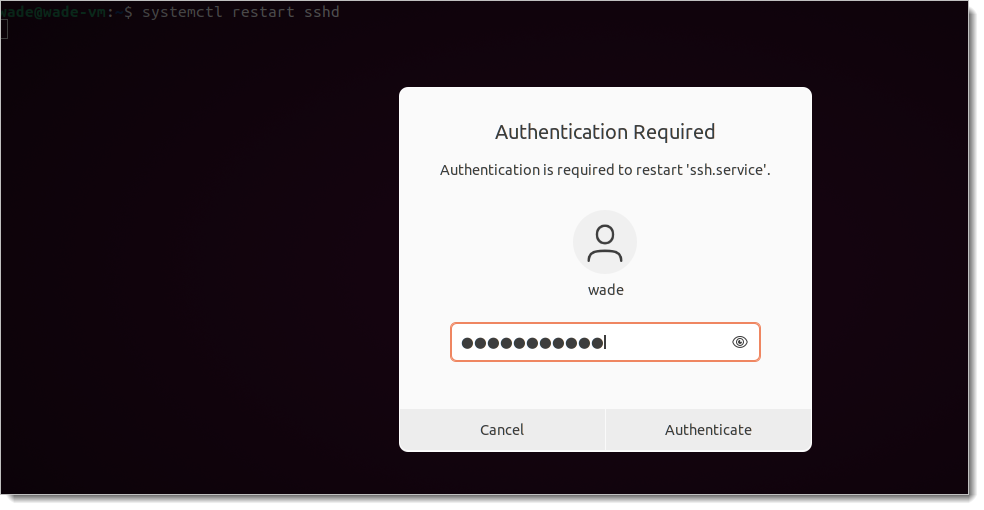
Apply the changes by restarting the
sshdservice using this command:$ sudo systemctl restart sshd
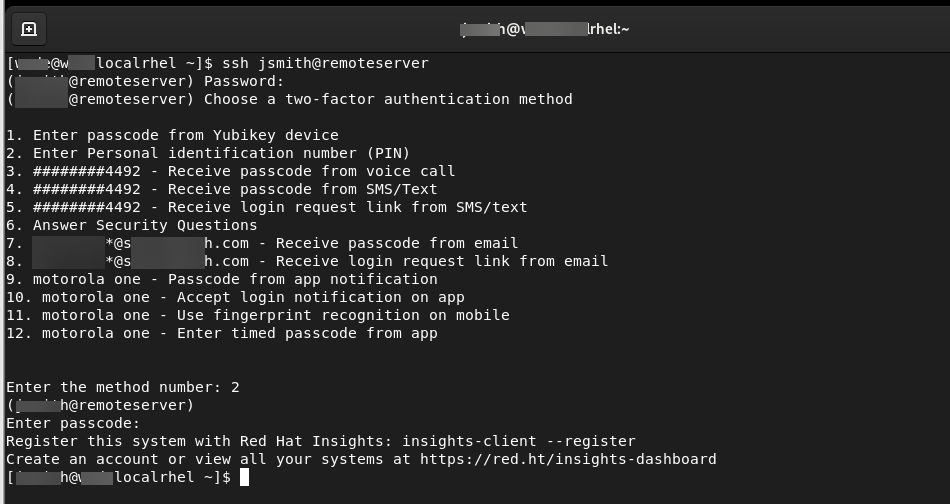
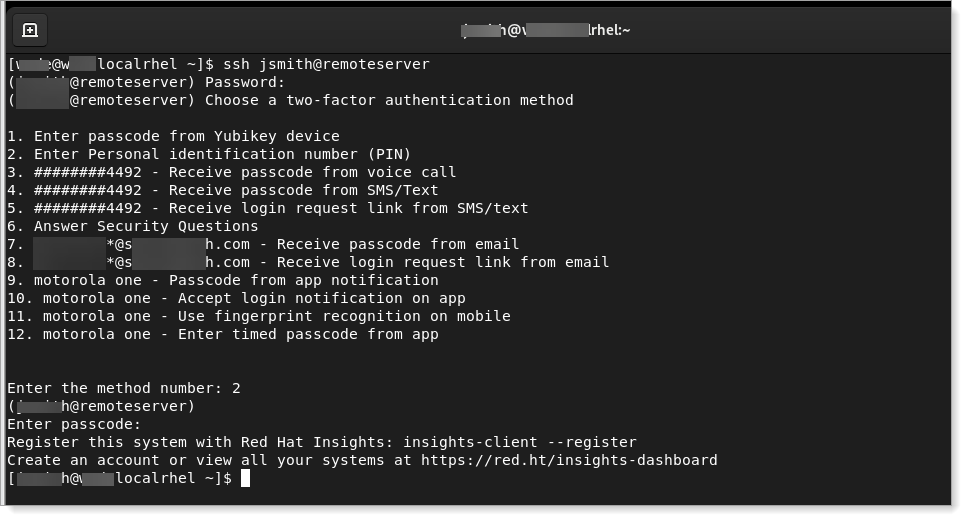
Test your configuration by running an ssh connection to the server where you just set up Login for Linux.
A successful ssh configuration test should look like this example:
You have completed the Red Hat Enterprise Linux configuration. If you need to customize Login for Linux features - such as connection timeout and error messages - see Configure Identity Platform and Login for Endpoints.
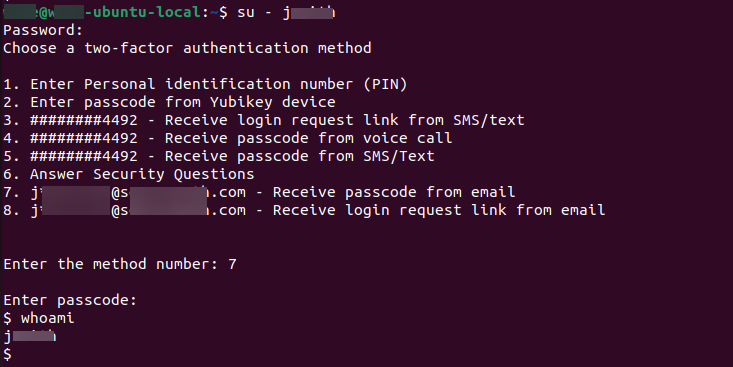
Do the following on a sudo shell.
To enable the SecureAuth PAM module, open the
/etc/pam.d/sufile.Search for
auth substack system-auth. Then, add the following line below it:auth required /usr/local/lib/pam/pam_sa_authenticator.so try_first_pass
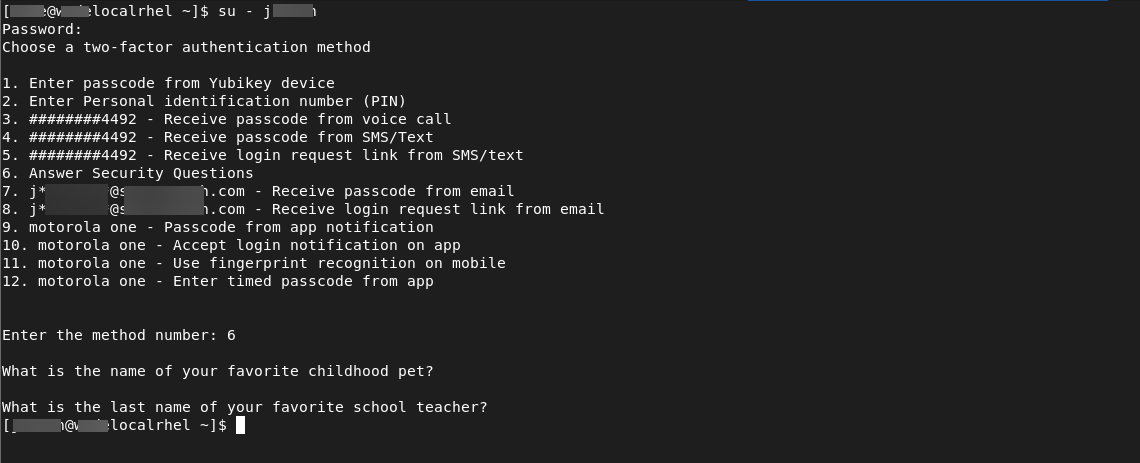
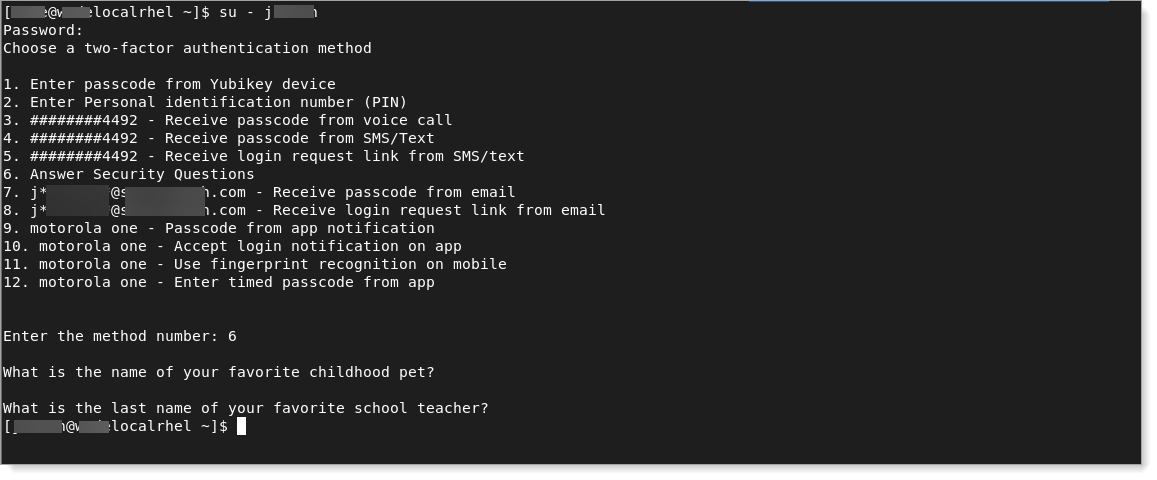
Test your configuration by running a su connection to the server where you just set up Login for Linux.
A successful su configuration test should look like this example:
You have completed the Red Hat Enterprise Linux configuration. If you need to customize Login for Linux features - such as connection timeout and error messages - see Configure Identity Platform and Login for Endpoints.
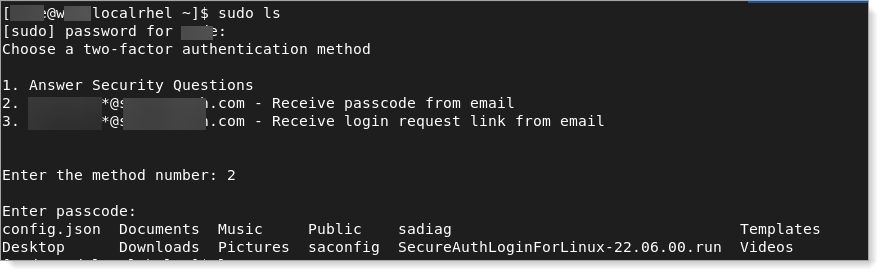
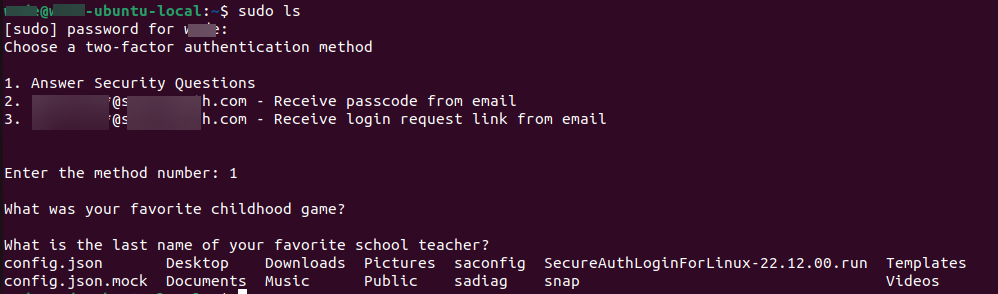
Do the following on a sudo shell.
To enable the SecureAuth PAM module, open the
/etc/pam.d/sudofile.Search for the following line:
auth include system-auth
Replace it with this line:
auth substack system-auth
Below the line you just changed, add this new line,
auth required /usr/local/lib/pam/pam_sa_authenticator.so try_first_pass. Like this example:... auth substack system-auth auth required /usr/local/lib/pam/pam_sa_authenticator.so try_first_pass ...
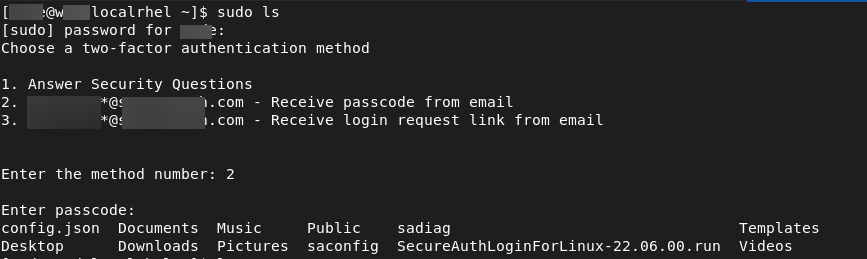
Test your configuration by running a sudo connection test to the server where you just set up Login for Linux.
A successful sudo configuration test should look like this example:
You have completed the Red Hat Enterprise Linux configuration. If you need to customize Login for Linux features - such as connection timeout and error messages - see Configure Identity Platform and Login for Endpoints.
Do the following on a sudo shell.
To enable the SecureAuth PAM module, open the
/etc/pam.d/gdm-passwordfile.Search for
auth substack password-auth. Then, add the following line below it:auth required /usr/local/lib/pam/pam_sa_authenticator.so try_first_pass
To apply the changes, restart the GDM service. Use the following command.
sudo systemctl restart gdm
Test your configuration by logging in to the server where you just set up Login for Linux.
A successful login test should look like this example:
You have completed the Red Hat Enterprise Linux configuration. If you need to customize Login for Linux features - such as connection timeout and error messages - see Configure Identity Platform and Login for Endpoints.
To enable the SecureAuth PAM module, open the
/etc/pam.d/polkit-1file.Search for
auth include system-authand replace it with the following.auth substack system-auth
Below the line you just changed, add the following.
auth required /usr/local/lib/pam/pam_sa_authenticator.so try_first_pass
For example:
...
auth   substack     system-auth
auth   required     /usr/local/lib/pam/pam_sa_authenticator.so try_first_pass
...
Test your configuration by running a privileged command on a unprivileged terminal. For example:
systemctl restart sshd
You have completed the Red Hat Enterprise Linux configuration. If you need to customize Login for Linux features - such as connection timeout and error messages - see Configure Identity Platform and Login for Endpoints.
Amazon Linux
The following configuration instructions were tested on Amazon Linux 2023 and Amazon Linux 2.
We'll cover the following configurations:
ssh connections
su authentication
sudo authentication
Do the following on a sudo shell.
To enable the SecureAuth PAM module, open the
/etc/pam.d/sshdfile.Search for the line
auth substack password-auth.Add the following line below it:
auth required /usr/local/lib/pam/pam_sa_authenticator.so try_first_pass
To integrate Login for Linux into SSH logins, edit the
/etc/ssh/sshd_configSSH daemon configuration file.Next, to enable SecureAuth PAM, add the following key:
UsePAM yes
Select the SSH authentication method you require from the following configuration options:
Apply the changes by restarting the
sshdservice using this command:$ sudo systemctl restart sshd
Test your configuration by running an ssh connection to the server where you just set up Login for Linux.
A successful ssh configuration test should look like this example:
You have completed the Amazon Linux configuration. If you want to customize Login for Linux features, such as connection timeout and error messages, see Configure Identity Platform and Login for Endpoints.
Do the following on a sudo shell.
To enable the SecureAuth PAM module, open the
/etc/pam.d/sufile.Search for
auth substack system-auth. Then, add the following line below it:auth required /usr/local/lib/pam/pam_sa_authenticator.so try_first_pass
Test your configuration by running a su connection to the server where you just set up Login for Linux.
A successful su configuration test should look like this example:
You have completed the Amazon Linux configuration. If you want to customize Login for Linux features, such as connection timeout and error messages, see Configure Identity Platform and Login for Endpoints.
Do the following on a sudo shell.
To enable the SecureAuth PAM module, open the
/etc/pam.d/sudofile.Search for
auth include system-auth. Then, replace it with the following:auth substack system-auth
Below the line you just changed, add the following.
auth required /usr/local/lib/pam/pam_sa_authenticator.so try_first_pass
For example:
...
auth   substack     system-auth
auth   required     /usr/local/lib/pam/pam_sa_authenticator.so try_first_pass
...
Test your configuration by running a sudo connection test to the server where you just set up Login for Linux.
A successful sudo configuration test should look like this example:
You have completed the Amazon Linux configuration. If you want to customize Login for Linux features, such as connection timeout and error messages, see Configure Identity Platform and Login for Endpoints.
Debian and Ubuntu
The following configuration instructions were tested on Debian version 10 and Ubuntu versions 20.04 and 22.04.
We'll cover the following configurations:
ssh connections
su authentication
sudo authentication
GNOME Display Manager (GDM) authentication
polkit authentication
Do the following on a sudo shell.
To enable the SecureAuth PAM module, open the
/etc/pam.d/sshdfile.Search for the line
@include common-auth.Add the following line below it:
auth required /usr/local/lib/pam/pam_sa_authenticator.so try_first_pass
To integrate Login for Linux into SSH logins, edit the
/etc/ssh/sshd_configSSH daemon configuration file.Next, to enable SecureAuth PAM, add the following key:
UsePAM yes
Select the SSH authentication method you require from the following configuration options:
Apply the changes by restarting the
sshdservice using this command:$ sudo systemctl restart sshd
Test your configuration by running an ssh connection to the server where you just set up Login for Linux.
A successful ssh configuration test should look like this example:
You have completed the Debian or Ubuntu configuration. If you want to customize Login for Linux features, such as connection timeout and error messages, see Configure Identity Platform and Login for Endpoints.
Do the following on a sudo shell.
To enable the SecureAuth PAM module, open the
/etc/pam.d/sufile.Search for
@include common-auth. Then, add the following line below it:auth required /usr/local/lib/pam/pam_sa_authenticator.so try_first_pass
Test your configuration by running a su connection to the server where you just set up Login for Linux.
A successful su configuration test should look like this example:
You have completed the Debian or Ubuntu configuration. If you want to customize Login for Linux features, such as connection timeout and error messages, see Configure Identity Platform and Login for Endpoints.
Do the following on a sudo shell.
To enable the SecureAuth PAM module, open the
/etc/pam.d/sudofile.Search for
@include common-auth. Then, add the following line below it:auth required /usr/local/lib/pam/pam_sa_authenticator.so try_first_pass
Test your configuration by running a sudo connection test to the server where you just set up Login for Linux.
A successful sudo configuration test should look like this example:
You have completed the Debian or Ubuntu configuration. If you want to customize Login for Linux features, such as connection timeout and error messages, see Configure Identity Platform and Login for Endpoints.
Do the following on a sudo shell.
To enable the SecureAuth PAM module, open the
/etc/pam.d/gdm-passwordfile.Search for
@include common-auth. Then, add the following line below it:auth required /usr/local/lib/pam/pam_sa_authenticator.so try_first_pass
To apply the changes, restart the GDM service. Use the following command.
sudo systemctl restart gdm
Test your configuration by logging in to the server where you just set up Login for Linux.
A successful login test should look like this example:
You have completed the Debian or Ubuntu configuration. If you want to customize Login for Linux features, such as connection timeout and error messages, see Configure Identity Platform and Login for Endpoints.
Do the following on a sudo shell.
To enable the SecureAuth PAM module, open the
/etc/pam.d/polkit-1file.Search for
@include common-auth. Then, add the following line below it:auth required /usr/local/lib/pam/pam_sa_authenticator.so try_first_pass
Test your configuration by running a privileged command on a unprivileged terminal. For example:
systemctl restart sshd
You have completed the Debian or Ubuntu configuration. If you want to customize Login for Linux features, such as connection timeout and error messages, see Configure Identity Platform and Login for Endpoints.
Uninstalling Login for Linux
The following instructions explain how to uninstall Login for Linux. You must first revert the changes you made in the configuration files and then you can run the uninstall command.
Log files are not uninstalled; use them for troubleshooting any issues with the uninstallation. After you have worked through any issues, you can delete the log files.
Revert the changes by using the backups that were saved as part of install process.
If the uninstaller detects that the configuration files still reference the Login for Linux PAM module, the uninstall process fails.
Run the uninstaller using this command:
$ sudo ./SecureAuthLoginForLinux-23.09.02.run -- uninstall