Remote Desktop Web Access 2016 integration
Microsoft Remote Desktop Web Access (Microsoft RD Web Access) is a Remote Desktop Services role in Windows Server 2016 (and later) that allows users to remotely access the desktop where they have remote desktop access (RDP).
Use this guide to integrate SecureAuth® Identity Platform (formerly SecureAuth IdP) and enable secure, single sign-on (SSO) access via WS-Federation to use RD Web Access.
Prerequisites
Active RD Web Access Server 2016 (or later)
Have a realm ready in the Identity Platform Web Admin for the RD Web Access Server integration
Configure the following tabs in Advanced Settings (formerly Classic Experience) before configuring the Post Authentication tab:
Overview – define the realm description and SMTP connections
Data – an enterprise directory must be integrated with the Identity Platform
Workflow – define how users will access this resource
Multi-Factor Methods – define the multi-factor authentication methods (MFA), if any, to access this resource
Configure the realm to pass a UPN Claim to RD Web Access Server as the identity on the (Data tab)
Windows Identity Foundation (WIF) configuration
Windows Identity Foundation (WIF) is a Microsoft software framework used to build identity-aware applications, and is a core component that must be installed on the RD Web Access server before configuration.
Install Windows Identity Foundation on the RD Web Access Server.
From the Microsoft Download Center, download and install Windows Identity Foundation.
Use the Roles and Features Installer.
Configure Claims to Windows Token Service (C2WTS).
In a text editor (run as an administrator), open the c2wtshost.exe.config file located in C:\Program Files\Windows Identity Foundation\v3.5.
Add the following line to the code:
<allowedCallers>
<clear />
<add value= "IIS APPPOOL\RDWebAccess" />
</allowedCallers>
Save the file.
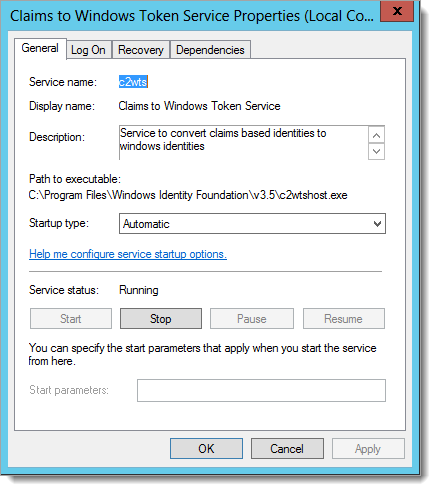
Enable Claims to Windows Token Service (C2WTS).
On the RD Web Server, open services.msc.
From the list of services, right-click Claims to Windows Token Service and select Properties.
Set the Startup type to Automatic.
Click Start to begin the service.
Set Claims to Windows Token Service (C2WTS).
Note
According to Microsoft, ensure that Cryptographic Services service (CryptSvc) is guaranteed to start before Claims to Windows Token Service by explicitly adding the following dependency in the service definition.
From the command prompt, type
sc config c2swts depend= CryptSvc.Open the Services console by selecting Start > Run > services.msc and locate Claims to Windows Token Service.
Open the Properties of the service.
On the Dependencies tab, verify the Cryptographic Service is listed.
Click OK.
Identity Platform configuration
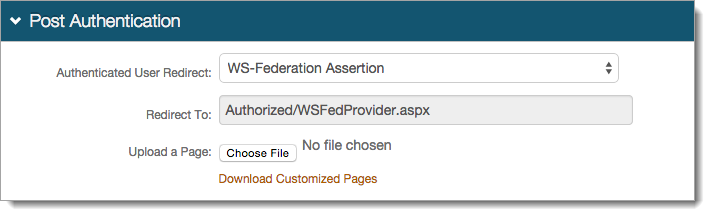
In Advanced Settings (formerly Classic Experience), go to the Post Authentication tab.
In the Post Authentication section, set Authenticated User Redirect to WS-Federation Assertion.
An unalterable URL is auto-populated in the Redirect To field, which appends to the domain name and realm number in the address bar (Authorized/WSFedProvider.aspx)
Note
For an alternate configuration, see the Troubleshooting and common issues section at the end of this topic.
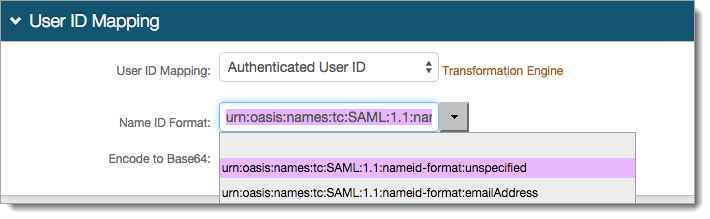
In the User ID Mapping section, set the following:
User ID Mapping
Set to Authenticated User ID.
Name ID Format
Leave the default value as urn:oasis:names:tc:SAML:1.1:nameid-format:unspecified.
If the service provider (SP) provides a different format for the RD Web Access, select a different option.
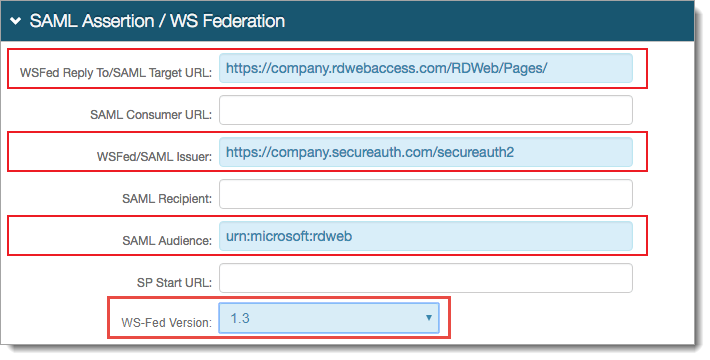
In the SAML Assertion / WS-Federation section, set the following:
WSFed Reply To/SAML Target URL
Set to https://<RDWeb-FQDN>/RDWeb/Pages/.
WSFed/SAML Issuer
Set to the fully qualified domain name (FQDN) of the Identity Platform appliance, followed by the current RD Web Access integration realm, for example, https://company.secureauth.com/secureauth2.
SAML Audience
Set to urn:microsoft:rdweb.
WS-Fed Version
Set the version to 1.3.
Signing Cert Serial Number
Leave this field as default, unless using a third-party certificate.
To choose a different certificate, click the Select Certificate link.
Assertion Signing Certificate
Download the Assertion Signing Certificate, which is used in the RD Web Access configuration procedure.

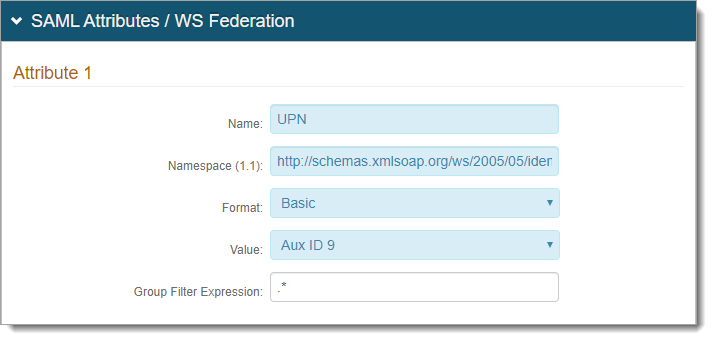
In the SAML Attributes / WS-Federation section, set the following for Attribute 1:
Name
Set to UPN.
Namespace (1.1)
Set to http://schemas.xmlsoap.org/ws/2005/05/identity/claims/upn.
Format
Set to Basic (default).
Value
Set to Aux ID 9 (default).
For example, Aux ID 9 was used on the Data tab to map UPN.

Save your changes.
RD Web Access Server configuration
Configure the RD Web Access Server to integrate with the Identity Platform.
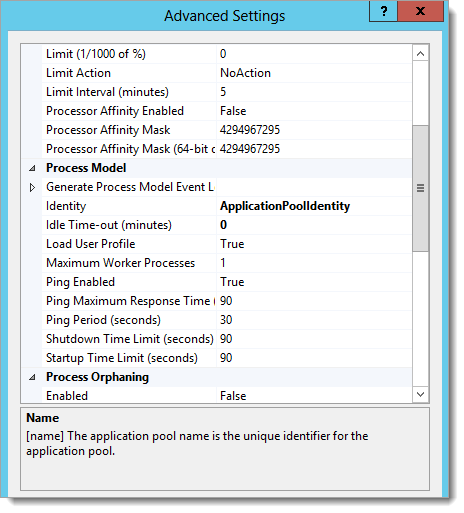
Update the RD Web Access Application Pool
Open the IIS Manager and select Application Pools.
Right-click the RDWebAccess pool and select Advanced Settings.
Set Load User Profile to True.
Update the RD Web Access web.config file
Important
Make a backup of the existing web.config file before making any modifications.
In a text editor (run as an administrator), open the web.config file located in C:\Windows\Web\RDWeb\Pages\.
Search for and delete the line
<httpRuntime targetFramework="4.5" />.At the top of the file, after the
<configuration>tag, add the following lines:<!-- SecureAuth --> <configSections> <section name="microsoft.identityModel" type="Microsoft.IdentityModel.Configuration.MicrosoftIdentityModelSection, Microsoft.IdentityModel, Version=3.5.0.0, Culture=neutral, PublicKeyToken=31bf3856ad364e35" /> </configSections> <!-- /SecureAuth -->After the
<system.web>tag, add the following lines:<!-- SecureAuth --> <httpRuntime targetFramework= "4.5" requestValidationMode="2.0"/> <pages validateRequest="false"/> <customErrors mode="Off" /> <!-- /SecureAuth -->
After the
<system.web>tag, modify and add the<authorization>and<authentication>tags to display the following lines:<!-- SecureAuth --> <authorization><deny users="?"/></authorization> <authentication mode="Windows"/> <!-- /SecureAuth -->
Edit the
<modules>tag to<modules runAllManagedModulesForAllRequests="true">.In the
<modules>section, add the following lines shown in the code block.Important
You must place the lines before any existing lines that begin with
<add name=.<!-- SecureAuth --> <add name= "WSFederationAuthenticationModule" type= "Microsoft.IdentityModel.Web.WSFederationAuthenticationModule, Microsoft.IdentityModel, Version=3.5.0.0, Culture=neutral, PublicKeyToken=31bf3856ad364e35" preCondition= "managedHandler" /> <add name= "SessionAuthenticationModule" type= "Microsoft.IdentityModel.Web.SessionAuthenticationModule, Microsoft.IdentityModel, Version=3.5.0.0, Culture=neutral, PublicKeyToken=31bf3856ad364e35" preCondition= "managedHandler" /> <!-- /SecureAuth -->
In the RD Web Access application, provide the certificate Thumbprint from the Assertion Signing Certificate downloaded from the Identity Platform Web Admin (step 4 of Identity Platform configuration).
Open the Assertion Signing Certificate, and select the Details tab.
Copy and paste the Thumbprint value into a text editor (see the following code example in line 28).
Important: Remove all spaces and change all letters to uppercase.
Copy the following code block and add it after the
</runtime>section.<!--SecureAuth--> <microsoft.identityModel> <service> <audienceUris> <add value="urn:microsoft:rdweb" /> <add value="Replace with SecureAuth Realm URL" /> <add value="Replace with Customer RDWEB URL Ending in /RDWEB/Pages/" /> </audienceUris> <securityTokenHandlers> <remove type="Microsoft.IdentityModel.Tokens.SessionSecurityTokenHandler, Microsoft.IdentityModel, Version=3.5.0.0, Culture=neutral, PublicKeyToken=31bf3856ad364e35" /> <add type="Microsoft.IdentityModel.Tokens.SessionSecurityTokenHandler, Microsoft.IdentityModel, Version=3.5.0.0, Culture=neutral, PublicKeyToken=31bf3856ad364e35"> <sessionTokenRequirement useWindowsTokenService="true" /> </add> <add type="Microsoft.IdentityModel.Tokens.Saml11.Saml11SecurityTokenHandler, Microsoft.IdentityModel, Version=3.5.0.0, Culture=neutral, PublicKeyToken=31bf3856ad364e35"> <samlSecurityTokenRequirement mapToWindows="true" useWindowsTokenService="true" /> </add> </securityTokenHandlers> <federatedAuthentication> <wsFederation passiveRedirectEnabled="true" issuer="Replace with SecureAuth Realm URL" realm="Replace with Customer RDWEB URL Ending in /RDWEB/Pages/" requireHttps="true" /> <cookieHandler requireSsl="false" /> </federatedAuthentication> <applicationService> </applicationService> <issuerNameRegistry type="Microsoft.IdentityModel.Tokens.ConfigurationBasedIssuerNameRegistry, Microsoft.IdentityModel, Version=3.5.0.0, Culture=neutral, PublicKeyToken=31bf3856ad364e35"> <trustedIssuers> <add thumbprint="Replace with SecureAuth cert Thumbprint" name="Replace with SecureAuth Realm URL" /> </trustedIssuers> </issuerNameRegistry> <certificateValidation certificateValidationMode="None" /> </service> </microsoft.identityModel> <!--/SecureAuth-->After you copy and add the above code snippet, modify the following lines:
<add value="urn:microsoft:rdweb" /><add value="Replace with SecureAuth RDWEB URL" /><add value="urn:microsoft:rdweb" /><add value="Replace with Customer RDWEB URL Ending in /RDWEB/Pages/" /><wsFederation passiveRedirectEnabled="true" issuer="Replace with SecureAuth Realm URL" realm="Replace with Customer RDWEB URL Ending in /RDWEB/Pages/" requireHttps="true" />The issuer value in the code must match the WSFed/SAML Issuer value set in the Identity Platform Web Admin (step 4 of Identity Platform configuration).
<add thumbprint="Replace with SecureAuth cert Thumbprint" name="Replace with SecureAuth Realm URL" />
Save the web.config file.
Test the configuration
To test the configuration, access the RD Web Access Server page URL directly or from the Identity Platform realm. When a page displays the application icons, this indicates a successful access into the RD Web Access application.
Troubleshooting and common issues
Parameters not passing to the WSFedProvider.aspx page
- Issue
Parameters are not passed correctly to the WSFedProvider.aspx page during execution.
- Workaround
Do the following in lieu of step 2 of Identity Platform configuration:
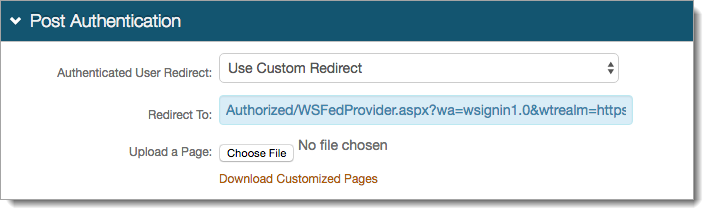
Set Authenticated User Redirect to Use Custom Redirect.
Set Redirect To to include the following parameters as part of the URL, for example:
Authorized/WSFedProvider.aspx?wa=wsignin1.0&wtrealm=https%3a%2f%2f<RDWebAccessServerURL>%2fRDWeb%2fPages%2f&wctx=rm%3d0%26id%3dpassive%26ru%3d%252fRDWeb%252fPages%252f
ID4175 exception message
- Issue
An exception message occurs: "Exception message: ID4175: The issuer of the security token was not recognized by the IssuerNameRegistry. To accept security tokens from this issuer, configure the IssuerNameRegistry to return a valid name for this issuer."
- Workaround
In the RD Web Access application log, where the Identity Platform redirects back to the RD Web Access server after authentication, manually type the certificate thumbprint and trusted issuer name instead of copying and pasting this information.
Note
The thumbprint must still be in ALL CAPS with spaces removed.