ServiceNow (SP-initiated) integration guide
Updated April 20, 2020
Use this guide to enable multi-factor authentication and single sign-on (SSO) access via SAML to ServiceNow.
Prerequisites
Have a ServiceNow account.
SecureAuth Identity Platform version 9.x or later, with a new realm created for the integration with ServiceNow.
Configure the following tabs in Advanced Settings (formerly Classic Experience) before configuring the Post Authentication tab: Overview, Data, Workflow, Multi-Factor Methods
Identity Platform configuration steps
In Advanced Settings (formerly Classic Experience), go to the Data tab.
In the Profile Fields section, map the directory field that contains the user's ServiceNow ID to the Identity Platform Property.
For example, add the ServiceNow ID Field to the Email 2 Property if it is not already contained somewhere else.
Save your changes.
Go to the Post Authentication tab.
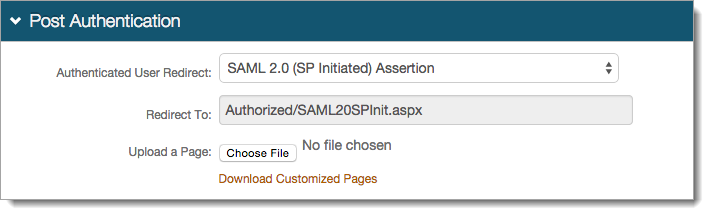
In the Post Authentication section, set Authenticated User Redirect to SAML 2.0 (SP-initiated) Assertion.
An unalterable URL is auto-populated in the Redirect To field, which appends to the domain name and realm number in the address bar (Authorized/SAML20SPInit.aspx)
A customized post authentication page can be uploaded, but is not required.
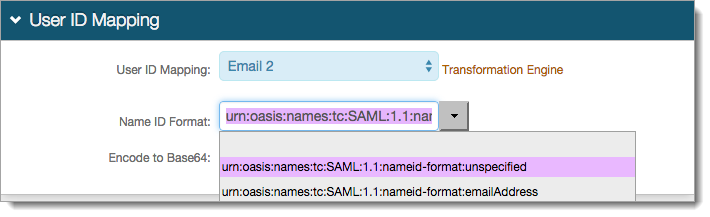
In the User ID Mapping section, set the following:
User ID Mapping
Set to the Identity Platform property that corresponds to the directory field that contains the ServiceNow ID.
For example, the property is set to Email 2. The Email 2 setting is mapped to the ServiceNow ID on the Data tab in Step 2.
Name ID Format
Leave the default value as urn:oasis:names:tc:SAML:1.1:nameid-format:unspecified.
If required by ServiceNow, choose the option supplied by the Service Provider (SP).
Encode to Base64
Set to False.
In the SAML Assertion / WS Federation section, set the following:
WSFed/SAML Issuer
Set to unique name that is shared with ServiceNow.
For example, https://secureauthfqdn/Secureauthxx/
The WSFed/SAML Issuer must match exactly on the Identity Platform side and the ServiceNow side.
SAML Audience
Set to https://<company>.service-now.com.
SP Start URL
Provide the starting URL to enable SSO and to appropriately redirect users to access ServiceNow.
For example, https://<company>.service-now.com
SAML Offset Minutes
Set the minutes to account for time differences between devices.
SAML Valid Hours
Time limit that the SAML assertion is valid.
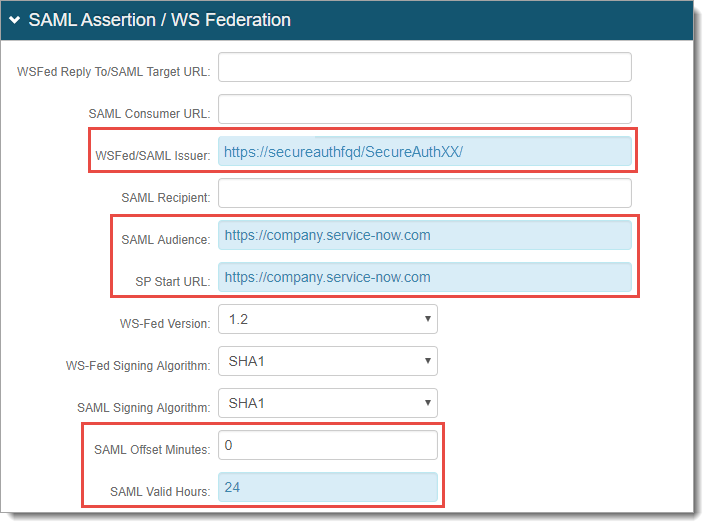
No configuration is required for the WSFed Reply To/SAML Target URL, SAML Consumer URL, or SAML Recipient fields.
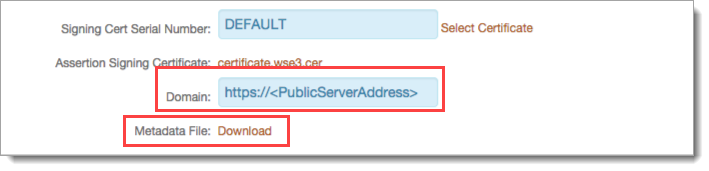
Leave the Signing Cert Serial Number as the default value, unless using a third-party certificate for the SAML assertion.
If using a third-party certificate, click Select Certificate and choose the appropriate certificate.
ServiceNow requires the certificate to be in privacy-enhanced mail (PEM) format.
If required, provide the Domain so you can download the metadata file to send to ServiceNow.
Save your changes.
Optional configuration settings
To configure this realm's token or cookie settings, see Configure token or cookie settings
To configure this realm for SSO, see SecureAuth IdP Single Sign-on Configuration.
To configure this realm for Windows Desktop SSO, see one of the following topics:
For Identity Platform release 19.07, 20.06, or 21.04, see Windows desktop SSO configuration.
For Identity Platform release 22.02 or later, see Windows SSO integration guide.
ServiceNow configuration steps
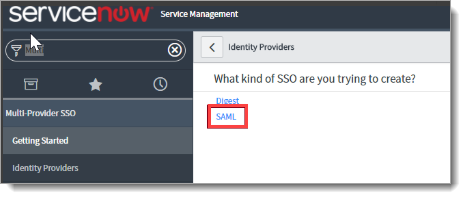
In the ServiceNow Admin Console, navigate to Multi-Provider SSO and select Identity Providers. Click New.

If you will activate the Multi-Provider SSO plugin in your instance, follow the steps in Activate multiple provider single sign-on on the ServiceNow website.
In the What kind of SSO are you trying to create section, click SAML.
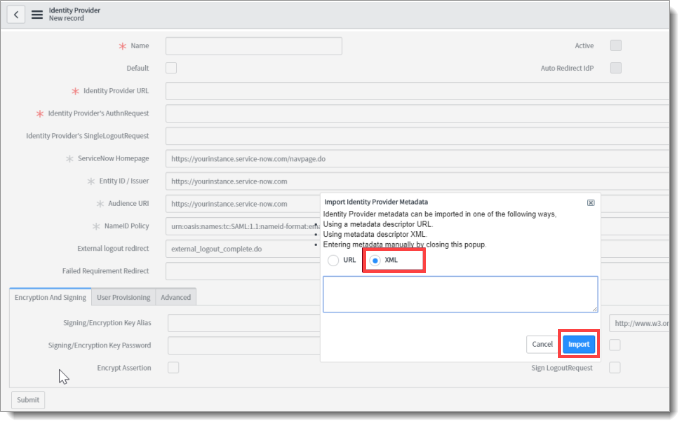
Configure the ServiceNow Identity Provider by importing the metadata that you downloaded in the Identity Platform configuration.
On the Identity Provider New record page, an Import Identity Provider Metadata pop-up is displayed.
Select XML and paste the XML content you copied in the Identity Platform configuration in Step 10.
Click Import.
The required fields will be automatically populated.
Activate the imported Identity Provider settings.
Scroll down and select the Advanced tab. Check that User Field is set to email.
Click Test Connection.
Click Activate.
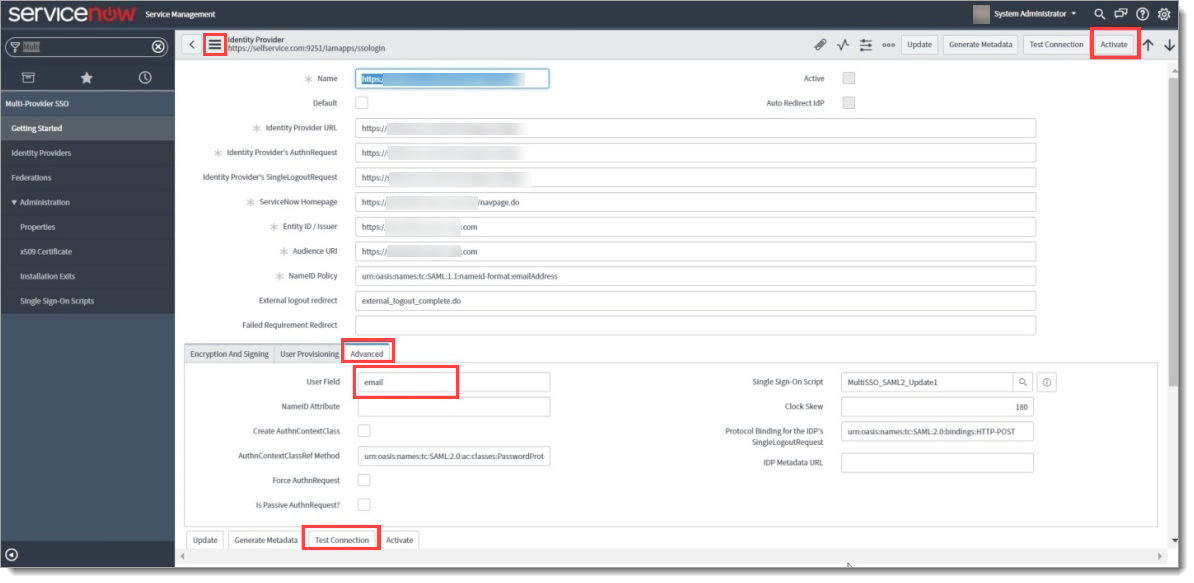
Set email as the user identification value.
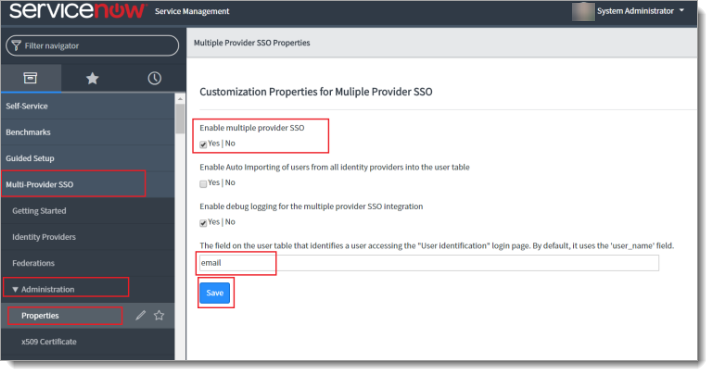
On the left side, navigate to Multi-Provider SSO > Identity Providers > Properties
Check that Enable multiple provider SSO is set to Yes.
Change user_name to email in the user identification field so that users accessing the "User identification" login page are identified by email.
Save your changes.
Change the signing certificate
The certificate is set up automatically when the ServiceNow integration imports the Identity Platform metadata, which includes the certificate.
If you need to change the signing certificate, you must do so manually. See the steps for installing a certificate for a generic identity provider in Install the identity provider certificate on the ServiceNow website.
Note
Only one certificate can be used at a time. To change the certificate, replace it rather than adding the new one.