Microsoft 365 application integration
This topic covers how to integrate the Microsoft 365 application in the SecureAuth® Identity Platform to securely allow the right user access to Microsoft 365 applications in your organization.
If you're looking for Office 365, it is now Microsoft 365. The terms Office 365 and Microsoft 365 are used interchangeably in this topic.
Prerequisites - Microsoft 365
Have Microsoft 365 account with admin access.
Activate Microsoft 365 account and tenant.
Register a valid domain with Microsoft 365.
Ensure the Microsoft Active Directory domain controller has the same domain suffix as the one registered with Microsoft 365.
Have access to a Windows machine where the MSOnline module is installed to use Window PowerShell.
You'll need this to federate the connection between the Identity Platform and the service provider. Instructions are provided in Identity Platform configuration for Step 13. This machine is not required to be domain-joined.
Note
Once you run the PowerShell script to instantiate federation with SecureAuth, it applies to all users attempting to log in to Microsoft 365 with an email address that matches the federated domain suffix.
Get a publicly trusted SSL / signing certificate.
To use thick clients like Outlook, it requires a third-party certificate.
Prerequisites - Identity Platform
Active Directory data store added to the Identity Platform
Configured user authentication policy
Data store configuration
In the Identity Platform, go to the data store properties for your integrated Active Directory.
Set the following mappings to an available data store property. For example, Aux ID 1 and Aux ID 2.
Make a note of these data store mappings; you'll need them in Identity Platform configuration for Step 9 and Step 10.
Aux ID 1
Set to
UserPrincipalName.Aux ID 2
Set to
objectGUID.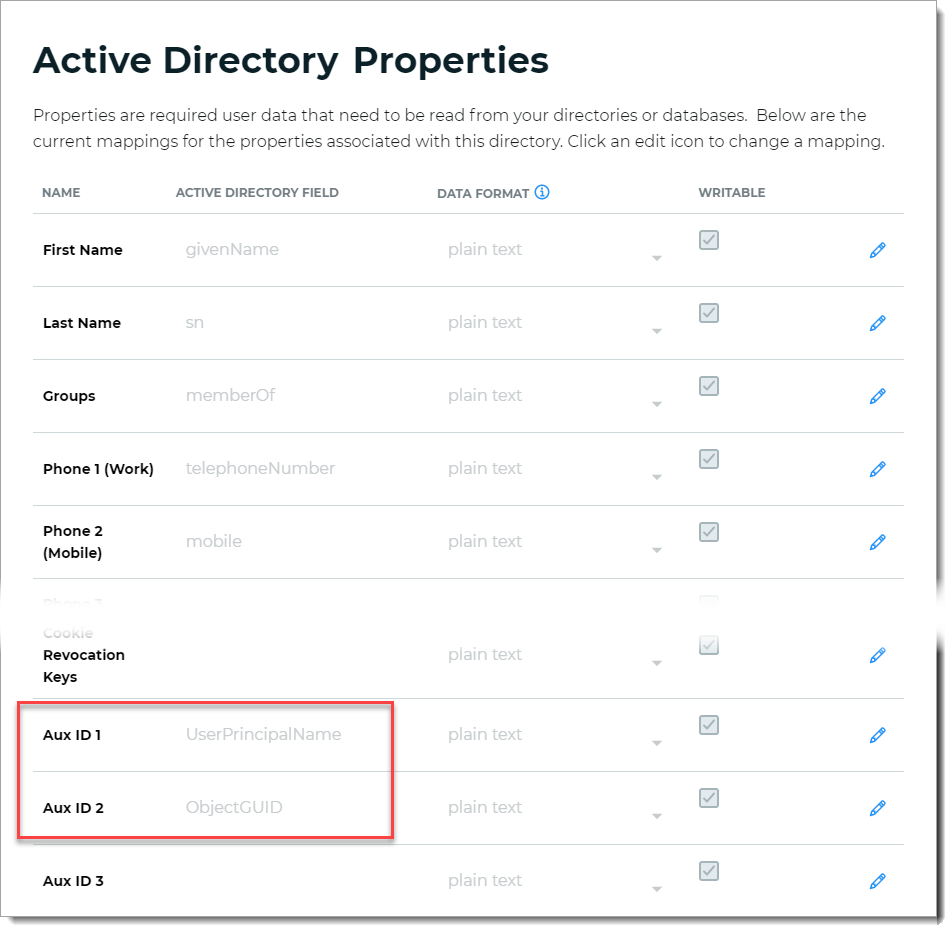
Save your changes.
Identity Platform configuration
On the left side of the Identity Platform page, click Application Manager.
Click Add an Application.
The application template library appears.
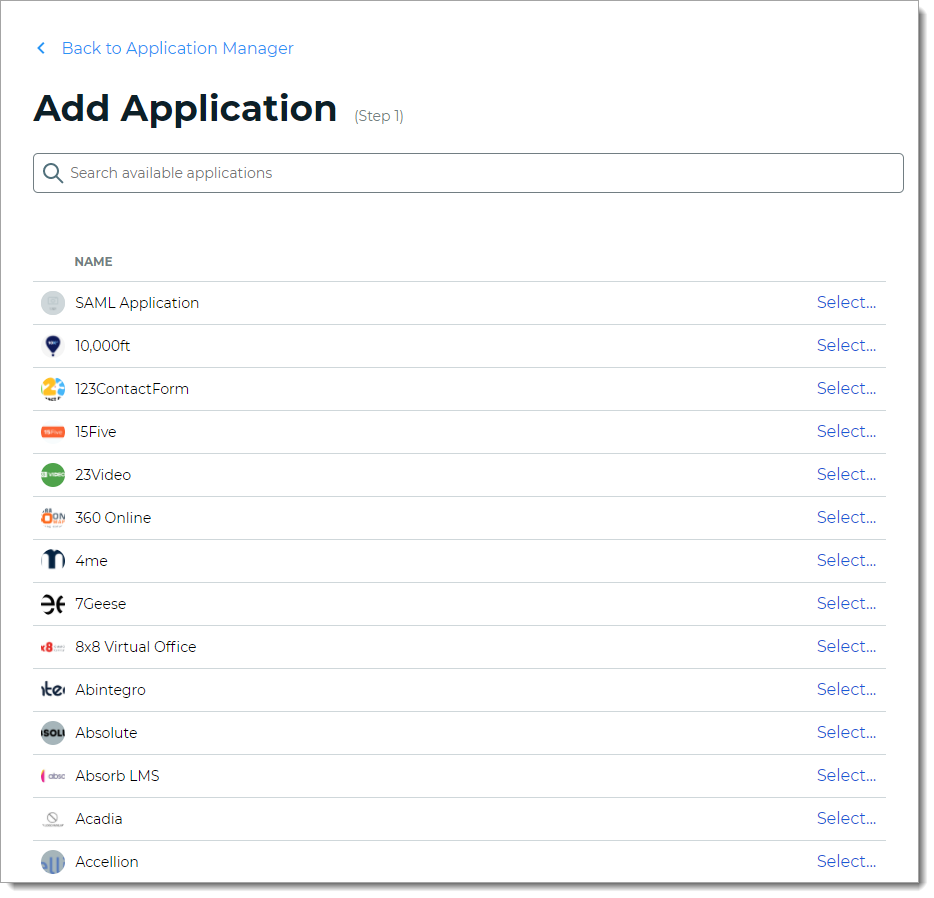
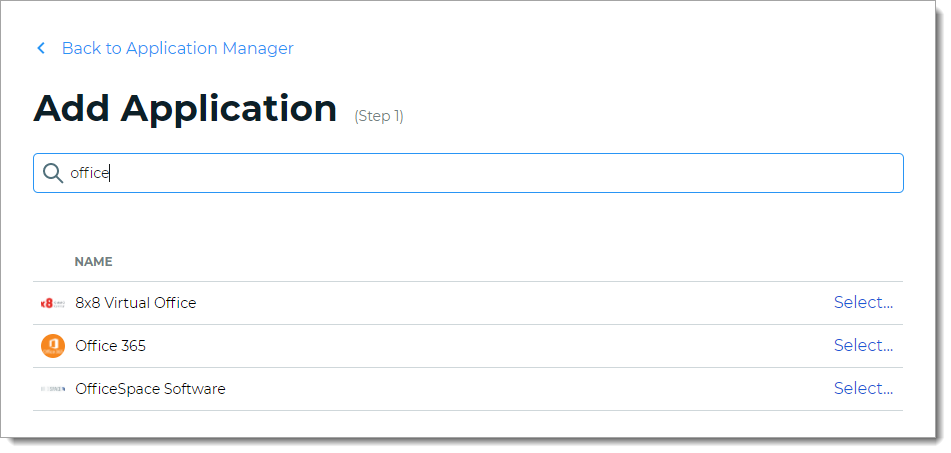
From the list of application templates, search and select Office 365.
On the Applications Details page, set the following configurations.
Application Name
Name is prefilled by default; you can optionally change the application name. This displays on the Application Manger list and on the Application Settings page.
Application Description
Enter descriptive name about this application integration.
Upload logo
Optional. Click Upload to change the logo.
Authentication Policy
Select the login authentication policy for this application.
Data Stores
Enter the data stores to to authenticate and allow user access for this application. Start typing to bring up a list of data store names. You can enter more than one data store.
Groups
Use one of the following options:
Slider in the On position (enabled): Allow users from every group in your selected data stores access to this application.
Slider in the Off position (disabled): Enter the specific groups who are allowed access to this application.
Realm Number
Select the Realm Number to use for this application.
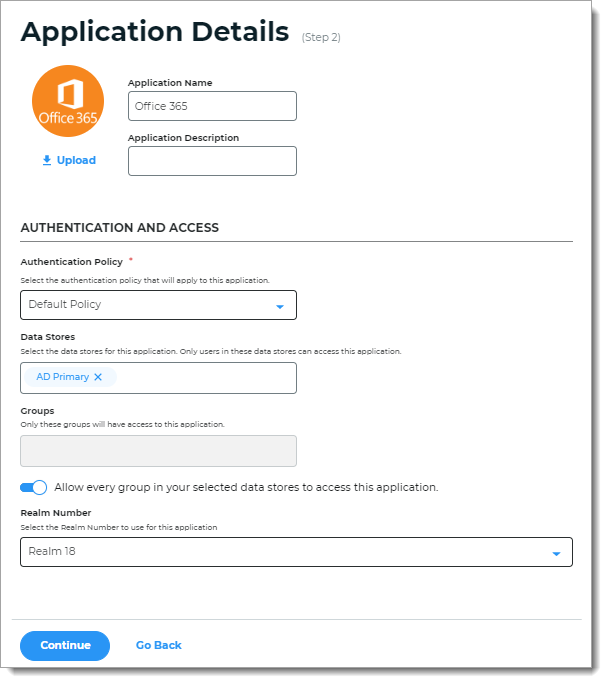
Click Continue.
The Connection Settings page appears.
In the Configure Connection section, set the following configuration.
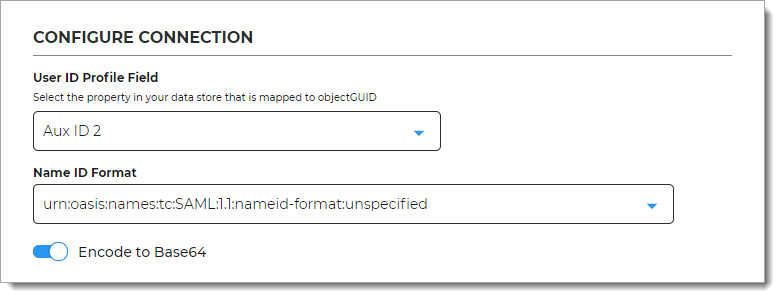
User ID Profile Field
Select the property in your data store that is mapped to
objectGUID.For example, Aux ID 2. This the data store mapping you set in Data store configuration.
Name ID Format
By default, this is set to urn:oasis:names:tc:SAML:1.1:nameid-format:unspecified.
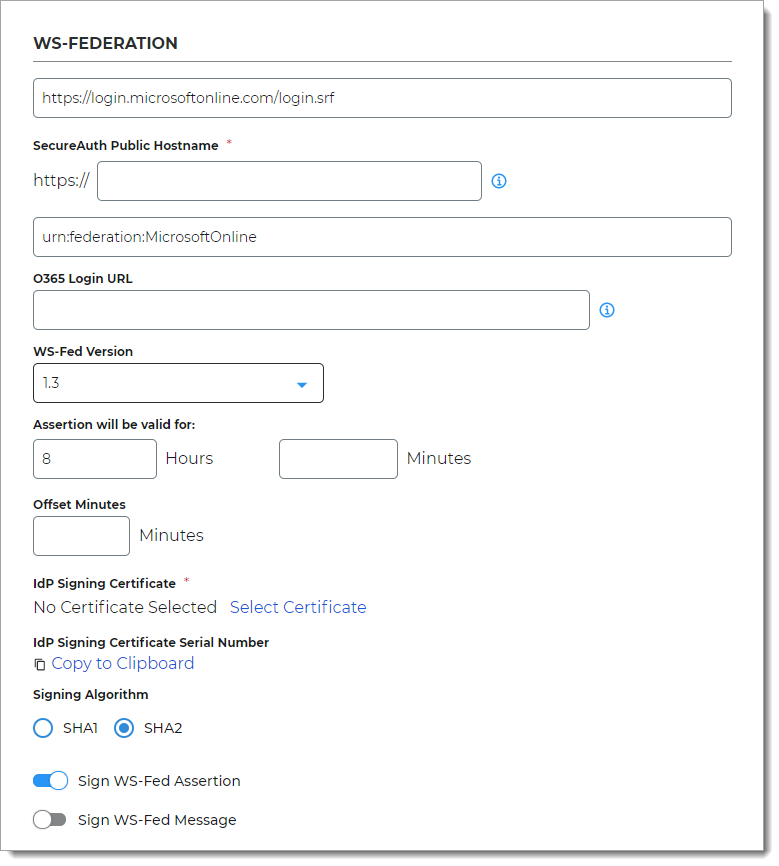
In the WS-Federation section, set the following configurations.
<field does not have a label>
This the target login URL to Microsoft 365.
By default this is set to https://login.microsoftonline.com/login.srf.
SecureAuth Public Hostname
Enter the fully qualified domain name for your SecureAuth URL (for example, company.secureauth.identitysomething.com).
For an on-prem deployment, this is the FQDN URL for the appliance. Otherwise, for a cloud-only deployment, this is the URL is provided to you by SecureAuth.
<field does not have a label>
This is the SAML Audience login URL for Microsoft 365.
By default this is set to urn:federation:MicrosoftOnline.
O365 Login URL
Optional. Enter the login URL to the Microsoft 365 application.
WS-Fed Version
Select the WS-Fed specification version to which this application integration applies.
Assertion will be valid for
Indicate in hours and minutes, how long the assertion is valid for.
The default setting is one hour, but for more sensitive application resources, the recommended value is between one to five minutes.
Offset Minutes
Indicate in minutes to account for the time differences among devices.
IdP Signing Certificate
Click Select Certificate, choose the IdP signing certificate to use and then click Select to close the box.
IdP Signing Certificate Serial Number
When you select an IdP signing certificate, the serial number populates this field.
Signing Algorithm
The signing algorithm digitally signs the SAML assertion and response.
Choose the signing algorithm – SHA1 or SHA2 (slightly stronger encryption hash and is not subject to the same vulnerabilities as SHA1.)
Sign WS-Fed Assertion
Enable signing of the WS-Fed assertion to ensure assertion integrity when the assertion is delivered to the service provider (SP).
Sign WS-Fed Message
Enable signing of the WS-Fed message to ensure message integrity when the message is delivered to the service provider (SP).
In the WS-Trust Endpoints section, set the following configuration.
Enable O365 Legacy Endpoints
Move the slider On to enable the endpoints for the legacy version of Office 365.

In the WS-Federation Attributes section, set the following configurations for the first WS-Fed Attribute.
Attribute Name
The WS-Federation attribute name from the directory to which identifies the user to the application.
Set to IDPEmail.
Data Store Property
Select the data store property which maps to this directory attribute.
For example, set to Aux ID 1 (or the field that you have mapped
userPrincipalName) in the data store in Data store configuration.Namespace (1.1)
The authorization URL to tell the application which attribute is being asserted.
By default, this is set to http://schemas.xmlsoap.org/claims/UPN.
Format
Encoding format for the login request.
By default, this is set to Basic.
Filtered Group
Optional. To parse the data different from the default settings, use default value of
.*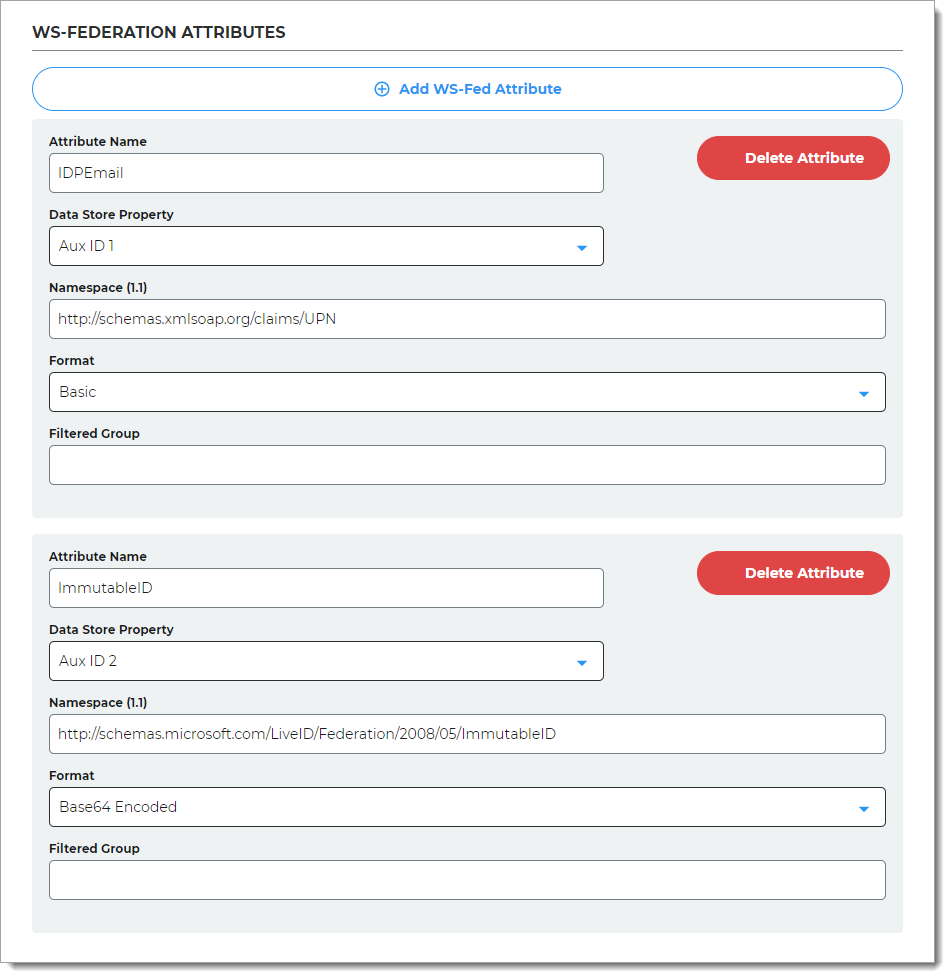
Set the following configurations for the second WS-Fed Attribute.
Attribute Name
The WS-Federation attribute name from the directory to which identifies the user to the application.
Set to ImmutableID.
Data Store Property
Select the data store property which maps to this directory attribute.
For example, set to Aux ID 2 (or the field that you have mapped
objectGUID) in the data store in Data store configuration.Namespace (1.1)
The authorization URL to tell the application which attribute is being asserted.
By default, this is set to http://schemas.microsoft.com/LiveID/Federation/2008/05/ImmutableID.
Format
Encoding format for the login request.
By default, this is set to Base64 Encoded.
Filtered Group
Optional. To parse the data different from the default settings, use default value of
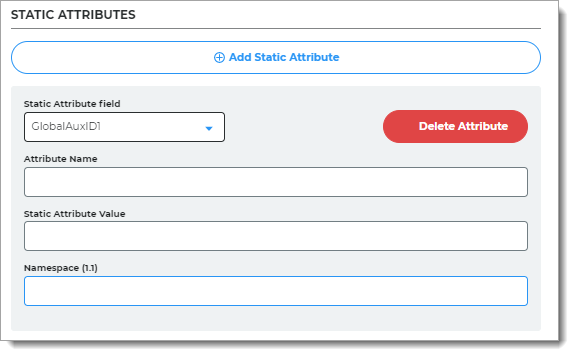
.*To add attributes with fixed values that apply to all users, in the Static Attributes section, click Add Static Attribute and set the following configurations.
Static Attribute field
Select the Global Aux ID to map the static attribute to. The options are Global Aux ID 1 to Global Aux ID 5.
For example, select Global Aux ID 1.
Attribute Name
Set to the attribute name required by the Service Provider.
For example, companyName.
Static Attribute Value
Set the value of the attribute. This value is fixed and applies to all users.
For example, SecureAuth.
Namespace (1.1)
Set to the value required by the Service Provider.
Click Add Application.
After saving the application, the Information for Service Providers page appears.

To complete the integration and establish a working connection with SecureAuth, provide the following information as required to the service provider.
Login URL, Logout URL, IdP Issuer
Click Copy to Clipboard to copy the Identity Platform realm information and paste it in the corresponding field on the service provider user interface, as required.
IdP Signing Certificate
Download the IdP Signing Certificate.
PowerShell Script
To federate the connection between the Identity Platform and the service provider, copy and run the PowerShell script.
Note
Once you run the PowerShell script to instantiate federation with SecureAuth, it applies to all users attempting to log in to Microsoft 365 with an email address that matches the federated domain suffix.
Example PowerShell script
Connect-MsolService
$dom = "<O365 DOMAIN NAME>"
$ura = "https://company.initech.com/Secureauth20/webservice/wstrust.svc/2005/usernamemixed"
$url = "https://company.initech.com/Secureauth20/"
$uri = "https://company.initech.com/Secureauth20"
$logouturl = "https://company.initech.com/Secureauth20/wsfedsignout.aspx"
$metadata = "https://company.initech.com/Secureauth20/webservice/wstrust.svc/mex"
$cert = "<CERT VALUE>"
Set-MsolDomainAuthentication -DomainName $dom -FederationBrandName $dom -Authentication Federated -PassiveLogOnUri $url -ActiveLogonUri $ura -MetadataExchangeUri $metadata -SigningCertificate $cert -IssuerUri $uri -LogOffUri $logouturl -PreferredAuthenticationProtocol WsFed
The following are descriptions of the command lines in the script.
Connect-MsolServiceBegins the process of the federating the connection.
$dom="<Microsoft 365 DOMAIN NAME>"Name of Microsoft 365 domain.
$ura="https://<SecureAuth Public Hostname>/SecureAuthRealm#/webservice/wstrust.svc/2005/usernamemixed"Defines the Identity Platform on-prem FQDN URL for the appliance (or for a cloud-only deployment this is the URL provided by SecureAuth) and Microsoft 365 realm number, followed by /webservice/ wstrust.svc/2005/usernamemixed. This URL specifies the endpoint used by active clients when authenticating with domains set up for SSO (identity federation) in Microsoft 365.
$url="https://<SecureAuth Public Hostname>/SecureAuthRealm#/"Defines the Identity Platform on-prem FQDN URL for the appliance (or for a cloud-only deployment this is the URL provided by SecureAuth) and Microsoft 365 realm number. This is the URL where web-based clients are directed to when logging into Microsoft 365.
$uri="https://<SecureAuth Public Hostname>/SecureAuthRealm#/"Defines the Identity Platform on-prem FQDN URL for the appliance (or for a cloud-only deployment this is the URL provided by SecureAuth) and Microsoft 365 realm number. This is the unique identifier of the domain in the Microsoft 365 platform that is derived from the federation server.
Note
The uri command and the WSFed/SAML Issuer in the Advanced Settings (formerly Classic Experience) must match exactly, including the trailing forward slash "/".
$logouturl="https://<SecureAuth Public Hostname>/SecureAuthRealm#/wsfedsignout.aspx"Defines the Identity Platform on-prem FQDN URL for the appliance (or for a cloud-only deployment this is the URL provided by SecureAuth) and Microsoft 365 realm number, followed by /wsfedsignout.aspx. This is the URL to which users are redirected to when logging out of Microsoft 365. If you are using both IdP-initiated and SSO, and experience issues with logging in, then contact Support.
$metadata="https://company.initech.com/Secureauth20/webservice/wstrust.svc/mex"Defines the Identity Platform on-prem FQDN URL for the appliance (or for a cloud-only deployment this is the URL provided by SecureAuth) and Microsoft 365 realm number, followed by /webservice/wstrust.svc/mex. This URL specifies the metadata exchange endpoint used for authentication from rich client applications.
$cert="<CERT VALUE>"Defines the certificate value of the certificate used to sign tokens passed to Microsoft 365 platform. Replace the <CERT VALUE> with the actual value in a single line with no breaks or space.
To export the certificate:
Export the SSL certificate in Base64 format.
Using a text editor, open the exported certificate.
Remove the Begin Certificate and End Certificate lines from the file.
Remove all returns (CR-LF) so that the certificate value is one line of text with no formatting.
Set-MsolDomainAuthenticationIn the command line for
Set-MsolDomainAuthentication, use the variables set in the previous lines to configure Microsoft 365.
Download Metadata
To download the metadata file:
Click Download Metadata.
Enter the Domain name to the Identity Platform appliance URL or IP address.
For example, https://secureauth.company.com or https://111.222.33.44
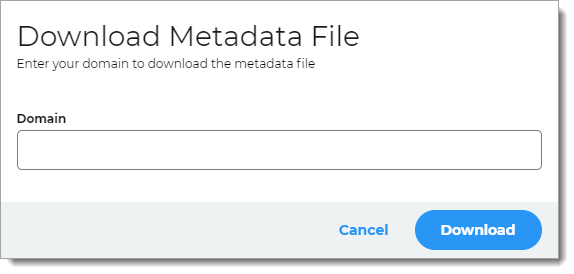
Click Download to get the configuration file.
Upload the file to the service provider.
Click Continue to Summary to review the application settings.

Click Back to Application Manager to find the application added to the list.