End user login experience on Linux
This topic describes in detail the Login for Linux experience for your end users to help you decide what configurations are best for your organization.
First login with password only
End users can log in without second-factor authentication for the number of days set by the administrator in the Installer Configuration Details page, in the Grace Period option. This allows end users to log in with a password only (without using second-factor authentication), and typically occurs after the Login for Linux installation. End users can then access their device to set up their two-factor authentication methods, such as PIN creation and answers to Security Questions, before they must authenticate to access their device.
Use case: Password-only login is useful for one or more new employees who have been issued a laptop on their first day of employment. For example, if Login for Linux is already installed on the laptops and the admin has not set a grace period value, new employees might not be able to log into their computer if they cannot connect to the SecureAuth Identity Platform to register their mobile phone or self-service page to enter a phone number.
Workflow: End users are prompted to log in with their username and password only. The login screen indicates the number of days end users can continue to log in with a password only on the machine, as shown in the following image.
End users will see the following message when they log in with password only. End users who want to log in with a password only enter their password next to number 1 and enter No for number 2 and log in. After end users set up their second-factor methods, they are ready to authenticate so they enter Yes for number 2, which dismisses the password-only screen and opens the 2FA login screen. Thereafter, the 2FA login screen opens for end users.
 |
Login without connection to Identity Platform
End users can log in when their machine does not have a connection to the Identity Platform. You must set Install Login for Endpoint without connection to Identity Platform and Grace Period to at least 1. This allows end users to log in with a password only (without using second-factor authentication) for the specified number of days.
Use case: Password-only login is useful if a third-party company configures machines for end users and the third-party company does not have connectivity to the Identity Platform. For example, if Login for Linux is installed on machines by a third-party without a connection to the Identity Platform, and the admin has not set Install Login for Endpoint without connection to Identity Platform and Grace Period to at least 1, when new employees get their machine, they will not be able to log in.
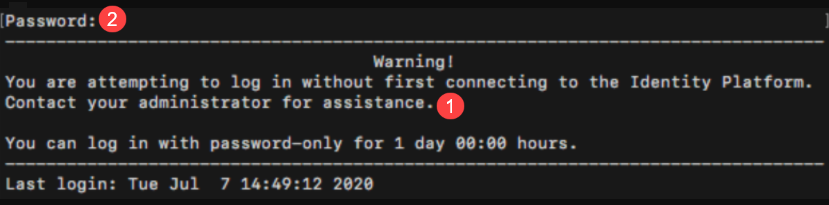
Workflow: End users are prompted to log in with their username and password only. The login screen indicates the number of days end users can continue to log in with a password only on the machine, as shown in the following image.
End users whose machines are not connected to the Identity Platform should contact the admin first so they can copy the message next to number 1 and send it to their admin. End users can then enter their password next to number 2 and log in. After the machine connects to the Identity Platform, the 2FA login screen opens for end users so they can set up their second-factor methods and log in.
 |
First-time login experience
Enter your domain username and password on the login screen, and then choose a 2FA method.
The first time end users log in, Login for Linux shows only OATH-based methods (for example, TOTP, HOTP), if at least one method is available to end users. If at least one OATH-based method is not available to end users, they can use any other available method. This could be a method that uses the SecureAuth Authenticate App on their mobile device or another device provisioned with the SecureAuth Identity Platform to supply timed passcodes, such as an HOTP YubiKey.
If end users need to login when their machine is offline, they must choose an OATH-based method during the first login. After end users select a timed authentication option and enter their password, TOTP and HOTP passcode options will be available for them to use when logging on the machine offline.
End users with more than one mobile phone or YubiKey provisioned can select which device or token to use when online. When logging on the machine offline, any OATH-based method that was used online will be available for use.
If you do not have an authentication method that provides an OATH-based method, then select any other option available to you.
Enter the passcode that appears on the device, and then click Submit.
After successfully logging on using a timed passcode, timed passcodes from that device can be used for login access when offline, i.e., when the machine is not connected to the Internet.
Log out.
Log back on the machine, and select an authentication option from the list of multi-factor authentication methods for which you have previously enrolled.
Enter the method number to access the machine on the network.

Authentication method workflows are described in the following sections.
SecureAuth Authenticate Mobile App options
The methods in this section are delivered via push notification and require the use of the SecureAuth Authenticate App.
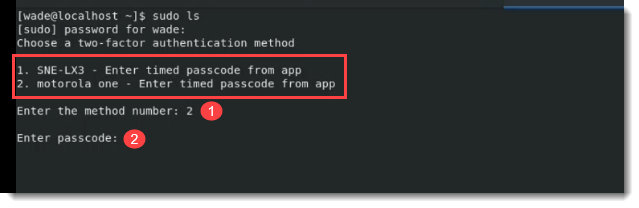
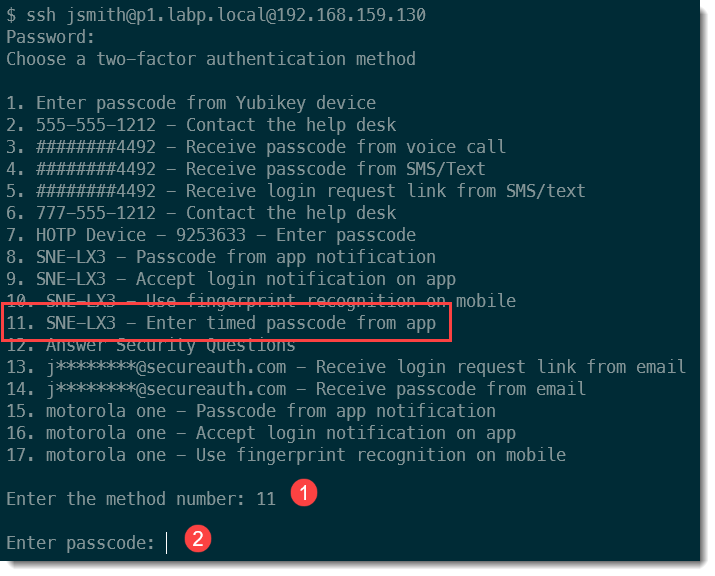
Enter timed passcode from app
This method and "Enter passcode from YubiKey" are displayed at first login, if available. If not available, all available methods are displayed.
Enter the number to the left of the timed passcode option in the list.
Enter the TOTP that was sent to the SecureAuth Authenticate app on your mobile device.
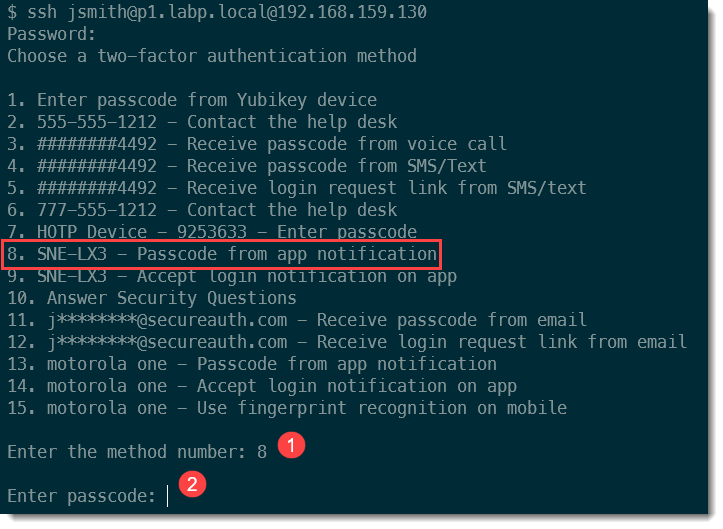
Receive passcode from notification
Enter the number to the left of the timed passcode option in the list.
Enter the passcode that was sent to the SecureAuth Authenticate App on your mobile device.
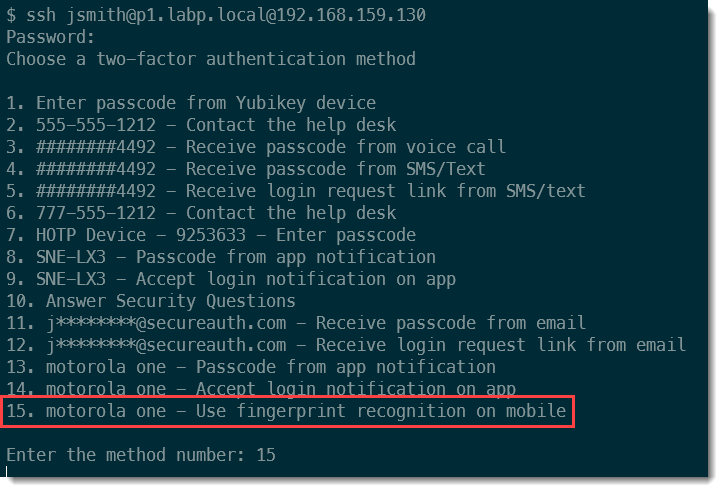
Approve login notification for fingerprint recognition
Enter the number to the left of the fingerprint recognition option in the list.
You'll receive a touch ID request in the SecureAuth Authenticate App on your mobile device to log on. Tap Use Touch ID and then enter your fingerprint.
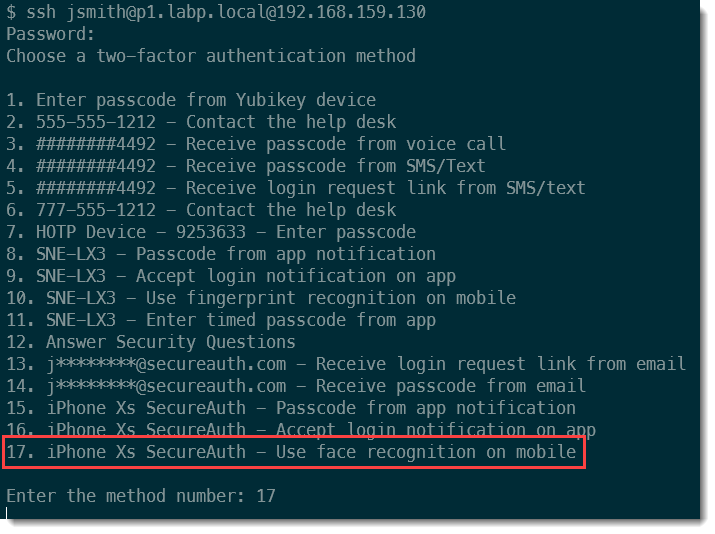
Approve login notification for face recognition
Enter the number to the left of the face recognition option in the list.
You'll receive a face ID request in the SecureAuth Authenticate App on your mobile device to log on. Tap Use Face ID and then scan your face.
Approve login notification for Symbol-to-Accept
Enter the number to the left of the Accept login notification on app option in the list.
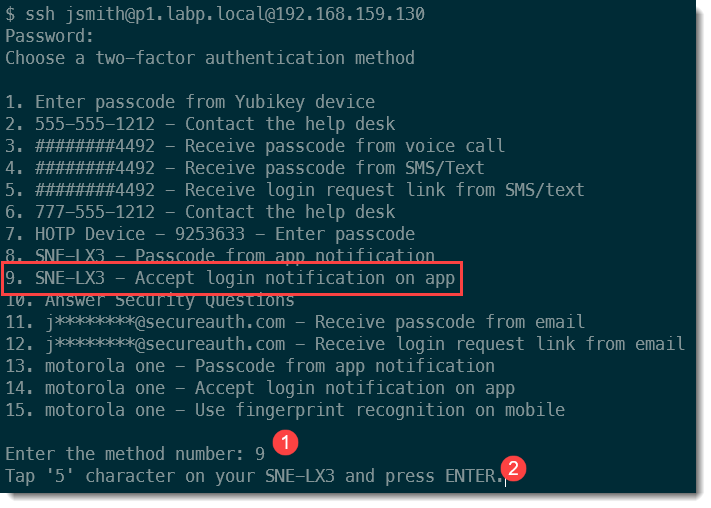
Receive the set of 4 symbols sent to the Authenticate mobile app on your mobile device.
On the Authenticate mobile app, tap the symbol that matches the one displayed on your desktop or laptop, shown in the image in step 2. You are then logged on.
SMS / Text Message
Receive passcode
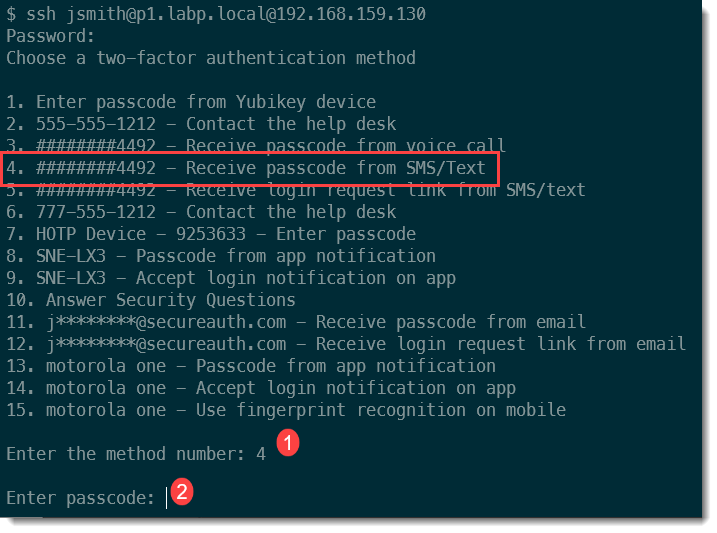
Enter the number to the left of the passcode from SMS text option in the list.
Enter the passcode sent via SMS text to your mobile phone.
Click Submit to log on.
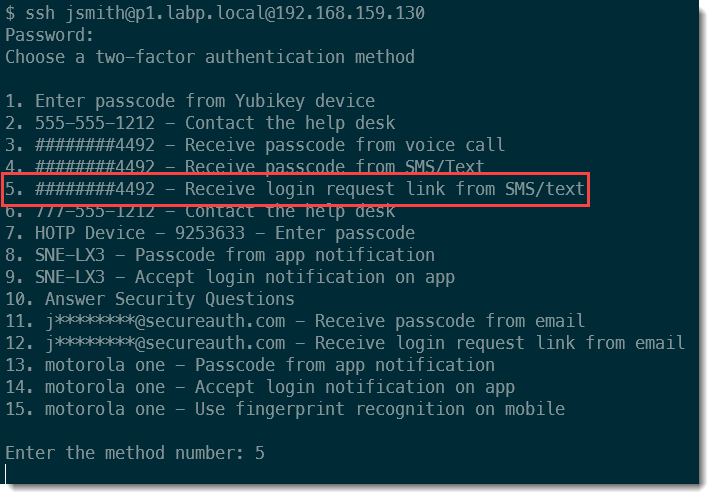
Receive link
Enter the number to the left of the link from SMS/text option in the list.
Click the link sent via SMS text to your mobile phone.
Receive passcode
Enter the number to the left of the passcode from email option in the list.
Enter the passcode sent to your email address.

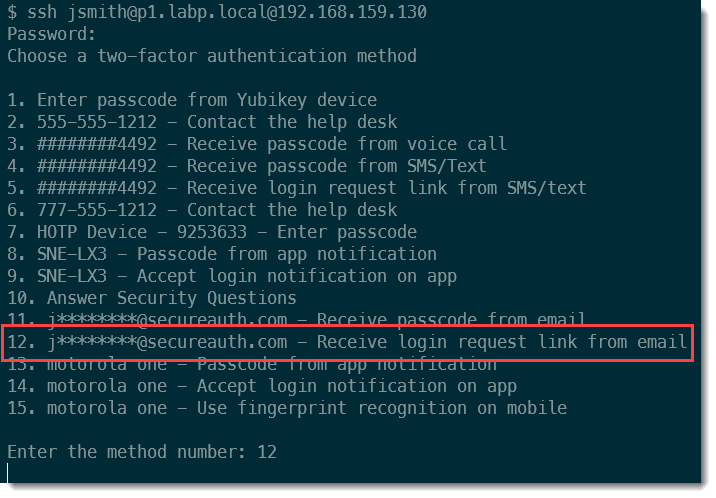
Receive link
Enter the number to the left of the login request link from email option in the list.
Click the link sent to your email address.
Voice Call
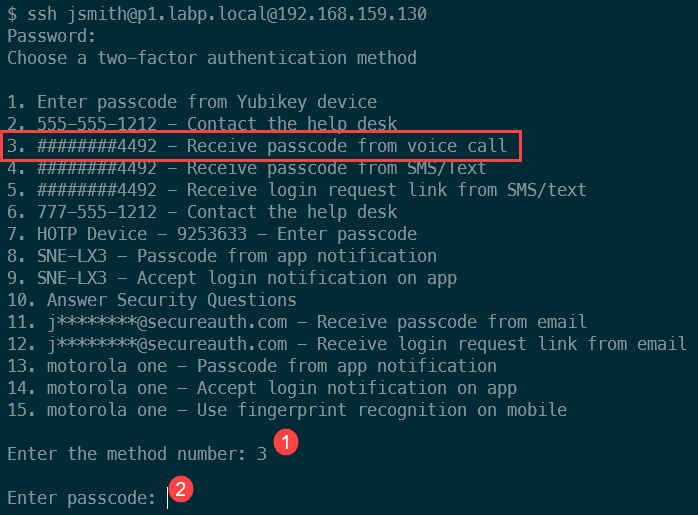
Receive passcode
Enter the number to the left of the passcode from voice call option in the list.
Enter the passcode received from the phone call.
Additional methods
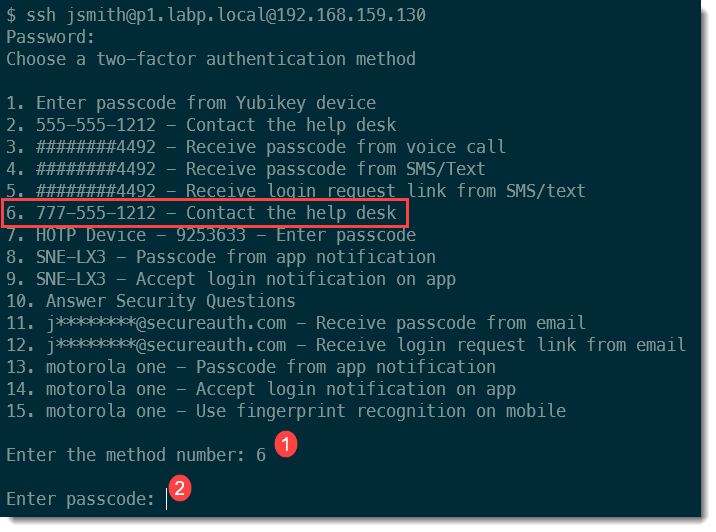
Contact the help desk
Enter the number to the left of the help desk option in the list.
If more than one phone number displays for the help desk, select the phone number to use for contacting the help desk. (The phone number in the image below is an example only.)
Input the passcode supplied by the help desk.
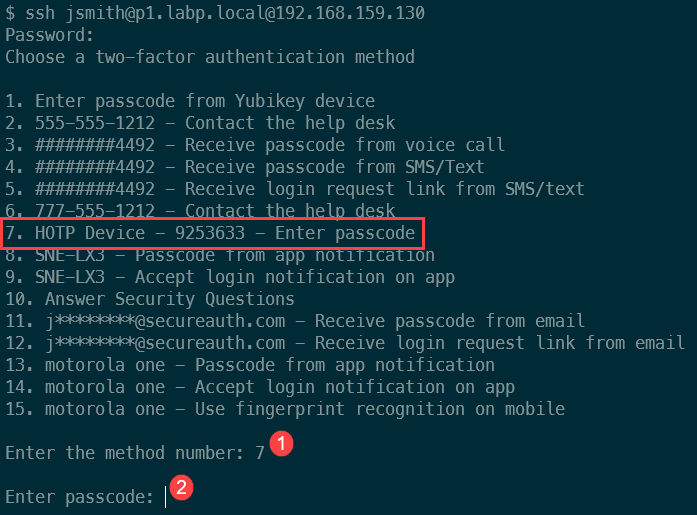
Enter passcode from token
This method and "Enter timed passcode from app" are displayed at first login, if available. If not available, all available methods are displayed.
Enter the number to the left of the HOTP device option in the list.
With the YubiKey HOTP device inserted in the machine, tap or press the device to populate the passcode in the field.
Enter passcode from YubiKey (Yubico OTP protocol)
Enter the number to the left of the YubiKey device option in the list.
With the YubiKey OTP device (Yubico OTP protocol) inserted in the machine, tap or press the device to populate the passcode in the field.
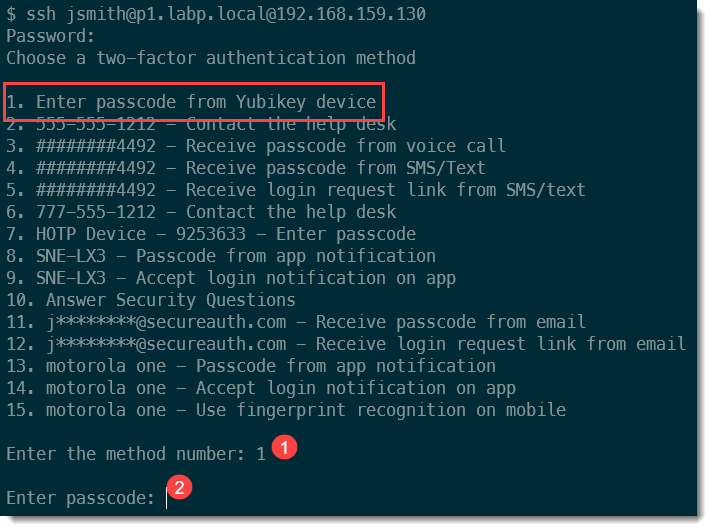
Enter passcode from YubiKey
In this example, the passcode is sent from a generic TOTP device, which might be a YubiKey, an OTP generator app (for example, FreeOTP), or any other way to generate the TOTP. You can use whatever OTP generator you prefer; the example uses a YubiKey.
Enter the number to the left of the YubiKey device option in the list.
With the YubiKey OATH-TOTP device inserted in the machine, tap or press the device to populate the passcode in the field.
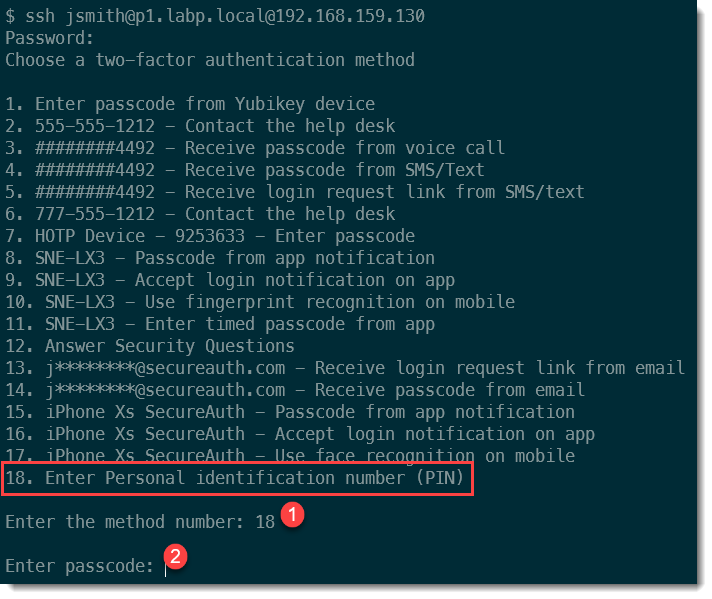
Enter PIN
Enter the number to the left of the PIN option in the list.
Enter your predefined personal identification number.
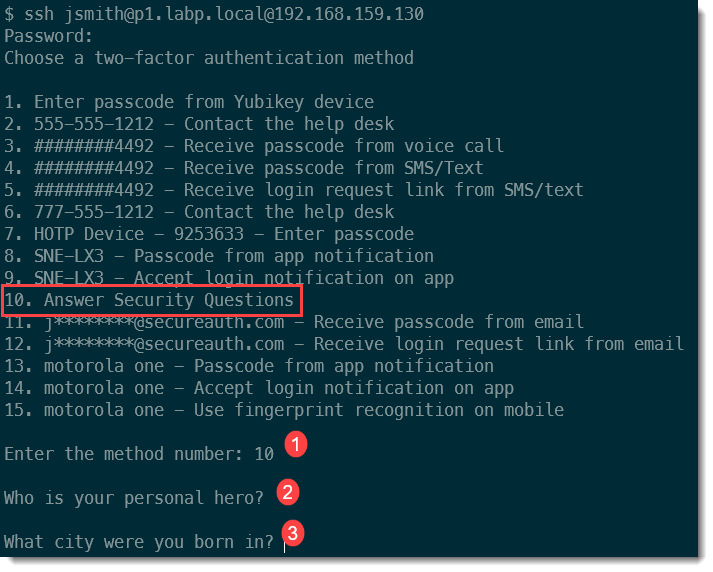
Enter answers to Security Questions
Enter the number to the left of the security questions option in the list.
Answer both questions with your predefined answers. You must answer both questions.