Web proxy server configuration
Use this guide to integrate a web proxy with the SecureAuth® Identity Platform 19.07 or later.
Prerequisites
Ensure an established proxy server is up and running.
Identity Platform configuration
These configuration settings must be completed on each realm that uses the proxy and on the Admin realm (SecureAuth0).
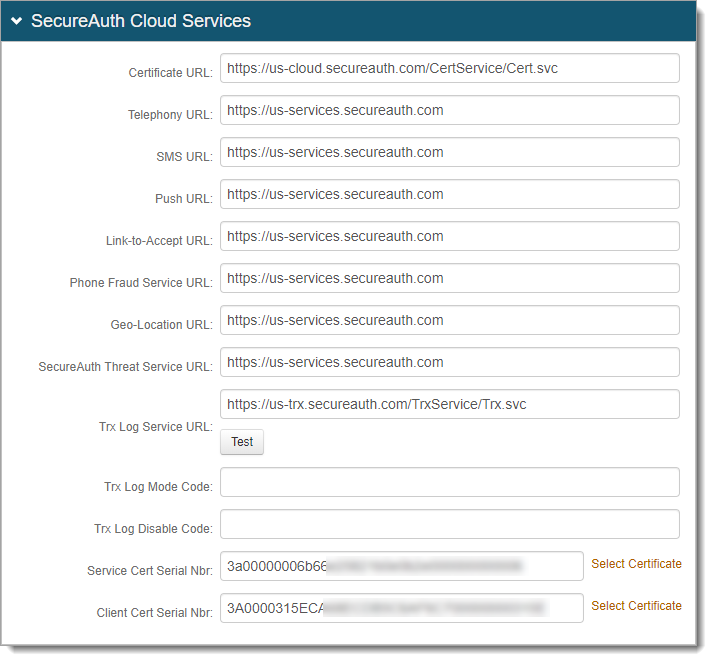
In the Advanced Settings (formerly Classic Experience), go to the System Info tab.
In the SecureAuth Cloud Services section, set the following URLs:
In the Identity Platform versions 19.07 or later, all URLs must have https and and no longer use the /msg suffix.
Certificate URL
https://us-cloud.secureauth.com/CertService/Cert.svc
Telephony URL
https://us-services.secureauth.com
SMS URL
https://us-services.secureauth.com
Push URL
https://us-services.secureauth.com
Link-to-Accept URL
https://us-services.secureauth.com
Phone Fraud Service URL
https://us-services.secureauth.com
Geo-Location URL
https://us-services.secureauth.com
SecureAuth Threat Service URL
https://us-services.secureauth.com
Trx Log Service URL
https://us-trx.secureauth.com/TrxService/Trx.svc
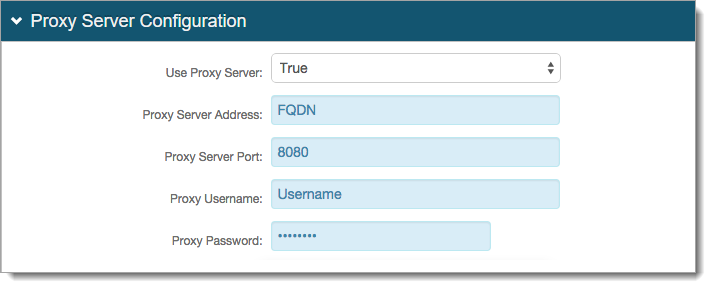
In the Proxy Server Configuration section, set the following:
Use Proxy Server
Set to True.
Proxy Server Address
Set to the IP address of the proxy or FQDN.
Tip
IP addresses are accepted in following formats, with multiple entries separated by a comma:
Specific IP address – for example, 72.32.245.182
CIDR notation – for example, 72.32.245.0/24
IP range – for example, 72.32.245.1-72.32.245.254
Multiple formats can be used on same line. The following example entry is valid:
72.32.245.182,72.32.245.0/24,72.32.245.1-72.32.245.25Proxy Server Port
Set the TCP port to which the web proxy server is configured to respond, for example, 8080.
Proxy Username
If the proxy requires authentication, provide the proxy username.
Proxy Password
If the proxy requires authentication, provide the proxy password.
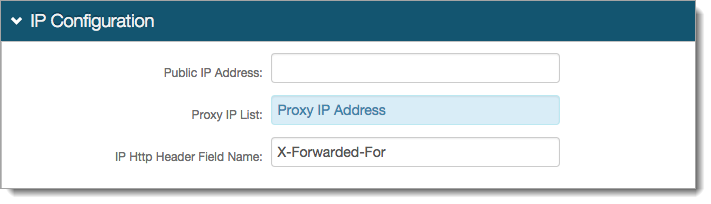
In the IP Configuration section, set the following:
Proxy IP List
List the proxy IP address.
Tip
For the accepted IP address formats, see the description for the Proxy Server Address field in the previous step.
Save your changes.
In the Links section, click the link for the Web Config Editor.

Search for two lines with wse3IP and set them to:
<add key="wse3IP" value="False" />
<add key="wse3IPEvaluation" value="False" />
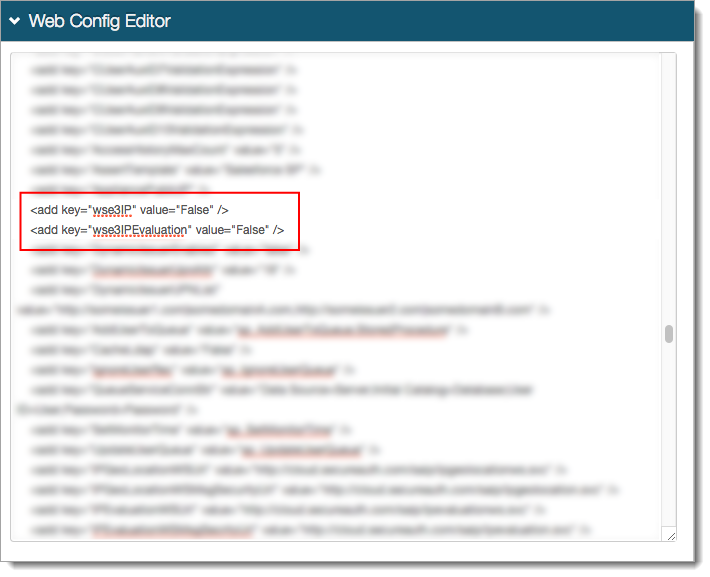
Click Save.