ASP.NET database configuration
In the SecureAuth® Identity Platform, use this guide to configure an ASP.NET database for integration with the SecureAuth® Identity Platform.
Prerequisites
Available in the following product releases, cloud or hybrid deployment:
Identity Platform release 22.12 with hotfix 22.12-2 or later
Identity Platform release 22.02 with hotfix 22.02-8 or later
Have the ASP.NET framework
Make sure Microsoft SQL Server is installed on the server
Authenticate with a user that has Create Database permissions
Create the database
To create the ASP.NET database, follow this procedure:
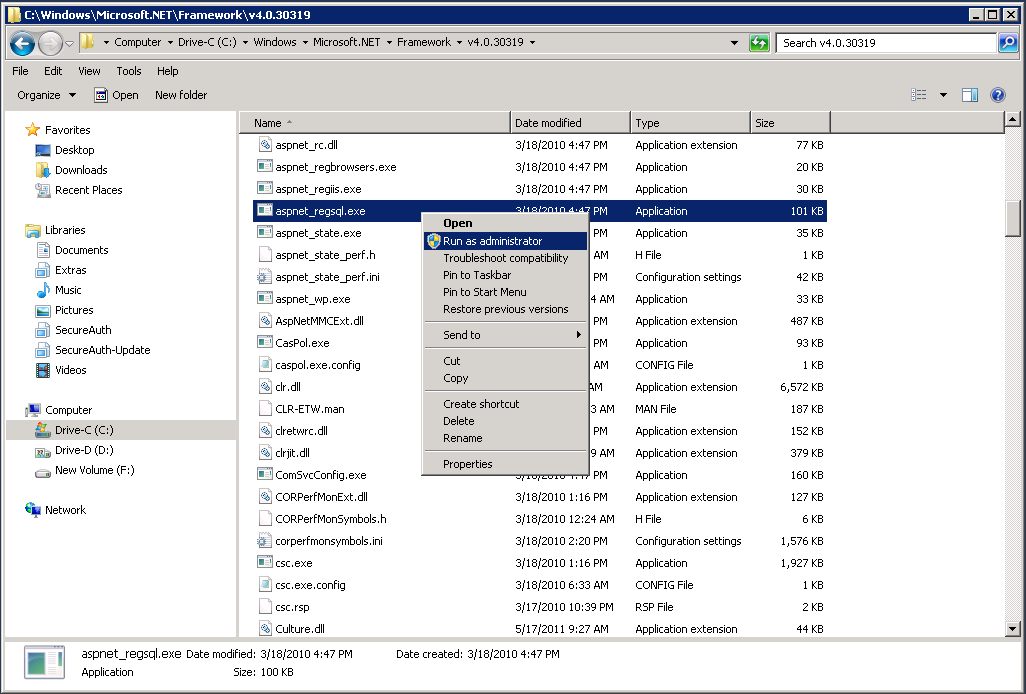
Navigate to the following directory on the server: C:\Windows\Microsoft.NET\Framework\4.0.30319.
Locate aspnet_regsql.exe, right-click, and select Run as administrator.
Click Next
On the Setup Option page, select Configure SQL Server for application services.
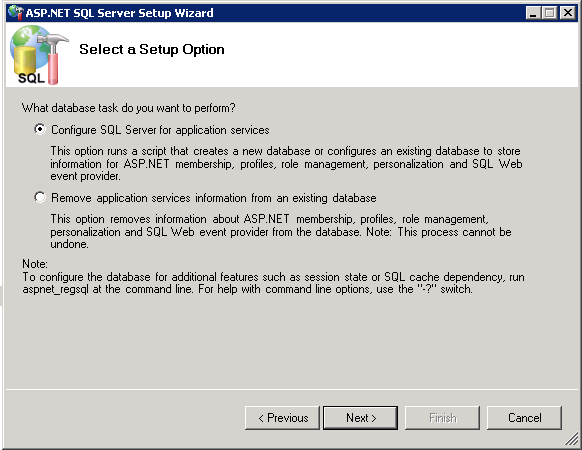
Click Next.
Set the Server to the server address.
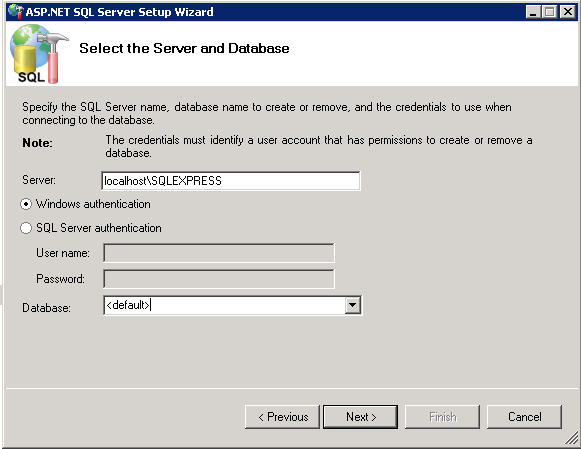
In the Database list, select the database name or <default> (aspnetdb).
Click Next.
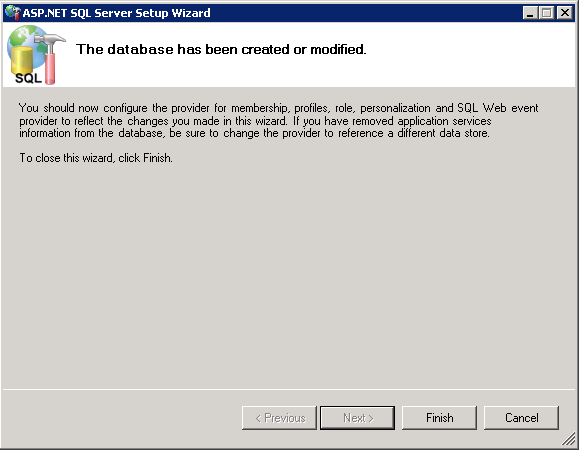
Confirm the database information and click Next.
Click Finish.
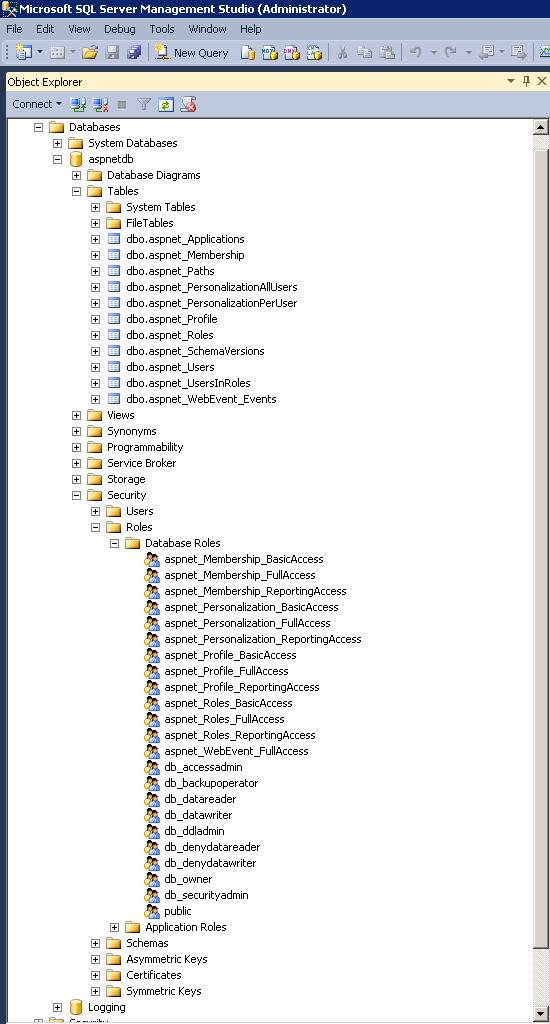
(OPTIONAL) With the new database created, verify that the database, tables, stored procedures, and roles have been created.
To update the ASPNETDB schema, download and run the aspnet_db_UpdateSchema.sql script.
This adds support for Fingerprinting, Push Notifications, Access Histories, and OATH Tokens
In the aspnetdb, expand Programmability > Stored Procecures and right -click dbo.aspnet_Applications_CreateApplication
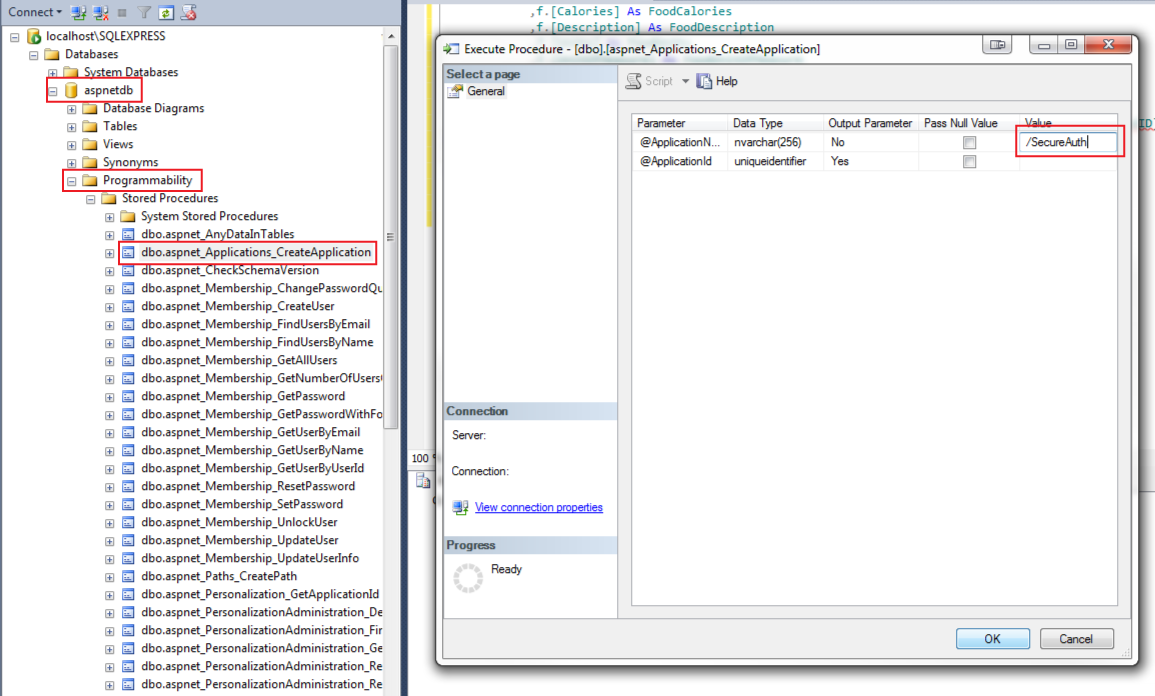
Click Execute Procedure, which opens a new window.
Provide the application name in the Value field.
For example, /SecureAuth
Click OK.
Troubleshooting
Custom connection string error
If manually entering a custom connection string, an error might occur with the connection. This interferes with the SQL Server integration with the Identity Platform.
By default, the values in the Data Source and Initial Catalog fields auto-populate the Connection String.
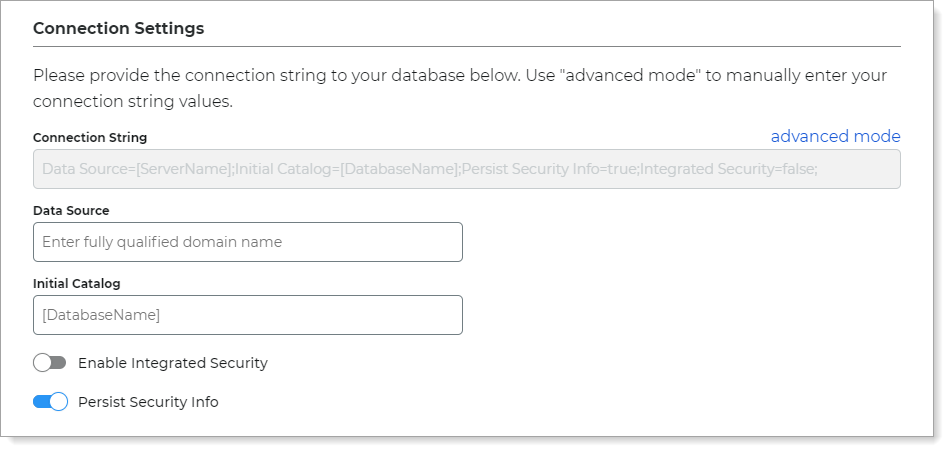 |
However, you can optionally click the advanced mode link to enter a custom Connection String; which is where a problem could occur with a misconfiguration.
 |
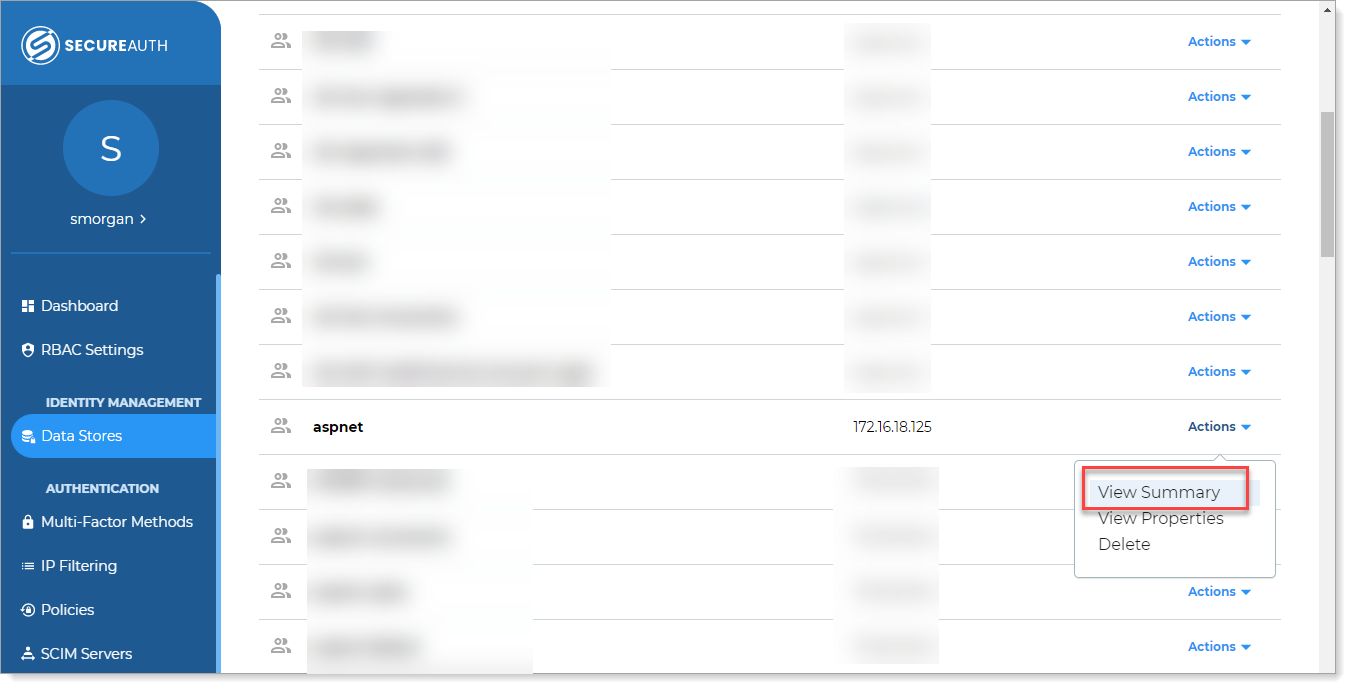
Workaround
In the Identity Platform New Experience, go to the Data Stores section.
In the list, for the affected ASP.NET data store, click Actions > View Summary.
In the Connection Settings section, click the pencil icon to edit the connection string.
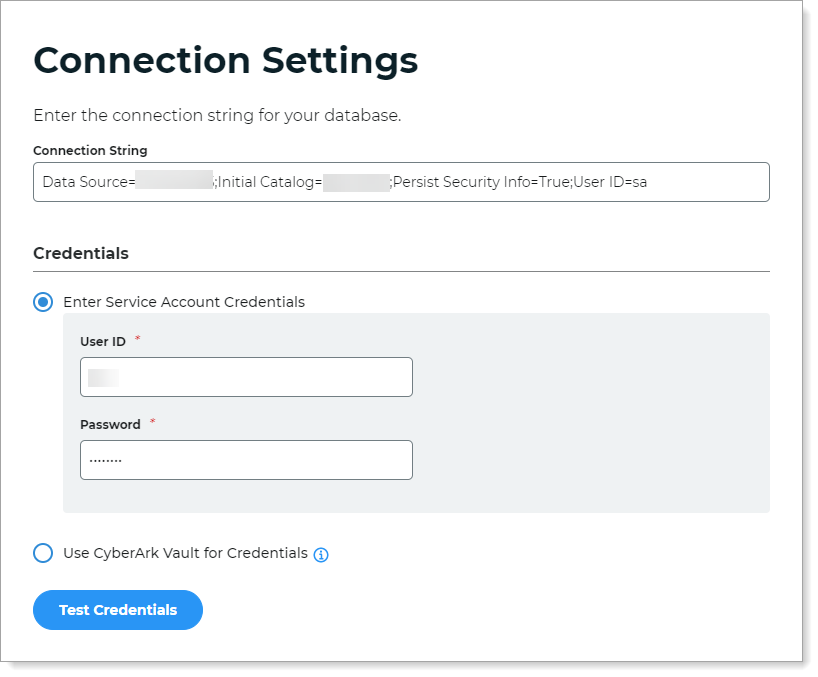
Click Test Credentials to test the connection.
Save your changes.
XML error
If an XML error occurs while attempting to call setpropertyvalues, then you might need to create the ClientMembership table and stored procedure. You might need to assign the aspnet_Profile_FullAccess to the stored procedure.
ClientMembership table and stored procedure
Add the ClientMembership table like the following example.
CREATE TABLE [dbo].[ClientMembership](
        [UserId] [uniqueidentifier] NULL,
        [ClientGuid] [uniqueidentifier] NULL,
        [CreatedOn] [datetime] NOT NULL,
        [CreatedBy] [varchar](50) NULL,
        [UpdatedOn] [datetime] NULL,
        [UpdatedBy] [varchar](50) NULL
) ON [PRIMARY]

GO

SET ANSI_PADDING OFF
GO

ALTER TABLE [dbo].[ClientMembership] ADD  CONSTRAINT [DF_ClientMembership_CreatedOn]  DEFAULT (getdate()) FOR [CreatedOn]
GO

CREATE PROCEDURE [dbo].[getClientMembership]
    @ApplicationName      nvarchar(256),
    @UserName             nvarchar(256)
AS
BEGIN
        DECLARE @ApplicationId uniqueidentifier
    SELECT  @ApplicationId = NULL
    SELECT  @ApplicationId = ApplicationId FROM dbo.aspnet_Applications WHERE LOWER(@ApplicationName) = LoweredApplicationName
    IF (@ApplicationId IS NULL)
        RETURN

        DECLARE @UserId uniqueidentifier
    SELECT  @UserId = NULL

        SELECT @UserId = UserId
    FROM   dbo.aspnet_Users
    WHERE  ApplicationId = @ApplicationId AND LoweredUserName = LOWER(@UserName)

        IF (@UserId IS NULL)
        RETURN

        SELECT Top 1 ClientGuid FROM ClientMembership WHERE @UserID = UserId
END
GO
After adding the table and stored procedure (above), update the profile section in the SecureAuth IdP web.config file to include a ClientGUID property value
Note
To update the web.config file, you will need to contact Support.
Web.config profile section
After you add the above table and stored procedure, update the profile section in the web.config file to include a ClientGUID property value like the following example.
      <properties>
        <add name="FirstName" />
        <add name="LastName" />
        <add name="AuxID1" />
        <add name="AuxID2" />
        <add name="AuxID3" />
        <add name="AuxID4" />
        <add name="AuxID5" />
        <add name="AuxID6" />
        <add name="AuxID7" />
        <add name="AuxID8" />
        <add name="AuxID9" />
        <add name="AuxID10" />
        <add name="Email1" />
        <add name="Email2" />
        <add name="Phone1" />
        <add name="Phone2" />
        <add name="Phone3" />
        <add name="Phone4" />
        <add name="kbq1" />
        <add name="kbq2" />
        <add name="kbq3" />
        <add name="kba1" />
        <add name="kba2" />
        <add name="kba3" />
        <add name="CertCount" />
        <add name="CertResetDate" />
        <add name="GroupList" />
        <add name="pinHash" />
        <add name="MobileResetDate" />
        <add name="MobileCount" />
        <add name="CertSerialNumber" />
        <add name="ExtSyncPwdDate" />
        <add name="HardwareToken" />
        <add name="iOSDevices" />
        <add name="Email3" />
        <add name="Email4" />
        <add name="OATHSeed" />
        <add name="DigitalFP" type="object" />
                <add name="ClientGUID" />
      </properties>