Citrix NetScaler Gateway OWA (SP-initiated) integration guide
This topic covers how to integrate the Citrix Netscaler Gateway in the SecureAuth® Identity Platform and enable single sign-on (SSO) access to Outlook Web Access (OWA).
Prerequisites
Applies to the following product releases:
Identity Platform release 19.07.01-34 or later
Identity Platform release 20.06-12 or later
Identity Platform release 21.04-5 or later
A realm ready for the NetScaler OWA integration
Citrix NetScaler 11.0 with a valid and appropriate license
Citrix NetScaler platform license with AAA feature functionality enabled
Exchange 2013 or 2016 (Note: Exchange 2010 is supported with the right Post Parameters - contact Customer Support.)
SecureAuth Identity Platform configuration steps
Log in to your SecureAuth Identity Platform Admin console.
Workflow tab
Select the Workflow tab.
In the Custom Identity Consumer section, make the following entries:
Token Data Type (Send)
Set to Custom.
Custom Token Fields
Set to Password.
Click the >> button to populate the next field with {Password}.
Append b64 to {Password} so that it matches the following screenshot:
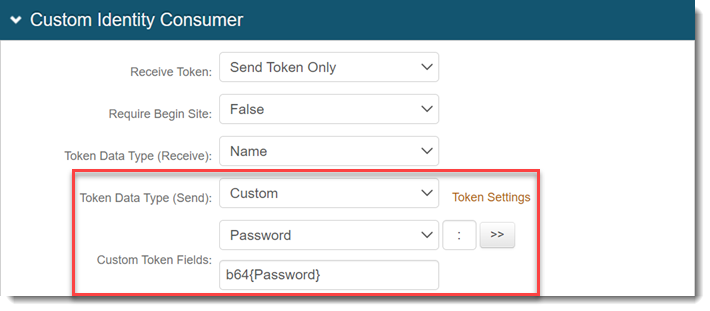
Click Save.
Post Authentication tab
Select the Post Authentication tab.
In the Post Authentication section, make the following entries:
Authenticated User Redirect
Set to SAML 2.0 (SP Initiated by Post) Assertion.
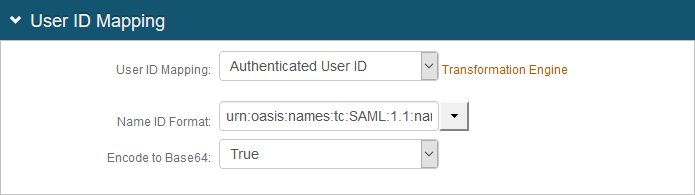
In the User ID Mapping section, make the following entries:
User ID Mapping
Set to Authenticated User ID.
Encode to Base64
Set to True.
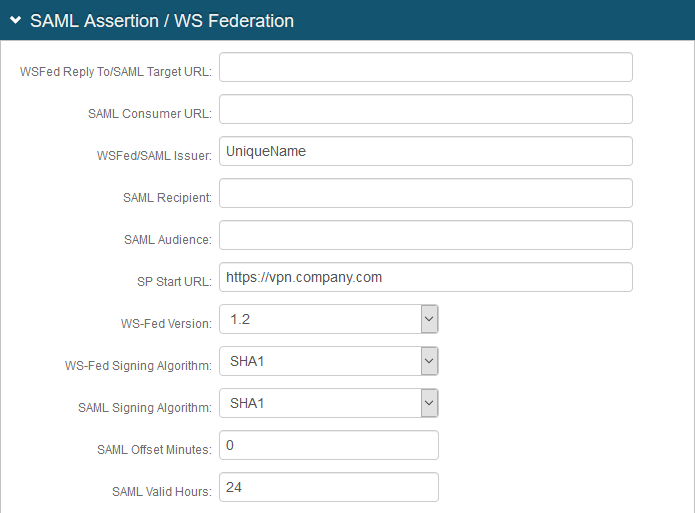
In the SAML Assertion / WS Federation section, make the following entries:
WSFed/SAML Issuer
Set to a unique name that identifies the Identity Platform to the application (as the SAML ID).
This value is shared with the application and can be any word, phrase, or URL, but must match exactly in the Identity Platform and NetScaler configurations.
SP Start URL
Set to the login URL to enable SSO and redirect users appropriately to access NetScaler virtual server (or VIP) for OWA.
For example, https://vpn.company.com
SAML Signing Algorithm
Set to SHA1.
NetScaler defaults to SHA1 for digest method, so the settings must be identical on the Identity Platform.
SAML Offset Minutes
Set to make up for time differences between devices.
SAML Valid Hours
Set to how long the SAML assertion is valid.
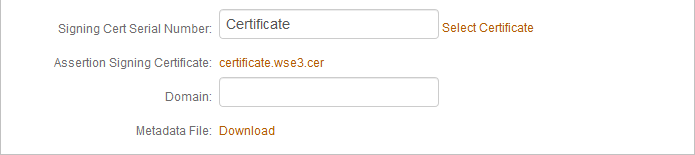
Click Select Certificate and choose the appropriate certificate to be used to sign the SAML assertion. This is also the same certificate that will be uploaded to the NetScaler SAML Authentication Server.
Download the metadata file and store it either in a local PC or on the NetScaler appliance.
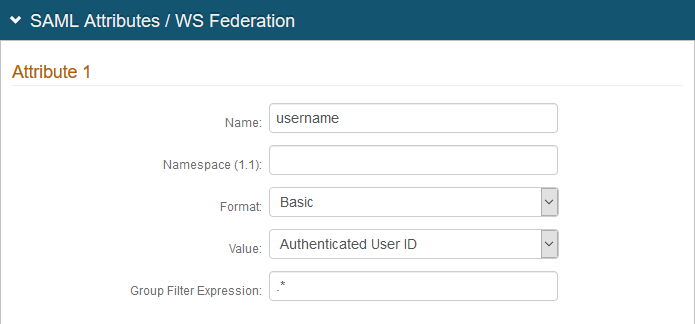
In the SAML Attributes / WS Federation section, make the following entries to Attribute 1:
Name
Set to username.
Value
Set to Authenticated User ID.
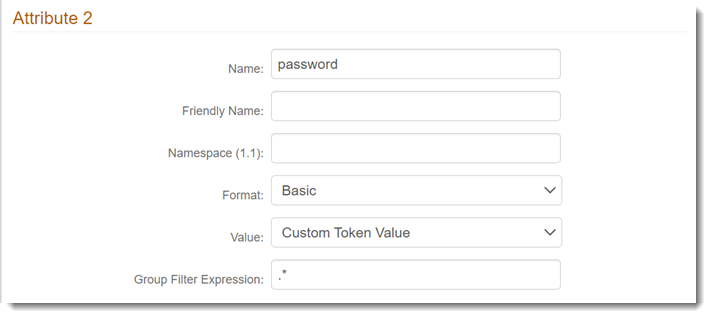
Make the following entries to Attribute 2:
Name
Set to password.
Value
Set to Custom Token Value.
Click Save.
NetScaler AAA configuration for SecureAuth Identity Platform and OWA form-based authentication
This section describes how to configure NetScaler AAA for SecureAuth Identity Platform and OWA form-based authentication. The following steps include these three main components:
Add load balancing virtual server
Add AAA authentication virtual server
Add traffic policy for OWA logout
Prerequisites
SecureAuth Identity Platform configured realm (See SecureAuth Identity Platform configuration steps)
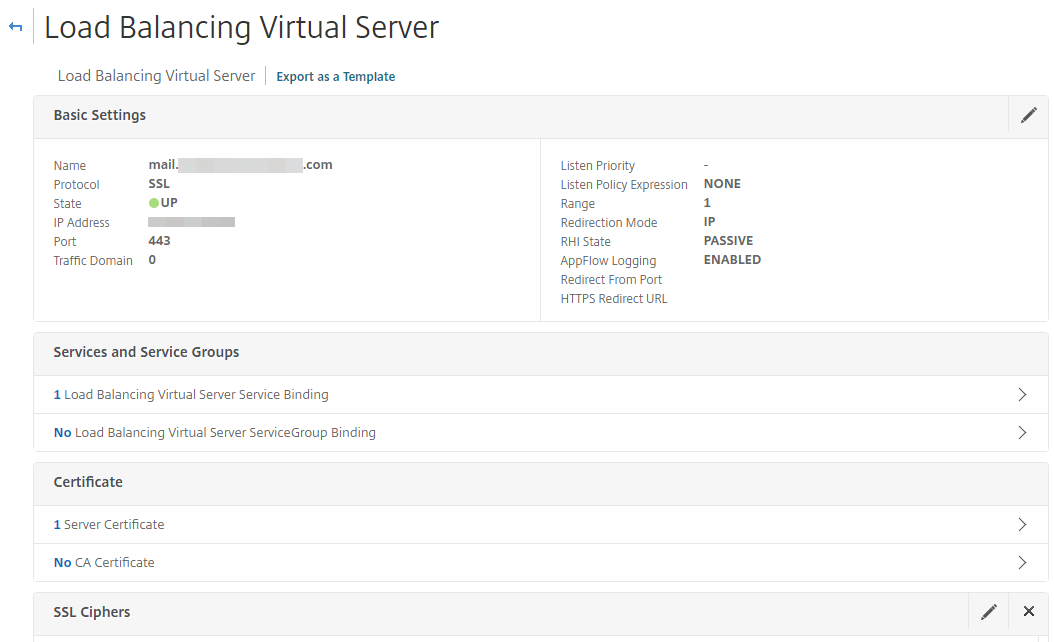
Load balancing virtual server
In NetScaler, create a load balancing virtual server configured with OWA on Exchange server as a service.
AAA authentication virtual server
In NetScaler, create an AAA authentication virtual server which serves as the credential collector and authentication provider for the OWA virtual server.
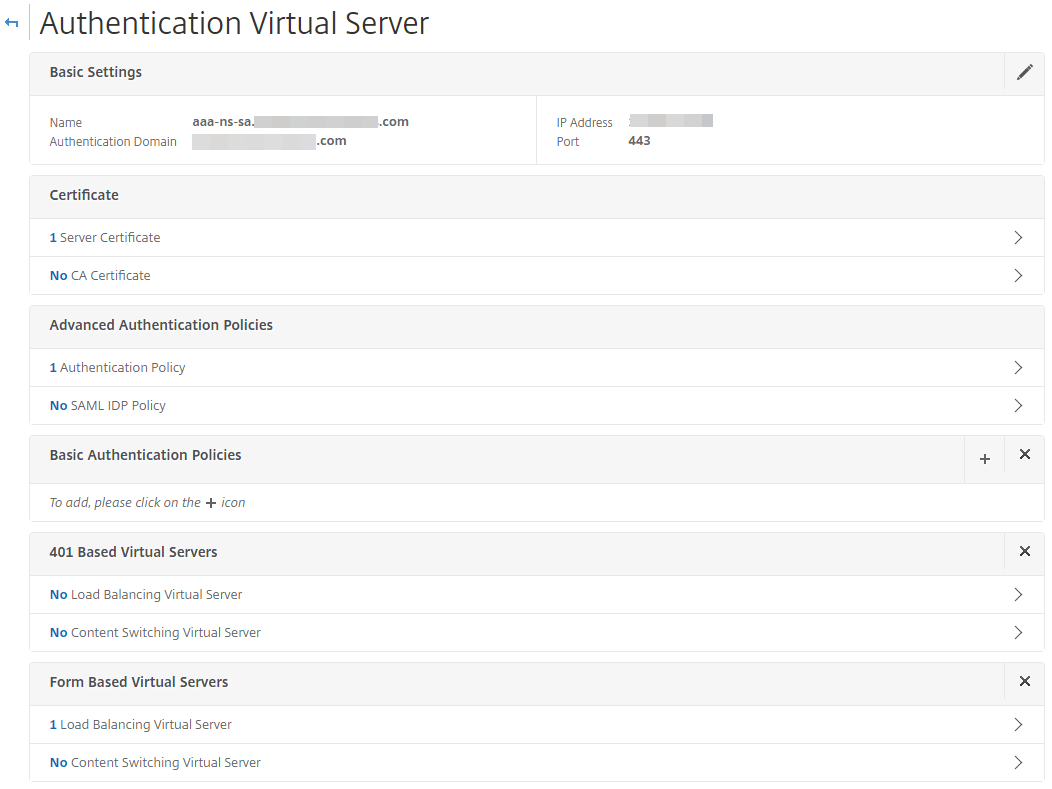
In the Advanced Authentication Policy for the AAA virtual server, add the Identity Platform SAML identity provider.

To use the Identity Platform, make the following entries:
IDP Certificate Name
Set to use the Identity Platform certificate.
Redirect URL
Point to the Identity Platform SAML realm.
User Field
Set to NAMEID.
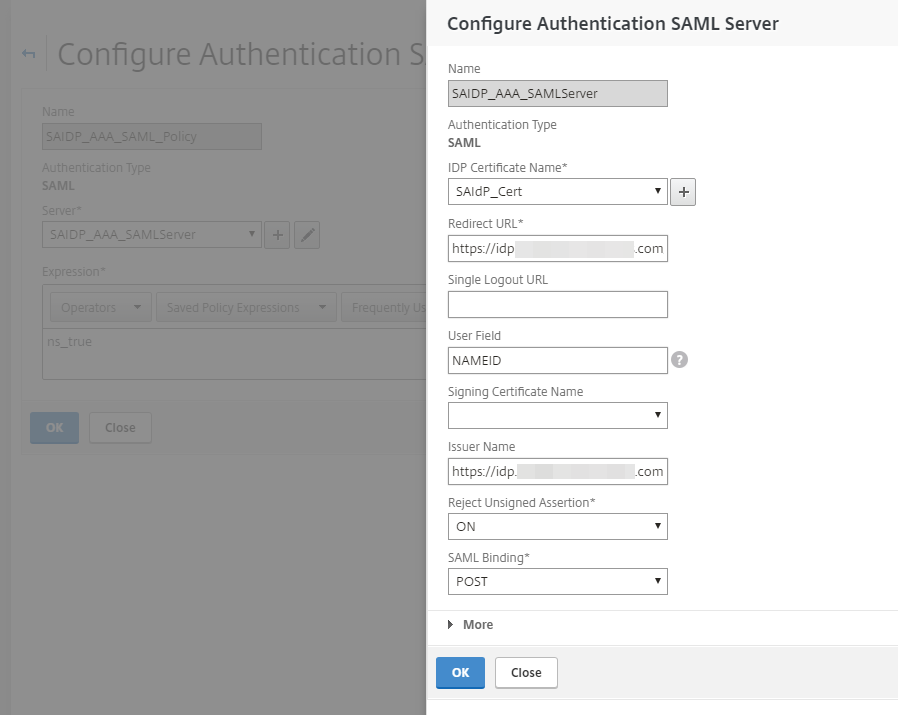
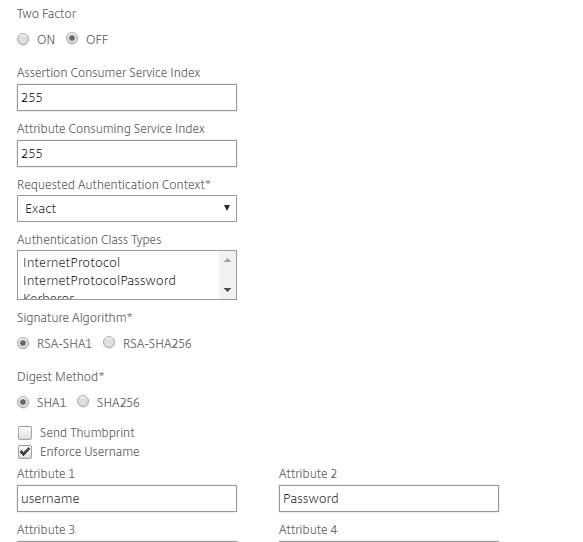
Expand More and continue to make the following entries:
Signature Algorithm
Set to RSA-SHA1.
Digest Method
Set to SHA1.
Notice
The above two configurations are important because the NetScaler digest method defaults to SHA1. Otherwise, the NetScaler SP would not process the SAML assertion generated by the SecureAuth custom Identity Platform.
In the Attributes section, be sure to set the case-sensitive attributes that are also defined in the assertion.
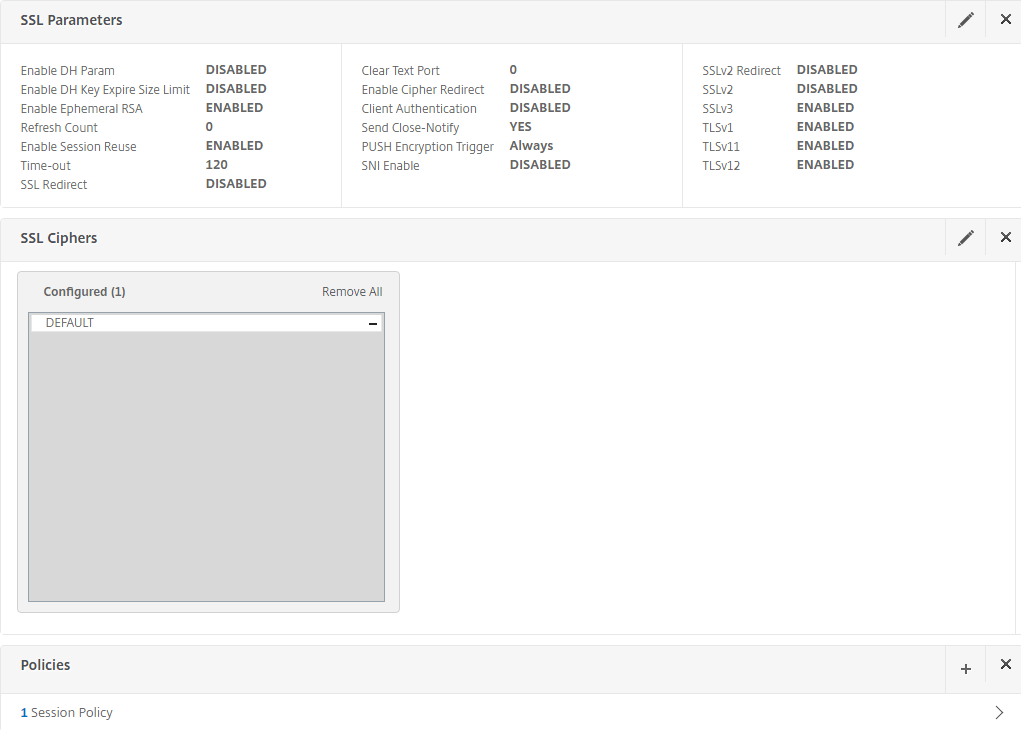
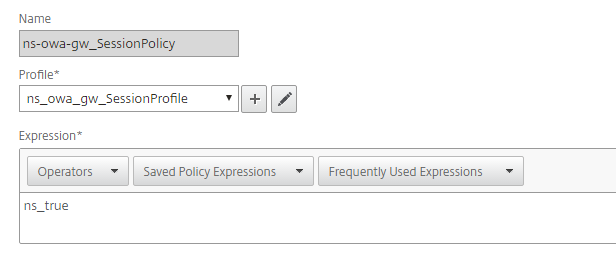
In the Configure Session Policy section, create a Session Profile . Ensure the applicable Override Global check box is selected and make the following entries:
Single Sign-on to Web Applications
Set to ON.
Single Sign-on Domain
Set the domain name.
If you are using a Content Switching VIP, ensure the following configurations are set:
Enable Persistent Cookie
Set to ON.
Persistent Cookie Validity
Set to 30.

Attach the OWA session policy to the AAA virtual server.
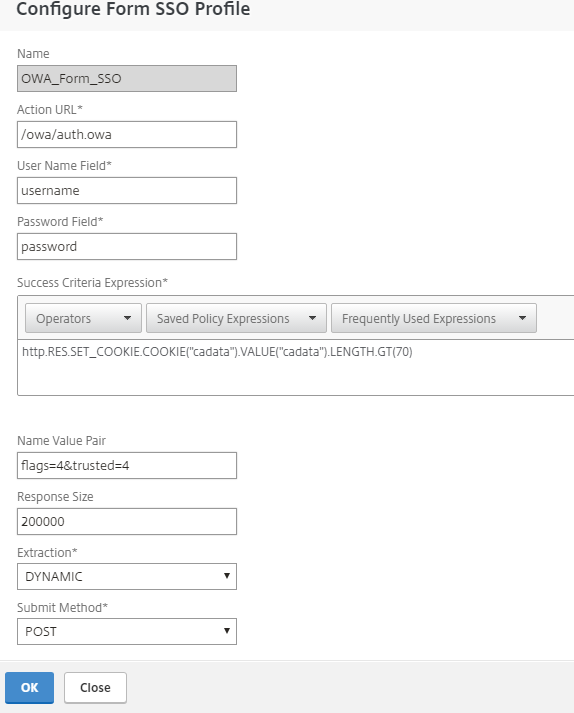
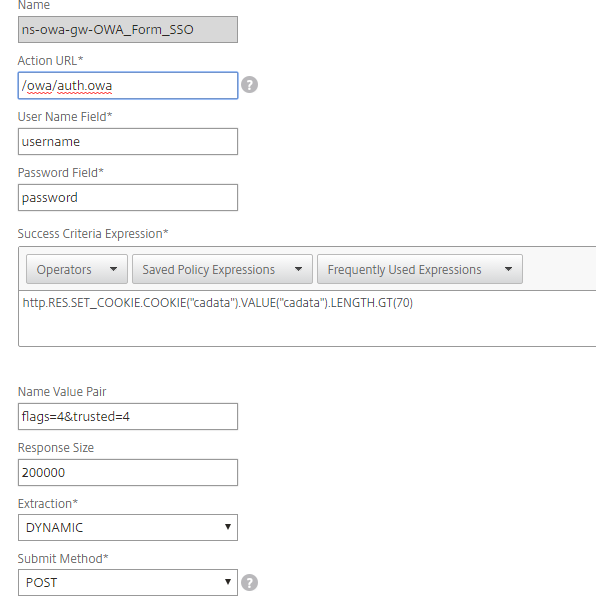
In the Configure Form SSO Profile section, create the required settings for back-end authentication by NetScaler to OWA with the following entries:
Action URL
Set to /owa/auth.owa.
User Name Field
Set to username.
Password Field
Set to password.
Success Criteria Expression
Set to the following:
http.RES.SET_COOKIE.COOKIE("cadata").VALUE("cadata").LENGTH.GT(70)Name Value Pair
Set to the following:
flags=4&trusted=4
Note-- For the Name Value Pair to work correctly, you might have to use the following:
flags=4&trusted=4&destination=https://mail.company.com/owa
Response Size
Set to the response size,
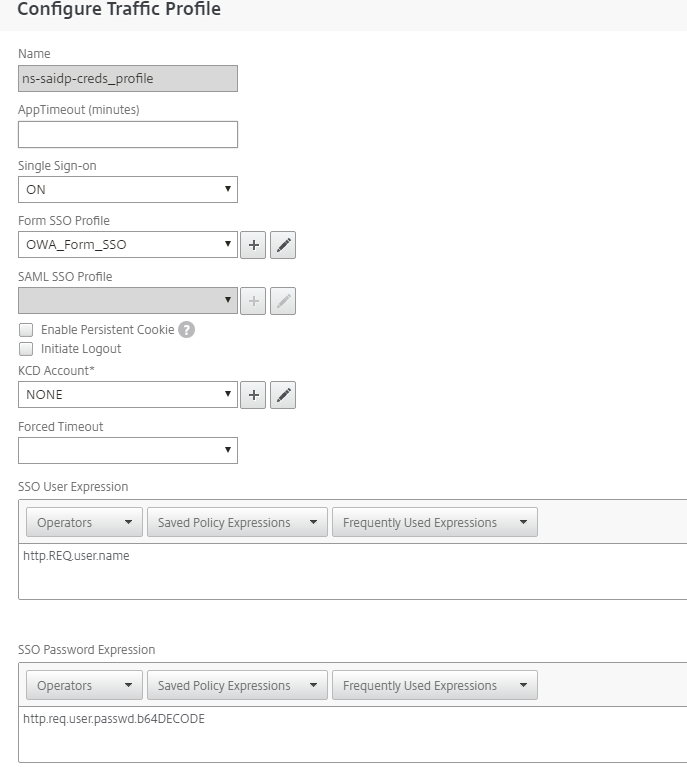
In the Configure Traffic Profile section, make the following entries.
The traffic profile extracts the user name and password from the SAML response and is used for SSO to back-end servers for OWA. This traffic profile will be assigned to the policy in Step 11 and the configured NetScaler virtual server for OWA.
Single Sign-on
Set to ON.
Form SSO Profile
Set to OWA_Form_SSO.
KCD Account
Set to NONE.
Use the command-line to create the SSO user and password expressions required for the traffic profile. (Creating them through the GUI is not available, so, use the command-line.) Run the following command-line parameters:
add tm trafficAction ns-saidp-creds_profile -sso on -userExpression http.REQ.user.name
 -passwdExpression http.req.user.passwd.b64DECODE
For issues with executing the commands, seek help from either a Citrix Admin or contact Citrix Technical Support.
Go back to the Configure Form SSO Profile section and add the Form SSO profile you just created.
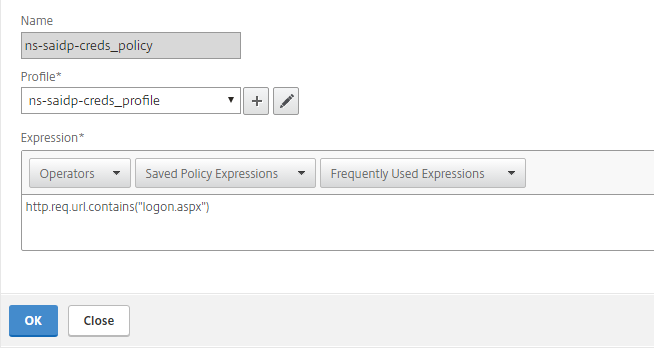
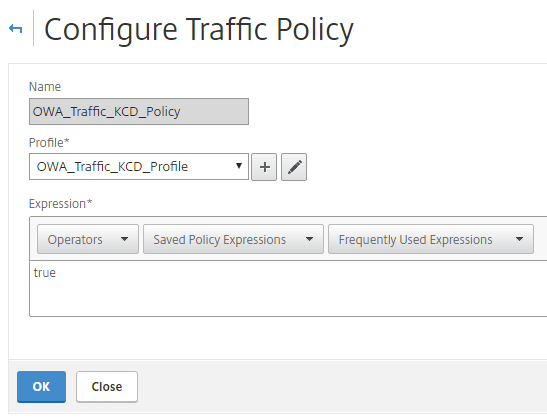
Create a traffic policy and attach the profile you created in Step 9.
Open the NetScaler OWA virtual server and add the AAA Authentication Virtual Server in the Authentication Policy.
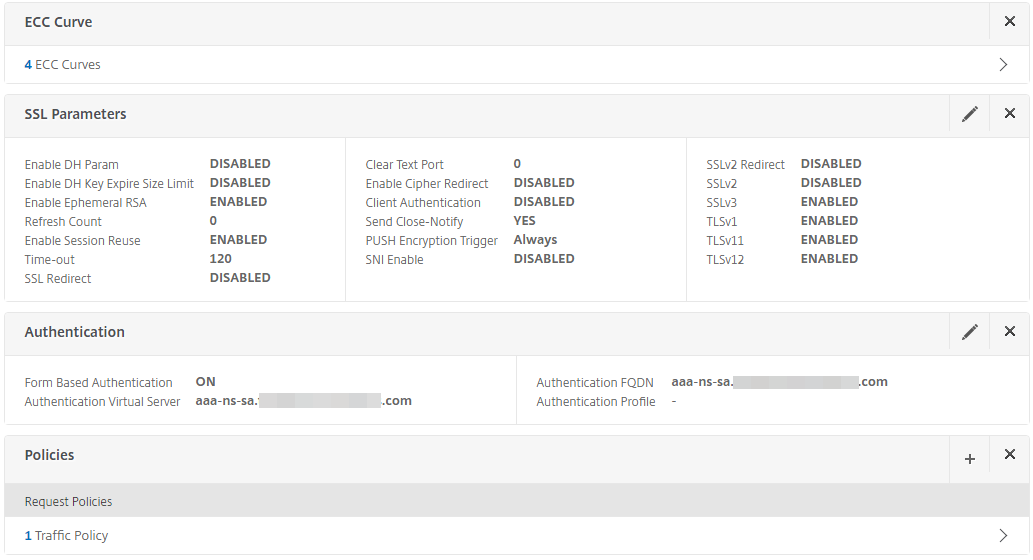
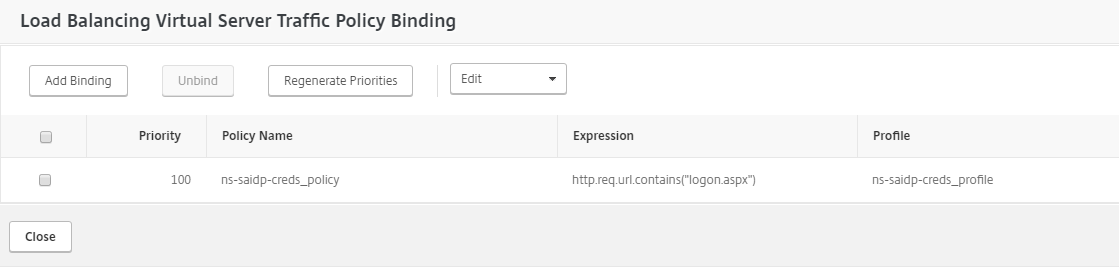
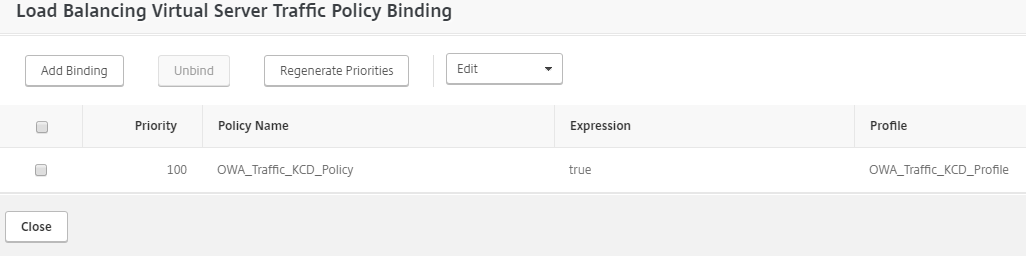
Bind the traffic policy to the NetScaler OWA virtual server and save the settings.
Traffic policy for OWA logout
Create a new traffic policy for OWA logout.
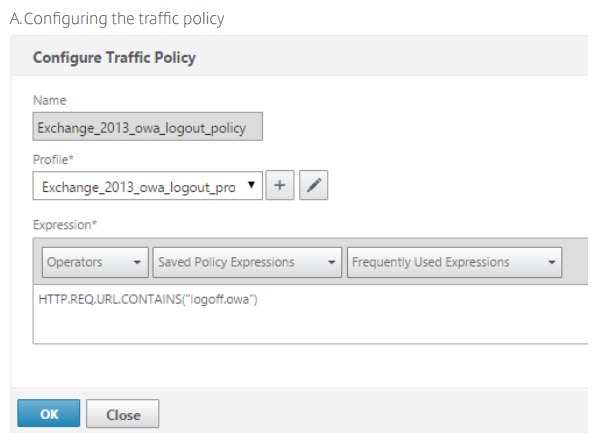
Add the traffic profile and select the Initiate Logout check box.
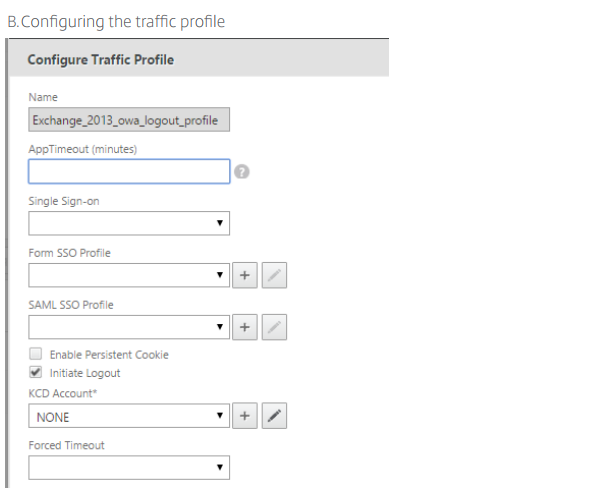
Bind the policy to the OWA virtual server.
NetScaler AAA configuration for SecureAuth Identity Platform and OWA Integrated Windows Authentication
This section describes how to configure NetScaler AAA for SecureAuth Identity Platform SAML and OWA Integrated Windows Authentication and includes two main components:
Active Directory configuration
Kerberos configuration
Prerequisites
SecureAuth Identity Platform configured realm (See SecureAuth Identity Platform configuration steps)
NetScaler Traffic virtual server created in the previous section
NetScaler AAA server created in the previous section
Active Directory configuration
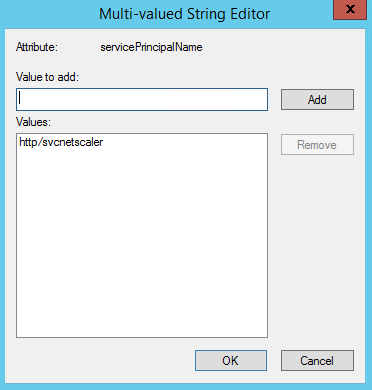
Create a service account with the following entries:
Attribute
Use the servicePrincipalName attribute.
Values
Set as http/account_name.
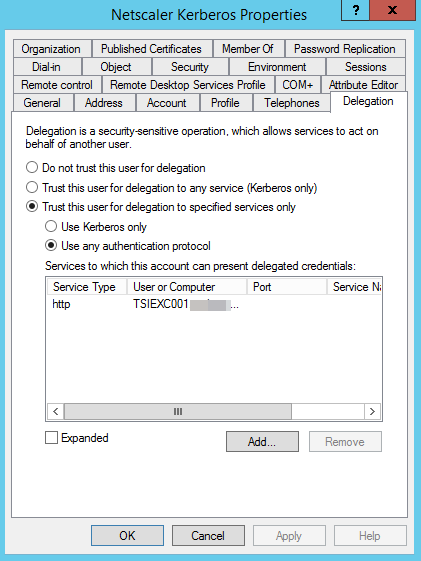
Select the Delegation tab.
Select the Exchange server with http service. If there is more than one server, select each applicable server.
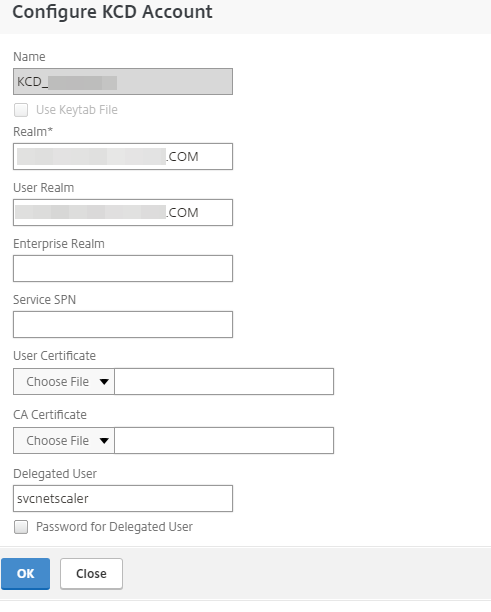
Kerberos configuration
In NetScaler, configure a KCD account and enter the realm name in upper case.
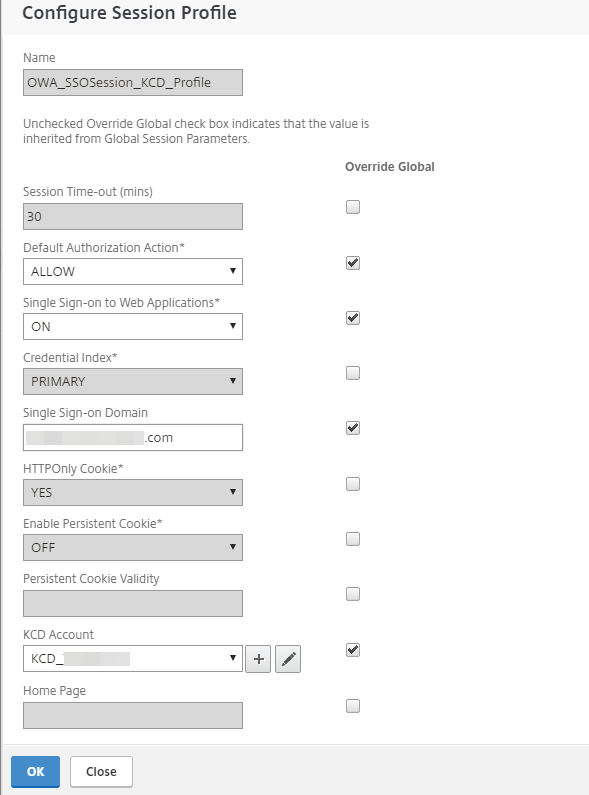
Configure a session profile with the following entries and ensure the applicable Override Global check box is selected:
Default Authorization Action
Set to ALLOW.
Single Sign-on to Web Applications
Set to ON.
Single Sign-on Domain
Type the Single Sign-on Domain name.
KCD Account
Select the applicable KCD Account.
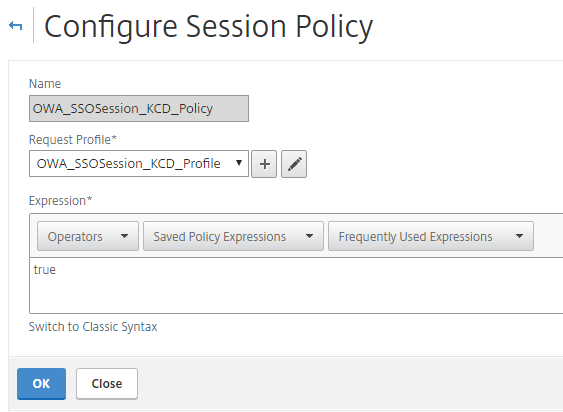
Configure a Session Policy with the profile you just created. Set the Request Profile to the profile that you just created in Step 2.
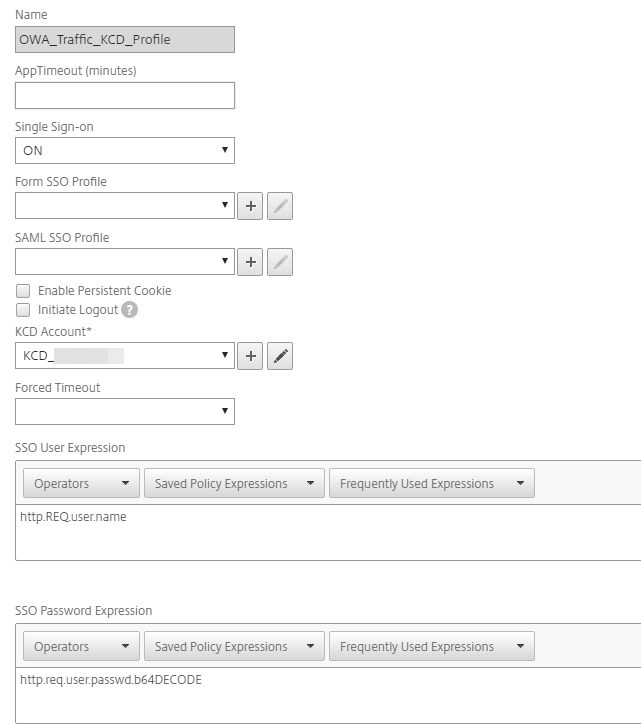
In the Configure Traffic Profile section, make the following entries:
The traffic profile extracts the user name and password from the SAML response and is used for SSO to back-end servers for OWA. This traffic profile will be assigned to the policy in Step 6 and the configured NetScaler virtual server for OWA.
Single Sign-on
Set to ON.
KCD Account
Select the applicable KCD Account.
Use the command-line to create the SSO user and password expressions required for the traffic profile. (Creating them through the GUI is not available, so use the command-line.) Run the following command-line parameters:
set tm trafficAction OWA_Traffic_KCD_Profile -sso on -userExpression http.REQ.user.name
 -passwdExpression http.req.user.passwd.b64DECODE
For issues with executing the commands, seek help from either a Citrix Admin or contact Citrix Technical Support.
In the Configure Traffic Policy section, make the following entry:
Profile
Set to the profile you just created in Step 4
In the Session Policy section, add the session policy you created in Steps 2-3 to the AAA server that will be used for OWA authentication.

Modify the Authentication policy of the NetScaler OWA virtual server.

Bind the traffic policy to the NetScaler virtual server.
NetScaler Gateway configuration for SecureAuth Identity Platform and OWA forms-based authentication
This section describes how to configure NetScaler Gateway for SecureAuth Identity Platform SAML and OWA on Exchange Server 2013 or 2016 form-based authentication.
Prerequisites
SecureAuth Identity Platform realm SAML settings (See SecureAuth Identity Platform configuration steps)
VPN virtual server configuration
Create a NetScaler Gateway VPN virtual server with a new IP address.
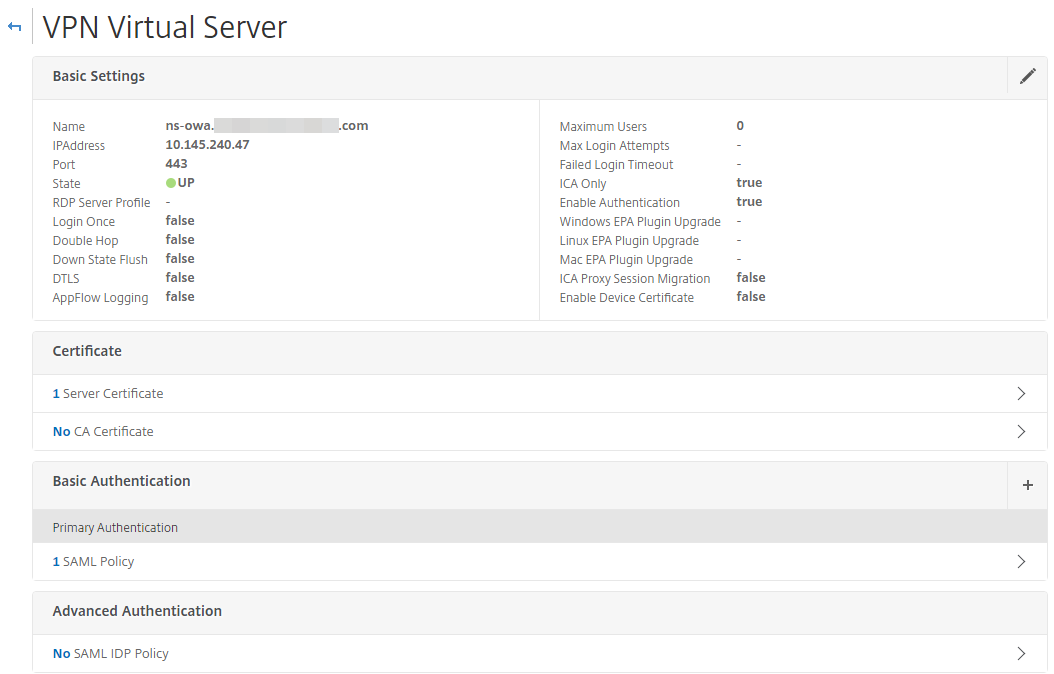
Add the server certificate for SSL.
In the Basic Authentication section, specify the SAML server that was configured with the Identity Platform.

Save the configuration settings.
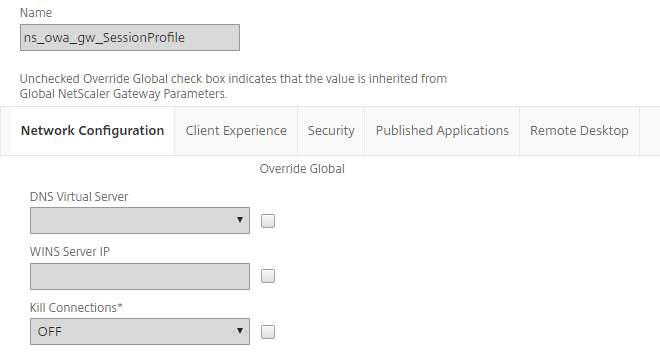
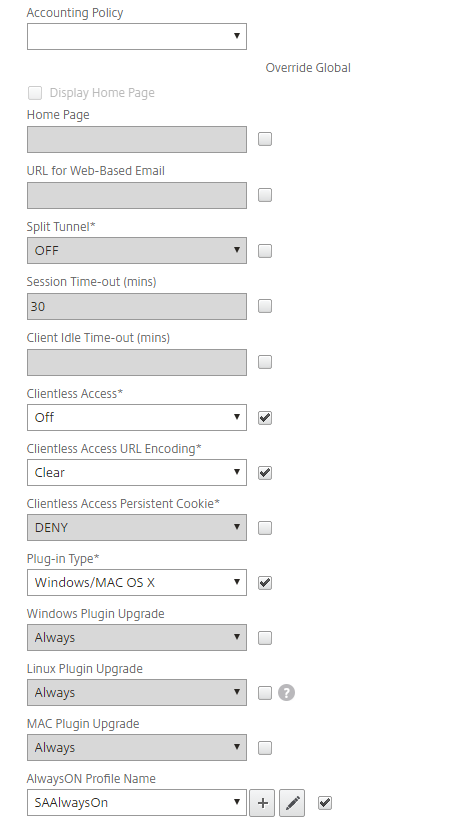
In the NetScaler Gateway, from the Policies section, create a new Session Profile and on the Network Configuration tab, make the following entries and ensure the applicable Override Global check box is selected.
This session profile will be added to the NetScaler Gateway VPN virtual server created in Step 1.
Clientless Access
Set to Off.
Clientless Access URL Encoding
Set to Clear.
Plug-in Type
Set to Windows/MAC OS X.
AlwaysON Profile Name
Set to SAAlwaysOn.
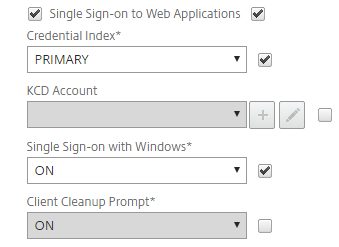
Scroll down and continue to make these entries and ensure the applicable Override Global check box is selected:
Single Sign-on to Web Applications
Select the check box.
Credential Index
Set to PRIMARY.
Single Sign-on with Windows
Set to ON.
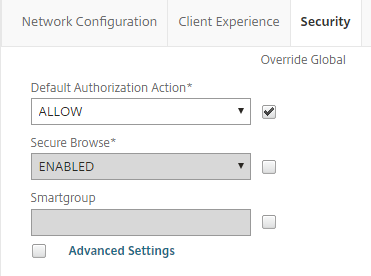
On the Security tab, ensure the Override Global check box is selected and make the following entry:
Default Authorization Action
Set to ALLOW .
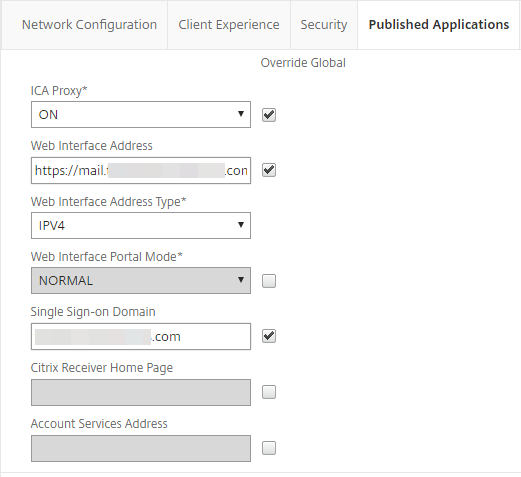
On the Published Applications tab, make the following entry:
Web Interface Address
Set the URL to your OWA which is a load balanced traffic VIP on the NetScaler.
For example, https://mail.company.com/owa
Create a Session Policy and add the profile created in Step 5.
Go to Policies > Configure Traffic Profile and make the following entries to create a Form SSO Profile--
Action URL
Set to /owa/auth.owa.
User Name Field
Set to username.
Password field
Set to password.
Success Criteria Expression
Set to the following:
http.RES.SET_COOKIE.COOKIE("cadata").VALUE("cadata").LENGTH.GT(70)Name Value Pair
Set to the following:
flags=4&trusted=4
Response Size
Set the response size.
Note-- The response size may vary, and typically for OWA, a value of 15000 should work.
Extraction
Set to DYNAMIC.
Submit Method
Set to POST.
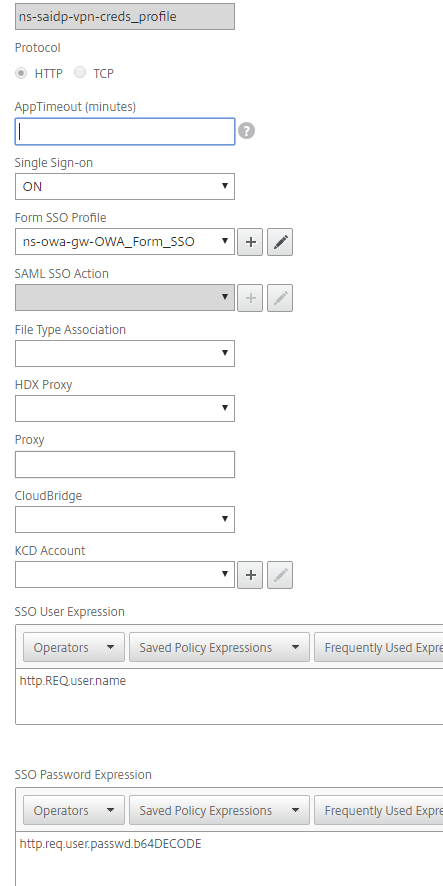
In the Configure Traffic Profile section, make the following entries.
The traffic profile extracts the user name and password from the SAML response and is used for SSO to back-end servers for OWA. This traffic profile will be assigned to the policy in Step 14 and the configured NetScaler OWA virtual server.
Protocol
Set to HTTP.
Single Sign-on
Set to ON.
Form SSO Profile
Set to ns-owa-gw-OWA_Form_SSO.
KCD Account
Set to NONE.
Use the command-line to create the SSO user and password expressions required for the traffic profile. (Creating them through the GUI is not available, so use the command-line.) Run the following command-line parameters:
add vpn trafficAction ns-saidp-vpn-creds_profile HTTP -SSO ON -formsSOAction ns-owa-gw-OWA_Form_SSO
 -userExpression http.REQ.user.name -passwdExpression http.req.user.passwd.b64DECODE
For issues with executing the commands, seek help from either a Citrix Admin or contact Citrix Technical Support.
Go back to the Configure Form SSO Profile section and add the Form SSO profile you just created.
Create a traffic policy and attach the profile you created in Step 11.
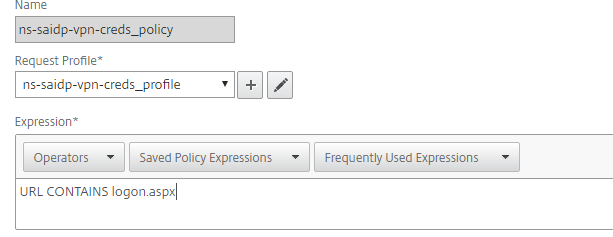
Add the session and traffic policies created in the previous steps to the NetScaler Gateway VIP or virtual server.
OWA on Exchange 2010 authentication
The previous steps work for authentication to OWA on Exchange Server 2013 or 2016. For OWA on Exchange Server 2010, you will need a rewrite policy in addition to Session and Traffic policies to address the authentication cookie (PBACK) mechanism.
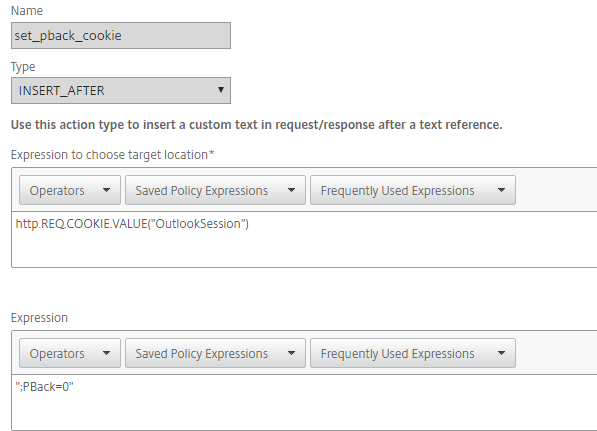
Go to AppExpert > Rewrite > Actions and make the following entries:
Rewrite Action
Create the rewrite action.
Expression to choose target location
Enter the following:
http.REQ.COOKIE.VALUE("OutlookSession")Expression
Enter the following:
";PBack=0"
Create a rewrite policy and ensure the Action points to the one created in Step 1.
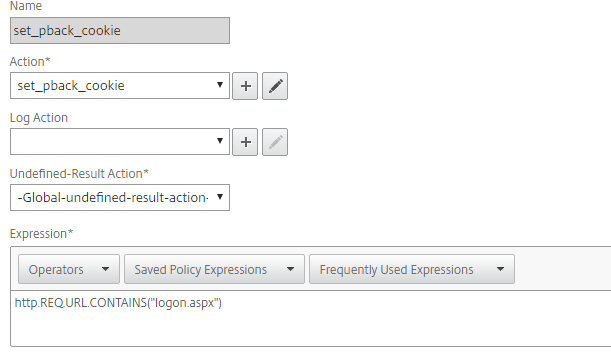
Bind the rewrite policy to the NetScaler Gateway virtual server along with the traffic and session policies.
OWA on Exchange 2010 for iPhone and iPad device authentication
For OWA on Exchange Server 2010, you will need to add two new rewrite policies and replace the policy and profile used in Steps 1 and 2 of the previous OWA on Exchange 2010 authentication section.
To add two new rewrite policies, replace the policies and profiles, do the following:
Create a rewrite policy for the session cookie
Make the following entry:
add rewrite policy EXCH2010_OWA_TEST "http.REQ.URL.CONTAINS(\"logon.aspx\") &&
 http.REQ.COOKIE.CONTAINS(\"OutlookSession\")" TEST_REWRITE_idevice
Create the rewrite action for the session cookie
Make the following entry:
add rewrite action TEST_REWRITE_idevice insert_before "http.REQ.HEADER
(\"Cookie\").VALUE(0)" "\"PBack=0;\""
Create a rewrite policy to detect device and browser
Make the following entry:
add rewrite policy set_pback_cookie_idevice "http.req.url.contains(\"logon.aspx\").AND
(http.REQ.HEADER(\"User-Agent\").CONTAINS(\"iPad\") || http.REQ.HEADER(\"User-Agent\")
.CONTAINS(\"Safari\"))" set_pback_idevice
Create the rewrite action for device and browser detection
Make the following entry:
add rewrite action set_pback_idevice insert_http_header Cookie "\"OutlookSession=;PBack=0\""
Bind the policies to the NetScaler Gateway virtual server.