Authentication API guide
Updated October 5, 2020
The SecureAuth Authentication API embeds the SecureAuth Identity Platform functionality into a custom application, enabling flexible workflow configurations and user interfaces.
Using a RESTful API encrypted over Secure Sockets Layer (SSL), SecureAuth Identity Platform can:
validate
user IDs
passwords
PINs
soft tokens
knowledge-based answers
Push-to-Accept responses; note the following:
Symbol-to-Accept or Push-to-Accept and biometric and are available in SecureAuth® Identity Platform release 19.07 or later.
Depending on how the administrator configures Identity Platform, either Push-to-Accept or Symbol-to-Accept is available. For example, an organization can have Push-to-Accept and biometric or Symbol-to-Accept and biometric, depending on the Identity Platform configuration.
Teams must download the Authenticate app on their mobile device because Push-to-Accept and Symbol-to-Accept are initiated through the Authenticate app.
Link-to-Accept links; note the following:
Link-to-Accept is available in the Identity Platform 19.07, but requires installing hotfix release 19.07.01-25+ to use the phone and email link capabilities.
Link-to-Accept is available in the Identity Platform 20.06, but requires installing hotfix release 20.06-2+ to use the phone and email link capabilities.
Teams can use email to respond to an email link or a phone to respond to a phone link.
generate One-time Passwords (OTPs) delivered by
phone call
SMS message
email message
help desk
Push / Push-to-Accept notification
analyze a user's access attempt through the SecureAuth
Device / Browser Fingerprinting
Adaptive Authentication
Behavioral Biometric profile
evaluate IP address risk through threat intelligence data
prevent end users from logging on a realm
Each SecureAuth Identity Platform realm can host its own uniquely configured Authentication API, so admins can enable various workflows and registration methods.
By integrating an application with the SecureAuth Authentication API, enabling Multi-Factor Authentication mechanisms, and configuring Adaptive Authentication, admins can securely direct users through unique logins and interfaces without leaving the application.
Note
Information about using Identity Management API tools is in the Identity Management API guide.
Information about configuring the Login for Windows API endpoint are in the following topics:
Identity Platform 21.04 or later (New Experience): Configure Identity Platform and Login for Endpoints
SecureAuth IdP 9.2 or later (Classic Experience / Advanced Settings): Login for Windows configuration guide
The SecureAuth public GitHub link is https://github.com/SecureAuthCorp/. Use the link to access sample API SDK files for your applications.
Prerequisites
SecureAuth IdP 9.1 or later
Symbol-to-Accept or Push-to-Accept and biometric are available in SecureAuth® Identity Platform release 19.07 or later; end users must download the Authenticate app on their mobile device
Link-to-Accept is available in SecureAuth® Identity Platform release 19.07.01-25 or later. See the Multi-Factor Authentication API guide and the Profile Validation API guide for more information.
Link-to-Accept is available in SecureAuth® Identity Platform release 20.06-2 or later+. See the Multi-Factor Authentication API guide and the Profile Validation API guide for more information.
Access to the application code
On-premises directory that SecureAuth Identity Platform can integrate with
New realm or access to existing realm on SecureAuth IdP 9.1 or later where the Authentication API will be enabled
The API can be included in any realm with any post-authentication event as long as the appropriate directory is integrated and the necessary features are configured, based on the endpoints being used.
If you will use the FIDO2 WebAuthn API endpoints to enroll and authenticate end users to use your login page instead of the SecureAuth Registration and Management page, you must complete the following:
Run SecureAuth Identity Platform release 20.06 or later
Enable the API realm in the SecureAuth Identity Platform New Experience that uses a policy with FIDO2 enabled. See FIDO2 WebAuthn global MFA settings.
Configure the Data Tab in the SecureAuth Identity Platform Web Admin.
A directory integration is required for SecureAuth Identity Platform to pull user profile information during the login process.
Note
The Behavioral Biometrics feature only supports LDAP directory integrations, while other Authentication API features support most directory type integrations.
Ensure the Multi-Factor Methods Profile Properties (e.g., Phone 1, Email 1, etc.) are accurately mapped to directory attributes to enable multi-factor authentication workflows.
If you use a load balancer:
When you use the Push-to-Accept, Symbol-to-Accept, or Link-to-Accept MFA method, you must enable session persistence ("sticky sessions") on the load balancer to maintain state with the Identity Platform. The client applications (Login for Endpoints, RADIUS Server) support cookie-based persistence only. Additionally, only the SecureAuth Java SDK supports cookies.
Configure Identity Platform Web Admin
The following steps describe how to configure the Identity Platform to enable API functionality and to create a request header for authentication against an API. Only API steps are required; all other Web Admin steps are optional and should be performed based on the features you want to implement.
In the API tab, go to the API Key section.
Select the Enable API for this realm check box.
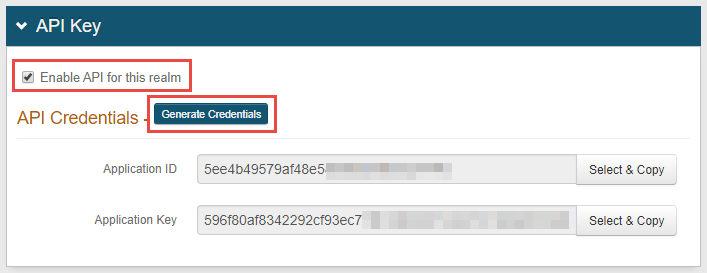
Click Generate Credentials to create a new Application ID and Application Key.
The Application ID and Application Key are unique for each realm.
The API key looks like it comprises 64 random characters, but it actually comprises 32 two-character base-16 hexadecimal values.
This is important to note when using the API key to produce the HMAC hash.
Click Select & Copy to copy the credential contents.
These values are required in the Header configuration steps below.
In the API Permissions section, check Enable Authentication API.
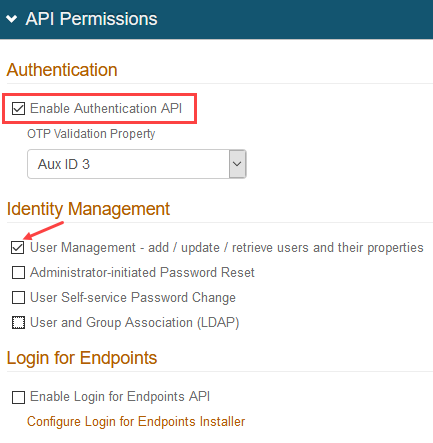
If your team is using SecureAuth RADIUS 2.4.15 or later, you must check User Management. This setting enables the SecureAuth Identity Platform API to connect to User properties.
Use the OTP Validation Property dropdown in the following ways:
Set this to use the /otp/validate POST endpoint to validate generated one-time passcodes (OTPs). See the Validate OTP Authentication API guide.
Customers running Login for Endpoints v19.09+ can set this to validate OTPs from email, phone calls, SMS, Helpdesk, and Notification Passcode. See the SecureAuth Apps topics, select the Login for Windows or Login for Mac document version 19.09 or later, and search the document for "OTP Validation Property."
Save the configuration.
Configure request header
Authentication against an API requires an HTTP basic authorization header and Content-Type header.
Add a Content-Type header with a value of application/json.
Create an authorization header for GET and POST requests by following the steps below.
Optionally, you can complete one or both of the following two customizations:
Optional: Add request ID to header for transactional logging
Modify the request header to include a request ID, X-Request-ID, to identify API calls with the same request ID. (This option is available in the Identity Platform release 20.06 and later.)
Optional: Configure X-SA-Ext-Date header
Configure the string section for DATE/TIME to use the millisecond-precision format DateTime.
Authorization request header
Set up the authorization header for GET and POST endpoints.
Step A: Build a string based on the request:
METHOD (GET) or METHOD (POST)
DATE/TIME
Header types
SecureAuth IdP version
String requirements
Date
9.1 or later
second-precision timestamp
X-SA-Date (custom)
9.1 or later
second-precision timestamp
X-SA-Ext-Date (custom)
9.2 or later
millisecond-precision timestamp
Note
If you are running the Identity Platform release 20.06 and later, use the examples for SecureAuth IdP 9.2 or later, which use API version 2.
APPLICATION ID (from the Identity Platform Web Admin – API Key section).
PATH (API endpoint). Examples:
/secureauth2/api/v3/users/{userID}SecureAuth IdP 9.2 or later –
/secureauth2/api/v2/users/{userID}
Step B: Create an HMAC SHA256 hash of step 3 using the Application Key (from the Identity Platform Web Admin – API Key section).
This step is executed by calling the HMAC and producing the hash value.
Step C: Encode the HMAC SHA256 hash from step 3 in Base64.
Step D: Concatenate the "Application ID", ":", and the "Base64 encoded HMAC SHA256 hash" from step 3:
ApplicationID:Base64EncodedHMACSHA256Hash
Step E. Encode the value from step 4 in Base64.
Step F. Concatenate "Basic" and the "Value of Step 5":
Basic Step5Value
Authorization header GET / POST request examples
Authorization header non-validation response examples
Optional: If using the Email two-factor authentication method and a language different than US English, create an Accept-Language header to generate the Email OTP messages in the preferred language.
If no Accept-Language header is present, the Email OTP messages default to US English.
Configure response header
SecureAuth's API includes a security hashing enhancement that ensures the integrity of the information being sent in all of the endpoints' responses from the appliance to the application.
Through a hashing algorithm, SecureAuth Identity Platform delivers a signature that can be validated by the application to ensure that no data manipulation has occurred prior to the application consuming the data.
Before sending the response to the application (initiated by the endpoint request), SecureAuth Identity Platform creates the signature and includes it in the Response Header (prepended by X-SA-SIGNATURE:). The application can then validate the response by hashing the date / time and content from the consumed response and the Application ID with the Application Key and compare the new hashed value with the X-SA-SIGNATURE value. The Application ID and Application Key are generated in SecureAuth Identity Platform and connect the appliance with the application for each endpoint transaction.
Application response header
In the application's code, the following is required to validate the response header's signature.
Build a string based on the request.
X-SA-DATE for a second-precision timestamp (from the SecureAuth Identity Platform v.1+ response)
APPLICATION ID (from SecureAuth Identity Platform Web Admin)
CONTENT (JSON Parameters from the SecureAuth Identity Platform response)
Create an HMAC SHA256 hash of step 1 using the Application Key (from SecureAuth Identity Platform Web Admin).
This step is executed by calling the HMAC and producing the hash value.
Encode the HMAC SHA256 hash from step 2 in Base64.
Compare the HMAC SHA256 hash from step 3 to the X-SA-SIGNATURE value in the SecureAuth Response Header.
Consume the response based on the comparison result.
Note
If, after hashing the data, the value exactly matches the signature provided in the SecureAuth Identity Platform response header, then the data has not been compromised; if the value does not match the response signature, then the data has been modified.
Optional: Configure X-SA-Ext-Date Header
The string section for DATE/TIME can be configured to use either the second-precision UTC time or the millisecond-precision format DateTime.
If using the millisecond-precision, the date string must be included in the X-SA-Ext-Date header.
The following is a sample of X-SA-Ext-Date code:
var dateMillis = request.Headers.Date.Value.UtcDateTime.ToString("ddd, dd MMM yyyy HH:mm:ss.fff G\\MT");
                request.Headers.Add("X-SA-Ext-Date", dateMillis);
                request.Headers.Remove("Date");
                var httpMethod = request.Method.Method;
                string uri = request.RequestUri.AbsolutePath;
                string content = null;
                if (request.Content != null)
                {
                    content = request.Content.ReadAsStringAsync().Result;
                }
                result = (string.IsNullOrEmpty(content)) ?
                    string.Join("\n", httpMethod, dateMillis, appId, uri) :
                    string.Join("\n", httpMethod, dateMillis, appId, uri, content);
Optional: Add request ID to header for transactional logging
Modify the request header to include a request ID, X-Request-ID. The request ID helps you to identify API calls with the same request ID to obtain transactional logging information about a specific user. The request ID helps unite your different API calls, as in the following example:
In your business logic, you make an API call to the Identity Platform to check user validity and receive an answer confirming that the user is valid.
You make an API call to the Identity Platform for two factor, requesting profile information and receive email, phone number, etc.
You make an API call to the Identity Platform for password and receive matching information.
You might make more API calls to the Identity Platform for different information and receive responses.
When you add the request ID to the request header, you add the same header with the same ID into your transactions, which unites all the information.
Method: GET,RequestUri: 'https://secureauth.company.com/secureauth2/api/v2/users/jsmith/factors',
Version: 1.1,
Headers: {
    Connection: Keep-Alive
    Date: Wed, 10 June 2020 09:37:33 GMT
    Authorization: Basic MWI3MDBkMmUtN2I3Yi00YWJmLWExOTUtMGM4NjVlMjNlODFhOkY1eXFkTERKZGRVWU9scnBCbE9KQmgvWUNVSU1WQ3NXZWp1aGlDcnFNbXc9
    Host: secureauth.company.com
    Content-Length: 0
    X-Request-ID: d4a51bec-a609-4774-aa84-7e45c3d8bfa7
}
User authenticated API endpoint for transactional logging
Requires Identity Platform release 20.06 or later
Use this endpoint to enable the Authentication API to set end user authentication statuses. The statuses help notify the user risk functionality of the Identity Platform whether or not the transaction was successful. This endpoint is required to add API transactions into dashboard reporting.
POST /authenticated
The POST method sets the end user authentication status.
HTTP Method | URI | Example | SecureAuth product |
|---|---|---|---|
POST |
| https://secureauth.company.com/secureauth3/api/v2/authenticated | 20.06 or later |
Configure endpoints
Configure the endpoints for the selected feature.
Feature | Endpoint | Methods | Functions |
|---|---|---|---|
Profile Validation | /auth | POST | Validate end user information and generate OTPs for authentication |
/auth/{REF_ID} | GET | Check status of push-to-accept responses | |
/auth/link/{REF_ID} | GET | Check status of link-to-accept responses | |
Multi-Factor Authentication | /users/{username}/factors | GET | Access end user profile and respond with multi-factor authentication selections |
Multi-Factor Throttling Authentication | /users/{username}/throttle | GET | Retrieve current count of multi-factor authentication attempts for given username |
/users/{username}/throttle | PUT | Reset count of multi-factor authentication attempts to 0 | |
Phone Profiling Service Authentication | /numberprofile | POST | Retrieve phone profile record from data provider / directory which includes carrier information |
/numberprofile | PUT | Update the directory to reflect change in phone profile record | |
Device Recognition Authentication | /dfp/js | GET | Retrieve JavaScript reference required to generate fingerprints |
/dfp/validate | POST | Compare presented fingerprint with those stored in end user profile | |
/dfp/confirm | POST | Create and update fingerprint in end user profile in directory | |
Adaptive Authentication | /adaptauth | POST | Analyze end user profile, group, IP address, country, geo-velocity, and risks detected by threat intelligence data |
/accesshistory | POST | Create end user access history for geo-velocity calculations | |
IP Evaluation | /ipeval | POST | Evaluate an IP address for risk factors based on threat intelligence data |
Behavioral Biometrics Authentication | /behavebio/js | GET | Retrieve JavaScript reference required to gather and analyze end user behavioral biometric profile |
/behavebio | POST | Collect and create end user behavioral biometric profile for analyzing profile account info subsequently posted | |
/behavebio | PUT | Reset end user profile to enable retraining |