SecureAuth IdP Single Sign-on (SSO) Configuration Guide
Introduction
SecureAuth IdP Single Sign-on (SSO) enables end-users to navigate between SecureAuth IdP realms (applications, IdM tools, etc.) with a single set of credentials. This can be achieved through the use of a Secure Portal or by token recognition in each realm (transparent SSO).
To configure a realm for Windows Desktop SSO, refer to the Windows desktop SSO configuration topic.
Warning
Security Note: Realms configured for transparent SSO do not perform group checking or adaptive authentication. All group checking or adaptive authentication must be performed on the authentication realm, such as on the portal realm.
Prerequisites
1. Configure the following tabs in the Web Admin before enabling SSO:
Overview – the description of the realm and SMTP connections must be defined
Data – an enterprise directory must be integrated with SecureAuth IdP
Workflow – the way in which users will access this page must be defined
Multi-Factor Methods – the Multi-Factor Authentication methods that will be used to access this page (if any) must be defined
Post Authentication – the target resource of the realm must be defined (SSO configuration is in this tab)
SecureAuth IdP Configuration Steps
Post Authentication
 |
1. In the Forms Auth / SSO Token section, click View and Configure FormsAuth keys / SSO token
Forms Authentication
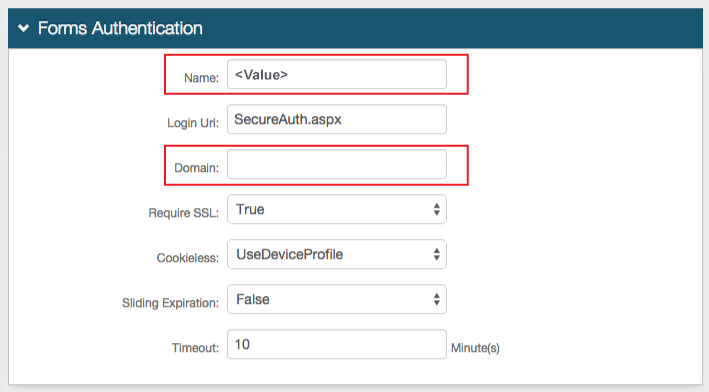 |
2. Set the Forms Based Authentication (FBA) token Name and ensure that it matches in each realm for which SSO is enabled
By default, the Name will be set to .ASPXFORMSAUTH[realm#], but it can be changed to any name
If a realm has already been set up for SSO, then the Name from that realm will be used here
Note that the same value in this field must be used in the Post-Auth Cookie field in step 6
3. Set the common Domain of the realms and ensure that it matches in each realm for which SSO is enabled
By default, this field is left empty and SecureAuth IdP will utilize the appliance's domain
If a realm has already been set up for SSO, then the Domain from that realm will be used here
Note
The FBA Tokens Require SSL, Cookieless, and Sliding Expiration settings must match across the SSO realms; the Timeout values can be distinct
Machine Key
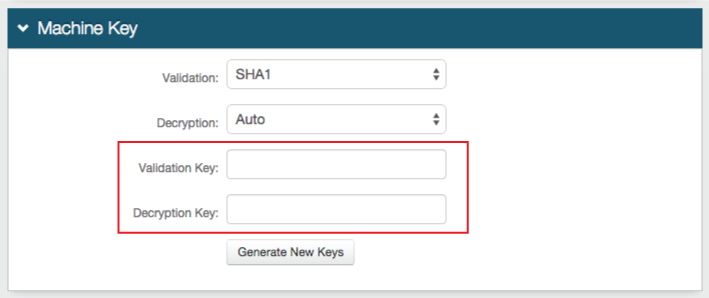 |
4. Set the Validation Key and the Encryption Key by clicking Generate New Keys
These fields must match in each realm for which SSO is enabled
Note
If a realm has already been set up for SSO, then do not click Generate New Keys; the Validation Key and Encryption Key from that realm will be used here
Note
The Validation and Decryption settings must match across the SSO realms
Authentication Cookies
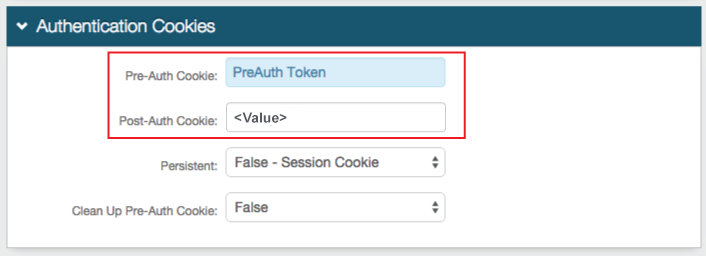 |
5. Set the Pre-Auth Cookie name and ensure it matches in each realm on which SSO is enabled
If a realm has already been set up for SSO, then the Pre-Auth Cookie name from that realm will be used here
6. Set the Post-Auth Cookie name to the same value used in the Name field in step 2
Note
The Persistent and Clean Up Pre-Auth Cookie settings must match across the SSO realms
Warning
Click Save once the configurations have been completed and before leaving the Forms Auth / SSO Token page to avoid losing changes
Note
To enable Transparent SSO, complete the step below; to enable a Secure Portal for SSO, refer to Secure Portal single sign-on configuration for additional steps and information
Workflow
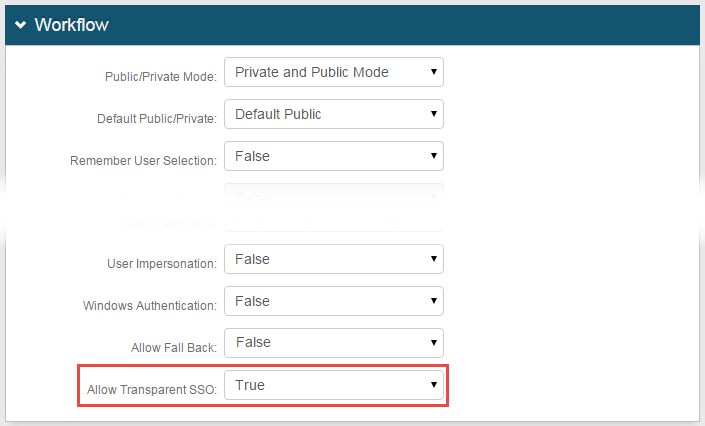 |
7. To enable transparent SSO, select True from the Allow Transparent SSO dropdown in the Workflow section
Transparent SSO allows end-users to access realms without logging in and without the use of a Secure Portal. This is achieved by SecureAuth IdP recognizing an authenticated token and asserting the user to the target resource
Select True from the dropdown when using a Secure Portal to enable immediate access into applications without following the realm's specific Authentication Mode (workflow type, e.g. username + second factor + password)
Warning
Click Save once the configurations have been completed and before leaving the Workflow page to avoid losing changes