Manage organization settings
In Arculix, the Organization Settings section contains all the administration details for your tenant.
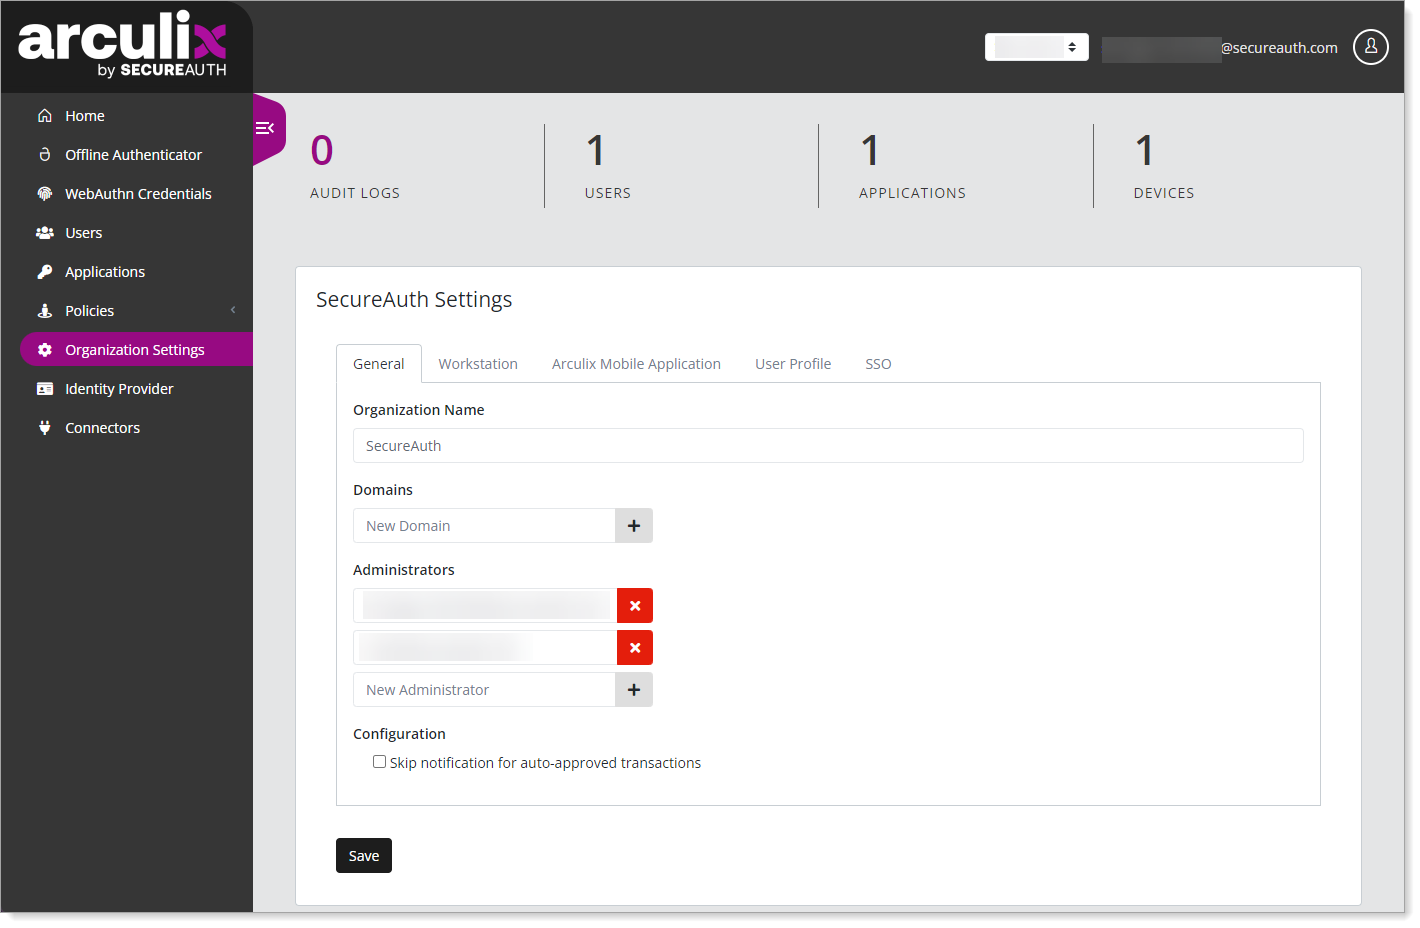 |
Arculix, by default, is a multi-tenant cloud web application. Each virtual tenant is called an Organization. Organizations do not share any information with each other.
The most important piece of data that distinguishes organizations is the email domain. Each organization is assigned one or more email domains. There is no limitation to the number of domains an organization can have, but they cannot be public (like gmail.com) or shared with other organizations.
During enrollment, Arculix automatically assigns users to the corresponding organization based on their email domain. For example, if the ACME organization is assigned the domain acme1.com and a user with an email address of name@acme1.com enrolls with Arculix, that user account is automatically assigned to the ACME organization.
The Organization Settings section has five tabs: General, Workstations, Arculix Mobile Application, User Profile, and SSO. Read on to find out what information each tab contains and the settings you can configure.
Note
This documentation encompasses all organizational settings. The way your settings appear may vary based on how your organization's Super Admin set them up.
General tab
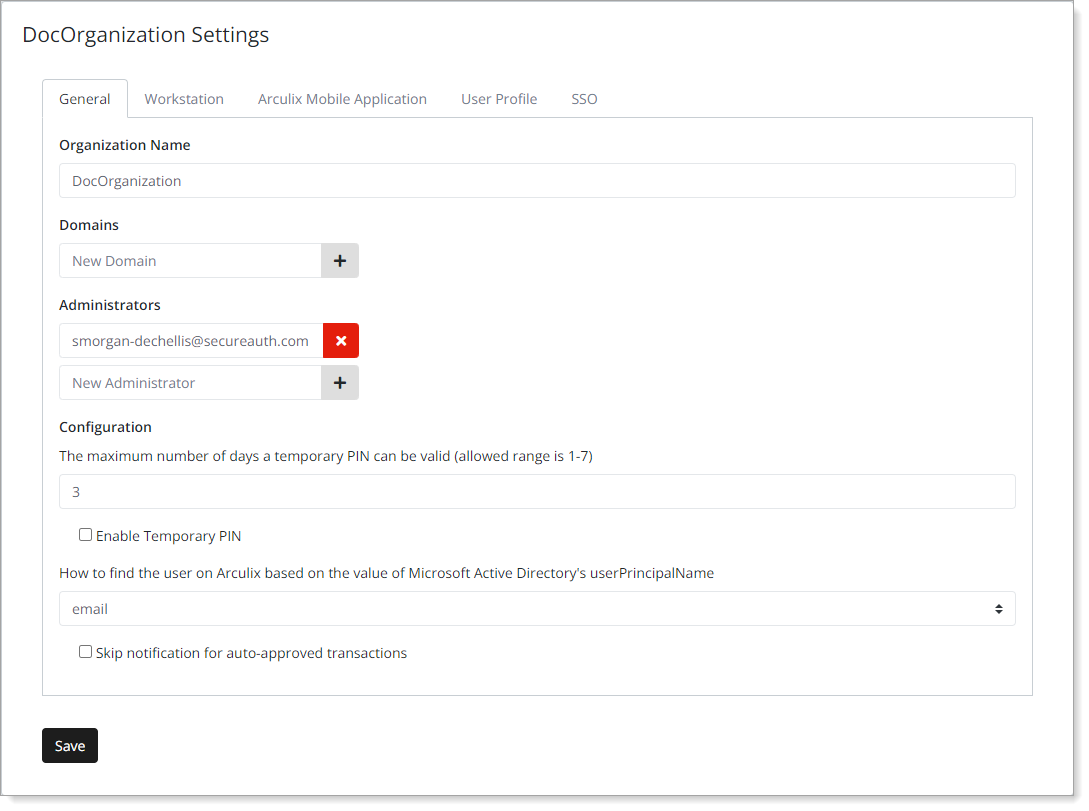
The General tab contains information about your tenant, domains, and administrators.
 |
View, edit, or set the following configurations.
Organization Name | Name of your organization for this tenant. |
Domains | Domains associated with your organization in this tenant. Users who enroll with an associated email domain are automatically assigned to your organization. |
Administrators | Administrators for your organization in this tenant. User accounts must have the appropriate permissions to manage the organization settings for this tenant. |
Configuration | |
The maximum number of days a temporary PIN can be valid (allowed range is 1-7) | Set the maximum number of days 1-7 that the temporary PIN is valid for. |
Enable Temporary PIN | Allow users with the appropriate permissions to configure and generate temporary PINs. To learn more about temporary PINs, see Create temporary PIN. |
How to find the user on Arculix based on the value of Microsoft Active Directory's userPrincipalName | This relates to users with VDI workstations. Determine how Microsoft Active Directory's Selection options:
|
Skip notifications for auto-approved transactions | Typically, the server sends a push notification to the user's mobile device when an MFA request is automatically approved due to a policy. Select this check box to prevent the server from sending that push notification. |
Workstation tab
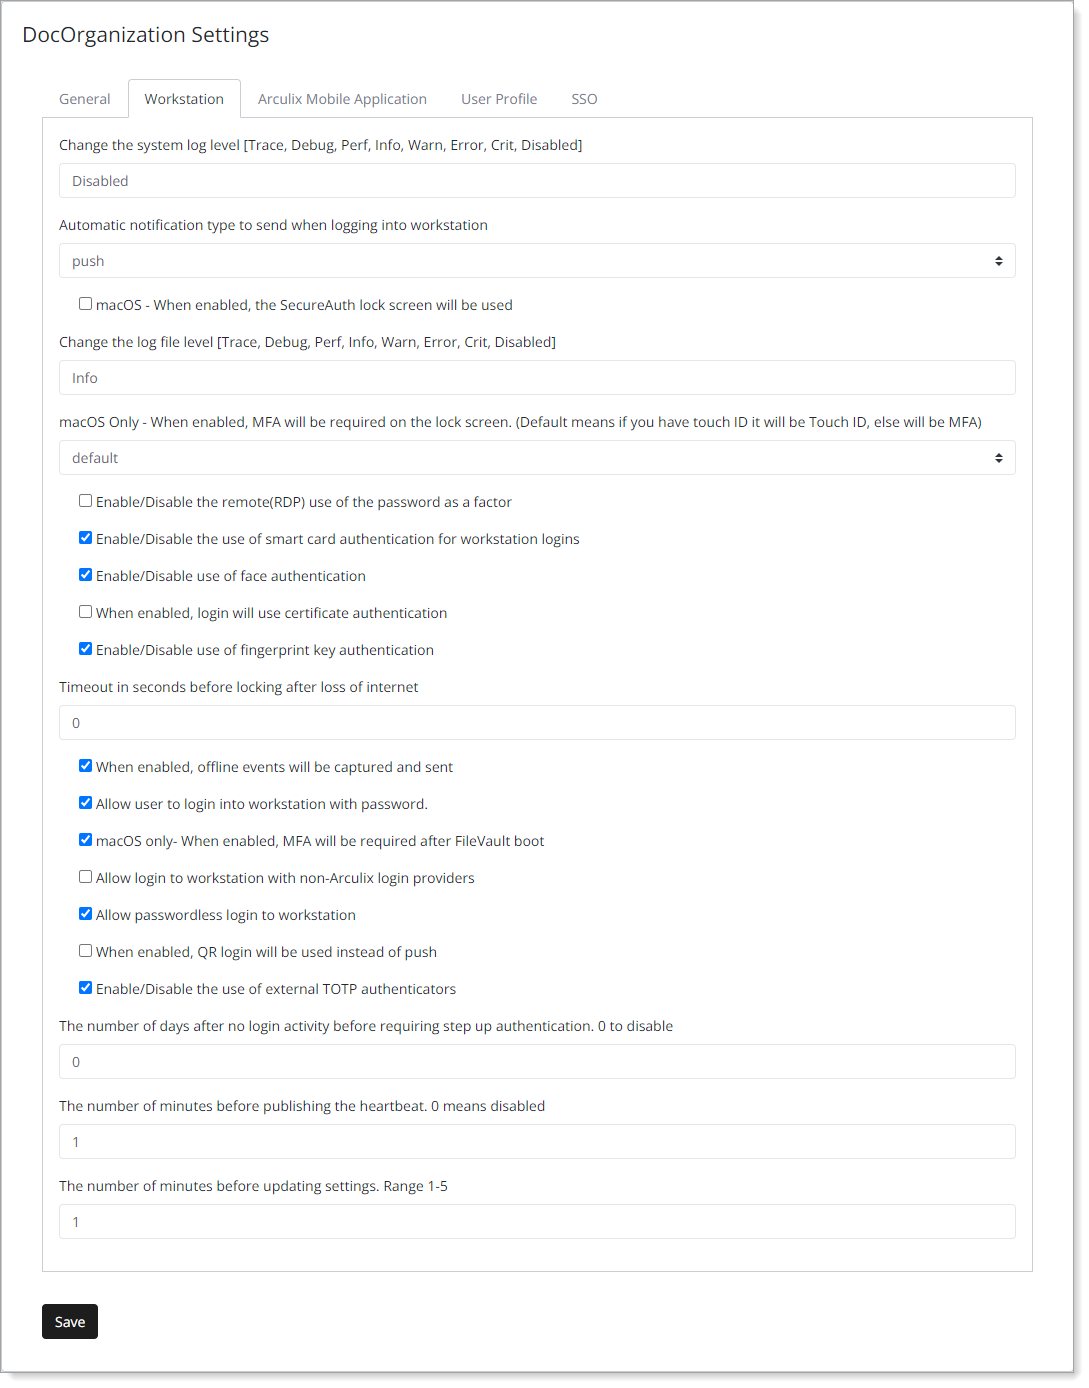
In the Workstation tab, manage authentication methods for workstations that have Arculix Device Trust installed.
 |
View, edit, or set the following configurations.
Change the system log level [Trace, Debug, Perf, Info, Warn, Error, Crit, Disabled] | Set how much diagnostic information that DeviceTrust produces. Selection options:
|
Automatic notification type to send when logging into workstation | Define how to send workstation login notifications to end users in your organization. Selection options:
|
macOS - When enabled, the SecureAuth lock screen will be used | Select this check box to require MFA after unlocking the macOS workstation. |
Change the log file level [Trace, Debug, Perf, Info, Warn, Error, Crit, Disabled] | Set how much diagnostic information to recieve in the log files. Selection options:
|
macOS Only - When enabled, MFA will be required on the lock screen. (Default means if you have touch ID it will be Touch ID, else will be MFA) | Set the login method for end users on the lock screen of macOS workstations. Selection options:
|
Enable/Disable the remote (RDP) use of the password as a factor | Select this check box to require password login for for remote (RDP) logins to the workstation. |
Enable/Disable the use of smart card authentication for workstation logins | Select this check box to allow the use of a smart card for workstation logins. When enabled, it displays as "Register Badge" on the Arculix Device Trust screen. To learn more, see RFID badge in the Arculix Device Trust end user guide. |
Enable/Disable use of face authentication | Select this check box to allow end users to authenticate to their workstation using facial recognition. To learn more, see Biometric - Windows Hello. |
When enabled, login will use certificate authentication | Selecting this check box indicates the following:
|
Enable/Disable use of fingerprint key authentication | Select this check box to allow end users to authenticate to their workstation using a fingerprint reader. To learn more, see Biometric - Windows Hello. |
Timeout in seconds before locking after loss of internet | Set the time in seconds after losing an internet connection before it locks the workstation. This forces users to log in with an offline method or after they reestablish their internet connection. |
When enabled, offline events will be captured and sent | Select this check box to capture and send offline events to the logs. |
Allow user to login into workstation with password. | Select this check box to allow end users to log in to their workstation with a password. To learn more, see Password. |
macOS only- When enabled, MFA will be required after FileVault boot | Select this check box to require login authentication on a macOS workstation with FileVault encryption at boot up. |
Allow login to workstation with non-Arculix login providers | Select the check box to allow end users to authenticate their workstation logins through an external third-party credential provider. |
Allow passwordless login to workstation | Select this check box to automatically allow end users passwordless logins to their workstation. Use case: End users can use passwordless logins, depending on policy settings like push to mobile or offline codes (TOTP). |
When enabled, QR login will be used instead of push | Select this check box to show a QR code on the Arculix Device Trust screen to end users for workstation logins. To learn more, see QR code over Bluetooth. |
Enable/Disable the use of external TOTP authenticators | Select this check box to allow end users to authenticate their workstation logins with a TOTP code from an external third-party authenticator. |
The number of days after no login activity before requiring step up authentication. 0 to disable | Select this check box to require end users to provide some form of authentication after no login activity on their workstation for x number of days. Use case: Regardless of continuous authentication or acceptable LOA scores for automatic logins, end users must reauthenticate their workstation login after a set period of time. |
The number of minutes before publishing the heartbeat. 0 means disabled | Select this check box to publish data about devices to Arculix. |
The number of minutes before updating settings. Range 1-5 | Set the number of minutes after saving your changes to push out these configuration updates to your organization. |
Arculix Mobile Application tab
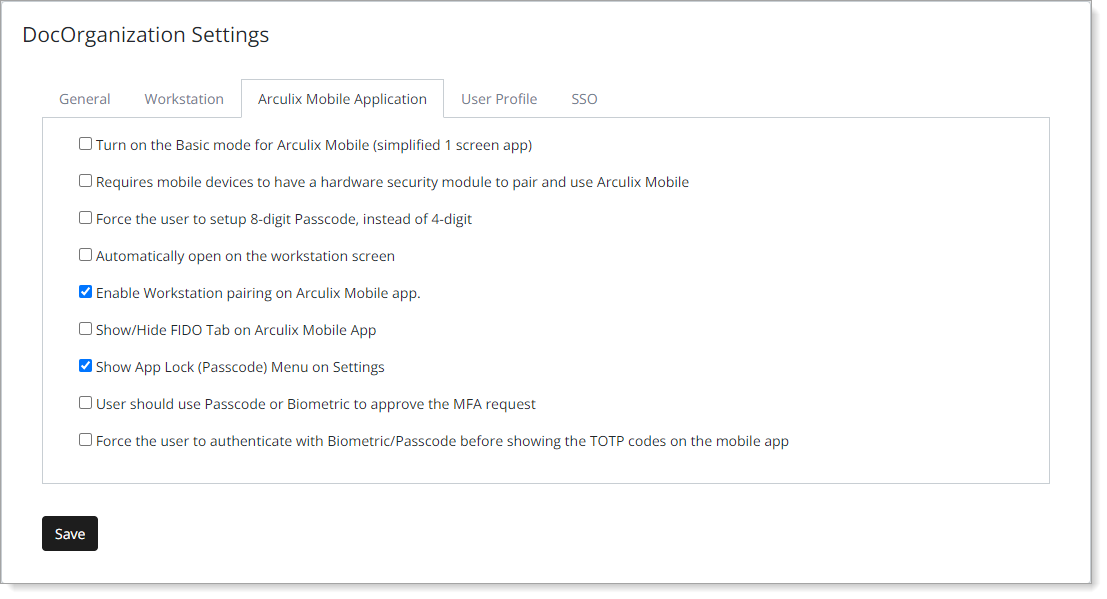
In the Arculix Mobile Application tab, manage certain features of the Arculix Mobile app for your organization.
 |
View or set the following configurations.
Turn on the Basic mode for Arculix Mobile (simplified 1 screen app) | Allow end users to switch on Basic Mode in Arculix Mobile. The Basic Mode has only one screen (Dashboard) with access to QR scan and Settings. |
Requires mobile devices to have a hardware security module to pair and use Arculix Mobile | Select this check box to perform a hardware security module (HSM) check and prevent pairing of rooted and jailbroken devices. Use case: Prevents pairing of rooted or jailbroken devices with Arculix Mobile. |
Force the user to setup 8-digit Passcode, instead of 4-digit | Requires Arculix Mobile app version 5.0.5 or later Select this check box if your end users must set up an 8-digit PIN in the Arculix Mobile app. Use case: This setting requires end users to go to the Settings in the Arculix Mobile app and turn on the App Lock feature. Users must then set up an 8-digit passcode. Prerequisite: You must have this setting enabled: |
Automatically open on the workstation screen | Select this check box to automatically open the Workstations page in the Arculix Mobile app instead of the Dashboard view. Use case: The Arculix Mobile app automatically opens on the Workstations page. |
Enable Workstation pairing on Arculix Mobile app. | Select this check box to allow end users to pair their workstation with Arculix Mobile app. Use case: Setting works in conjunction with Arculix Device Trust for MFA on workstation logins. |
Show/Hide FIDO Tab on Arculix Mobile App | Select this check box to show the FIDO tab in the Arculix Mobile app under Settings. Use case: Display the FIDO tab in the Arculix Mobile app. With this setting end users can use FIDO MFA. |
Show App Lock (Passcode) Menu on Settings | Select this check box to show the App Lock feature in the Arculix Mobile app under Settings. Use case: Display the App Lock setting in the Arculix Mobile app. With this setting, end users can set up an app passcode or biometric MFA for login requests. |
User should use Passcode or Biometric to approve the MFA request | Select this check box if your end users must provide a passcode or biometric MFA in the Arculix Mobile app to approve the login request. Use case: This setting requires end users to go to the Settings in the Arculix Mobile app and turn on the App Lock feature to set up a passcode. Prerequisite: You must have this setting enabled: |
Force the user to authenticate with Biometric/Passcode before showing the TOTP codes on the mobile app | Select this check box to require end users to use a passcode or biometric MFA to unlock and view offline codes (TOTP) in the Arculix Mobile app. Use case: Provides an added layer of security for accessing offline codes in the Arculix Mobile app. Prerequisite: You must have this setting enabled: |
User Profile tab
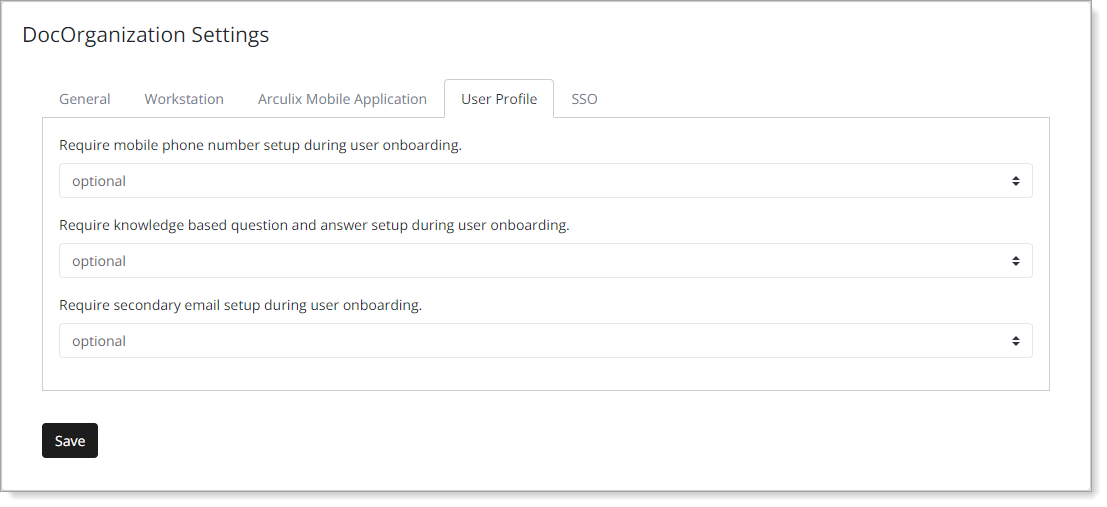
In the User Profile tab, manage the user onboarding experience for your organization.
 |
View or set the following configurations.
Require mobile phone number setup during user onboarding. | This relates to the display of the phone number field in the user profile in the Arculix Mobile app. Selection options:
Use case: Show, hide, or require use of the phone number field in the Arculix Mobile app. |
Require knowledge based question and answer setup during user onboarding. | This relates to the display of the security question field in the user profile in the Arculix Mobile app. Selection options:
Use case: Show, hide, or require use of the security question field (KBQ/KBA) in the Arculix Mobile app. |
Require secondary email setup during user onboarding. | This relates to the ability of adding another email address in the user profile in the Arculix Mobile app. Selection options are:
Use case: Show, hide, or require end users to add another email in the Arculix Mobile app. |
SSO tab
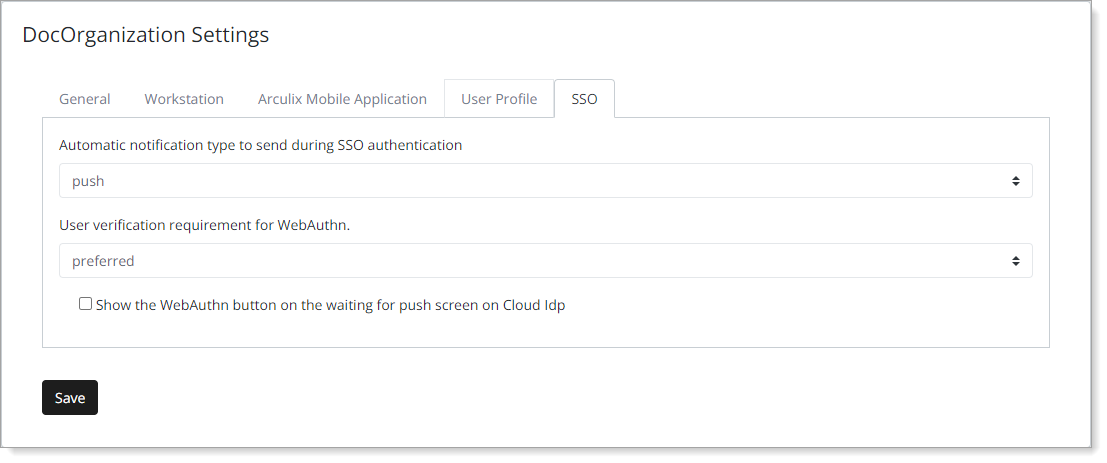
In the SSO tab, manage the SSO experience for end users in your organization.
 |
View or set the following configurations.
Automatic notification type to send during SSO authentication | Define how to send SSO login notifications to end users in your organization. Selection options:
Use case: Define how your end users will receive notifications to authenticate their SSO logins to applications. |
User verification requirement for WebAuthn. | Define how your end users will use FIDO2 WebAuthn-compliant authenticators like security keys or built-in biometrics on devices. This relates to registered devices in the WebAuthn Credentials section in Arculix Core for any user account. Selection options:
Use case: If allowed or required, end users must register a FIDO2 WebAuthn authenticator like a security key or a device with built-in biometrics. |
Show the WebAuthn button on the waiting for push screen on Cloud Idp | Select this check box to display a WebAuthn button in a push notification for authentication to SSO logins. |