(Valid Persistent Token) | Second Factor Workflow Configuration
Introduction
Use this guide as a reference to configure a SecureAuth IdP realm that utilizes Valid Persistent Tokens and Second Factor Authentication methods.
Valid Persistent Tokens are generated by SecureAuth IdP as a Java certificate, device / browser fingerprint, UBC, or browser plug-in; and can be validated as a means of Multi-Factor Authentication.
This can be applied to any realm to access web, SaaS, mobile, or network applications and devices, and SecureAuth IdP out-of-the-box Identity Management (IdM) tools via Multi-Factor Authentication.
SecureAuth IdP Configuration Steps
Notice
This configuration requires steps to be taken in two (2) distinct realms (Realm A and Realm B)
Realm A can be configured as preferred as long as the steps below are included
Realm A
Workflow
 |
1. In the Device Recognition Method section, select Certification Enrollment and Validation from the Integration Method dropdown
2. Select Device / Browser Fingerprinting from the Client Side Control dropdown
See additional Fingerprinting configuration steps below in the Realm B Configuration Steps
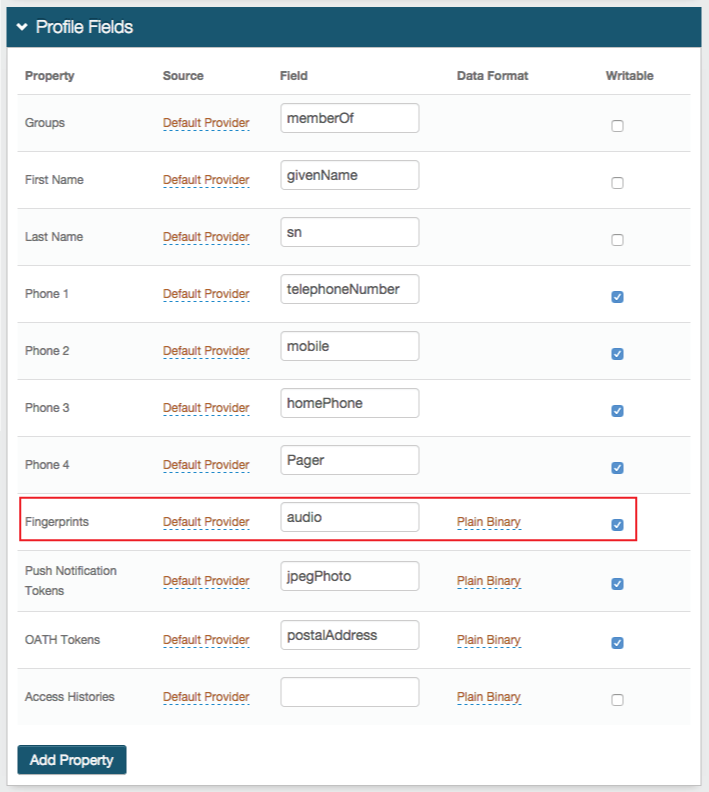
Be sure to map a directory field to the SecureAuth IdP Fingerprints Property
Workflow
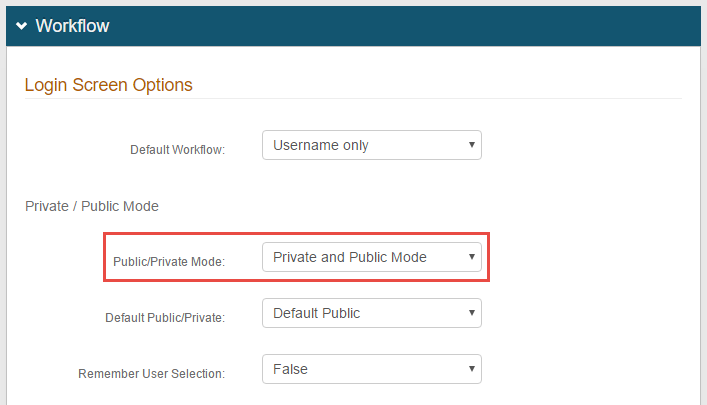 |
3. Select Private and Public Mode or Private Mode Only from the Public / Private Mode dropdown
When the realm is in Private Mode, a persistent token is generated
Warning
Click Save once the configurations have been completed and before leaving the Workflow page to avoid losing changes
Realm B
Workflow
 |
1. In the Device Recognition Method section of Realm B, select Certification Enrollment and Validation from the Integration Method dropdown
2. Select Device / Browser Fingerprinting from the Client Side Control dropdown
Be sure to map a directory field to the SecureAuth IdP Fingerprints Property (see image example in Realm A, step 2)
Workflow
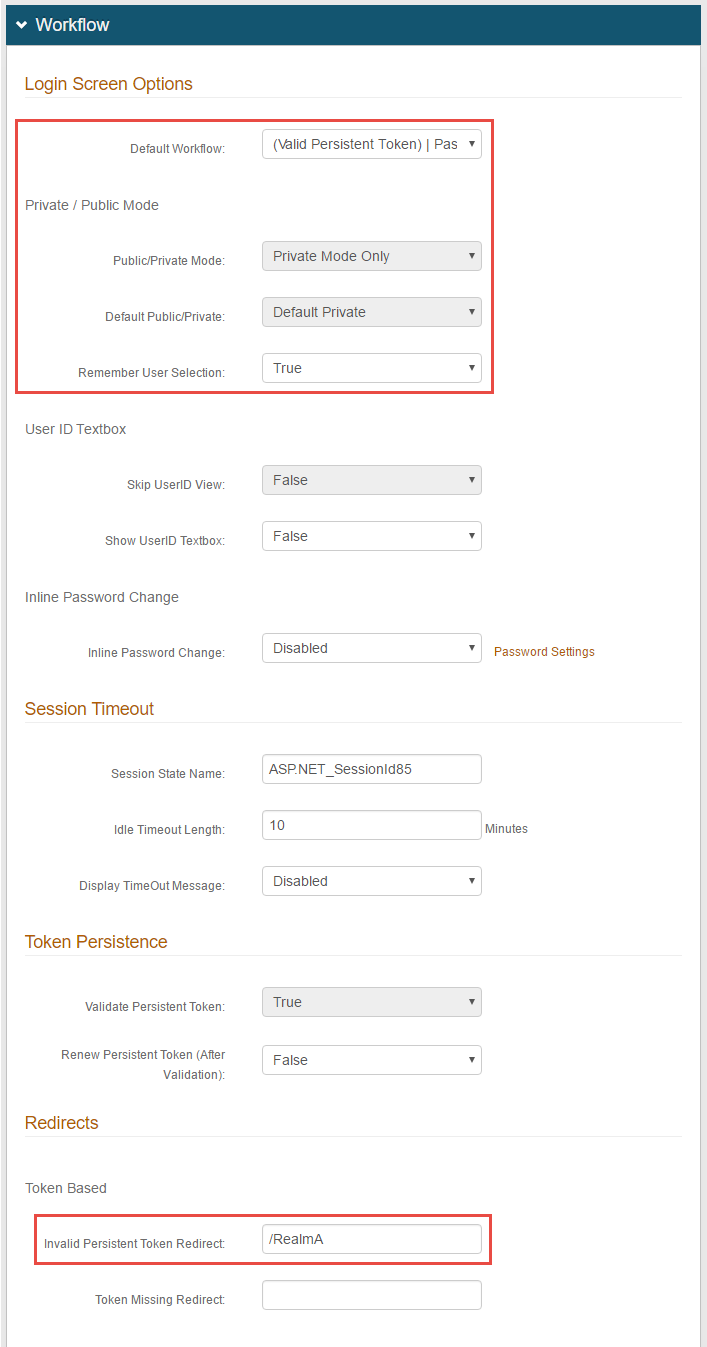 |
3. Select (Valid Persistent Token) | Second Factor or (Valid Persistent Token) | Second Factor | Password from the Default Workflow dropdown
Private Mode Only is automatically selected from the Public / Private Mode dropdown
Default Private is automatically selected from the Default Public / Private dropdown
4. Select True from the Remember User Selection dropdown
5. Set the Invalid Persistent Token Redirect to Realm A URL to enable end-users to reenroll for a persistent token to access this realm
6. Leave the rest as Default
Note
The following Device Recognition configuration steps should be completed in Realm A and Realm B
Browser / Mobile Device Digital Fingerprinting
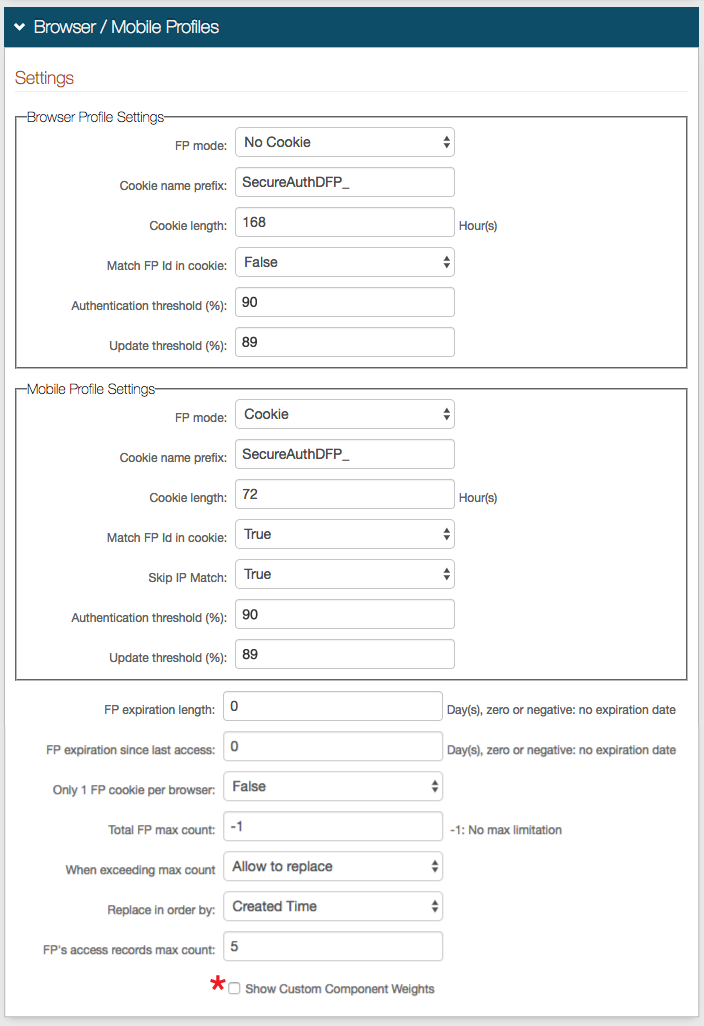 |
7. In the Browser Profile Settings section, select Cookie from the FP Mode dropdown to enable SecureAuth IdP to deliver a cookie to the browser after authentication; or select No Cookie if no cookie is to be used
8. If Cookie is selected in step 9, then provide the Cookie name prefix and Cookie length, or leave as default
The cookie name appears as Cookie Name Prefix + company name + hashed value of user ID
The Cookie length sets for how many hours the cookie is valid, e.g. 72 hours
9. Select True from the Match FP in cookie to require the profile ID to be presented and then matched to a profile ID in the directory, with an acceptable Authentication Threshold score; or select False to not require ID matching between the cookie and the stored profile
Tip
If No Cookie is selected in step 7, then steps 8 and 9 can be ignored
10. Set the Authentication Threshold to 90-100% based on preference
11. Set the Update Threshold to a percentage just below the Authentication Threshold
The Update Threshold must be less than the Authentication Threshold
Notice
Review the Profile Comparison Score information below for more explanation of the Thresholds
12. In the Mobile Settings section, select Cookie from the FP Mode dropdown to deliver a cookie to the mobile device; or select App Mode to utilize the DR App for further device / browser validation
13. Leave the Cookie name prefix as the default, or set it to a preferred name
The cookie name appears as Cookie Name Prefix + company name + hashed value of user ID
14. Set the Cookie Length to the amount of hours during which the cookie is valid, e.g. 72 Hours
15. Select True from the Match FP in cookie to require the profile ID to be presented and then matched to a profile ID in the directory, with an acceptable Authentication Threshold score; or select False to not require ID matching between the cookie and the stored profile
Tip
If App Mode is selected in step 12, then steps 13 - 15 can be ignored
16. Select True from the Skip IP Match dropdown to not require an exact IP Address match for profile comparison; or select False to require an exact match
17. Set the Authentication Threshold to 90-100% based on preference
18. Set the Update Threshold to a percentage just below the Authentication Threshold
The Update Threshold must be less than the Authentication Threshold
See Profile Comparison Score information in step 11
19. Set the FP expiration length to the number of days the profile is valid
For example, if this field is set to 10 days, then the user's profile expires in 10 days, no matter how often it is used
Set to 0 for no expiration
20. Set the FP expiration since last access to the number of days the profile is valid since last usage
For example, if this field is set to 10 days, then the user's profile expires if it is not used during the 10 days since it was last employed
Set to 0 for no expiration
21. Set the Total FP max count to the maximum number of profiles that can be stored in a user's account at a given time
If a maximum is to be set, a typical configuration would limit profile storage to 5-8
Set to -1 for no maximum entries
22. If a maximum is set in step 21, then select Allow to replace from the When exceeding max count dropdown to enable the replacement of an existing profile with a new one; or select Not allow to replace if the profiles cannot be automatically replaced
If Not allow to replace is selected, then the user or administrator must manually remove stored profiles from the user profile on the Self-service Account Update Page or Account Management (Help Desk) Page
23. If a maximum is set in step 21 and Allow to replace is selected in step 22, then select Created Time from the Replace in order by dropdown to enable the replacement of the oldest stored profile with the new one; or select Last Access Time to enable the replacement of the least recently used profile with the new one
24. Set the FP's access records max count to the number of access history entries per profile stored in the profile
SecureAuth recommends setting this to 5
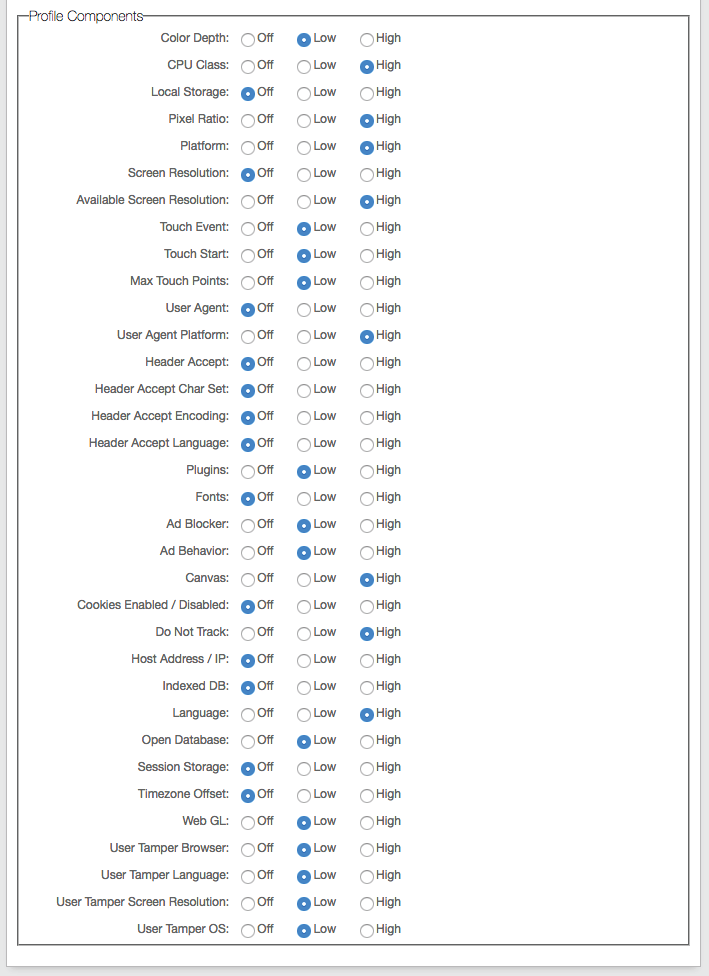
* Check Show Custom Component Weights to modify the defaulted weights of each profile's components
Custom Identity Consumer
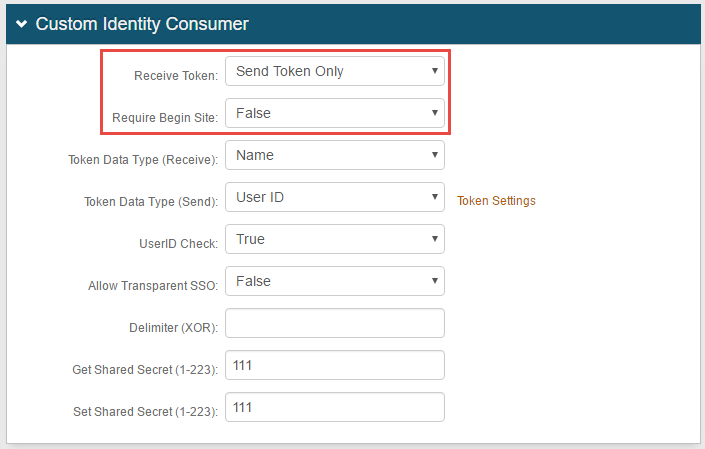 |
25. Select Send Token Only from the Receive Token dropdown
26. Select False from the Require Begin Site dropdown
27. Leave the rest as Default
Warning
Click Save once the configurations have been completed and before leaving the Workflow page to avoid losing changes
Multi-Factor Methods
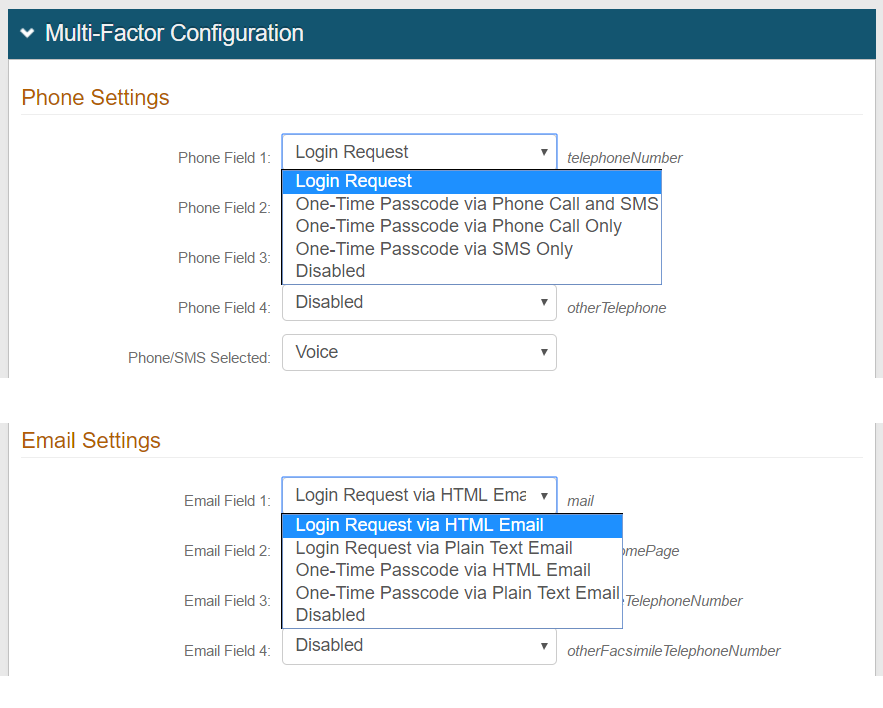 |
28. In the Multi-Factor Configuration section, ensure that at least one Multi-Factor Authentication method is enabled for use on this realm
Warning
Click Save once the configurations have been completed and before leaving the Multi-Factor Methods page to avoid losing changes
System Info
Note
This configuration step should be completed in Realm A and Realm B
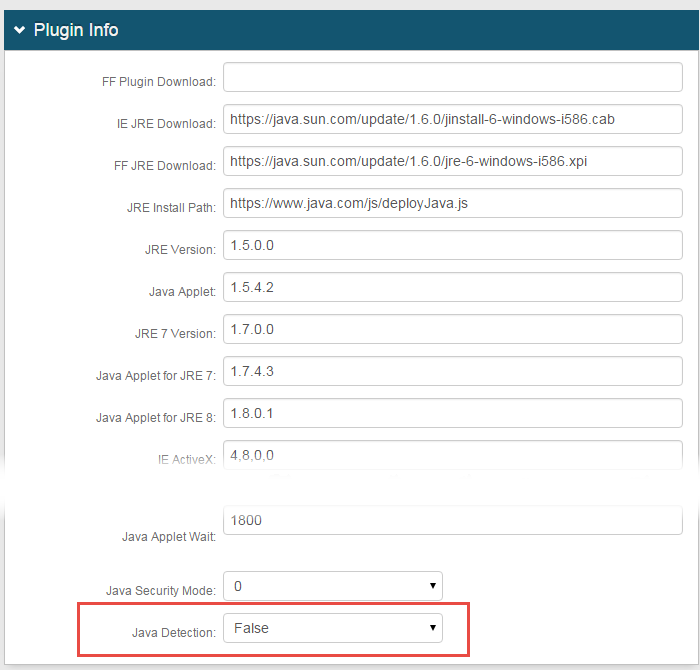
29. In the Plugin Info section, select False from the Java Detection dropdown
 |
Warning
Click Save once the configurations have been completed and before leaving the System Info page to avoid losing changes
End-user Experience
Click here to view the Valid Persistent Token and Reg Code workflow
