Cisco ISE (SP-initiated) integration guide
Introduction
Use this guide to enable Single Sign-on (SSO) access via SAML to Cisco Identity Services Engine (ISE).
There are several procedures for the Cisco ISE and SecureAuth IdP configurations, including instructions for testing and troubleshooting.
Prerequisites
Cisco ISE account
SecureAuth IdP version 9.1 or later, with a realm ready for the Cisco ISE integration
Cisco ISE configuration steps
The Cisco ISE configuration steps are divided into several sections:
Step A: Add external ID source to Cisco ISE – configure Cisco ISE to use external SAML identity provider
Step B: Cisco ISE Guest Portal configuration – configure the Guest Portal in Cisco ISE to use an external SAML identity provider
Step C: Configure the SecureAuth IdP alternative login on Cisco page – configure the display of the SecureAuth IdP login on the Cisco Guest Portal login page
Step D: Export SecureAuth IdP metadata file – export SecureAuth IdP metadata from Cisco ISE
Step A: Add external ID source to Cisco ISE
This procedure explains how to configure Cisco ISE to use an external SAML identity provider to obtain user information for authentication.
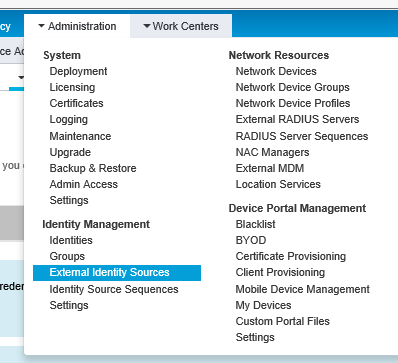
1. In Cisco ISE, select Administration > Identity Management > External Identity Sources.
 |
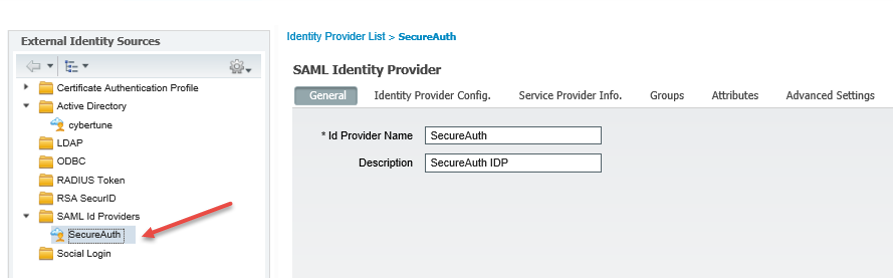
2. On the External Identity Sources tab, select the folder SAML Id Providers.
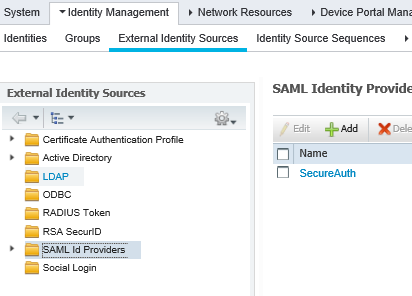 |
3. Select the SecureAuth check box and click Add.
4. On the General tab, in the Id Provider Name field, enter the name of the identity provider, SecureAuth.
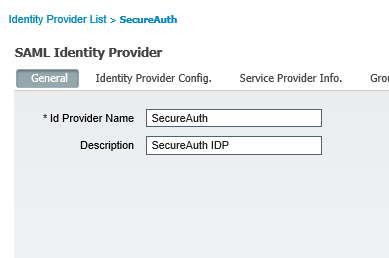 |
5. Click Save.
The remaining configuration settings depend on the metadata imported from the SecureAuth IdP in later steps.
Step B: Cisco ISE Guest Portal configuration
This procedure explains how to configure the Guest Portal in Cisco ISE to use an external SAML identity provider to authorize temporary access for external users to internal networks and services.
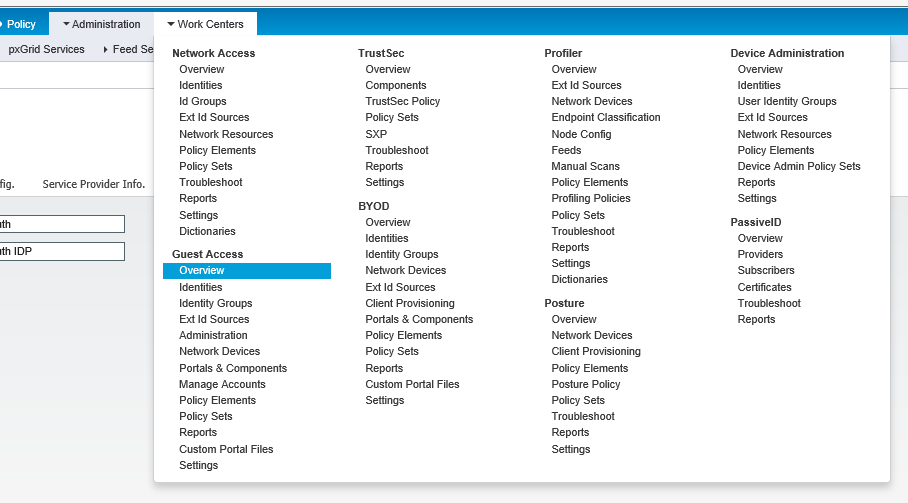
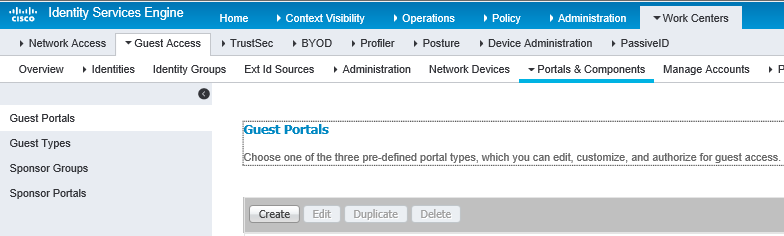
1. In Cisco ISE, select the Work Centers tab and in the Guest Access group, click Overview.
 |
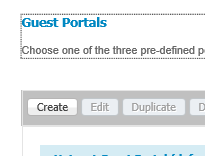
2. Select the Portals & Components tab and click Guest Portals.
 |
3. Click Create.
 |
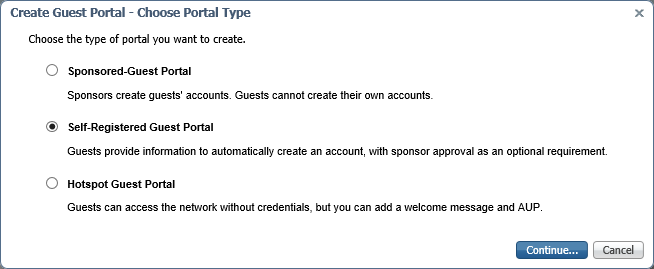
4. Select the Self-Registered Guest Portal option and click Continue.
Note: This is not the main portal for the user interaction to SecureAuth IdP. Instead, this is a subportal interaction to verify session status. This portal is called SSOSubPortal.
 |
5. In the Portal Name field, type the name of the portal.
6. Expand Portal Settings.
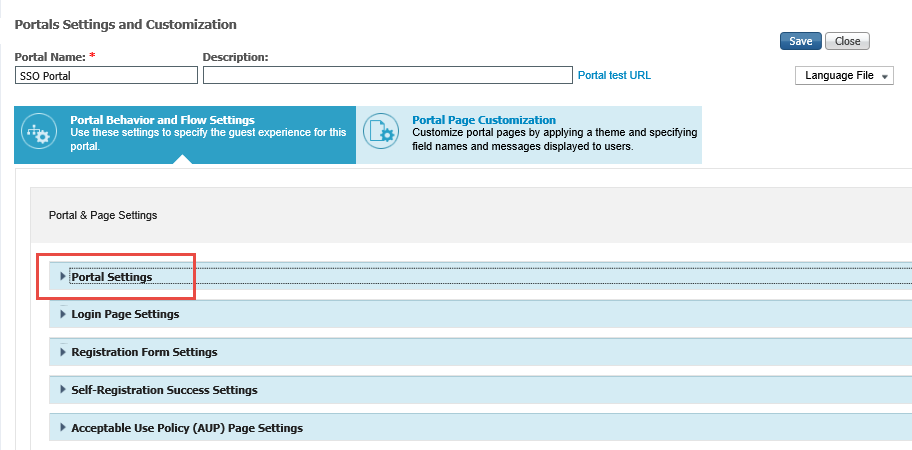 |
7. In the Authentication method field, select SecureAuth.
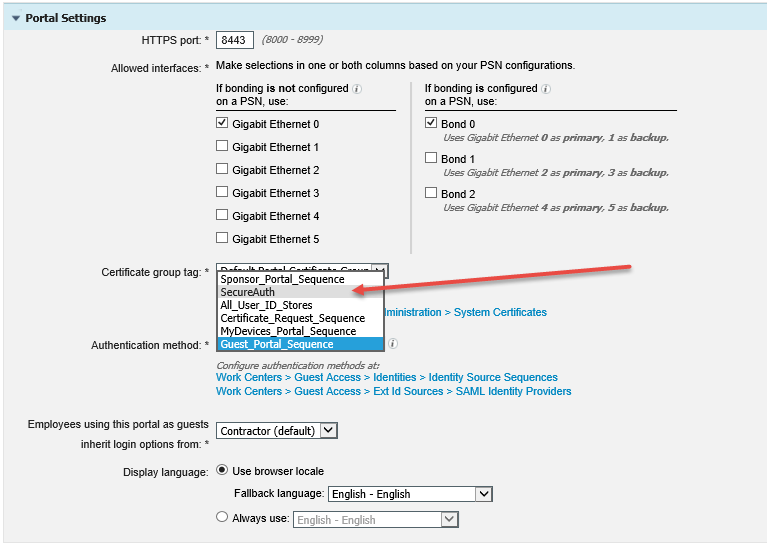 |
8. Click the Work Centers > Guest Access > Identity Source Sequences link and choose the previously defined External SAML IdP.
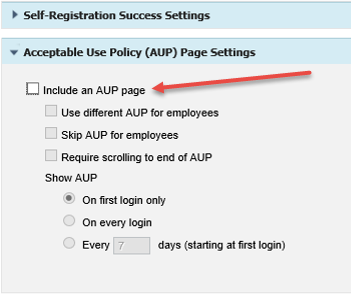
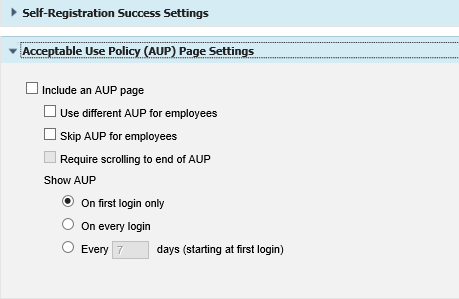
9. Expand Acceptable Use Policy (AUP) Page Settings and clear the Include an AUP page check box.
 |
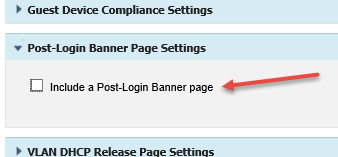
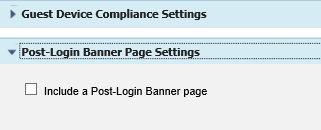
10. Expand Post-Login Banner Page Settings and clear the Include a Post-Login Banner page check box.
 |
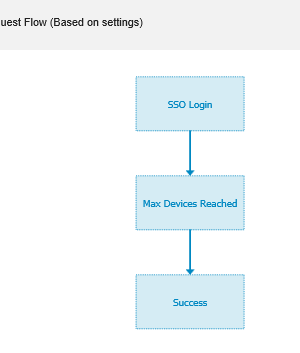
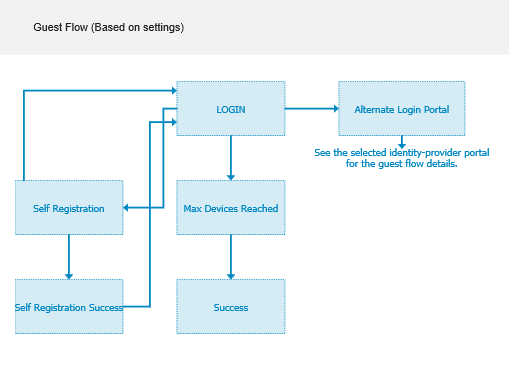
The Portal flow is SSO Login to Max Devices Reached to Success.
 |
11. Save your changes.
12. Go back to Guest Portals and create a new one using the Self-Registered Guest Portal option.
TIP: For more information about repeating these steps, see steps 2 through 4.
13. In the Portal Name field, type the primary portal name.
 |
14. Expand Login Page Settings.
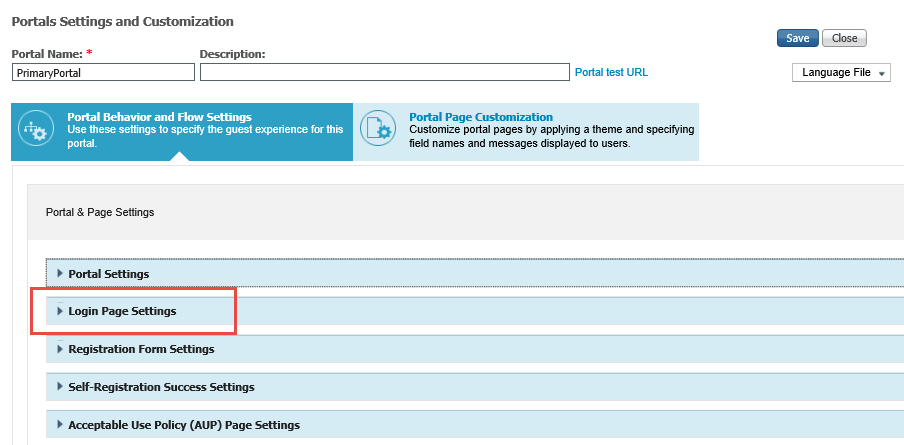 |
15. Select the Allow the following identity-provider guest portal to be used for login check box and choose the name of the previously created SSO sub portal.
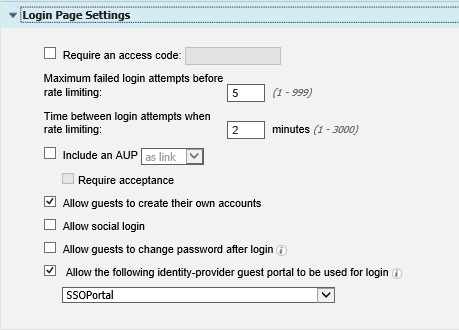 |
16. Expand Acceptable Use Policy (AUP) Page Settings and clear all of the check boxes.
 |
17. Expand Post-Login Banner Page Settings and clear the Include a Post-Login Banner page check box.
 |
At this point, the portal Guest Flow looks like the following screen capture.
 |
Step C: Configure the SecureAuth IdP alternative login on Cisco page
To display the SecureAuth IdP login on the Cisco Guest Portal login page, you must configure the alternative login option.
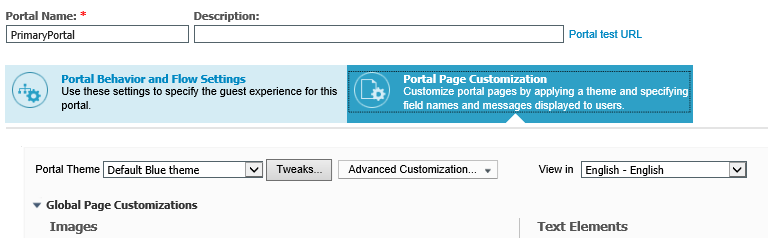
1. In Cisco ISE, click Portal Page Customization.
 |
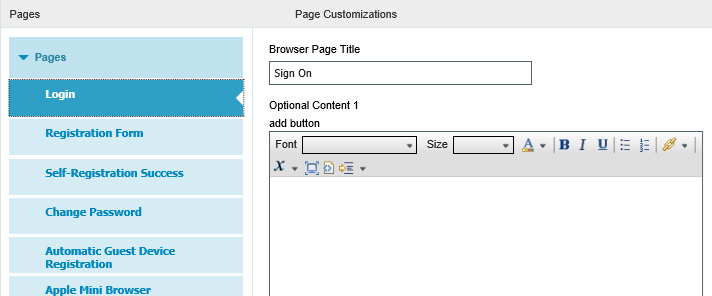
2. Click the Login section.
 |
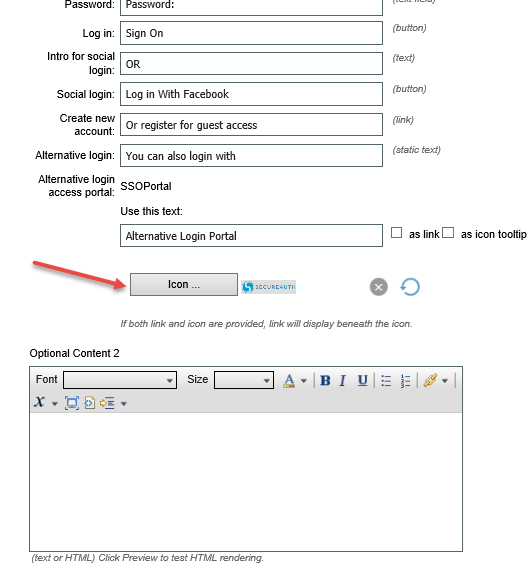
3. Click Icon.
 |
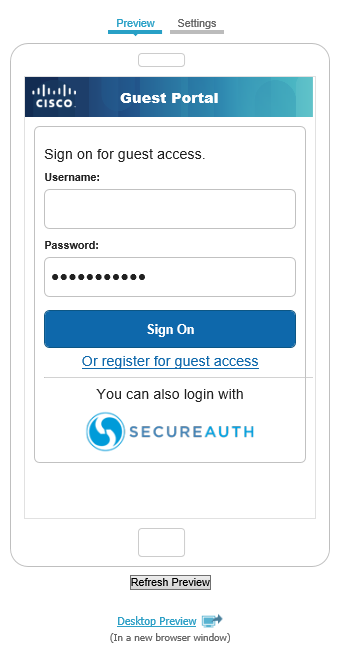
4. Select Portal Customization > Pages > Login.
You can preview your changes for a mobile login screen.
 |
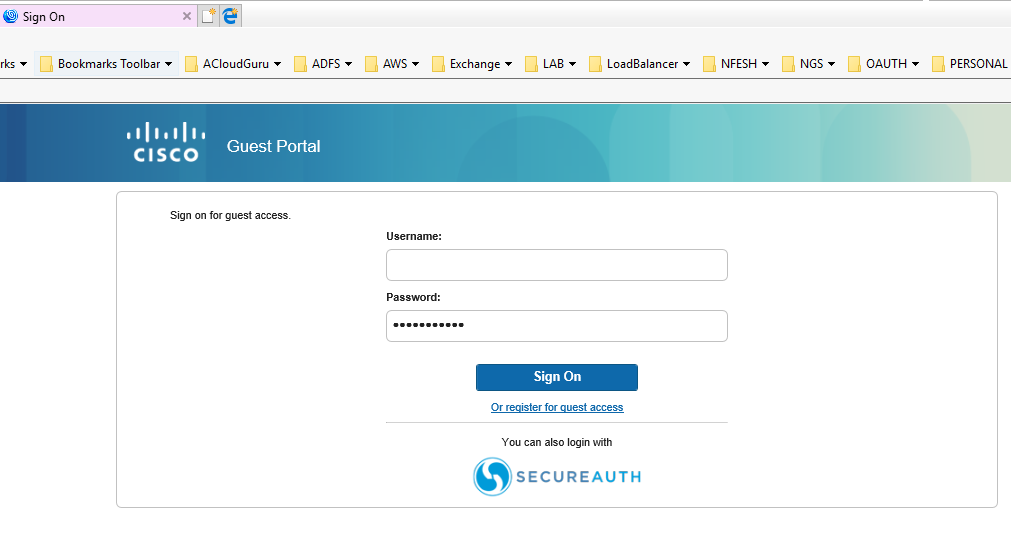
You can also view your changes for a desktop browser login page.
 |
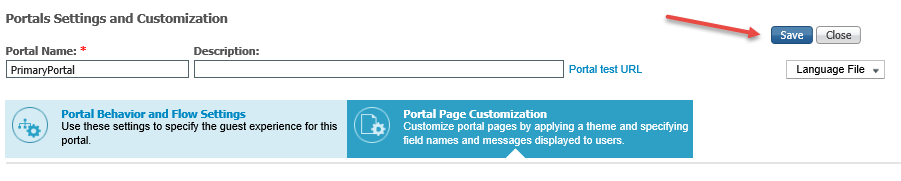
5. In the Portals Settings and Customizations section, click Save.
 |
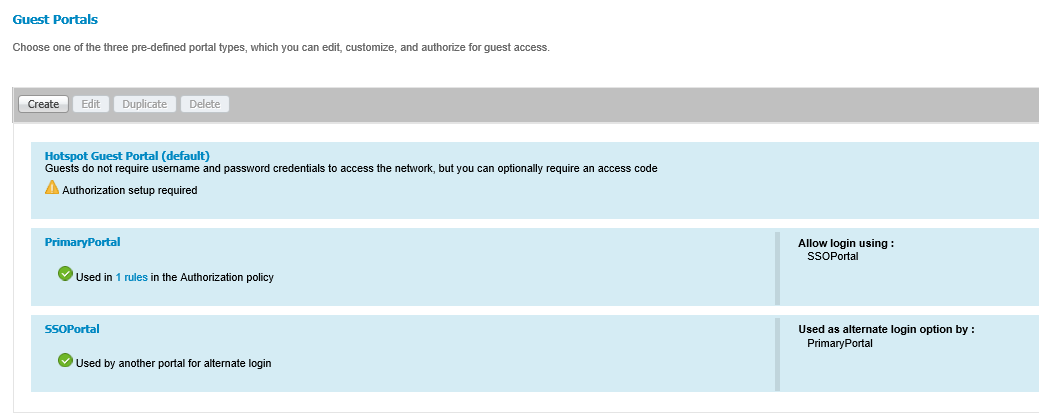
Your changes appear in the Guest Portals section.
 |
Step D: Export SecureAuth IdP metadata file
As part of the Cisco ISE configuration with SecureAuth IdP, the SecureAuth IdP metadata file must be exported from Cisco ISE. During the later steps of the SecureAuth IdP configuration, this exported file will need to be imported into SecureAuth IdP.
1. In Cisco ISE, from the Administration tab, in the Identity Management group, select External identity Sources.
 |
2. From the list of folders on the left, expand the SAML Id Providers folder and click SecureAuth.
 |
3. Select the Service Provider Info tab.
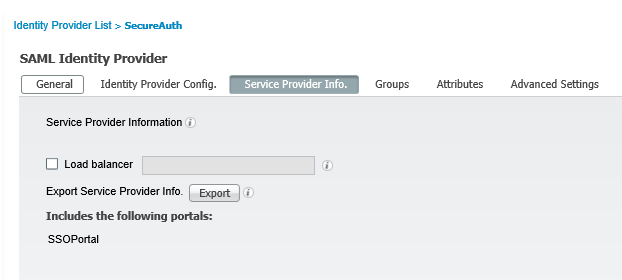 |
4. Next to Export Service Provider Info, click Export.
The SecureAuth IdP metadata file SSOPortal.xml downloads in a zip file.
SecureAuth IdP configuration steps
1. Log in to your SecureAuth IdP Admin console.
Post Authentication tab
Note
Important! To retain your configurations, be sure to click Save often, before leaving the Post Authentication tab page. Once you leave that tab, any unsaved changes are lost.
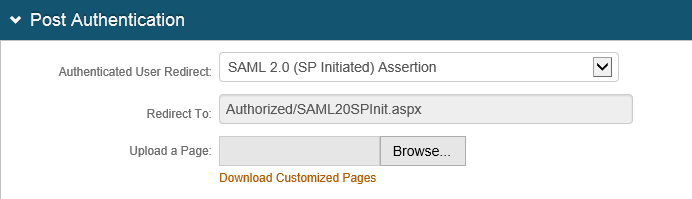
2. Select the Post Authentication tab.
Post Authentication section
3. In the Post Authentication section, make the following entry.
a. Set Authenticated User Redirect to SAML 2.0 (SP Initiated) Assertion.
 |
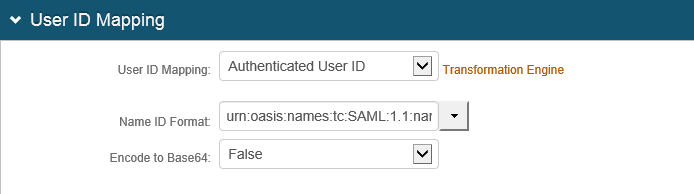
User ID Mapping section
4. In the User ID Mapping section, make the following entries.
a. Set User ID Mapping to Authenticated User ID.
b. Set Name ID Format to urn:oasis:names:tc:SAML:1.1:nameid-format:unspecified.
c. Set Encode to Base64 to False.
 |
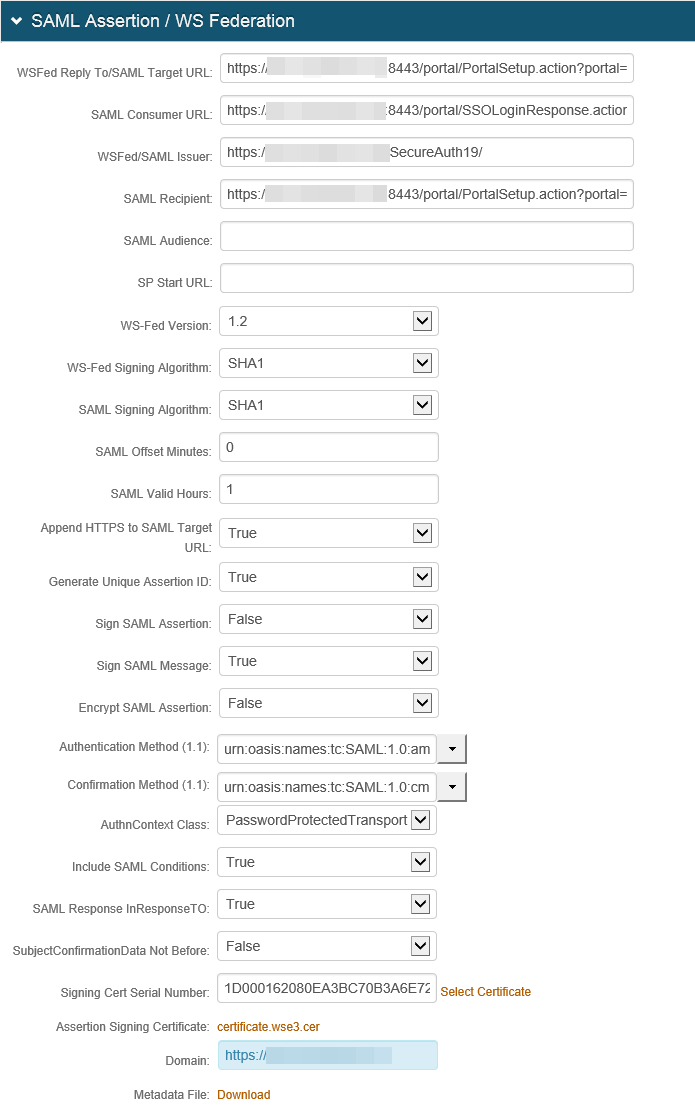
SAML Assertion / WS Federation section
5. In the SAML Assertion / WS Federation section, make the following entries.
a. Set WSFed Reply To/SAML Target URL to the Cisco ISE URL where users are redirected upon successful authentication.
b. Set the SAML Consumer URL to the Cisco ISE URL used to accept the SAML assertion.
c. Set the WSFed/SAML Issuer to the unique name that identifies SecureAuth IdP to Cisco ISE. (Note: This might include the realm number in the URL).
The value used in the WSFed/SAML Issuer field must match in both the Cisco ISE and SecureAuth IdP configurations.
d. Set the SAML Recipient URL to the identifiable information of the SAML Recipient.
e. Set A uthnContext Class to PasswordProtectedTransport.
f. Leave the default value in the Signing Cert Serial Number field. Otherwise, to use a third-party certificate for the SAML assertion, click the Select Certificate linkand choose the appropriate certificate.
g. Set the Domain to the SecureAuth IdP appliance URL or IP address to download the metadata file.
h. Next to Metadata File, click the Download link to download the SecureAuth IdP metadata file.
 |
SAML Attributes / WS Federation section
6. In the SAML Attributes / WS Federation section, make the following entries.
Section | Field | Description/Recommendation |
|---|---|---|
Attribute 1 | Name | Set to mail |
Value | Set to Email 1 | |
Attribute 2 | Name | Set to memberOf |
Value | Set to GroupLIst | |
Attribute 3 | Name | Set to givenName |
Value | Set to First Name | |
Attribute 4 | Name | Set to userPrincipalName |
Value | Set to Aux ID 1 | |
Attribute 5 | Name | Set to objectGUID |
Value | Set to Aux ID 2 | |
Attribute 6 | Name | Set to username |
Value | Set to Authenticated User ID | |
Attribute 7 | Name | Set to sn |
Value | Set to Last Name |
 |
7. Click Save.
Import SecureAuth IdP metadata to Cisco ISE
After the SecureAuth IdP realm is configured for this integration, you need to import this SecureAuth IdP metadata into the Cisco ISE External SAML IdP Provider Profile.
1. In Cisco ISE, from the Administration tab, in the Identity Management group, click External identity Sources.
|
2. From the list of folders on the left, expand the SAML Id Providers folder and click SecureAuth.
|
3. Select the Identity Provider Config tab.
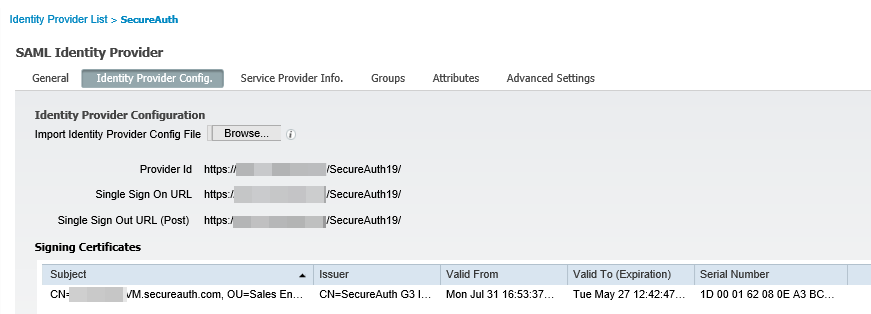 |
4. Next to the Import Identity Provider Config File field, click Browse and proceed to import the SecureAuth IdP metadata file that was exported and saved in step 5h. of the procedure SecureAuth IdP Configuration Steps.
5. Verify that the metadata is set correctly on the tabs.
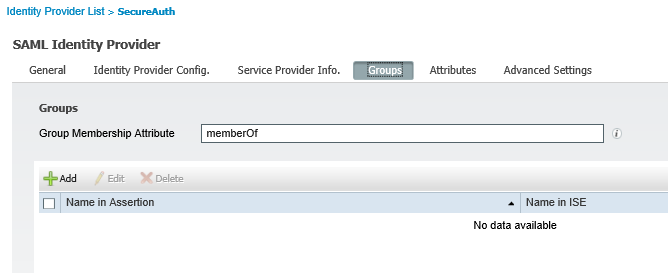
Groups tab
In the Groups tab, the Group Membership Attribute is set to memberOf.
 |
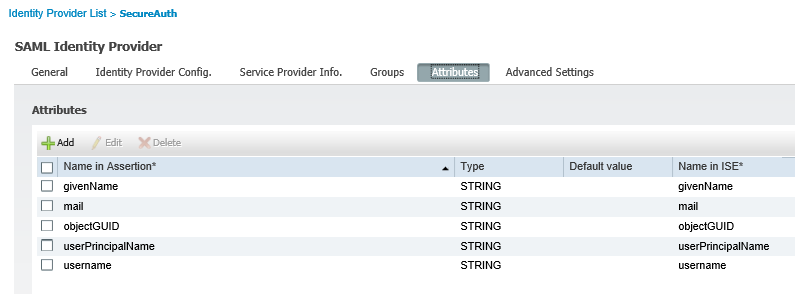
Attributes tab
In the Attributes tab, verify these attributes are included.
Name in Assertion | Type | Name in ISE |
|---|---|---|
givenName | STRING | givenName |
STRING | ||
objectGUID | STRING | objectGUID |
userPrincipalName | STRING | userPrincipalName |
username | STRING | username |
 |
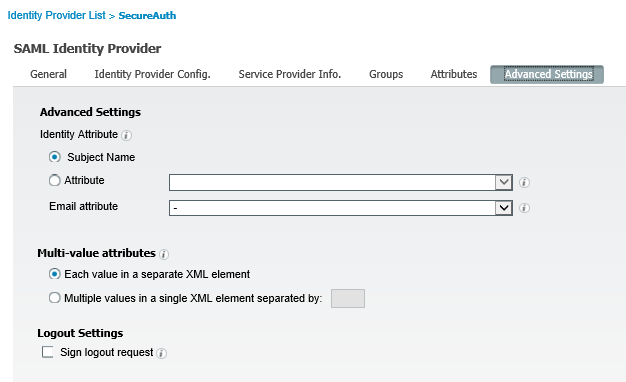
Advanced Settings tab
In the Advanced Settings tab, the verify that the following configurations are set.
a. In the Advanced Settings group, the Subject Name option is selected.
b. In the Multi-value attributes group, the Each value in a separate XML element option is selected.
c. In the Logout Settings group, the Sign logout request check box is cleared.
 |
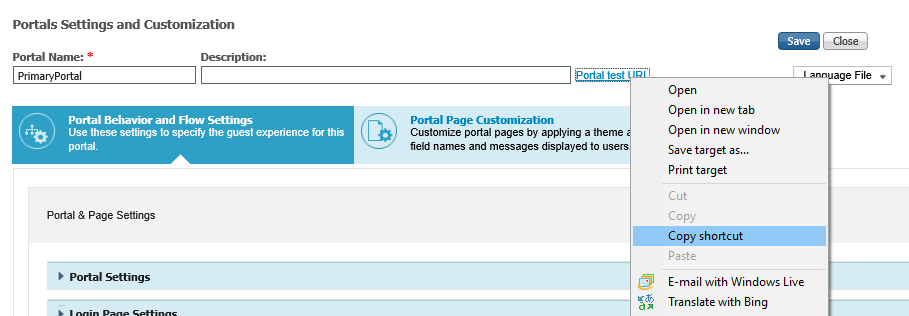
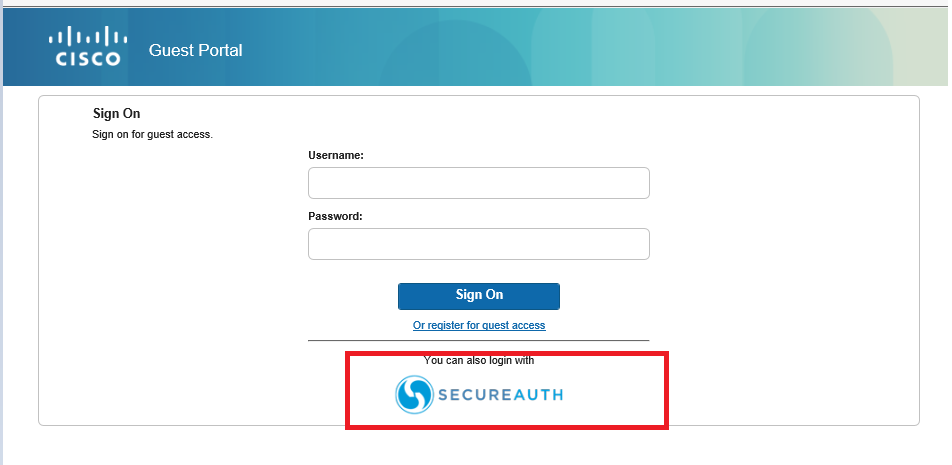
Test portal URL
This procedure explains how to test the SecureAuth IdP portal URL.
1. In Cisco ISE, from the Portals and Settings Customization page, click the Portal text URL link > Copy shortcut.
 |
2. Open a blank browser page and paste the shortcut link and press Enter.
Verify that the SecureAuth icon appears as an alternate login.
 |
Troubleshooting SAML authentication
When there are issues with SAML authentication, that info is logged in the ise-psc.log file. This section explains how to troubleshoot issues in various ways.
By component
This procedure explains how to troubleshoot a component.
1. In Cisco ISE, from the Administration menu, click Logging.
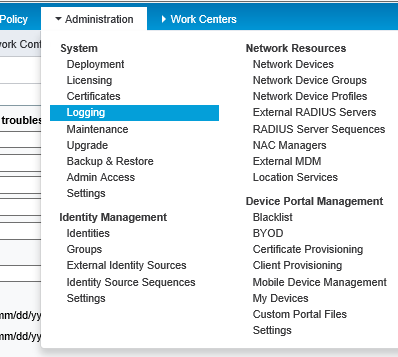 |
2. On the Logging tab, in the left-hand pane, click Debug Log Configuration.
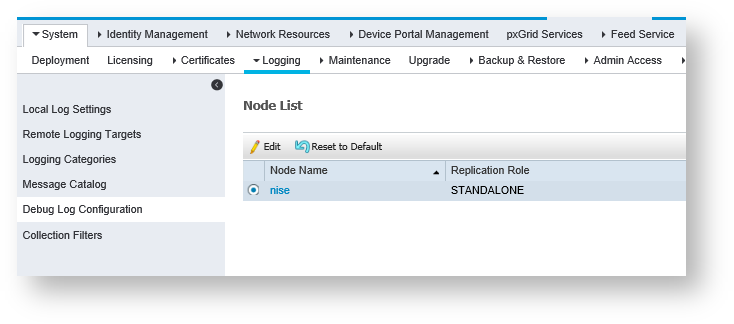
3. From the Node List, choose the node you want to troubleshoot.
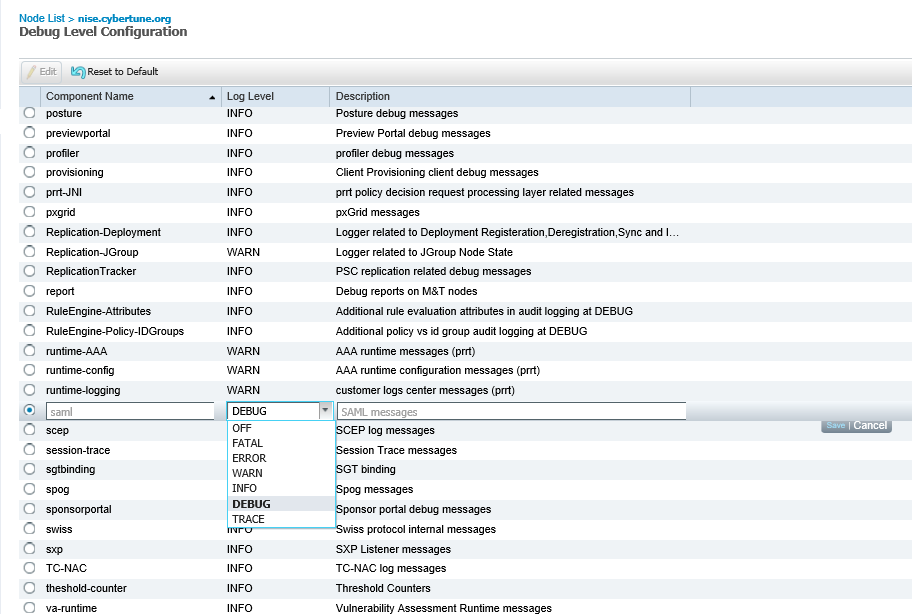
4. Set the saml component to the DEBUG log level.
 |
Command-line interface
To monitor the SAML events, you can access Cisco ISE through the command-line interface (CLI) and type the command:
show logging application ise-psc.log tail
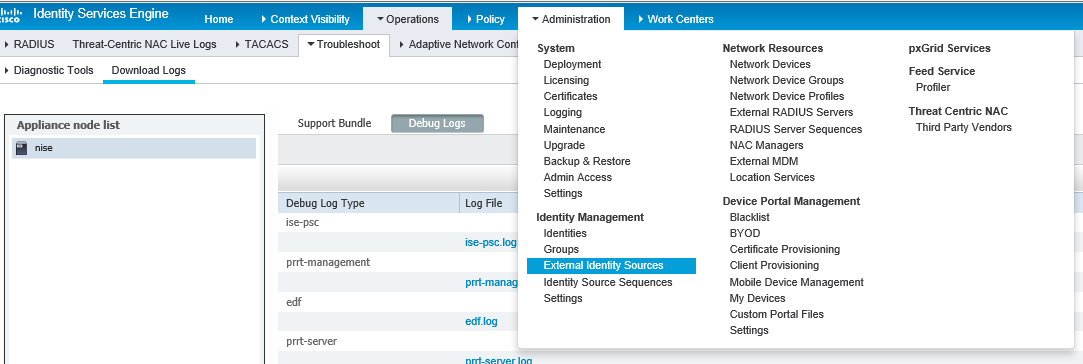
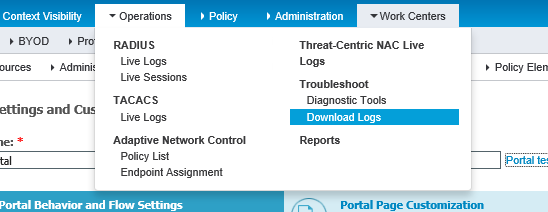
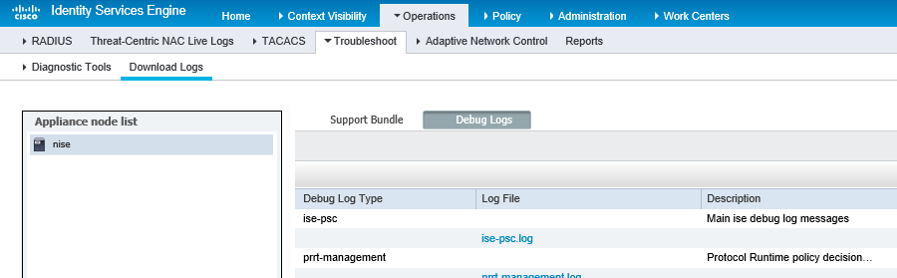
Download log file
You can download the log file for further analysis.
1. In Cisco ISE, from the Operations tab, click Download Logs.
 |
2. Click the ise-psc.log file link to download it.
 |