Multi-screen login workflows, v20.06
End users authenticate by entering their username on a VPN login screen followed by at least one other code, such as a password, passcode, PIN, or YubiKey passcode, and then a login button is enabled on a VPN login screen or Authenticate mobile app.
If end users will use YubiKey devices to obtain a one-time HOTP or TOTP passcode, ensure that the YubiKey devices are supported. See the "YubiKey" section of the SecureAuth compatibility guide.
If end users will use face or fingerprint recognition, ensure that they set up their mobile device for face or fingerprint recognition before enrollment, and then the features will work automatically with the SecureAuth Authenticate mobile app.
End users who already use the Authenticate mobile app and want to add the ability to accept biometric push notifications to use face or fingerprint recognition must first reconnect the account for their mobile device.
If end users want to use face or fingerprint recognition, but did not set up their mobile device to use the features before enrollment, they must turn on face or fingerprint recognition on their mobile device, then set up the SecureAuth mobile app again. See the Prerequisites section in the SecureAuth Authenticate App v20.03 documentation for iOS and Android.
Password | One-Time Passcode (TOTP/HOTP)
1. On the initial VPN login screen, enter your username.
2. Enter your password.
3. Get the one-time passcode from the SecureAuth Authenticate App or other SecureAuth TOTP application.
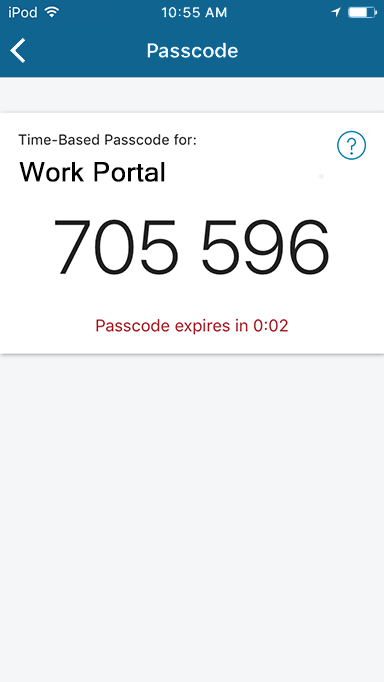 |
4. On the second VPN login screen, enter your passcode.
Password & Mobile Login Request (Approve / Deny)
1. On the initial VPN login screen, enter your username.
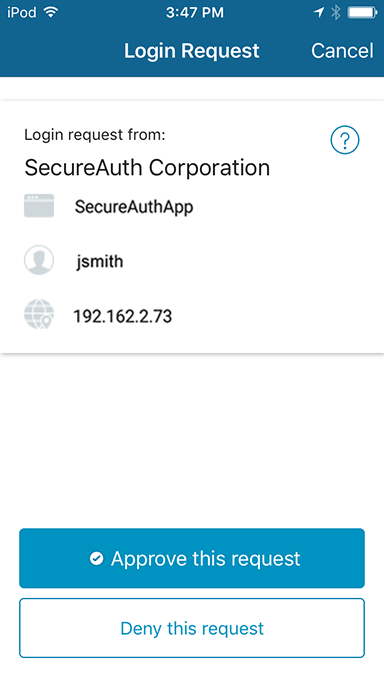
2. Enter your password. The VPN waits for RADIUS to respond.
3. On the mobile app Login Request screen, tap Approve or Deny request.
 |
Password | Second Factor
1. On the initial VPN login screen, enter your username.
2. Enter your password.
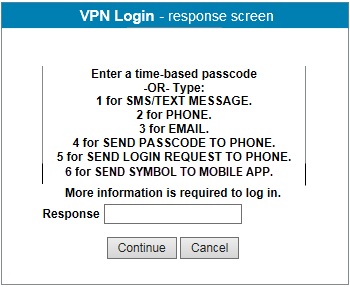
3. The response screen prompts you for one of two options:
a. Enter an HOTP one-time passcode (from a YubiKey) or a TOTP one-time passcode (from SecureAuth Authenticate, SecureAuth Passcode, or Yubico Authenticator).
b. Enter the number corresponding to an available Second Factor authentication method:
SMS / Text Message Phone
Email
Send Passcode to Phone (Push Notification)
Send Login Request to Phone (Push-to-Accept)
PIN
Yubico OTP Token
Help Desk OTP
Symbol-to-Accept
Fingerprint
Face Recognition
The list of available second-factor authentication methods is dynamic; it is based on the multi-factor authentication options provisioned by the administrator.
4. Make the appropriate entry on the response screen, based on the selected workflow (from the two options in step 3).
If the Send Passcode to Phone (Push Notification) workflow, PIN workflow, or Symbol-to-Accept workflow is initially selected, and then a different second-factor authentication option is preferred, end users can enter 0 (zero) in the Response field to return to the screen where they can select a different second-factor authentication option.
 |
If selecting step 3a
5a. Get the one-time passcode from the SecureAuth Authenticate App (or other SecureAuth TOTP application, such as SecureAuth Passcode), HOTP from YubiKey, or TOTP from a Yubico Authenticator app by using a YubiKey.
6a. Enter the passcode.
If selecting step 3b
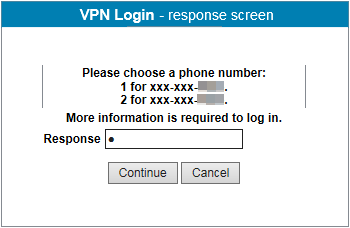
If end users select an option that includes use of a mobile phone and have set up more than one mobile phone number, they will see a choice screen, like the one shown below. End users must first select the phone number to use before seeing the second-factor authentication screen.
If the Phone option is selected and more than one phone number is set up in your account, enter the number corresponding to the phone number to use as the second-factor authentication method.
5b. Enter the number corresponding to an available second-factor authentication method.
 |
If the Push-to-Accept option is selected, the VPN waits for RADIUS to respond. When the Login Request screen appears on the mobile app, tap Approve or Deny on the screen.
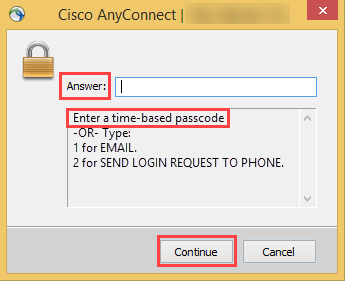
If the Help Desk OTP option is selected, the following occurs:
End users receive a message to call the help desk for a passcode, along with the help desk phone number.
If there is more than one help desk to select, end users choose the option for the help desk they will call and enter the number in the Answer field.
The end user calls the help desk and requests the passcode.
The end user enters the passcode in the VPN screen as the answer and clicks Continue on the VPN screen to be authenticated.
The following image shows an example of a VPN screen that end users might see; notice the areas called out with red boxes.
 |
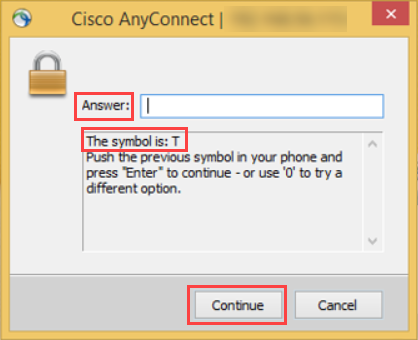
If the Symbol-to-Accept option is selected, the following occurs:
End users receive a valid symbol on the VPN screen.
On the mobile app, end users receive four symbols; they must tap the symbol that matches the one on the VPN screen.
The tapped symbol is sent back to the VPN screen as the answer. End users then click Continue on the VPN screen to be authenticated.
The following image shows an example of a VPN screen that end users might see; notice the areas called out with red boxes.
 |
If the Fingerprint or Face Recognition options are selected, the following workflow occurs:
A push notification is sent to the mobile phone that the end user set up.
The VPN waits for the fingerprint or face recognition. (Face recognition is available to users on iOS mobile phones only.)
On the SecureAuth mobile app, the end user receives a request to provide a fingerprint or face to approve the request.
The VPN receives the fingerprint or face information and the end user is authenticated.
One-Time Passcode (TOTP/HOTP) | Password
1. On the initial VPN login screen, enter your username.
2. Get the one-time passcode from the SecureAuth Authenticate App (or other SecureAuth TOTP application, such as SecureAuth Passcode), HOTP from YubiKey, or TOTP from a Yubico Authenticator app by using a YubiKey.
3. Enter your password on the second VPN login screen.
Username | Second Factor
1. On the initial VPN login screen, enter your username.
2. A password entry is not required.
3. On the response screen, enter the number corresponding to an available second-factor authentication method.
SMS / Text Message
Phone
Email
Send Passcode to Phone (Push Notification)
Send Login Request to Phone (Push-to-Accept)
PIN
Yubico OTP Token
Help Desk OTP
Symbol-to-Accept
Fingerprint
Face Recognition
The list of available second-factor authentication methods is dynamic; it is based on the multi-factor authentication options provisioned by the administrator.
4. Proceed with the appropriate second-factor authentication workflow described in the Password | Second Factor section above.
If the Send Passcode to Phone (Push Notification), PIN, Help Desk OTP, Symbol-to-Accept, Fingerprint, or Face Recognition workflows are initially selected, and then a different second-factor authentication option is preferred, end users can enter 0 (zero) in the Response field to return to the screen where they can select a different second-factor authentication option.
Username | Second Factor | Password
1. On the VPN login screen, enter your username.
2. A password entry is not required at this step.
3. On the response screen, enter the number corresponding to an available Multi-Factor Authentication method. (The following numbers are examples; yours will be different.)
SMS / Text Message
Phone
Email
Send Passcode to Phone (Push Notification)
Send Login Request to Phone (Push-to-Accept)
PIN
Yubico OTP Token
Help Desk OTP
Symbol-to-Accept
Fingerprint
Face Recognition
The list of available second-factor authentication methods is dynamic; it is based on the multi-factor authentication options provisioned by the administrator.
4. Proceed with the appropriate second-factor authentication workflow described in the Password | Second Factor section above.
If the Send Passcode to Phone (Push Notification), PIN, Help Desk OTP, Symbol-to-Accept, Fingerprint, or Face Recognition workflows are initially selected, and then a different second-factor authentication option is preferred, end users can enter 0 (zero) in the Response field to return to the screen where they can select a different second-factor authentication option.
See the Password | Second Factor section above, for sample screen shots showing the results of selections made in step 3.
5. On the response screen, enter your password.
 |
Username | Fingerprint
1. On the initial VPN login screen, enter your username.
2. A password entry is not required.
3. If more than one mobile phone is registered, select the phone to use. (You need to do this once only; the selection is persistent.)
4. Enter the number that corresponds with Fingerprint to send a request to the SecureAuth mobile app.
3. Provide a fingerprint on the SecureAuth mobile app to approve the request.
4. The VPN receives the fingerprint information and you are authenticated.
Username | Face Recognition
1. On the initial VPN login screen, enter your username.
2. A password entry is not required.
3. If more than one mobile phone is registered, select the phone to use. (You need to do this once only; the selection is persistent.)
4. Enter the number that corresponds with Face Recognition to send a request to the SecureAuth mobile app.
3. Show your face on the SecureAuth mobile app to approve the request.
4. The VPN receives the face information and you are authenticated.
Password & One-Time Passcode (TOTP/HOTP)
1. On the initial VPN login screen, enter your username.
2. Enter your password.
3. Get the one-time passcode from the SecureAuth mobile app (or other SecureAuth TOTP application, such as SecureAuth Passcode), HOTP from YubiKey, or TOTP from a Yubico Authenticator app by using a YubiKey.
4. Enter your passcode.
Password & Yubico One-Time Passcode (OTP)
1. On the initial VPN login screen, enter your username.
2. Enter your password.
3. Get the Yubico one-time passcode by pressing your YubiKey.
The Yubico OTP is automatically sent to the login app, the login app receives the OTP, and you are connected to your network.