Akana Integration Guide
Introduction
Use this guide to enable Multi-Factor Authentication and Single Sign-on (SSO) access via OpenID Connect / OAuth 2.0 to Akana.
Prerequisites
1. Have SecureAuth IdP 8.2+
2. Have an Akana admin account and access to the web admin
3. Create a New Realm for the Akana integration in the SecureAuth IdP Web Admin
4. Configure the following tabs in the Web Admin before configuring the Post Authentication tab:
Overview – the description of the realm and SMTP connections must be defined
Data – an enterprise directory must be integrated with SecureAuth IdP
Workflow – the way in which users will access this application must be defined
Multi-Factor Methods – the Multi-Factor Authentication methods that will be used to access this page (if any) must be defined
SecureAuth IdP Configuration Steps
Post Authentication
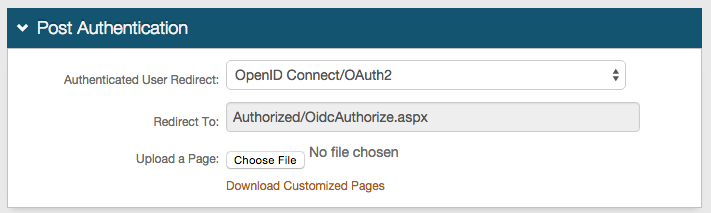 |
1. In the Post Authentication section, select OpenID Connect / OAuth 2 from the Authenticated User Redirect dropdown
2. An unalterable URL will be auto-populated in the Redirect To field, which will append to the domain name and realm number in the address bar (Authorized/OidcAuthorize.aspx)
Warning
Click Save once the configurations have been completed and before leaving the Post Authentication page to avoid losing changes
Forms Auth / SSO Token
Optionally, in the Forms Auth / SSO Token section, click the View and Configure FormsAuth keys/SSO token link to configure the token/cookie settings and configure this realm for SSO.
 |
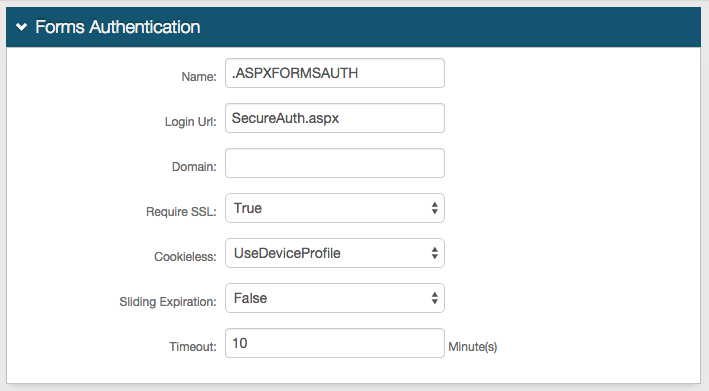
In the Forms Authentication section, set the following:
Require SSL
If the SSL is required to view the token, set to True.
Cookieless
Indicate whether SecureAuth IdP will deliver the token in a cookie to the user's browser or device:
UseCookies – Always deliver a cookie
UseUri – Do not deliver a cookie, deliver the token in a query string
AutoDetect – Deliver a cookie if the user's settings allow it.
UseDeviceProfile – Deliver a cookie if the browser settings allow it, regardless of the user's settings
Sliding Expiration
For the cookie to remain valid as long as the user is interacting with the page, set to True.
Timeout
Set the length of time in minutes the cookie is valid.
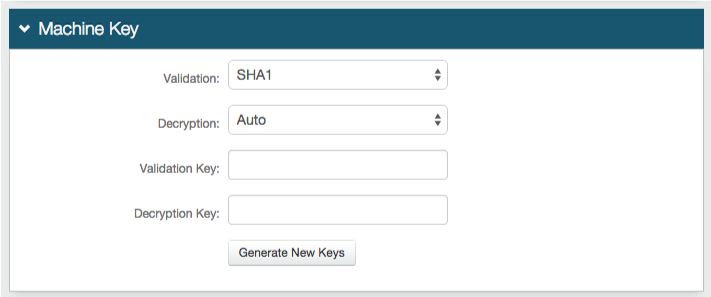
In the Machine Key section, set the following:
Validation
If the default value does not match your organization's requirements, choose another value.
Decryption
If the default value does not match your organization's requirements, choose another value.
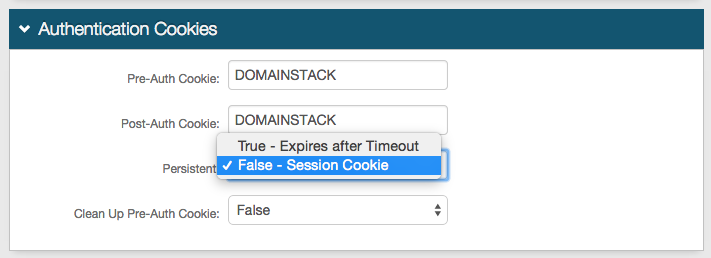
In the Authentication Cookies section, set the following:
Persistent
Set one of the following values:
True - Expires after Timeout – Allow the cookie to be persistent
False - Session Cookie – Allow the cookie to be valid as long as the session is open, and expires when the browser is closed or the session expires
Save your changes.
Note
To configure this realm for SSO, refer to SecureAuth IdP Single Sign-on Configuration
Note
To configure this realm for Windows Desktop SSO, refer to Windows desktop SSO configuration
OpenID Connect / OAuth 2.0 - Settings
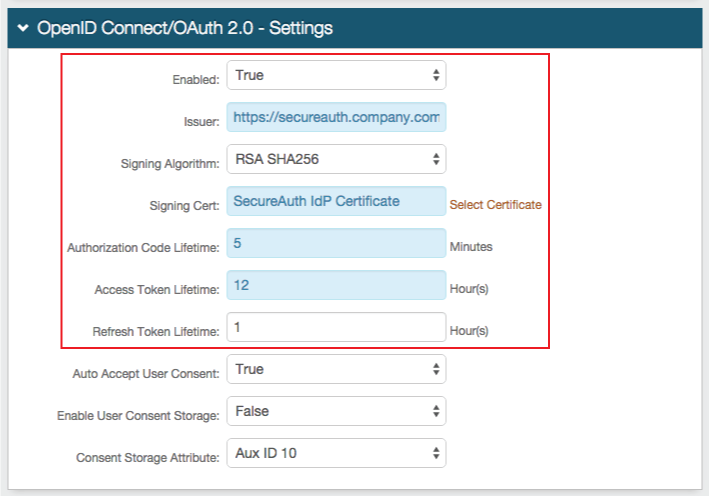 |
4. Select True from the Enabled dropdown
5. Set the Issuer to the Fully Qualified Domain Name (FQDN) of the SecureAuth IdP appliance, followed by the Akana-integrated realm, e.g. https://secureauth.company.com/secureauth2
6. Select RSA SHA256 from the Signing Algorithm dropdown
7. Click Select Certificate to select a SecureAuth IdP or third-party certificate uploaded to the appliance to be used in the integration
8. Set the Lifetimes for the Authorization Code, Access Token, and Refresh Token
OpenID Connect / OAuth 2.0 - Scopes
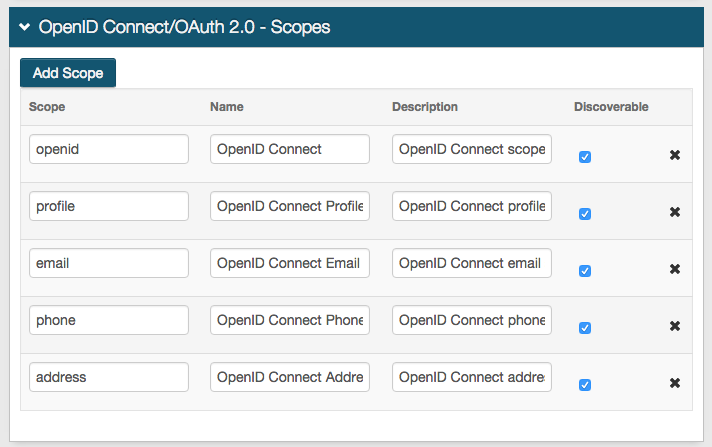 |
9. Check Discoverable from the openid Scope option
10. Check Discoverable on the other Scopes that are being used in the integration
Warning
Click Save once the configurations have been completed and before leaving the Post Authentication page to avoid losing changes
OpenID Connect / OAuth 2.0 - Clients
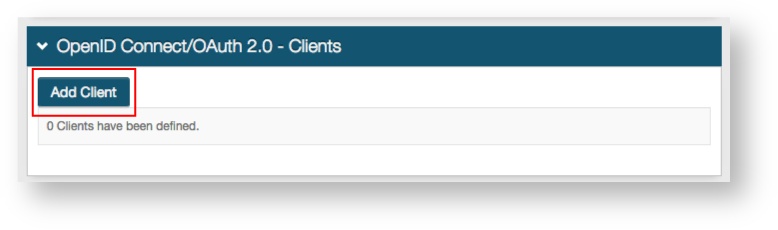 |
11. Click Add Client to create an Akana client
OpenID Connect / OAuth 2.0 - Client Details
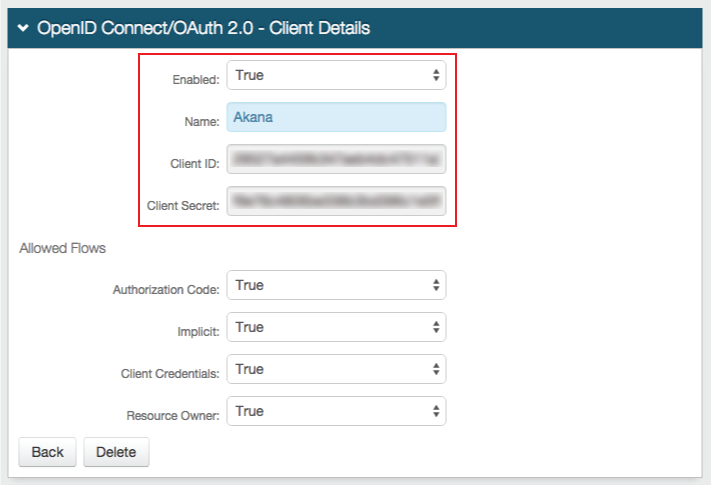 |
12. Select True from the Enabled dropdown
13. Set the Name to an identifiable name that appears in the SecureAuth IdP Web Admin, e.g. Akana
The Client ID and Client Secret are generated by SecureAuth IdP once the client is saved
The Client ID appears in the OpenID Connect / OAuth 2.0 - Clients section; and the Client Secret can be viewed by clicking on the Akana from the OpenID Connect / OAuth 2.0 - Clients section (once created)
OpenID Connect / OAuth 2.0 - Client Redirect URIs
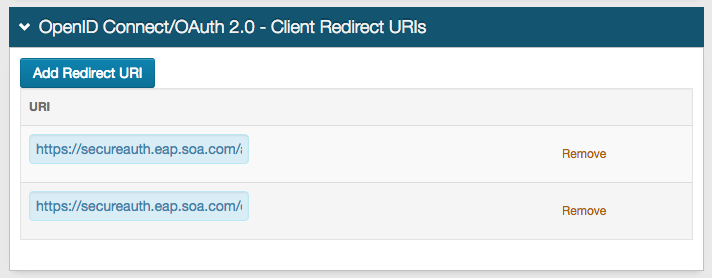 |
14. Click Add Redirect URI
15. Set the URI to https://secureauth.eap.soa.com/api/login/ssoLogin
16.Click Add Redirect URI
17. Set the second URI to https://secureauth.eap.soa.com/oauth/auz/grants/provider/authcomplete
Warning
Click Save once the configurations have been completed and before leaving the OpenID Connection / OAuth 2.0 Clients page to avoid losing changes
OpenID Connect / OAuth 2.0 - Claims
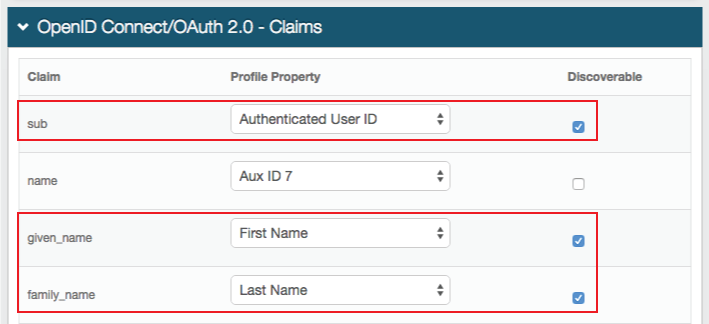 |
18. Select Authenticated User ID from the Profile Property dropdown in the sub Claim
19. Check Discoverable
20. Select First Name from the Profile Property dropdown in the given_name Claim
21. Check Discoverable
22. Select Last Name from the Profile Property dropdown in the family_name Claim
23. Check Discoverable
Warning
Click Save once the configurations have been completed and before leaving the Post Authentication page to avoid losing changes
Akana Configuration Steps
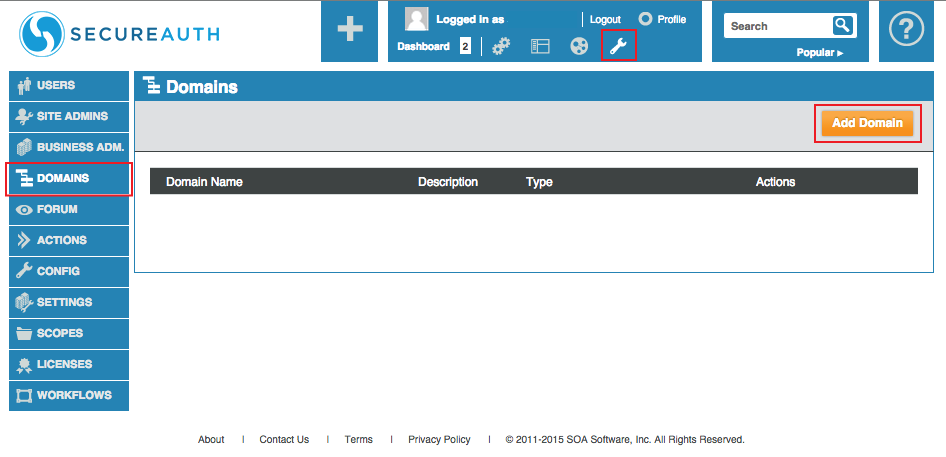
Domains
 |
 |
1. Log into the Akana web admin, and click the Tools icon from the top menu
2. Select Domains and click Add Domain
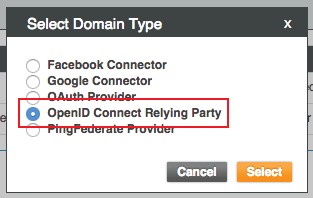
3. Select OpenID Connect Relying Party and click Select
Details
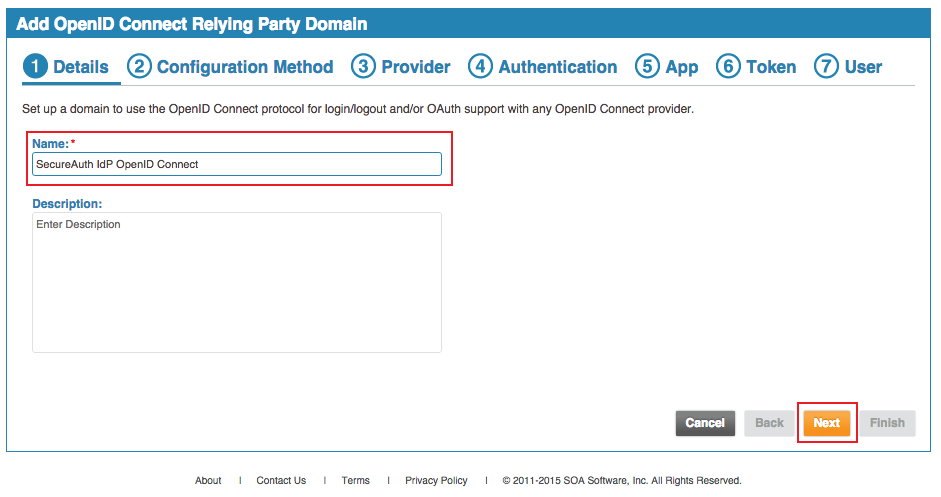 |
4. Provide a Name for the new domain, and an optional Description
5. Click Next
Configuration Method
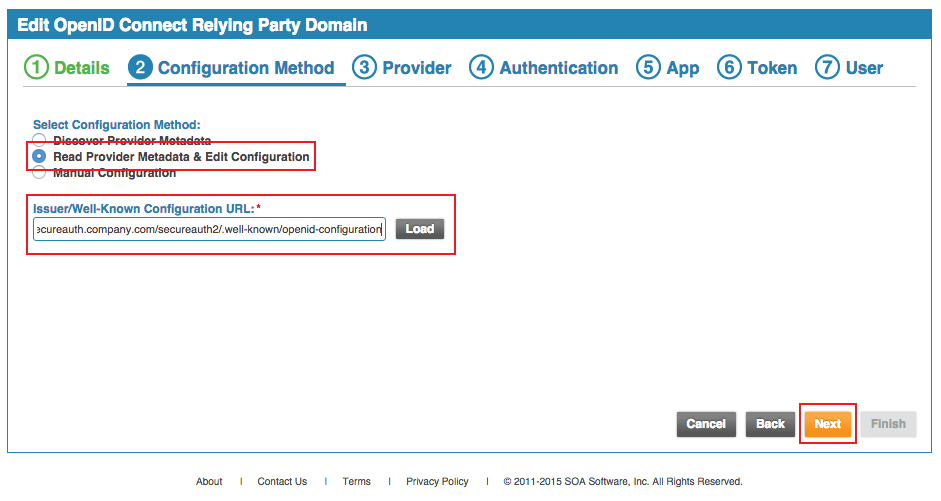 |
6. Select Read Provider Metadata & Edit Configuration from the Select Configuration Method options
7. Set the Issuer / Well-Known Configuration URL to the FQDN of the SecureAuth IdP appliance, followed by the Akana-integrated realm, and /.well-known/openid-configuration, e.g. https://secureauth.company.com/secureauth2/.well-known/openid-configuration; and click Load
8. Click Next
Provider
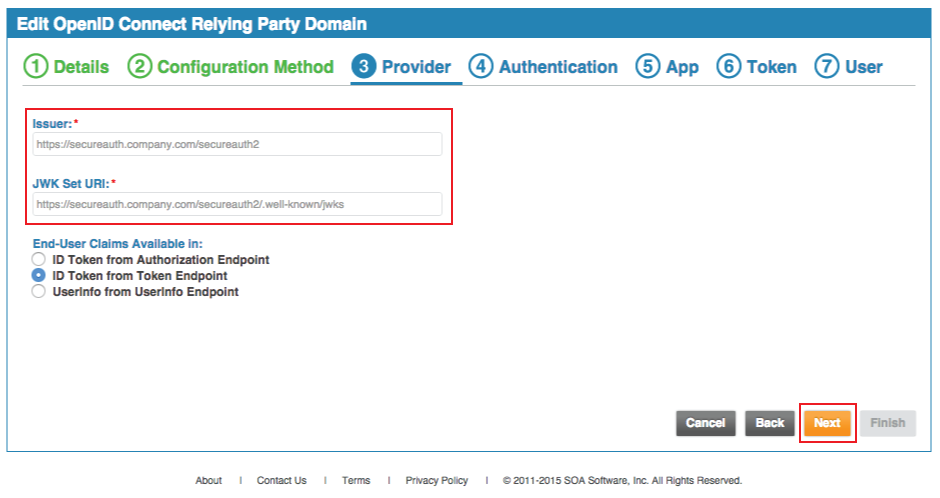 |
9. The Issuer is auto-populated and should be set to the FQDN of the SecureAuth IdP appliance, followed by the Akana-integrated realm, e.g. https://secureauth.company.com/secureauth2
This is the same value set in the Issuer field of the SecureAuth IdP Web Admin (step 5)
10. The JWK Set URI is auto-populated and should be set to the FQDN of the SecureAuth IdP appliance, followed by the Akana-integrated realm, and /.well-known/jwks, e.g. https://secureauth.company.com/secureauth2/.well-known/jwks
11. Select in which mode the End-User Claims are Available
SecureAuth recommends ID Token from Token Endpoint
12. Click Next
Authentication
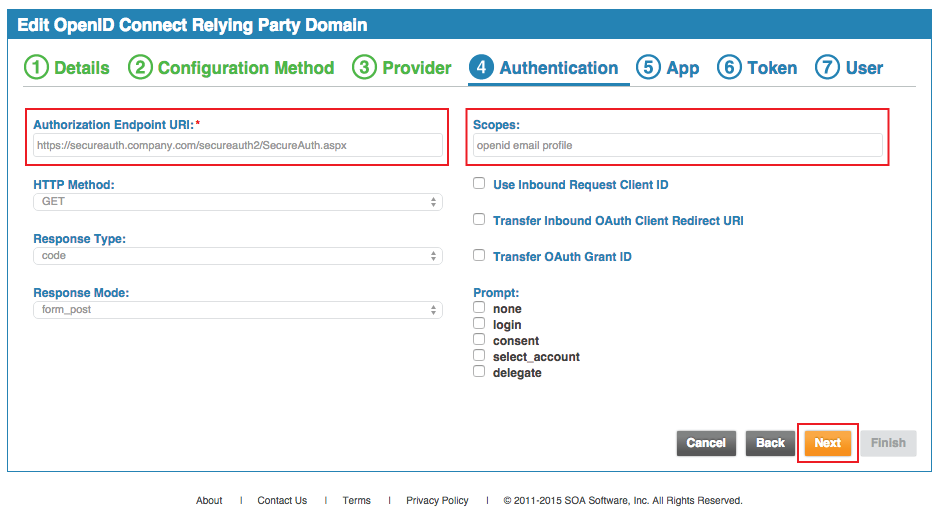 |
13. The Authorization Endpoint URI is auto-populated and should be set to the FQDN of the SecureAuth IdP appliance, followed by the Akana-integrated realm, and /SecureAuth.aspx, e.g. https://secureauth.company.com/secureauth2/SecureAuth.aspx
14. Select GET from the HTTP Method dropdown
15. Select the Response Type from the dropdown, which corresponds to the selection made for step 11
SecureAuth recommends code
16. Select the Response Mode from the dropdown
SecureAuth recommends form_post
17. List all of the Scopes utilized in the integration, and those configured as Discoverable in the SecureAuth IdP Web Admin (steps 9 - 10)
18. Click Next
App
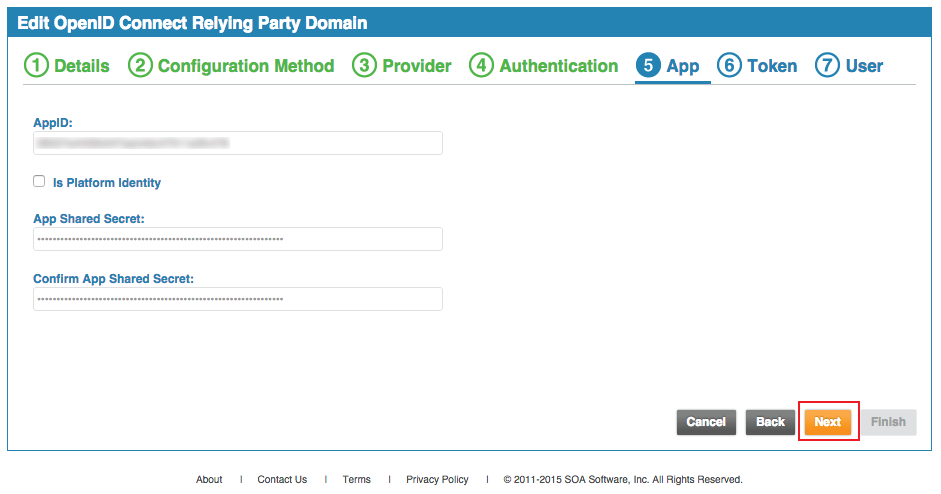 |
19. Set the App ID to the Client ID generated in the Client Details section of SecureAuth IdP Web Admin
20. Set the App Shared Secret to the Client Secret generated in the Client Details section of the SecureAuth IdP Web Admin, and Confirm
21. Click Next
Token
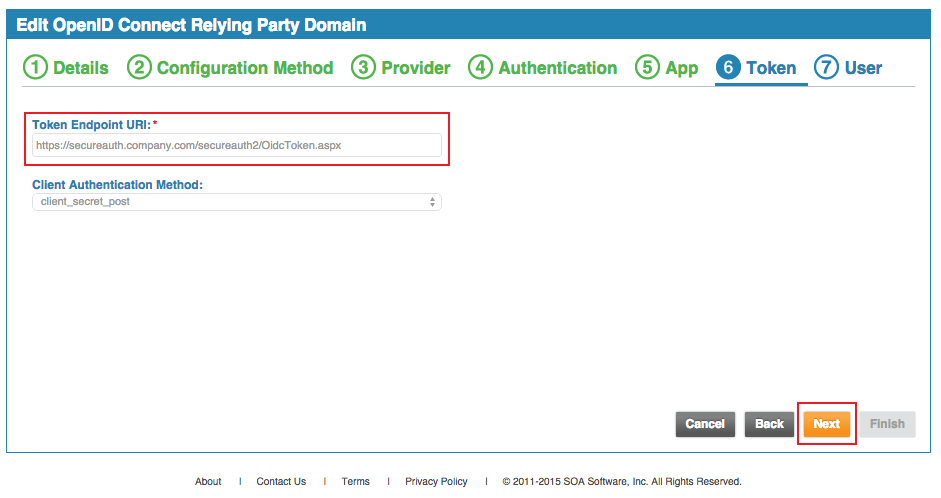 |
22. The Token Endpoint URI is auto-populated and should be set to the FQDN of the SecureAuth IdP appliance, followed by the Akana-integrated realm, and /OidcToken.aspx, e.g. https://secureauth.company.com/secureauth2/OidcToken.aspx
23. Select the Client Authentication Method from the dropdown
SecureAuth recommends client_secret_post
24. Click Next
User
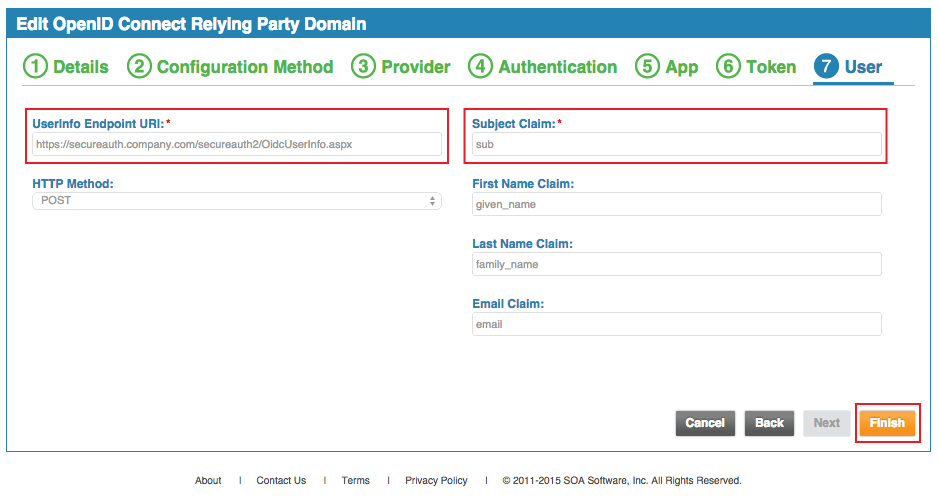 |
25. The UserInfo Endpoint URI is auto-populated and should be set to the FQDN of the SecureAuth IdP appliance, followed by the Akana-integrated realm, and /OidcUserInfo.aspx, e.g. https://secureauth.company.com/secureauth2/OidcUserInfo.aspx
26. Select POST from the HTTP Method dropdown
27. The Subject Claim, First Name Claim, Last Name Claim, and Email Claim values are auto-populated based on the mapping in the SecureAuth IdP Web Admin (steps 18 - 23)
29. Click Finish
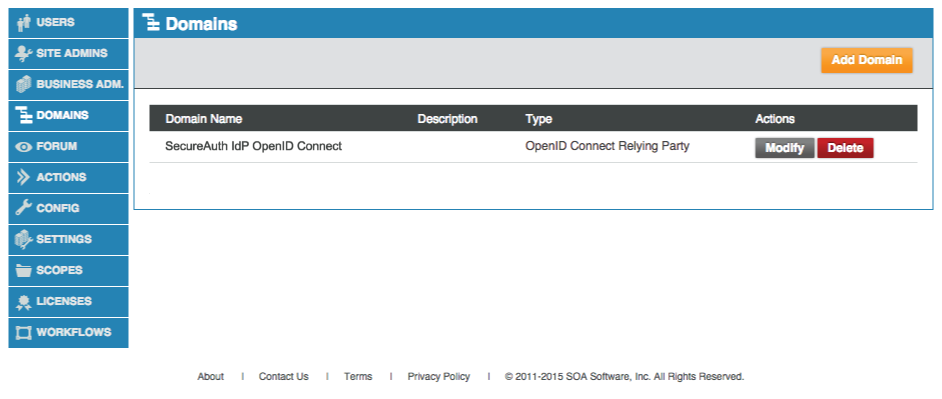 |
Once the Domain is created, it appears in the Domains section
Here, the configuration can be Modified or the domain can be Deleted
Config
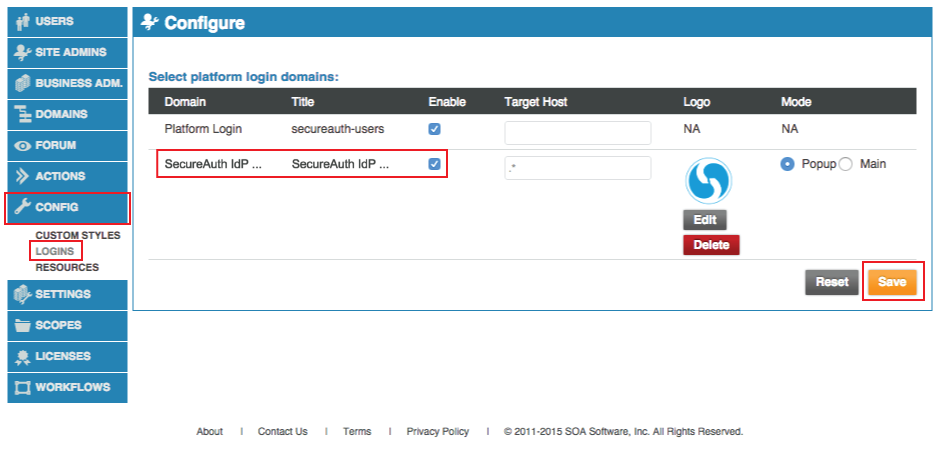 |
30. Select Logins under Config
31. Enable the newly-created Domain and upload a Logo that appears on the login pages
32. Click Save
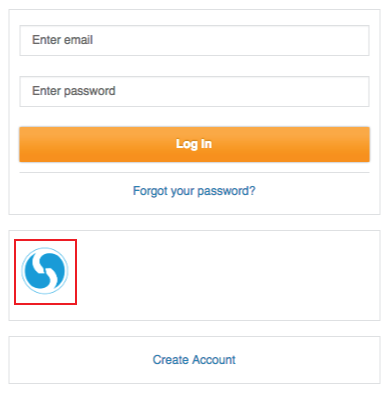
End-user Experience
When the end-user initiates the login process, instead of providing the username and password, click the Logo uploaded in step 31
The end-user is redirected to SecureAuth IdP for 2-Factor Authentication, and then redirected back into Akana upon successful identity validation
 |
 |