Submit Form Post to Generic Web Apps Configuration Guide
Introduction
Use this guide to provide a Submit Form Post Authentication page for users to perform a generic HTTPS post to a specific URL.
For example, this page can provide a direct login to Salesforce without the end-user needing to input a username and password on the Salesforce login page.
Prerequisites
1. Access to the configured application to which the form post will be submitted
2. List of control names to which posts will be made
3. Create a New Realm or edit an existing realm on which the form post information will be configured
4. Configure the following tabs on the Web Admin before configuring the Form Post
Overview– the description of the realm and SMTP connections must be defined
Data– an enterprise directory must be integrated with SecureAuth IdP, and AUX IDs configured for posting data to the form
Workflow– the way in which users will access the target must be defined
Multi-Factor Methods– the Multi-Factor Authentication methods that will be used to access the target (if any) must be defined
Post Authentication– the target resource or post authentication action must be defined
Logs– the logs that will be enabled or disabled for this realm must be defined
SecureAuth IdP Configuration Steps
Post Authentication
 |
1. Select Submit Form Post from the Authenticated User Redirect dropdown
Warning
Click Save once the configuration has been completed and before leaving the Post Authentication page to avoid losing changes
Submit Form Post
 |
2. Click View and Configure Submit Form Post page
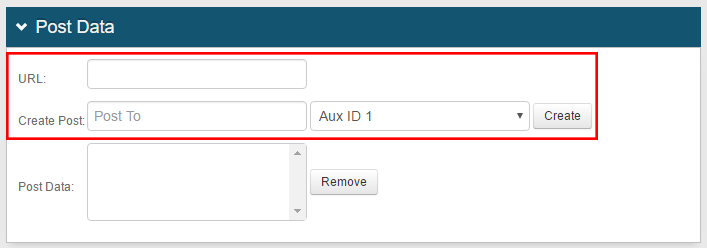
Post Data
 |
3. Enter the HTTPS URL of the application to which posts will be submitted
Note
HTTP is not supported in 9.0+ versions
4. In Create Post, enter the name of the control on the application to which posts will be submitted
5. Select the appropriate AUX ID from the dropdown to post data to the form
Note
The end-user's current Authenticated User ID and / or Authenticated Password can additionally be selected for posting data to the form
Passwords can be enrolled in AUX ID values through a Self-service Account Update Page.
6. Click Create to add the entry to the form
Optional: Static Post Data
 |
7. If static data also needs to be submitted, in Create Static Post, enter the name of the control on the application to which posts will be submitted
8. Enter the value corresponding to the control
9. Click Create
Warning
Click Save once the configuration has been completed and before leaving the Post Data page to avoid losing changes