Oracle Database as Additional Profile Provider Configuration Guide
Introduction
Use this guide along with the Data Tab Configuration guide to configure a SecureAuth IdP realm that uses Oracle Database as an additional Profile Provider.
Prerequisites
An on-premises Oracle Database with which SecureAuth IdP can integrate
SecureAuth IdP supports versions 11.2 and 12.1, and supports with limitations versions 11.1 and 10.2
Create or enable an admin account that has read access (and optional write access) to the tables and stored procedures
Write access is required to update user profile information, such as creating new users and changing passwords
Contact SecureAuth Support to download the Oracle Data Access Components and install it onto the SecureAuth IdP appliance
More download information found here
Oracle Database Configuration Steps
Note
Refer to Oracle Database Configuration Guide for directory configuration steps, including sample tables and stored procedures
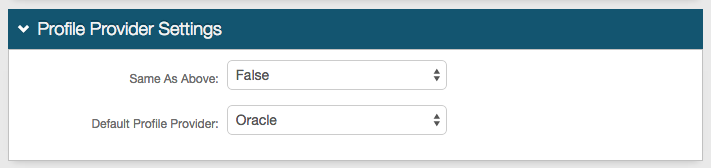 |
1. In the Profile Provider Settings section, select True from the Same as Above dropdown to copy the data store integration from the Membership Connection Settings section for use in profile connection; or select False if that directory is only used for the membership connection.
2. Select Oracle from the Default Profile Provider dropdown if Oracle is to be used as the default profile provider
Note
If another Oracle data store is configured in the Membership Connection Settings section, and True is selected from the Same as Above dropdown, then those settings appear in the Profile Connection Settings (below) and must be modified to reflect the settings of the new Oracle data store
Only one Oracle can be utilized for profile connection
If another directory is selected from the Default Profile Provider dropdown, then Oracle must be selected from Source dropdown in the Profile Fields section for the SecureAuth IdP Properties that are mapped to Oracle fields
Profile Connection Settings
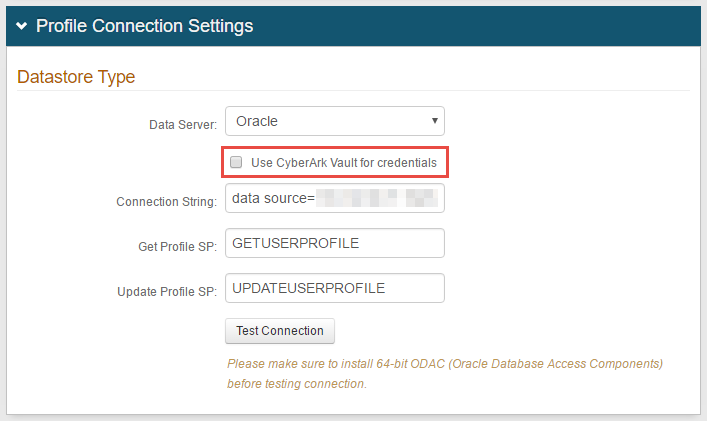 |
3. Select Oracle from the Data Server dropdown
Note
If using CyberArk Vault for credentials, enable Use CyberArk Vault for credentials and follow the steps in CyberArk Password Vault Server and AIM Integration with SecureAuth IdP
4. Provide or modify the given Connection String in the following format:
Data Source=(DESCRIPTION=(ADDRESS_LIST=(ADDRESS=(PROTOCOL=TCP)(HOST=localhost)(PORT=1522)))(CONNECT_DATA=(SERVER=DEDICATED)(SERVICE_NAME=[DBName]))); User Id=[username];Password=[password]
Replace localhost (after HOST) with the Server Name or IP Address of the Oracle Database if it is not on the same server
Replace 1522 with the appropriate PORT number if using a different port
Replace [DBName] with the name of the database
Replace [username] with the username of the service account
Replace [password] with the password of the service account
5. Provide the Stored Procedure Name for the Get Profile SP
6. Provide the Stored Procedure Name for the Update Profile SP
Note
If the tables and stored procedures from the Oracle Database as Additional Profile Provider Configuration Guide were used and the names we unchanged, steps 5 and 6 can be left as the default
7. Click Test Connection to ensure that the connection is successful
Note
Refer to Data Tab Configuration to complete the configuration steps in the Data tab of the Web Admin