Jobvite (SP-initiated) Integration Guide
Introduction
Use this guide to enable Multi-Factor Authentication and Single Sign-on (SSO) access via SAML to Jobvite.
Prerequisites
1. Have a Jobvite Account
2. Ensure that SAML SSO is enabled
Submit a support ticket to the Jobvite Customer Success Representative to enable SAML SSO
3. Create a New Realm for the Jobvite integration
4. Configure the following tabs in the Web Admin before configuring the Post Authentication tab:
Overview – the description of the realm and SMTP connections must be defined
Data – an enterprise directory must be integrated with SecureAuth IdP
Workflow – the way in which users will access this application must be defined
Multi-Factor Methods – the Multi-Factor Authentication methods that will be used to access this page (if any) must be defined
SecureAuth IdP Configuration Steps
Data
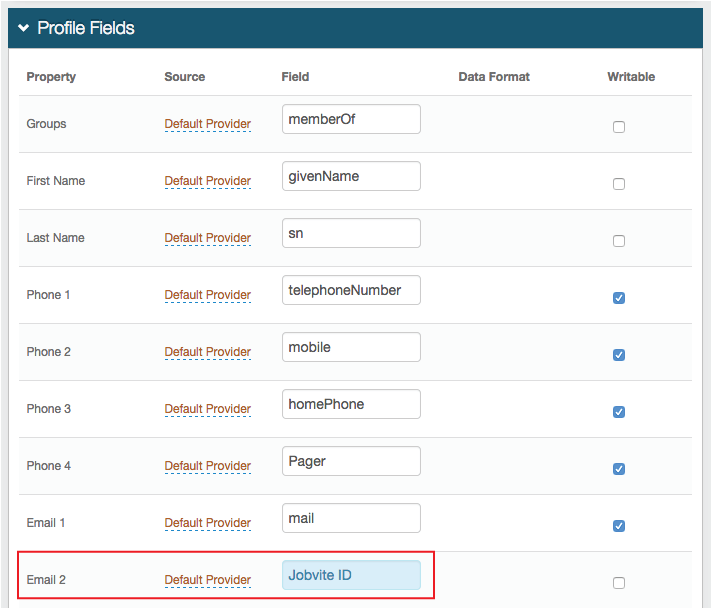 |
1. In the Profile Fields section, map the directory field that contains the user's Jobvite ID to the SecureAuth IdP Property
For example, add the Jobvite ID Field to the Email 2 Property if it is not already contained somewhere else
Warning
Click Save once the configurations have been completed and before leaving the Data page to avoid losing changes
Post Authentication
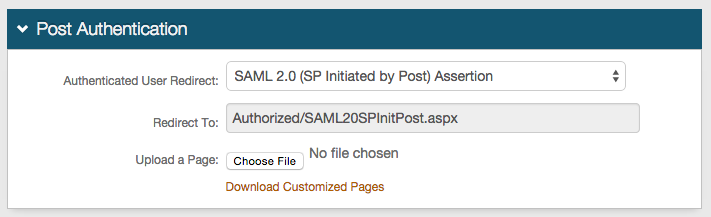 |
2. Select SAML 2.0 (SP Initiated by Post) Assertion Page from the Authenticated User Redirect dropdown in the Post Authentication tab in the Web Admin
3. An unalterable URL will be auto-populated in the Redirect To field, which will append to the domain name and realm number in the address bar (Authorized/SAML20SPInitPost.aspx)
4. A customized post authentication page can be uploaded, but it is not required
User ID Mapping
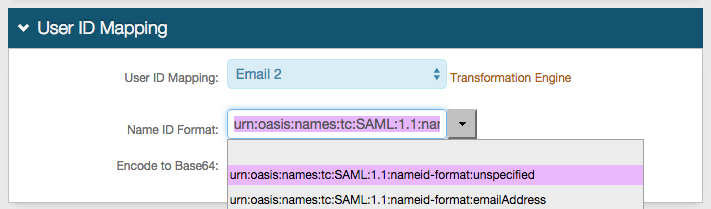 |
5. Select the SecureAuth IdP Property that corresponds to the directory field that contains the Jobvite ID (Email 2)
6. Select urn:oasis:names:tc:SAML:1.1:nameid-format:unspecified from the Name ID Format dropdown (default)
Select a different option if Jobvite requires it, which the Service Provider (SP) will provide
7. Select False from the Encode to Base64 dropdown
SAML Assertion / WS Federation
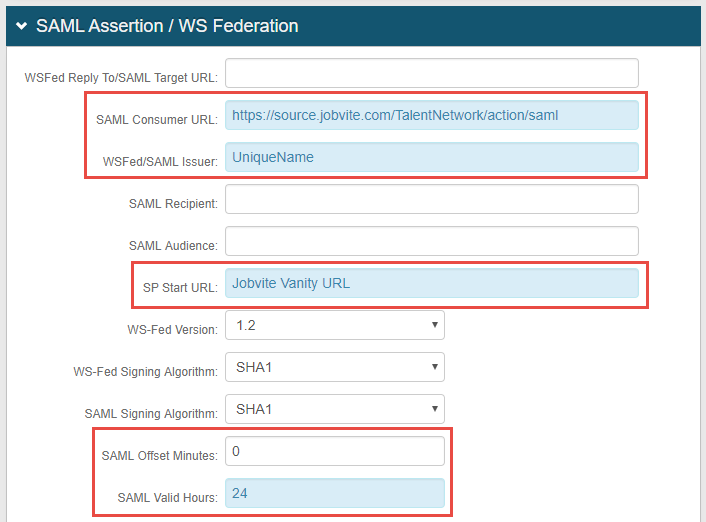 |
8. Set the SAML Consumer URL to https://source.jobvite.com/TalentNetwork/action/saml
9. Set the WSFed/SAML Issuer to a Unique Name that will be shared with Jobvite
The WSFed/SAML Issuer must match exactly on the SecureAuth IdP side and the Jobvite side
10. Provide the SP Start URL to enable SSO and to redirect users appropriately to access Jobvite
The SP Start URL would be the company's Jobvite vanity URL
11. Set the SAML Offset Minutes to make up for time differences between devices
12. Set the SAML Valid Hours to limit for how long the SAML assertion is valid
Note
No configuration is required for WSFed Reply To/SAML Target URL, SAML Recipient, or SAML Audience fields
 |
13. Leave the Signing Cert Serial Number as the default value, unless there is a third-party certificate being used for the SAML assertion
If using a third-party certificate, click Select Certificate and choose the appropriate certificate
14. Provide the Domain in order to Download the Metadata File to send to Jobvite
Warning
Click Save once the configurations have been completed and before leaving the Post Authentication page to avoid losing changes
Forms Auth / SSO Token
Optionally, in the Forms Auth / SSO Token section, click the View and Configure FormsAuth keys/SSO token link to configure the token/cookie settings and configure this realm for SSO.
 |
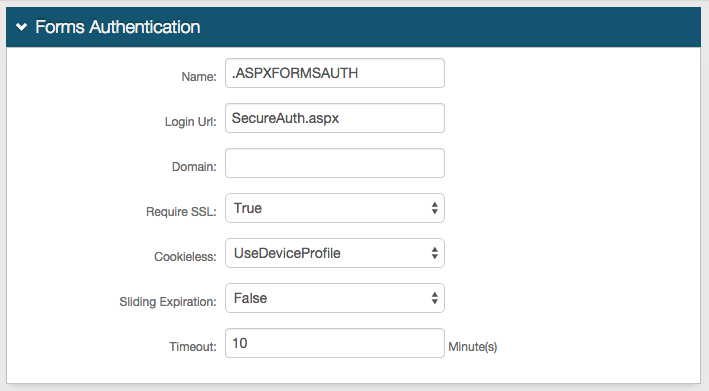
In the Forms Authentication section, set the following:
Require SSL
If the SSL is required to view the token, set to True.
Cookieless
Indicate whether SecureAuth IdP will deliver the token in a cookie to the user's browser or device:
UseCookies – Always deliver a cookie
UseUri – Do not deliver a cookie, deliver the token in a query string
AutoDetect – Deliver a cookie if the user's settings allow it.
UseDeviceProfile – Deliver a cookie if the browser settings allow it, regardless of the user's settings
Sliding Expiration
For the cookie to remain valid as long as the user is interacting with the page, set to True.
Timeout
Set the length of time in minutes the cookie is valid.
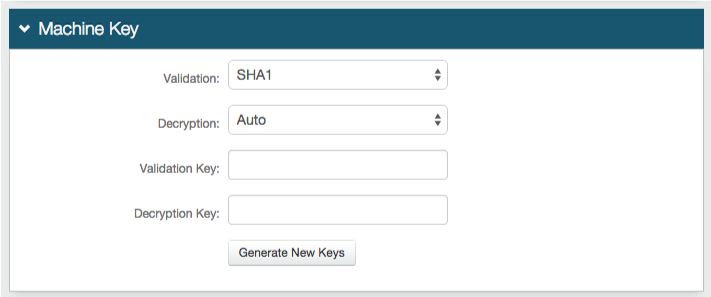
In the Machine Key section, set the following:
Validation
If the default value does not match your organization's requirements, choose another value.
Decryption
If the default value does not match your organization's requirements, choose another value.
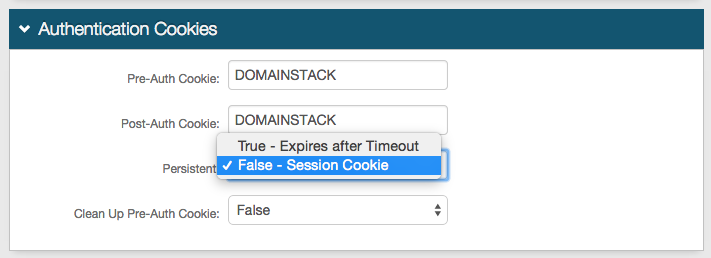
In the Authentication Cookies section, set the following:
Persistent
Set one of the following values:
True - Expires after Timeout – Allow the cookie to be persistent
False - Session Cookie – Allow the cookie to be valid as long as the session is open, and expires when the browser is closed or the session expires
Save your changes.
Note
To configure this realm for SSO, refer to SecureAuth IdP Single Sign-on Configuration
Note
To configure this realm for Windows Desktop SSO, refer to Windows desktop SSO configuration
Jobvite Configuration Steps
Submit a support ticket to enable SAML SSO, and provide the Metadata File from the SecureAuth IdP Web Admin