Admin API Guide
Introduction
SecureAuth's Admin API lets administrators configure SecureAuth IdP realms without using the Web Admin interface.
Using various GET, POST, and PATCH endpoint calls, admins can create new realms, customize client-side pages, integrate directories, dictate workflows, set Adaptive Authentication policies, enable multi-factor authentication methods, generate API credentials and settings, configure SAML / WS-Federation assertions, and enable logging.
Refer to the specific endpoint guides at the bottom of this page for more information on the possible configurations.
Prerequisites
Access to SecureAuth IdP v9.1 or later Web Admin (required for Enablement Step below).
Access to application code that calls the API endpoints.
SecureAuth IdP Enablement Steps
 |
1. Log on the SecureAuth IdP Web Admin and enter the Admin Realm (SecureAuth0)
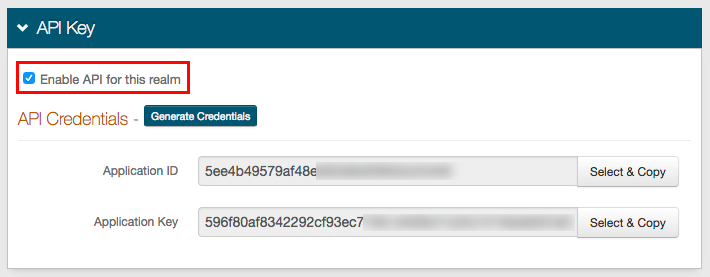
2. In the API tab, under API Key, check Enable API for this realm
3. Click Generate Credentials and copy the Application ID and Application Key from the page to use in the application's code and headers to create communication with SecureAuth IdP
Warning
Click Save once the configuration is complete and before leaving the API page to avoid losing changes
Configure Request Header
To authenticate against the API, an HTTP basic authorization header and Content-Type header are required
1. Add a Content-Type header with a value of application/json
2. Create an Authorization Header for all requests by following the steps below, based on whether SecureAuth IdP v9.1 or SecureAuth IdP v9.2 or later is running
Authorization Header
1. Build a string based on the request
a. METHOD (GET)
b. DATE/TIME
Header types | IdP version | String requirements |
|---|---|---|
Date | v9.1+ | second-precision timestamp |
X-SA-Date (custom) | v9.1+ | second-precision timestamp |
X-SA-Ext-Date (custom) | v9.2+ | millisecond-precision timestamp |
c. APPLICATION ID (from SecureAuth IdP Web Admin)
d. PATH (API endpoint)
– e.g.https://secureauth.company.com/api/v1/realms/{realmID} for SecureAuth IdP v9.1–orhttps://secureauth.company.com/api/v2/realms/{realmID} for SecureAuth IdP v9.2+
2. Create an HMAC SHA256 hash of step 1 using the Application Key (from SecureAuth IdP Web Admin)
This step is executed by calling the HMAC and producing the hash value
3. Encode the HMAC SHA256 hash from step 2 in Base64
4. Concatenate the "Application ID", ":", and the "Base64 encoded HMAC SHA256 hash" from step 3
ApplicationID:Base64EncodedHMACSHA256Hash
5. Encode the value from step 4 in Base64
6. Concatenate "Basic " and the "Value of Step 5"
Basic Step5Value
1. Build a string based on the request
a. METHOD (POST)
b. DATE/TIME
Header types | IdP version | String requirements |
|---|---|---|
Date | v9.1+ | second-precision timestamp |
X-SA-Date (custom) | v9.1+ | second-precision timestamp |
X-SA-Ext-Date (custom) | v9.2+ | millisecond-precision timestamp |
c. APPLICATION ID (from SecureAuth IdP Web Admin)
d. PATH (API endpoint)
– e.g.https://secureauth.company.com/api/v1/realms/{realmID} for SecureAuth IdP v9.1– orhttps://secureauth.company.com/api/v2/realms/{realmID} for SecureAuth IdP v9.2+
e. CONTENT (JSON parameters)
2. Create an HMAC SHA256 hash of step 1 using the Application Key (from SecureAuth IdP Web Admin)
This step is executed by calling the HMAC and producing the hash value
3. Encode the HMAC SHA256 hash from step 2 in Base64
4. Concatenate the "Application ID", ":", and the "Base64 encoded HMAC SHA256 hash" from step 3
ApplicationID:Base64EncodedHMAC256Hash
5. Encode the value from step 4 in Base64
6. Concatenate "Basic " and the "Value of Step 5"
Basic Step5Value
3. (OPTIONAL) If utilizing the Email 2-Factor Authentication method and a different language than US English, create an Accept-Language header to generate the Email OTP messages in the preferred language
If no Accept-Language header is present, the Email OTP messages default to US English
Configure Response Header
SecureAuth's API includes a security hashing enhancement that ensures the integrity of the information being sent in all of the endpoints' responses from the appliance to the application.
Through a hashing algorithm, SecureAuth IdP delivers a signature that can be validated by the application to ensure that no data manipulation has occurred prior to the application consuming the data.
Before sending the response to the application (initiated by the endpoint request), SecureAuth IdP creates the signature and includes it in the Response Header (prepended by X-SA-SIGNATURE:). The application can then validate the response by hashing the date / time and content from the consumed response and the Application ID with the Application Key and compare the new hashed value with the X-SA-SIGNATURE value.
Notice
The Application ID and Application Key are generated in SecureAuth IdP and connect the appliance with the application for each endpoint transaction
If, after hashing the data, the value matches (exactly) the signature provided in the SecureAuth IdP response header, then the data has not been compromised; if the value does not match the response signature, then the data has been modified.
Application Response Header
In the application's code, the following is required to validate the response header's signature:
1. Build a string based on the request
a. X-SA-DATE for a second-precision timestamp (from the SecureAuth IdP v.1+ response)
b. APPLICATION ID (from SecureAuth IdP Web Admin)
c. CONTENT (JSON Parameters from the SecureAuth IdP response)
2. Create an HMAC SHA256 hash of step 1 using the Application Key (from SecureAuth IdP Web Admin)
This step is executed by calling the HMAC and producing the hash value
3. Encode the HMAC SHA256 hash from step 2 in Base64
4. Compare the HMAC SHA256 hash from step 3 to the X-SA-SIGNATURE value in the SecureAuth Response Header
5. Consume the response based on the comparison result
OPTIONAL: Configure X-SA-Ext-Date Header
The string section for DATE/TIME can be configured to use either the second-precision UTC time or the millisecond-precision format DateTime
If using the millisecond-precision, the date string must be included in the X-SA-Ext-Date header
Sample X-SA-Ext-Date Code
var dateMillis = request.Headers.Date.Value.UtcDateTime.ToString("ddd, dd MMM yyyy HH:mm:ss.fff G\\MT");
                request.Headers.Add("X-SA-Ext-Date", dateMillis);
                request.Headers.Remove("Date");
                var httpMethod = request.Method.Method;
                string uri = request.RequestUri.AbsolutePath;
                string content = null;
                if (request.Content != null)
                {
                    content = request.Content.ReadAsStringAsync().Result;
                }
                result = (string.IsNullOrEmpty(content)) ?
                    string.Join("\n", httpMethod, dateMillis, appId, uri) :
                    string.Join("\n", httpMethod, dateMillis, appId, uri, content);