Outlook Web Access (OWA) 2013 SP1 & 2016 Integration Guide
Introduction
Use this guide to enable Multi-Factor Authentication and Single Sign-on (SSO) access via claims-based authentication and WS-Federation to Microsoft Outlook Web Access (OWA) 2013 SP1 / 2016.
Prerequisites
1. Have OWA 2013 SP1 / 2016 installed on a server
NOTE: The certificate chain for the certificate used for signing the WS-FED assertion must be trusted by the Exchange Server.
2. Create a New Realm for the OWA 2013 SP1 / 2016 integration
3. Configure the following tabs in the Web Admin before configuring the Post Authentication tab:
Overview– the description of the realm and SMTP connections must be defined
Data– an enterprise directory must be integrated with SecureAuth IdP
Workflow– the way in which users will access this application must be defined
Multi-Factor Methods– the Multi-Factor Authentication methods that will be used to access this page (if any) must be defined
Configuration Steps
Windows Identity Foundation (WIF) Configuration Steps
Windows Identity Foundation (WIF), a Microsoft framework for building identity-aware applications, is a core component in this installation and must be installed on the SecureAuth IdP server (if it hasn't already been installed)
1. To install WIF on the SecureAuth IdP server, download WIF from Microsoft's Download Center
NOTE: On Windows 2012 and later, install WIF via Server manager > Add / Remove Roles and Features.
2. Install the update and perform an IISRESET on the appliance
SecureAuth IdP Web Admin Configuration Steps
Data
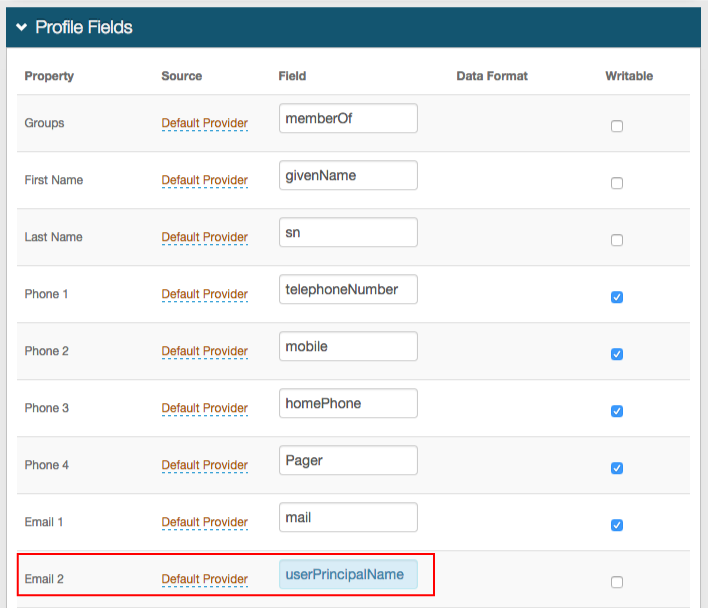 |
1. In the Profile Fields section, map the userPrincipalName to a SecureAuth IdP Property (e.g. Email 2)
Warning
Click Save once the configurations have been completed and before leaving the Data page to avoid losing changes
Post Authentication
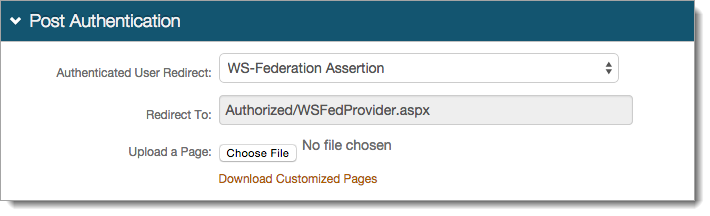 |
2. Select WS-Federation Assertion from the Authenticated User Redirect dropdown in the Post Authentication section
3. An unalterable URL will be auto-populated in the Redirect To field, which will append to the domain name and realm number in the address bar (Authorized/WSFedProvider.aspx)
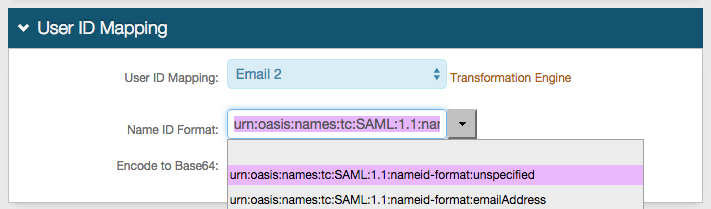 |
4. Select the SecureAuth IdP Property that corresponds to the directory field that contains the userPrincipalName (Email 2)
5. Select urn:oasis:names:tc:SAML:1.1:nameid-format:unspecified from the Name ID Format dropdown (default)
6. Select False from the Encode to Base64 dropdown
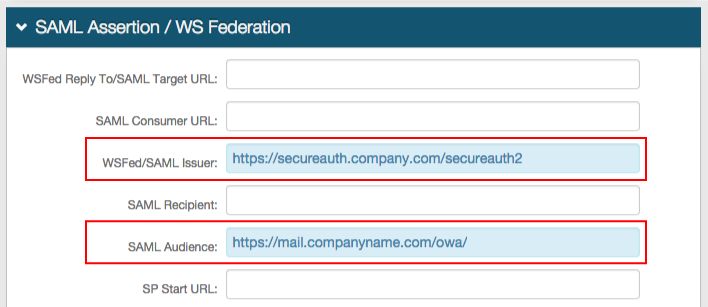 |
7. Set the WSFed/SAML Issuer to https://SecureAuthIdPFQDN/SecureAuthIdPRealm#/ and replace the values with the actual Fully Qualified Domain Name (FQDN) of the SecureAuth IdP appliance and the OWA integration realm number, e.g. SecureAuth2
For example, https://secureauth.company.com/secureauth2
8. Set the SAML Audience to https://mail.companyname.com/owa/ and replace "mail.companyname.com" with the actual DNS value
Note
No configuration is required for the WSFed Reply To/SAML Target URL, SAML Consumer URL, SAML Recipient, or SP Start URL fields
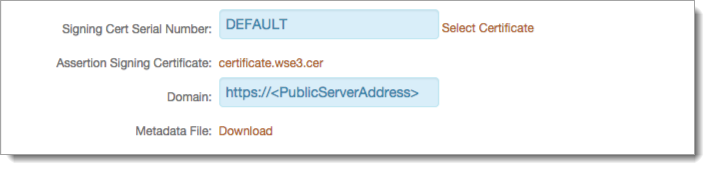 |
9. Leave the Signing Cert Serial Number as the default value, unless there is a third-party certificate being used for the SAML assertion
If using a third-party certificate, click Select Certificate and choose the appropriate certificate
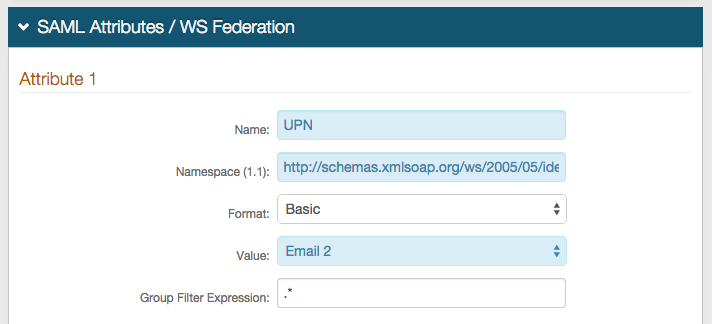 |
10. Set the Name of Attribute 1 to UPN
11. Set the Namespace (1.1) to http://schemas.xmlsoap.org/ws/2005/05/identity/claims/upn
12. Select Email 2 (or the field that contains the userPrincipalName) from the Value dropdown
The Value here and the User ID Mapping selections will be the same
Warning
Click Save once the configurations have been completed and before leaving the Post Authentication page to avoid losing changes
Forms Auth / SSO Token
Optionally, in the Forms Auth / SSO Token section, click the View and Configure FormsAuth keys/SSO token link to configure the token/cookie settings and configure this realm for SSO.
 |
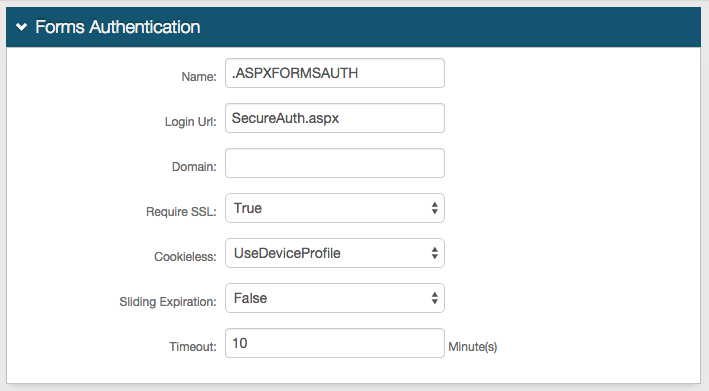
In the Forms Authentication section, set the following:
Require SSL
If the SSL is required to view the token, set to True.
Cookieless
Indicate whether SecureAuth IdP will deliver the token in a cookie to the user's browser or device:
UseCookies – Always deliver a cookie
UseUri – Do not deliver a cookie, deliver the token in a query string
AutoDetect – Deliver a cookie if the user's settings allow it.
UseDeviceProfile – Deliver a cookie if the browser settings allow it, regardless of the user's settings
Sliding Expiration
For the cookie to remain valid as long as the user is interacting with the page, set to True.
Timeout
Set the length of time in minutes the cookie is valid.
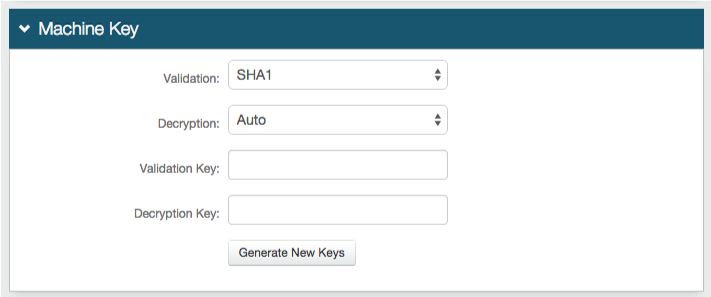
In the Machine Key section, set the following:
Validation
If the default value does not match your organization's requirements, choose another value.
Decryption
If the default value does not match your organization's requirements, choose another value.
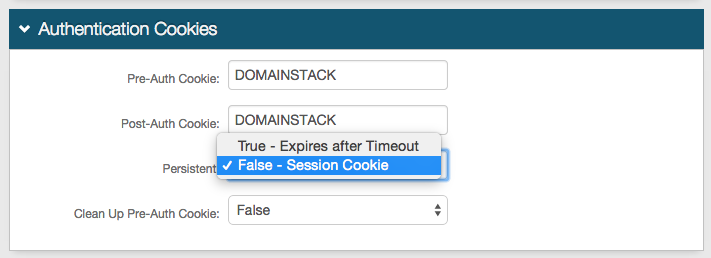
In the Authentication Cookies section, set the following:
Persistent
Set one of the following values:
True - Expires after Timeout – Allow the cookie to be persistent
False - Session Cookie – Allow the cookie to be valid as long as the session is open, and expires when the browser is closed or the session expires
Save your changes.
Note
To configure this realm for SSO, refer to SecureAuth IdP Single Sign-on Configuration
Note
To configure this realm for Windows Desktop SSO, refer to Windows desktop SSO configuration
OWA Integration Configuration Steps
Update the OWA web.config File
1. On the Exchange server, run Notepad elevated (Run as Administrator), and open C:\Program Files\Microsoft\Exchange Server\V15\Frontend\HttpProxy\Owa\web.config
2. Add the following text to the <configSections > at the top of the file:
<!-- SecureAuth -->
    <section name="system.identityModel" type="System.IdentityModel.Configuration.SystemIdentityModelSection, System.IdentityModel, Version=4.0.0.0, Culture=neutral, PublicKeyToken=B77A5C561934E089" />
    <section name="system.identityModel.services" type="System.IdentityModel.Services.Configuration.SystemIdentityModelServicesSection, System.IdentityModel.Services, Version=4.0.0.0, Culture=neutral, PublicKeyToken=B77A5C561934E089" />
<!-- /SecureAuth -->
If the <configSections> does not exist, add the following immediately under <configuration>:
<!-- SecureAuth -->
<configSections>
        <section name="system.identityModel" type="System.IdentityModel.Configuration.SystemIdentityModelSection, System.IdentityModel, Version=4.0.0.0, Culture=neutral, PublicKeyToken=B77A5C561934E089" />
    <section name="system.identityModel.services" type="System.IdentityModel.Services.Configuration.SystemIdentityModelServicesSection, System.IdentityModel.Services, Version=4.0.0.0, Culture=neutral, PublicKeyToken=B77A5C561934E089" />
  </configSections>
<!-- SecureAuth -->
3. If <configSections> is present, comment out the follow line from the <configSections> (in XML markup, comment out a section by adding <!-- at the beginning of the commented out line and --> at the end, which can span multiple lines):
<!-- <section name="microsoft.identityModel" type="Microsoft.IdentityModel.Configuration.MicrosoftIdentityModelSection, Microsoft.IdentityModel, Version=3.5.0.0, Culture=neutral, PublicKeyToken=31bf3856ad364e35" /> -->
4. Retrieve the Certificate "Thumbprint" from the SecureAuth IdP Signing Certificate (step 9)
Open the Signing Certificate in the Certificate MMC, click on the Details tab, scroll to the bottom and find the Thumbprint item
Copy the value, paste into Notepad
Remove all spaces and change all letters to UPPERCASE
Note
See Known Issues at the bottom for potential Thumbprint issues
5. Add the below lines right after <location inheritInChildApplications="false"> at the top of the file
The Thumbprint and other values must be changed from this default content
Replace the "mail.companyname.com" in the https://mail.companyname.com/owa/ value with the actual DNS value (three instances)
This is the same value provided in the SAML Audience field in the SecureAuth IdP Web Admin (step 8)
Replace YOURCERTTHUMBPRINTHERE with the content from step 4 (one instance)
Replace https://SecureAuthIdPFQDN/SecureAuthIdPRealm# with the actual FQDN of the SecureAuth IdP appliance, followed by the realm number, e.g. https://secureauth.company.com/secureauth2 (two instances)
This value must match exactly with the WSFed/SAML Issuer value established in the SecureAuth IdP Web Admin (step 7)
NOTE: If configuring a transparent SSO realm, append the URL with /Authorized/WSFedProvider.aspx
<!-- SecureAuth -->
<system.identityModel>
  <identityConfiguration>
    <securityTokenHandlers>
      <remove type="System.IdentityModel.Tokens.SamlSecurityTokenHandler, System.IdentityModel, Version=4.0.0.0, Culture=neutral, PublicKeyToken=b77a5c561934e089" />
      <remove type="System.IdentityModel.Tokens.Saml2SecurityTokenHandler, System.IdentityModel, Version=4.0.0.0, Culture=neutral, PublicKeyToken=b77a5c561934e089" />
      <add type="System.IdentityModel.Tokens.SamlSecurityTokenHandler, System.IdentityModel, Version=4.0.0.0, Culture=neutral, PublicKeyToken=b77a5c561934e089">
        <samlSecurityTokenRequirement mapToWindows="true" />
      </add>
      <add type="System.IdentityModel.Tokens.Saml2SecurityTokenHandler, System.IdentityModel, Version=4.0.0.0, Culture=neutral, PublicKeyToken=b77a5c561934e089">
        <samlSecurityTokenRequirement mapToWindows="true" />
      </add>
      <remove type="System.IdentityModel.Tokens.SessionSecurityTokenHandler, System.IdentityModel, Version=4.0.0.0, Culture=neutral, PublicKeyToken=b77a5c561934e089" />
      <add type="System.IdentityModel.Services.Tokens.MachineKeySessionSecurityTokenHandler, System.IdentityModel.Services, Version=4.0.0.0, Culture=neutral, PublicKeyToken=b77a5c561934e089" />
    </securityTokenHandlers>
    <audienceUris>
      <add value="https://mail.companyname.com/owa/" />
    </audienceUris>
    <issuerNameRegistry type="System.IdentityModel.Tokens.ConfigurationBasedIssuerNameRegistry, System.IdentityModel, Version=4.0.0.0, Culture=neutral, PublicKeyToken=b77a5c561934e089">
      <trustedIssuers>
        <add thumbprint="YOURCERTTHUMBPRINTHERE" name="https://SecureAuthIdPFQDN/SecureAuthIdPRealm#" />
      </trustedIssuers>
    </issuerNameRegistry>
  </identityConfiguration>
</system.identityModel>
<system.identityModel.services>
  <federationConfiguration>
    <cookieHandler requireSsl="true" path="/" />
    <wsFederation passiveRedirectEnabled="true" issuer="https://SecureAuthIdPFQDN/SecureAuthIdPRealm#" realm="https://mail.companyname.com/owa/" reply="https://mail.companyname.com/owa/" requireHttps="true" />
  </federationConfiguration>
</system.identityModel.services>
<!-- /SecureAuth -->
6. Change the <modules> tag to <modules runAllManagedModulesForAllRequests="true">
7. At the top of the <modules> section, add the following:
<!-- SecureAuth -->
        <add name="SessionAuthenticationModule" type="System.IdentityModel.Services.SessionAuthenticationModule, System.IdentityModel.Services, Version=4.0.0.0, Culture=neutral, PublicKeyToken=b77a5c561934e089" preCondition="" />
        <add name="WSFederationAuthenticationModule" type="System.IdentityModel.Services.WSFederationAuthenticationModule, System.IdentityModel.Services, Version=4.0.0.0, Culture=neutral, PublicKeyToken=b77a5c561934e089" preCondition="" />
<!-- /SecureAuth -->
Note
<add name="WSFederationAuthenticationModule" type="System.IdentityModel.Services.WSFederationAuthenticationModule, System.IdentityModel.Services, Version=4.0.0.0, Culture=neutral, PublicKeyToken=b77a5c561934e089" preCondition="" /> may already exist in the web.config under <modules>
If so, only add the following:
<add name="SessionAuthenticationModule" type="System.IdentityModel.Services.SessionAuthenticationModule, System.IdentityModel.Services, Version=4.0.0.0, Culture=neutral, PublicKeyToken=b77a5c561934e089" preCondition="" />
8. To ensure sign out to function, add the following lines under the commented area in <assemblies>:
<!-- SecureAuth -->
    <add assembly="System.IdentityModel, Version=4.0.0.0, Culture=neutral, PublicKeyToken=B77A5C561934E089" />
<!-- SecureAuth -->
9. Modify (or add) the following lines within the <appSettings> section:
Be sure to replace https://SecureAuthIdPFQDN/SecureAuthIdPRealm# with the actual FQDN and OWA-integrated realm number, e.g. https://secureauth.company.com/secureauth2 (two instances)
This value must match exactly with the WSFed/SAML Issuer value established in the SecureAuth IdP Web Admin (step 7)
NOTE: If configuring a transparent SSO realm, append the URL with /Authorized/WSFedProvider.aspx
<!-- SecureAuth -->
    <add key="ida:FederationMetadataLocation" value="https://SecureAuthIdPFQDN/SecureAuthIdPRealm#/FederationMetadata/2007-06/FederationMetadata.xml" />
    <add key="ida:Issuer" value="https://SecureAuthIdPFQDN/SecureAuthIdPRealm#" />
    <add key="ida:ProviderSelection" value="Secureauth" />
<!-- SecureAuth -->
10. Save the file
Update OWA Authentication through IIS
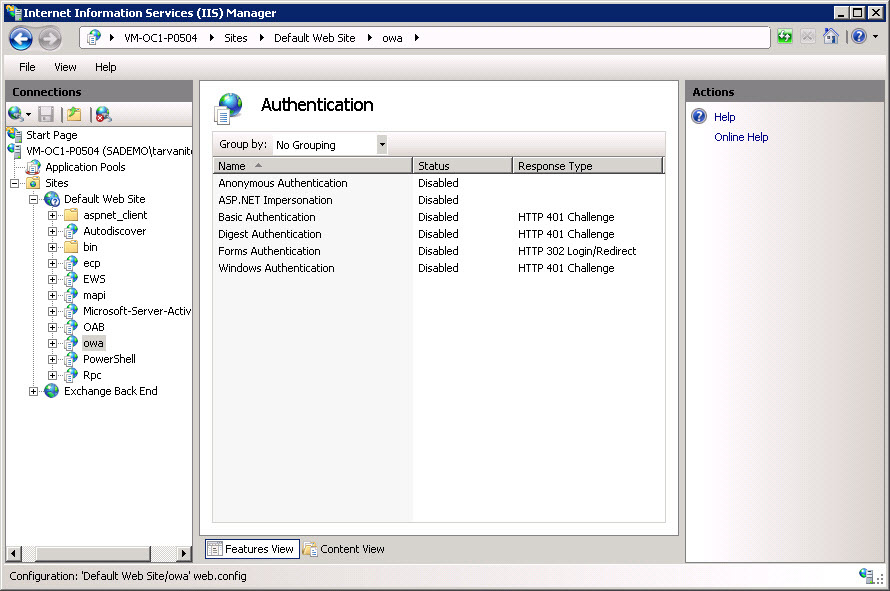
11. Open the Internet Information Services (IIS) Manager
12. Expand the site where OWA is installed, and click owa
13. Double-click the Authentication icon and verify that all authentications are set to Disabled
Exchange Control Panel (ECP) Functionality Configuration Steps
Update ECP web.config
1. On the Exchange server, run Notepad elevated (Run as Administrator), and open C:\Program Files\Microsoft\Exchange Server\V15\Frontend\HttpProxy\ecp\web.config
2. At the top of the file, add the following to the <configSections>:
<!-- SecureAuth -->
    <section name="system.identityModel" type="System.IdentityModel.Configuration.SystemIdentityModelSection, System.IdentityModel, Version=4.0.0.0, Culture=neutral, PublicKeyToken=B77A5C561934E089" />
    <section name="system.identityModel.services" type="System.IdentityModel.Services.Configuration.SystemIdentityModelServicesSection, System.IdentityModel.Services, Version=4.0.0.0, Culture=neutral, PublicKeyToken=B77A5C561934E089" />
<!-- /SecureAuth -->
If <configSections> does not exist, add the following immediately under <configuration>:
<!-- SecureAuth -->
<configSections>
        <section name="system.identityModel" type="System.IdentityModel.Configuration.SystemIdentityModelSection, System.IdentityModel, Version=4.0.0.0, Culture=neutral, PublicKeyToken=B77A5C561934E089" />
    <section name="system.identityModel.services" type="System.IdentityModel.Services.Configuration.SystemIdentityModelServicesSection, System.IdentityModel.Services, Version=4.0.0.0, Culture=neutral, PublicKeyToken=B77A5C561934E089" />
  </configSections>
<!-- SecureAuth -->
3. If <configSections> is present, comment out the follow line from the <configSections> (in XML markup, comment out a section by adding <!-- at the beginning of the commented out line and --> at the end, which can span multiple lines):
<!-- <section name="microsoft.identityModel" type="Microsoft.IdentityModel.Configuration.MicrosoftIdentityModelSection, Microsoft.IdentityModel, Version=3.5.0.0, Culture=neutral, PublicKeyToken=31bf3856ad364e35" /> -->
4. Modify (or add) the following lines within the <appSettings> section:
Be sure to replace https://SecureAuthIdPFQDN/SecureAuthIdPRealm# with the actual FQDN and OWA-integrated realm number, e.g. https://secureauth.company.com/secureauth2 (two instances)
This value must match exactly with the WSFed/SAML Issuer value established in the SecureAuth IdP Web Admin (step 7)
<!-- SecureAuth -->
    <add key="ida:FederationMetadataLocation" value="https://SecureAuthIdPFQDN/SecureAuthIdPRealm#/FederationMetadata/2007-06/FederationMetadata.xml" />
    <add key="ida:Issuer" value="https://SecureAuthIdPFQDN/SecureAuthIdPRealm#" />
    <add key="ida:ProviderSelection" value="Secureauth" />
<!-- SecureAuth -->
5. Add the below lines right after </appSettings>
The Thumbprint and other values must be changed from this default content
Replace the "mail.companyname.com" in the https://mail.companyname.com/ecp/ value with the actual DNS value (three instances)
This is the same value provided in the SAML Audience field in the SecureAuth IdP Web Admin (step 8)
Replace YOURCERTTHUMBPRINTHERE with the Certificate "Thumbprint" retrieved from the SecureAuth IdP Signing Certificate
Replace https://SecureAuthIdPFQDN/SecureAuthIdPRealm# with the actual FQDN of the SecureAuth IdP appliance, followed by the realm number, e.g. https://secureauth.company.com/secureauth2 (two instances)
This value must match exactly with the WSFed/SAML Issuer value established in the SecureAuth IdP Web Admin (step 7)
<!-- SecureAuth -->
<system.identityModel>
  <identityConfiguration>
    <securityTokenHandlers>
      <remove type="System.IdentityModel.Tokens.SamlSecurityTokenHandler, System.IdentityModel, Version=4.0.0.0, Culture=neutral, PublicKeyToken=b77a5c561934e089" />
      <remove type="System.IdentityModel.Tokens.Saml2SecurityTokenHandler, System.IdentityModel, Version=4.0.0.0, Culture=neutral, PublicKeyToken=b77a5c561934e089" />
      <add type="System.IdentityModel.Tokens.SamlSecurityTokenHandler, System.IdentityModel, Version=4.0.0.0, Culture=neutral, PublicKeyToken=b77a5c561934e089">
        <samlSecurityTokenRequirement mapToWindows="true" />
      </add>
      <add type="System.IdentityModel.Tokens.Saml2SecurityTokenHandler, System.IdentityModel, Version=4.0.0.0, Culture=neutral, PublicKeyToken=b77a5c561934e089">
        <samlSecurityTokenRequirement mapToWindows="true" />
      </add>
      <remove type="System.IdentityModel.Tokens.SessionSecurityTokenHandler, System.IdentityModel, Version=4.0.0.0, Culture=neutral, PublicKeyToken=b77a5c561934e089" />
      <add type="System.IdentityModel.Services.Tokens.MachineKeySessionSecurityTokenHandler, System.IdentityModel.Services, Version=4.0.0.0, Culture=neutral, PublicKeyToken=b77a5c561934e089" />
    </securityTokenHandlers>
    <audienceUris>
      <add value="https://mail.companyname.com/owa/" />
    </audienceUris>
    <issuerNameRegistry type="System.IdentityModel.Tokens.ConfigurationBasedIssuerNameRegistry, System.IdentityModel, Version=4.0.0.0, Culture=neutral, PublicKeyToken=b77a5c561934e089">
      <trustedIssuers>
        <add thumbprint="YOURCERTTHUMBPRINTHERE" name="https://SecureAuthIdPFQDN/SecureAuthIdPRealm#" />
      </trustedIssuers>
    </issuerNameRegistry>
  </identityConfiguration>
</system.identityModel>
<system.identityModel.services>
  <federationConfiguration>
    <cookieHandler requireSsl="true" path="/" />
    <wsFederation passiveRedirectEnabled="true" issuer="https://SecureAuthIdPFQDN/SecureAuthIdPRealm#" realm="https://mail.companyname.com/owa/" reply="https://mail.companyname.com/ecp/" requireHttps="true" />
  </federationConfiguration>
</system.identityModel.services>
<!-- /SecureAuth -->
6. Change the <modules> tag to <modules runAllManagedModulesForAllRequests="true">
7. Within the <modules> section, add the following:
<!-- SecureAuth -->
        <add name="SessionAuthenticationModule" type="System.IdentityModel.Services.SessionAuthenticationModule, System.IdentityModel.Services, Version=4.0.0.0, Culture=neutral, PublicKeyToken=b77a5c561934e089" preCondition="" />
        <add name="WSFederationAuthenticationModule" type="System.IdentityModel.Services.WSFederationAuthenticationModule, System.IdentityModel.Services, Version=4.0.0.0, Culture=neutral, PublicKeyToken=b77a5c561934e089" preCondition="" />
<!-- /SecureAuth -->
Note
<add name="WSFederationAuthenticationModule" type="System.IdentityModel.Services.WSFederationAuthenticationModule, System.IdentityModel.Services, Version=4.0.0.0, Culture=neutral, PublicKeyToken=b77a5c561934e089" preCondition="" /> may already exist in the web.config under <modules>
If so, only add the following:
<add name="SessionAuthenticationModule" type="System.IdentityModel.Services.SessionAuthenticationModule, System.IdentityModel.Services, Version=4.0.0.0, Culture=neutral, PublicKeyToken=b77a5c561934e089" preCondition="" />
8. To ensure sign out to function, add the following lines under the commented area in <assemblies>:
<!-- SecureAuth -->
    <add assembly="System.IdentityModel, Version=4.0.0.0, Culture=neutral, PublicKeyToken=B77A5C561934E089" />
<!-- SecureAuth -->
9. Save the file
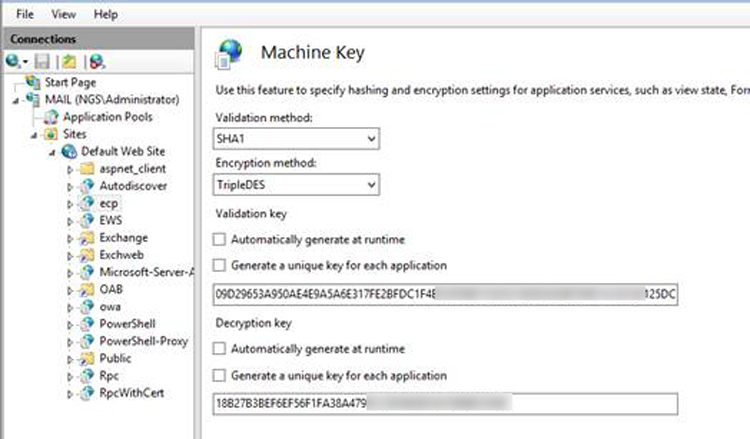
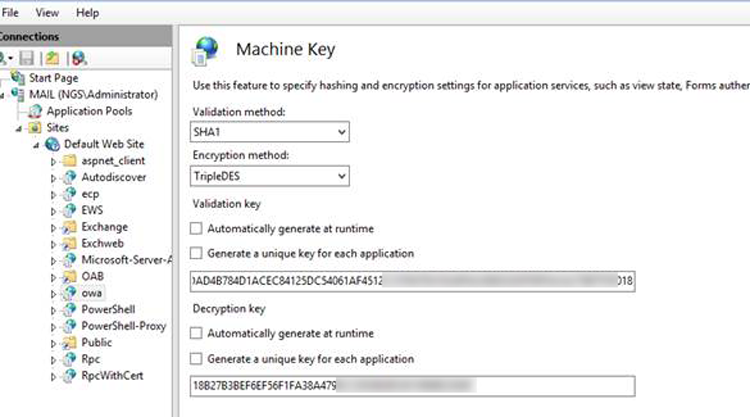
Machine Key Matching
10. Ensure that the Machine Key configurations match for OWA and ECP
IIS Manager > OWA > Machine Keys
IIS Manager > ECP > Machine Keys
Update ECP Authentication using IIS

11. Open the Internet Information Services (IIS) Manager
12. Expand the site where ECP is installed, and click ecp
13. Double-click the Authentication icon and verify that all authentications are set to Disabled
Update OWA for "Sign Out" to Clear Federation Cookies
14. System.IdentityModel.Services was already added to the web.config files in previous steps
15. In Logout.aspx under OWA\Auth\Logoff.aspx, add the following at the top under <%@ Page language...>
<!-- SecureAuth -->
    <%@ Import namespace="System.IdentityModel.Services"%>
<!-- SecureAuth -->
16. Under <body class...>, enter the following:
<!-- SecureAuth -->
    <% FederatedAuthentication.SessionAuthenticationModule.Signout(); %>
<!-- SecureAuth -->
(OPTIONAL) Scripts and Theme Folder Permissions
Note
This configuration step is required if experiencing a theme rendering issue after being authenticated into OWA and selecting Options(ECP)
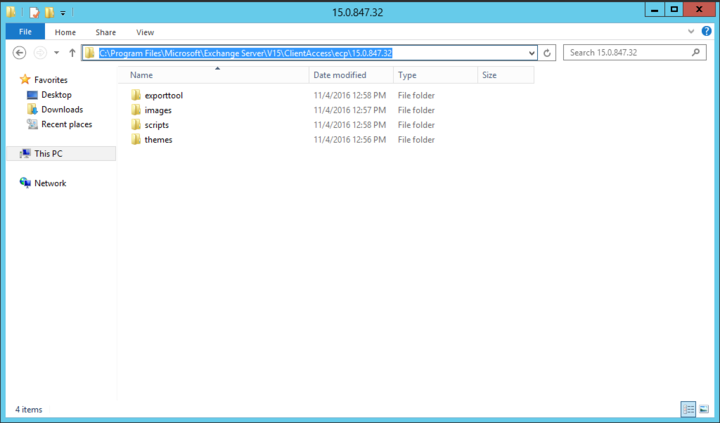
1. Add the following code as a web.config file to the folder with the highest version of the Cumulative Update
e.g.: \Exchange Server\Vxx\ClientAccess\ecp\xx.x.xxx.xxx\web.config
<?xml version="1.0"?>
<configuration>
    <location path="Themes">
        <system.web>
            <authorization>
                <!--<allow users="*"/>-->
                <allow users="?"/>
            </authorization>
        </system.web>
    </location>
            <location path="Scripts">
        <system.web>
            <authorization>
                <!--<allow users="*"/>-->
                <allow users="?"/>
            </authorization>
        </system.web>
    </location>
</configuration>These are optional configurations and not required for the integration
Note
Both the OWA and ECP applications have issues if a trailing slash is missing
To avoid these issues, use URL Rewrite

1. Download and install URL Rewrite for IIS
2. Open IIS, browse to Default Web Site, and select URL Rewrite
3. Click Add Rule(s) under Actions
4. Set the Name to Trailing Slash Fix
5. Select Matches the Pattern from the Requested URL dropdown
6. Set the Pattern to (.*[^/])$
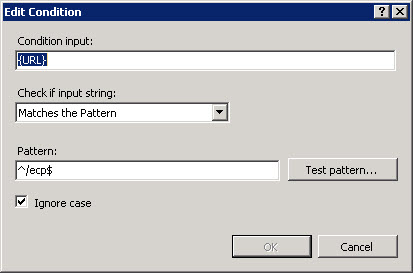
7. Expand the Conditions section
8. Select Match Any from the Logical Grouping dropdown
9. Click Add to include Condition 1

14. Click Add to include Condition 2
NOTE: In some environments Condition 2 should not be used if it causes "too many redirects".
19. Expand the Action section
20. Select Redirect from the Action Type dropdown
21. Set the Redirect URL to {R:1}/
22. Select Permanent (301) from the Redirect Type dropdown
23. Click Apply in the upper right-hand corner, under Actions
To avoid logout issues, use URL Rewrite (available here) on the OWA web server to redirect users appropriately
1. Open IIS, browse to Default Web Site, and select URL Rewrite
2. Click Add Rule(s) under Actions, and select Blank Rule
3. Two (2) Logout Redirect Rules are necessary
Note
When configuring OWA 2016 Logout Redirect Rules, on D:\SecureAuth\SecureAuthRealm# replace wsfedsignout.aspx and wsfedsignout.aspx.vb with the contents from the WSFedSignOut.zip file. Contact SecureAuth Support to learn more,
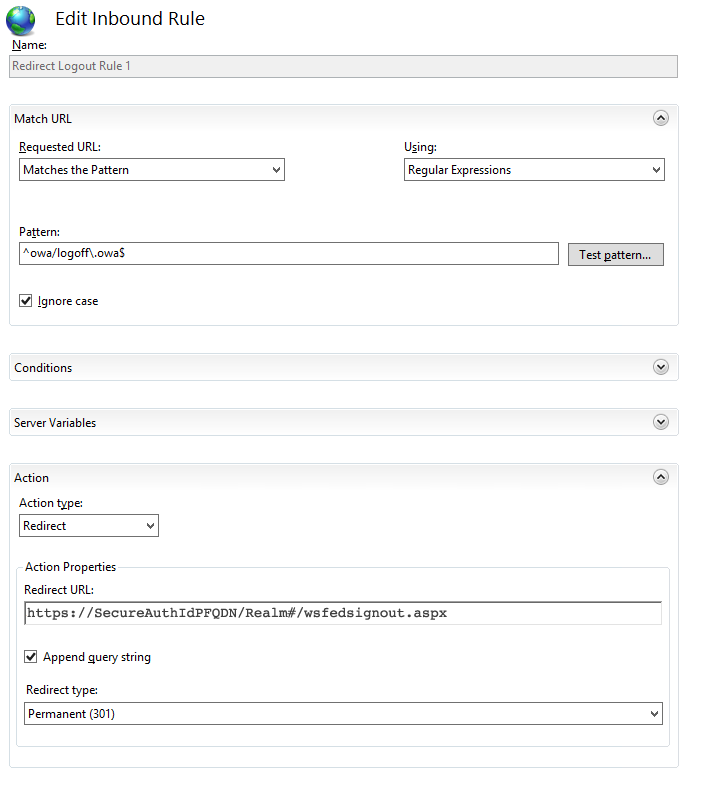
4. Set the Name to Redirect Logout Rule 1
5. Select Matches the Pattern from the Requested URL dropdown
6. Select Regular Expressions from the Using dropdown
7. Set the Pattern to ^owa/logoff\.owa$
8. Expand the Action section
9. Select Redirect from the Action Type dropdown
10. Set the Redirect URL to the FQDN of the SecureAuth IdP appliance, followed by the OWA 2013 SP1 / 2016 realm number, and
wsfedsignout.aspx?wa=wsignout1.0&wreply=https://secureauth.company.com/owa/?wa=wsignoutcleanup1.0
For example, https://secureauth.company.com/secureauth2/wsfedsignout.aspx?wa=wsignout1.0&wreply=https://secureauth.company.com/owa/?wa=wsignoutcleanup1.0
11. Select Permanent (301) from the Redirect Type dropdown
12. Click Apply in the upper right-hand corner, under Actions
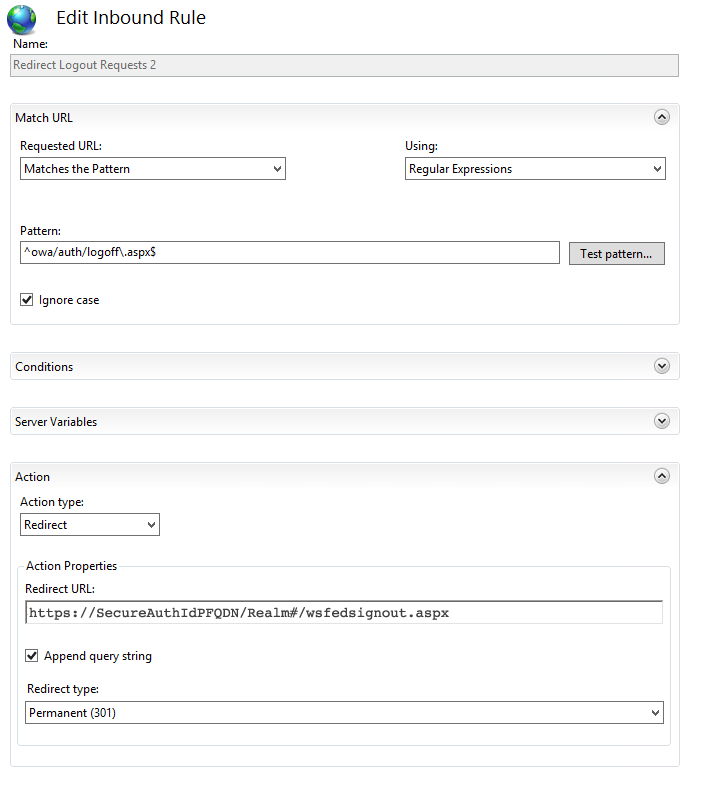
13. Set the Name to Redirect Logout Rule 2
14. Select Matches the Pattern from the Requested URL dropdown
15. Select Regular Expressions from the Using dropdown
16. Set the Pattern to ^owa/auth/logoff\.aspx$
17. Expand the Action section
18. Select Redirect from the Action Type dropdown
19. Set the Redirect URL to the FQDN of the SecureAuth IdP appliance, followed by the OWA 2013 SP1 / 2016 realm number, and
wsfedsignout.aspx?wa=wsignout1.0&wreply=https://secureauth.company.com/owa/?wa=wsignoutcleanup1.0
For example, https://secureauth.company.com/secureauth2/wsfedsignout.aspx?wa=wsignout1.0&wreply=https://secureauth.company.com/owa/?wa=wsignoutcleanup1.0
20. Select Permanent (301) from the Redirect Type dropdown
21. Click Apply in the upper right-hand corner, under Actions
Known Issues
If the code from the certificate window was pasted into thumbprint="", replacing the content within the quotation marks, there may be issues. The quotation marks may also need to be deleted and retyped as those additional characters still exist within the string. In the Event Viewer, an Error 1003, MSExchange Front End HTTP Proxy - ID4175 will be present if this is the issue. To resolve, delete the entire thumbprint, including the quotation marks, and retype the quotes and thumbprint value manually. For more information, click here.
If code content was copied from a PDF or other format, be aware that line breaks may be put into the web.config, breaking functionality. Line breaks need to be removed manually on all code if not copying directly from this webpage.
In some environments, an error occurs after setting the time zone for new users. As a workaround, use a powershell script or other automated method to set the value for msExchUserCulture (e.g. en-US).
Tips & Warnings
Set up SecureAuth IdP workflows as they normally would be. To utilize Windows Desktop SSO, WindowsSSO.aspx will need to be set as the default document and coded to retain the referral string. If Desktop SSO will be redirecting external users to another realm, the secureauth.aspx.vb page in that realm will need code that strips out the "?403;https://<SecureAuth-FQDN>/SAOWARealm". Refer to Windows desktop SSO configuration for more information on enabling Windows Desktop SSO for SecureAuth IdP realms.
When setting URLs in the web.config files and SecureAuth IdP, it is essential to be consistent and not forget something as simple as a trailing slash "/".