SharePoint 2010 / 2013 Integration Guide
Introduction
Use this guide to enable Multi-Factor Authentication and Single Sign-on (SSO) access via WS-Federation to Microsoft SharePoint 2010 / 2013.
Prerequisites
1. Have a Microsoft SharePoint 2010 or 2013 account
2. Download the Windows Identity Runtime and contact SecureAuth Support to download the WindowsIdentityFoundation-SDK-4.0.msi file
Copy these to the SecureAuth IdP Appliance and the SharePoint 2010 Servers
Install both starting with the Windows Identity Runtime
Note
Microsoft .NET Framework 4 is required to install the WIF SDK
3. Verify that SharePoint site can accept Claims-based Authentication
If not, see Additional SharePoint Configuration Information below for more information regarding the process of extending the site to a new zone and enabling Windows Authentication (NTLM / Kerberos) or Claims-based Authentication
4. Create a New Realm for the SharePoint integration in the SecureAuth IdP Web Admin
5. Configure the following tabs in the Web Admin before configuring the Post Authentication tab:
Overview – the description of the realm and SMTP connections must be defined
Data – an enterprise directory must be integrated with SecureAuth IdP
Workflow – the way in which users will access this application must be defined
Multi-Factor Methods – the Multi-Factor Authentication methods that will be used to access this page (if any) must be defined
SecureAuth IdP Configuration Steps
Data
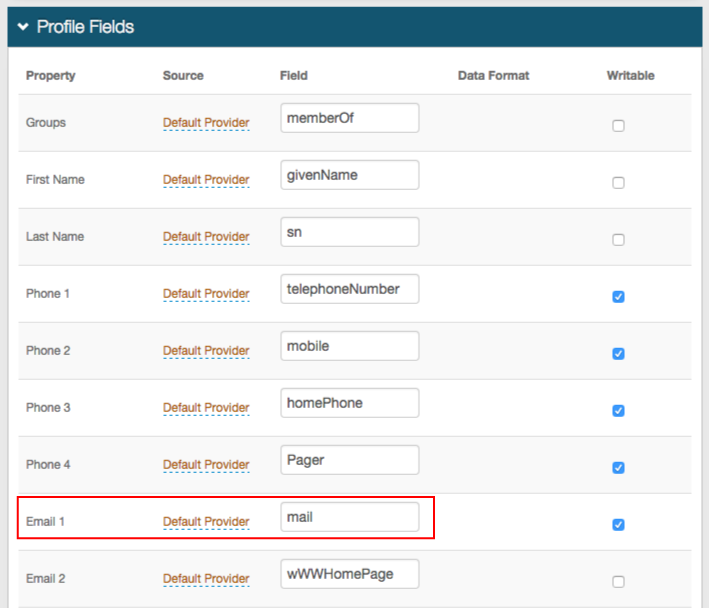 |
1. In the Profile Fields section, ensure that mail is appropriately mapped to the SecureAuth IdP Email 1 Property
Warning
Click Save once the configurations have been completed and before leaving the Data page to avoid losing changes
Post Authentication
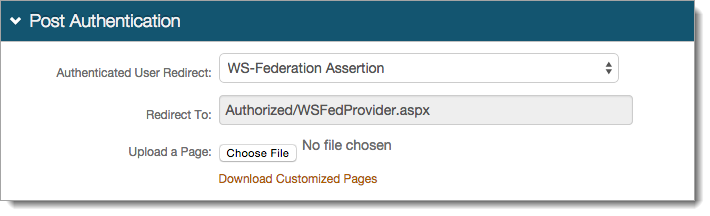 |
2. Select WS-Federation Assertion from the Authenticated User Redirect dropdown in the Post Authentication section
3. An unalterable URL will be auto-populated in the Redirect To field, which will append to the domain name and realm number in the address bar (Authorized/WSFedProvider.aspx)
4. A customized post authentication page can be uploaded, but it is not required
User ID Mapping
 |
5. Select the SecureAuth IdP Property that corresponds to the directory field that contains the mail attribute (Email 1)
6. Select urn:oasis:names:tc:SAML:1.1:nameid-format:emailAddress from the Name ID Format dropdown
7. Select False from the Encode to Base64 dropdown
SAML Assertion / WS Federation
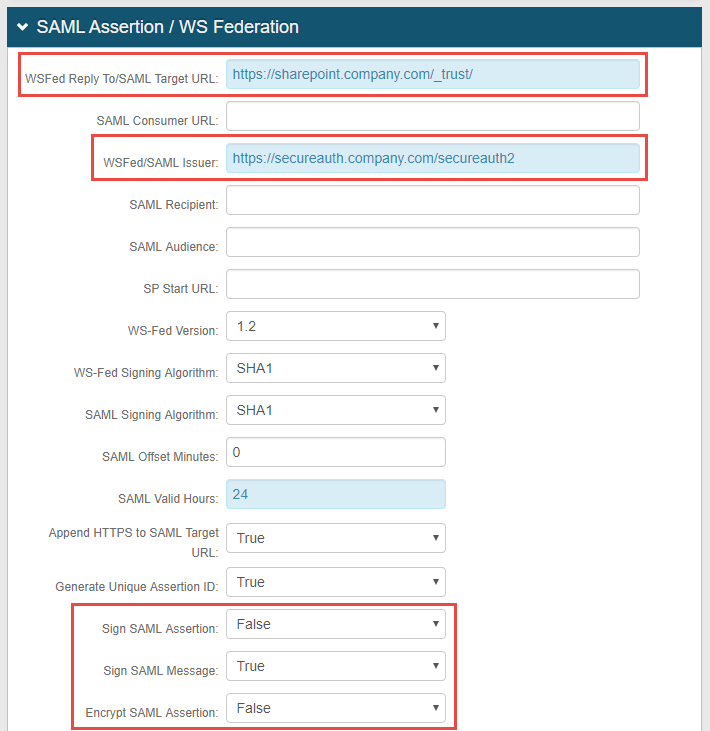 |
8. Set the WSFed Reply To/SAML Target URL to the Fully Qualified Domain Name (FQDN) of the SharePoint application, followed by /_trust/, e.g. https://sharepoint.company.com/_trust/
9. Set the WSFed/SAML Issuer to the FQDN of the SecureAuth IdP appliance, followed by the realm number of the realm created for this integration, e.g. https://secureauth.company.com/secureauth2
10. Select False from the Sign SAML Assertion dropdown
11. Select True from the Sign SAML Message dropdown
12. Select False from the Encrypt SAML Assertion dropdown
Note
No configuration is required for the SAML Consumer URL, SAML Recipient, SAML Audience, or SP Start URL fields
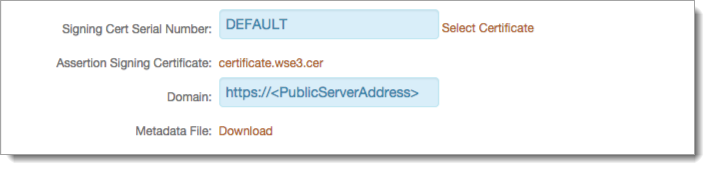 |
13. Leave the Signing Cert Serial Number as the default value, unless there is a third-party certificate being used for the SAML assertion
If using a third-party certificate, click Select Certificate and choose the appropriate certificate
14. Download the Assertion Signing Certificate to use for the SharePoint integration
SAML Attributes / WS Federation
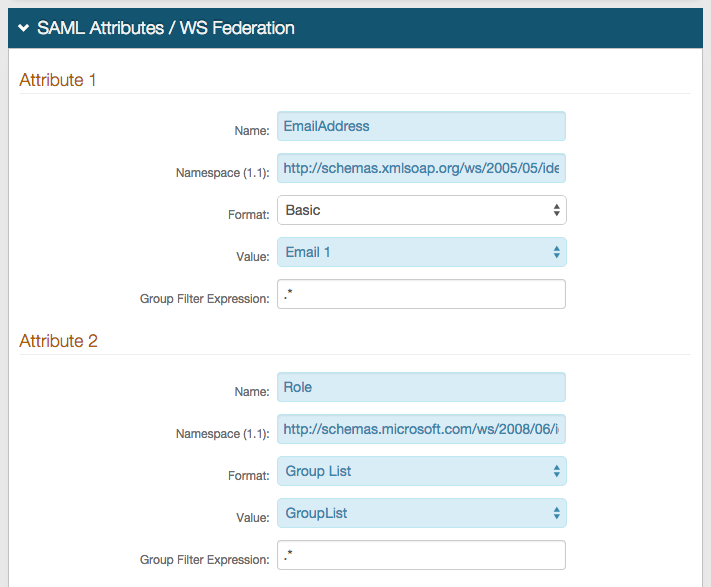 |
15. Set the Name of Attribute 1 to EmailAddress
16. Set the Namespace (1.1) to http://schemas.xmlsoap.org/ws/2005/05/identity/claims/emailaddress
17. Select Email 1 (or the field that contains mail) from the Value dropdown
18. Set the Name of Attribute 2 to Role
19. Set the Namespace (1.1) to http://schemas.microsoft.com/ws/2008/06/identity/claims/role
20. Select Group List from the Format dropdown
21. Select GroupList from the Value dropdown
Warning
Click Save once the configurations have been completed and before leaving the Post Authentication page to avoid losing changes
Forms Auth / SSO Token
Optionally, in the Forms Auth / SSO Token section, click the View and Configure FormsAuth keys/SSO token link to configure the token/cookie settings and configure this realm for SSO.
 |
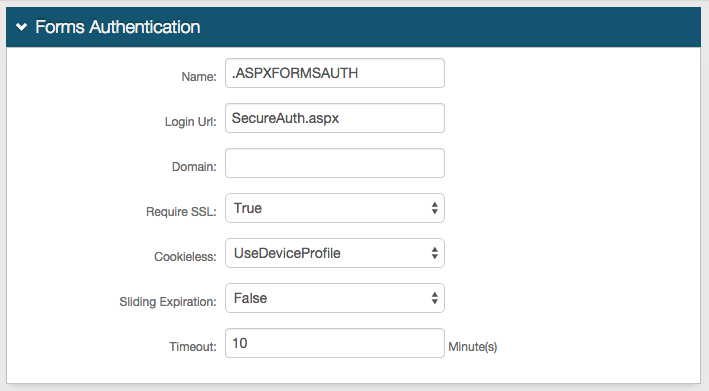
In the Forms Authentication section, set the following:
Require SSL
If the SSL is required to view the token, set to True.
Cookieless
Indicate whether SecureAuth IdP will deliver the token in a cookie to the user's browser or device:
UseCookies – Always deliver a cookie
UseUri – Do not deliver a cookie, deliver the token in a query string
AutoDetect – Deliver a cookie if the user's settings allow it.
UseDeviceProfile – Deliver a cookie if the browser settings allow it, regardless of the user's settings
Sliding Expiration
For the cookie to remain valid as long as the user is interacting with the page, set to True.
Timeout
Set the length of time in minutes the cookie is valid.
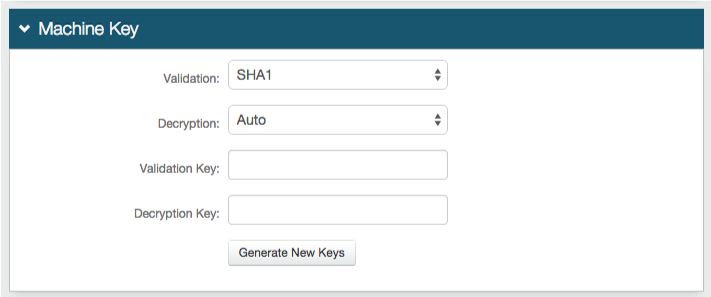
In the Machine Key section, set the following:
Validation
If the default value does not match your organization's requirements, choose another value.
Decryption
If the default value does not match your organization's requirements, choose another value.
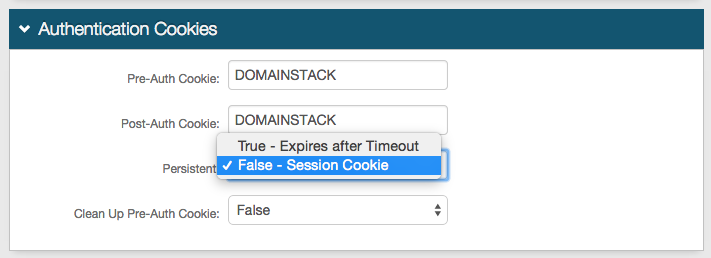
In the Authentication Cookies section, set the following:
Persistent
Set one of the following values:
True - Expires after Timeout – Allow the cookie to be persistent
False - Session Cookie – Allow the cookie to be valid as long as the session is open, and expires when the browser is closed or the session expires
Save your changes.
Note
To configure this realm for SSO, refer to SecureAuth IdP Single Sign-on Configuration
Note
To configure this realm for Windows Desktop SSO, refer to Windows desktop SSO configuration
SharePoint Configuration Steps
Define Trust Relationships
Note
The SharePoint server must trust the SSL certificate chain of the certificate used in the SecureAuth IdP appliance Web Services, as well as the SSL chain of the certificate used to sign the WS-Fed assertion
In most cases, this is the same SSL certificate chain
1. Download the latest SecureAuth Public Certificate bundle and expand the zip file on the SharePoint server
Note
If using a third-party certificate, rather than the SecureAuth IdP certificate provided in the Web Admin (step 13), do not download the certificate bundle
2. Add the SecureAuth Root and Intermediate Certificate authorities for the certificates
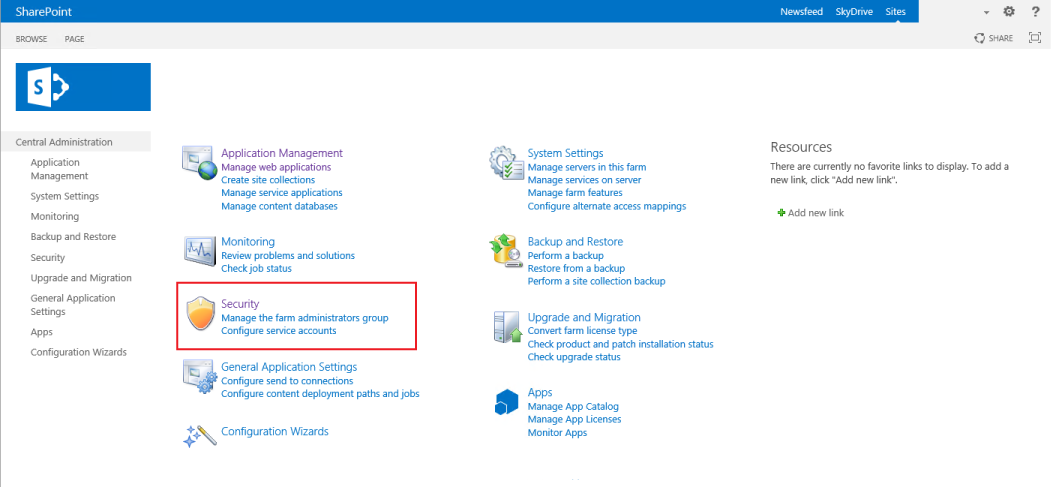
3. Open SharePoint 2010 / 2013 Central Administration
4. Click Security on the home page
 |
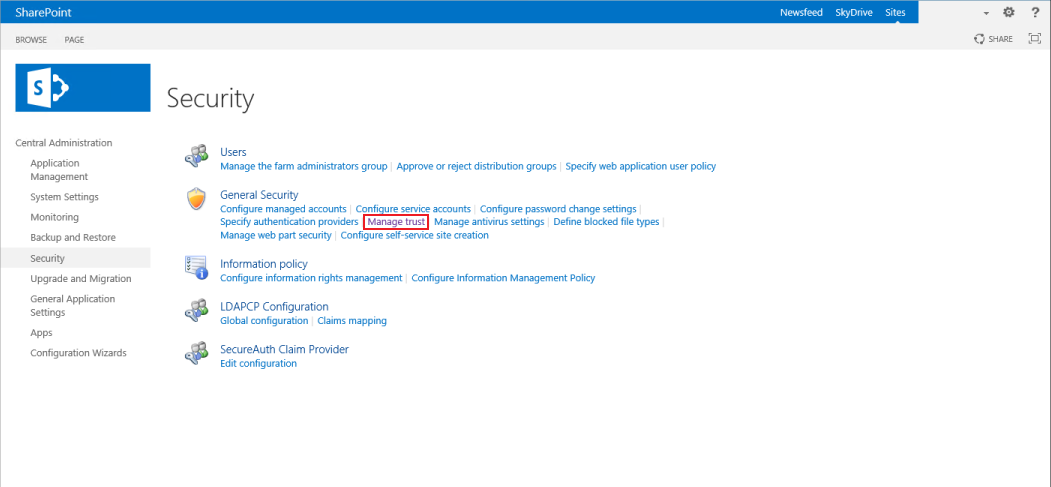
5. Click Manage Trust from the General Security section on the Security page
 |
Note
If using a third-party certificate, rather than the SecureAuth IdP certificate provided in the Web Admin (step 13), install the Root and Intermediate certificate authority public certificates for that certificate chain, rather than using the certificates below from the certificate bundle downloaded in step 1
6. In the Trust Relationships tab, click New in the Menu bar
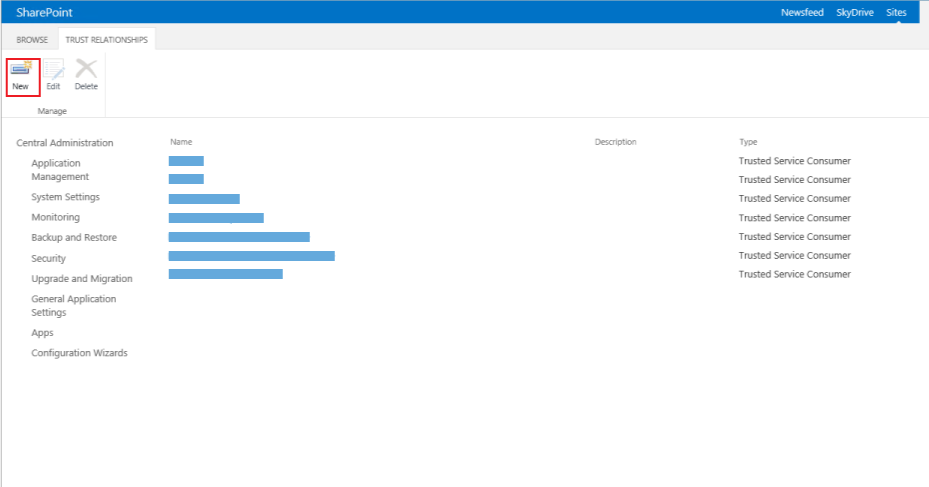 |
7. In the Establish Trust Relationship page, enter the CN of the certificate being installed in the Name field, e.g. SecureAuth Root
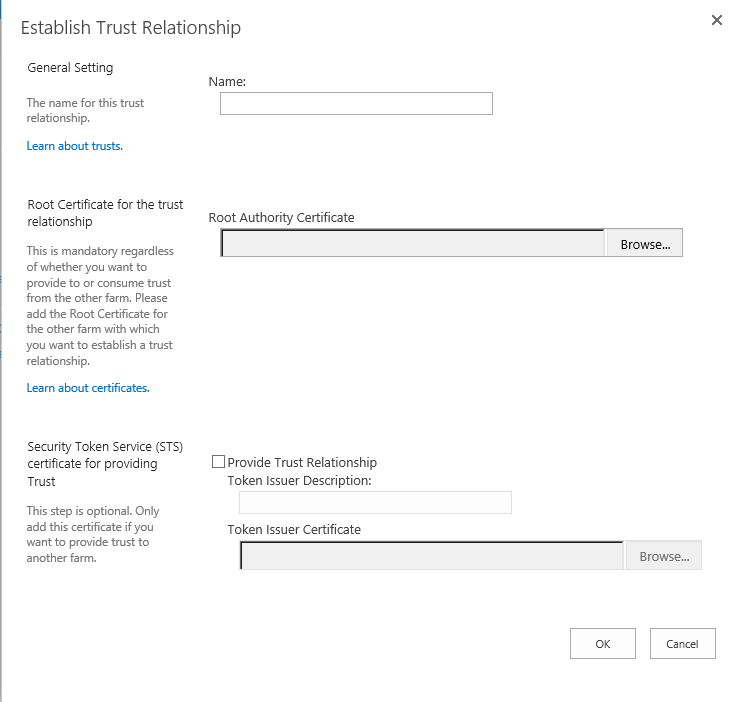 |
8. Click Browse and select the SecureAuth Root Certificate Authority.cer file downloaded in step 1
9. Click OK
10. Back in the Trust Relationships tab, click New in the Menu bar
11. Enter the CN of the certificate being installed in the Name field, e.g. SecureAuth Intermediate
12. Click Browse and select the SecureAuth Intermediate CA 1A.cer file downloaded in step 1
13. Click OK
Define Certificate Used to Validate Signed WS-Fed Assertion
14. Export the Public Key of the certificate being used to sign the WS-Fed assertion in Base64 Format and save it to the same location on the SharePoint 2010 / 2013 server as the Root and Intermediate public certificates
This should be the certificate selected in the SecureAuth IdP Web Admin (step 13)
15. On the SharePoint server, open SharePoint 2010 / 2013 Management Shell, using Run as Administrator
Keep this open for the following configuration steps
16. Copy the code below (Trusted Identity Provider Certificate Configuration) to a Notepad document
Trusted Identity Provider Certificate Configuration
$certPath = "<PhysicalPath>\<certificate-filename>.cer"
$cert = New-Object System.Security.Cryptography.X509Certificates.X509Certificate2("$certPath")
17. Replace the <PhysicalPath>\<certificate-filename>.cer with the Path and File Name of the certificate public key exported in step 14, e.g. $certPath = "C:\Temp\Certs\idp.company.com.cer"
Copy the lines of code from Notepad and paste it into the SharePoint 2010 / 2013 Management Shell to execute
Associate Certificate to Service Provider Trusted Root Authority
18. Copy the code below (Define SP Trusted Root Authority) to a Notepad document
Define SP Trusted Root Authority
New-SPTrustedRootAuthority -Name "<TIP Name>" -Certificate $cert
19. Replace <TIP Name> with the name intended to define the Trusted Identity Provided (TIP), e.g. SecureAuthIdP
This will be the name that will be selected when an end-user attempts to log into the Claims-aware SharePoint site
20. Copy the line of code from Notepad and paste it into the SharePoint 2010 / 2013 Management Shell to execute
Identify Claims Mapping for Display Name and Role
21. Copy the code below (Claims Mapping) to a Notepad document
Claims Mapping
$map1 = New-SPClaimTypeMapping -IncomingClaimType "http://schemas.xmlsoap.org/ws/2005/05/identity/claims/emailaddress" -IncomingClaimTypeDisplayName "EmailAddress" -SameAsIncoming
$map2 = New-SPClaimTypeMapping -IncomingClaimType "http://schemas.microsoft.com/ws/2008/06/identity/claims/role" -IncomingClaimTypeDisplayName "Role" -SameAsIncoming
22. No changes are necessary; however, an alternate IncomingClaimTypeDisplayName may be used
Note
This will configure the SharePoint Web Application to use SecureAuth IdP as a Trusted Identity Provider, which will require the user's email address as the primary identifier
If a different primary identifier is preferred, such as sAMAccountName, the proper IncomingClaimType namespace will be required
SecureAuth strongly recommends that the default EmailAddress be utilized
23. Copy the lines of code from Notepad and paste them into the SharePoint 2010 / 2013 Management Shell to execute
Define Uniform Resource Name and Sign-in URL
24. Copy the code below (Realm URN and Signing URL) to a Notepad document
Realm URN and Signing URL
$realm = "urn:sharepoint:wsfed"
$signinurl = "https://SecureAuthIdPFQDN/secureauthX/"
25. Leave urn:sharepoint:wsfed as is, or replace it with urn:<PreferredURN>
Changes to the URN must be configured on the TIP as well in the SAML (WS-Fed) Audience Field in the SecureAuth IdP Web Admin
26. Replace the SecureAuthIdPFQDN with the actual FQDN of the SecureAuth IdP appliance; and replace X with the actual realm number of the SharePoint configured realm (SecureAuth IdP Configuration steps), e.g. https://secureauth.company.com/secureauth2/
27. Copy the lines of code from Notepad and paste them into the SharePoint 2010 / 2013 Management Shell to execute
Define the Trusted Identity Provider
28. Copy the code below (Trusted Identity Token Issuer) to a Notepad document
Trusted Identity Token Issuer
$ap = New-SPTrustedIdentityTokenIssuer -Name "<TIP Name>" -Description "<TIP Name>-SecureAuthIdPFQDN" -realm $realm -ImportTrustCertificate $cert -ClaimsMappings $map1,$map2 -SignInUrl $signinurl -IdentifierClaim $map1.InputClaimType
29. Replace <TIP Name> with the same value established in step 19, e.g. SecureAuthIdP
30. Update the -Description to a preferred description
SecureAuth recommends using the <TIP Name> and the SecureAuth IdP FQDN, separated by a dash (-), e.g. -Description "SecureAuthIdP-secureauth.company.com"
31. Copy the line of code from Notepad and paste it into the SharePoint 2010 / 2013 Management Shell to execute
Review TIP Configuration
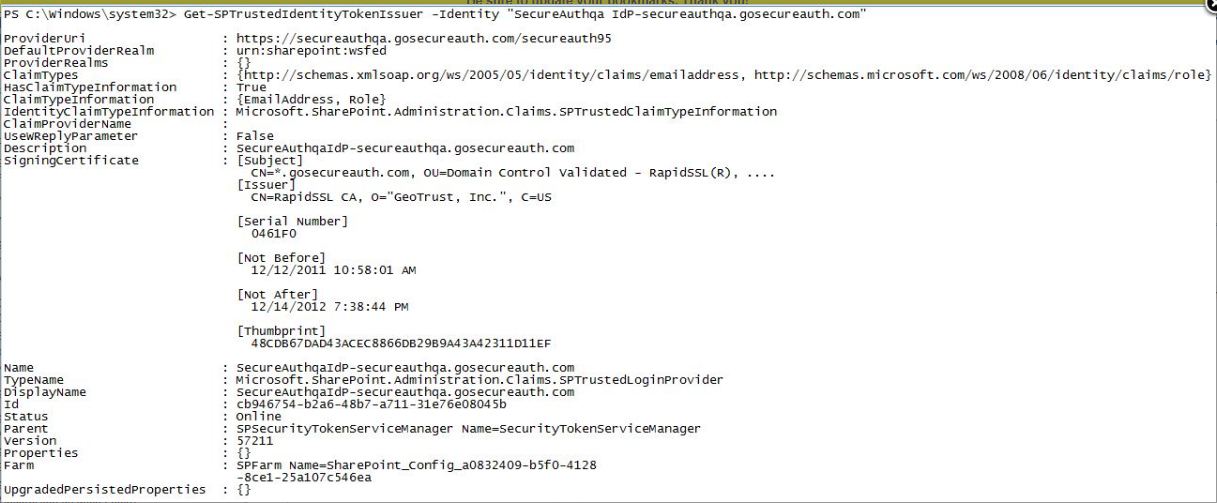
32. To review the TIP Configuration, copy the code below (Display TIP Configuration Info) to a Notepad document
Display TIP Configuration Info
Get-SPTrustedIdentityTokenIssuer -Identity "<TIP Name>"
33. Replace the <TIP Name> with the same value established in steps 19 and 29
34. Copy the line of code from Notepad and paste it into the SharePoint 2010 / 2013 Management Shell to execute
Configure Site to Use Trusted Identity Provider
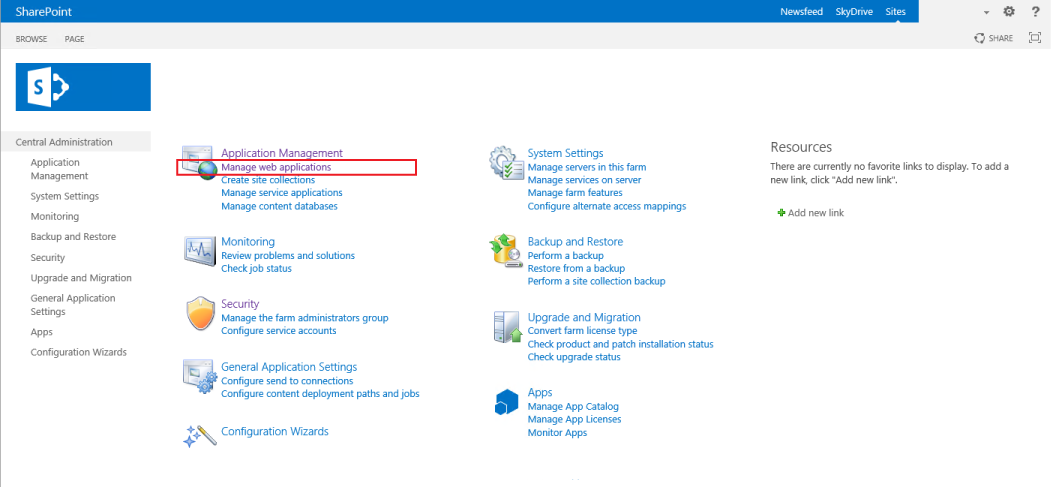
35. Open SharePoint Central Administrator
36. Select Manage web applications under Application Management
 |
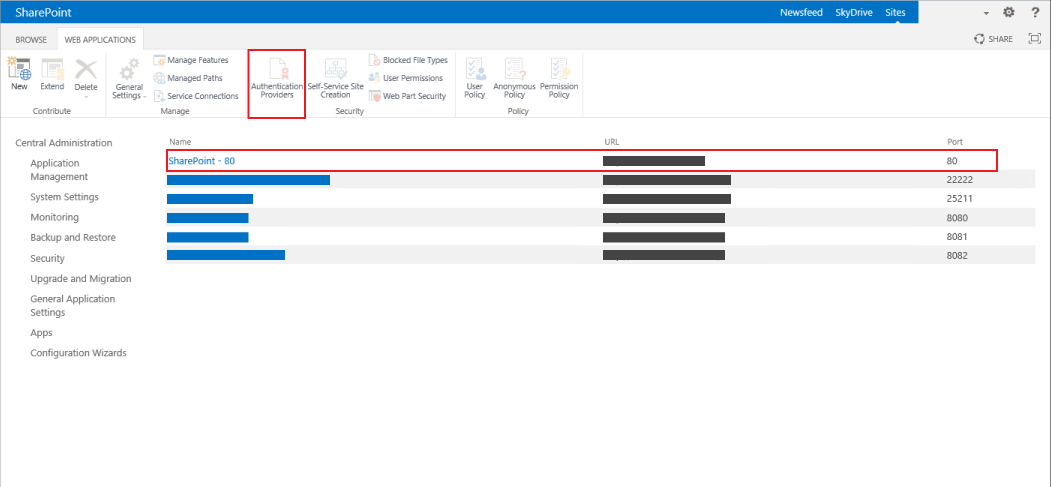
37. Select which site to use for Claims-based authentication from the list provided
38. Click Authentication Providers from the menu bar
 |
39. In the Authentication Providers window, click the Zone to configure from the list provided
 |
40. In the Claims Authentication Types section, check Trusted Identity Provider
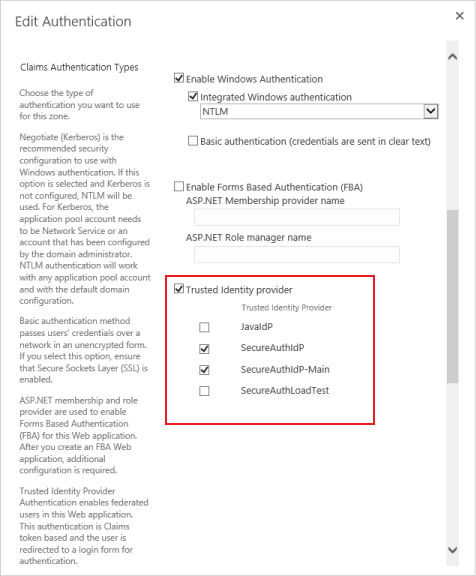 |
41. Check or uncheck the authentication types to disable or use for this zone
If multiple authentication types are checked, end-users will be prompted to select which type of authentication to use
If only the SecureAuth IdP TIP is checked, they will automatically be redirected to SecureAuth IdP when attempting to log into SharePoint
42. Click Save
Define Initial Users
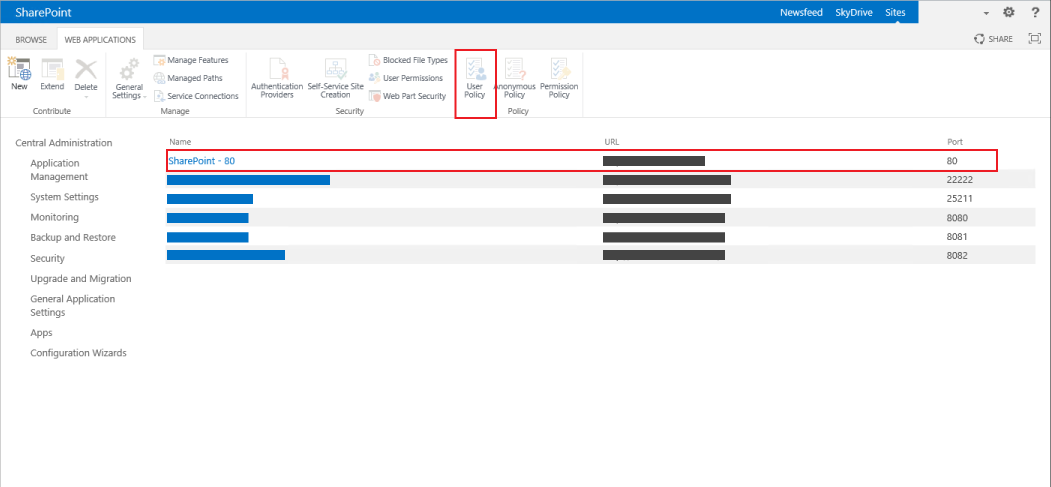
43. On the SharePoint Central Administration page, click Manage web applications under Application Management
|
44. Select the same site selected in step 37
45. Click User Policy from the menu bar
 |
46. In the Policy for Web Application window, click Add Users
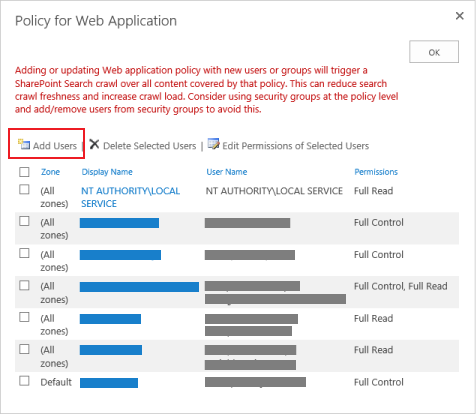 |
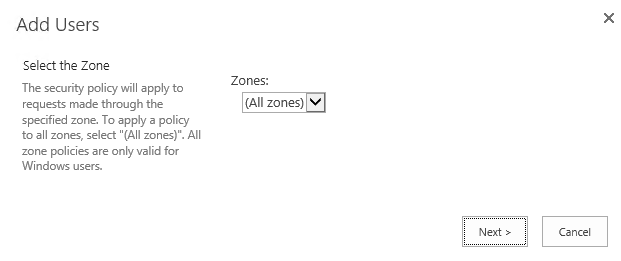
47. In the Add Users window, select the appropriate zone (or All Zones - default) from the dropdown, and click Next
 |
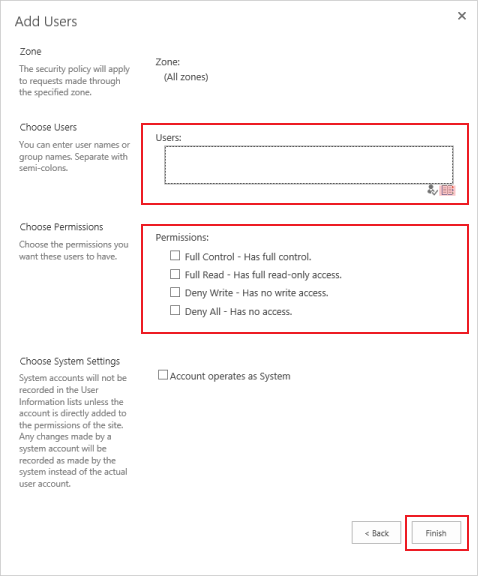
48. In the Choose Users section, under the Users: text box, click the Book icon for Group Configuration
 |
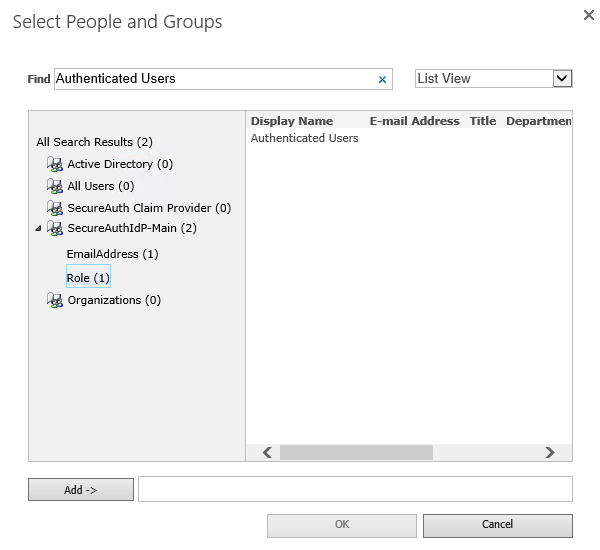
49. Enter a Group or Account Name (in this case, it would be the user's email address) to grant access in the Find text box at the top
The results of the search will appear in the right pane of the dialog
50. Select the type of claim, under the proper Trusted Identity Provider, such as EmailAddress for an individual user or Role for a specific group
51. Double-click on the listed account or role and it will populate next to the Add button
52. Select OK to add the selected account or role to the Users list on the Add Users page

53. Select the Permissions intended for the user or group
54. Click Finish to return to the Policy for Web Application window
55. Click OK to complete
Troubleshooting / Common Issues
Error 404 / Page Not Found on /_trust/default.aspx
If a "404" error or "Page Not Found" message for /_trust/default.aspx occurs when selecting SecureAuth as the credentials to use to log into SharePoint, then check the IIS server on the SharePoint server to see if the _trust directory exists under the SharePoint application virtual directory. If this directory is missing, then run the following command in the SharePoint Management Shell:
$webApp = GetSPWebApplication http://webappurl/
$webApp.Provision()
This will validate and rebuild the virtual directory with the correct settings for claim-based access and add the _trust directory if it is missing.