Use URL Rewrite for IP Restrictions
Introduction
This document describes how to use URL Rewrite for IP restrictions (i.e. redirect external traffic to a different realm)
Prerequisites
1. Ensure the following items are installed and running before configuring URL Rewrite
SecureAuth IdP Version 7.x+
Windows Server 2008, 2008 R2, 2012, or 2012 R2
2. Install URL Rewrite extension on the Windows server
Note
Note that IP and Domain Restrictions in IIS take precedence over URL Rewrite
When configuring the Windows server to use the URL Rewrite add-on, set the feature settings under IP and Domain Restrictions to Allow
Configuration Steps
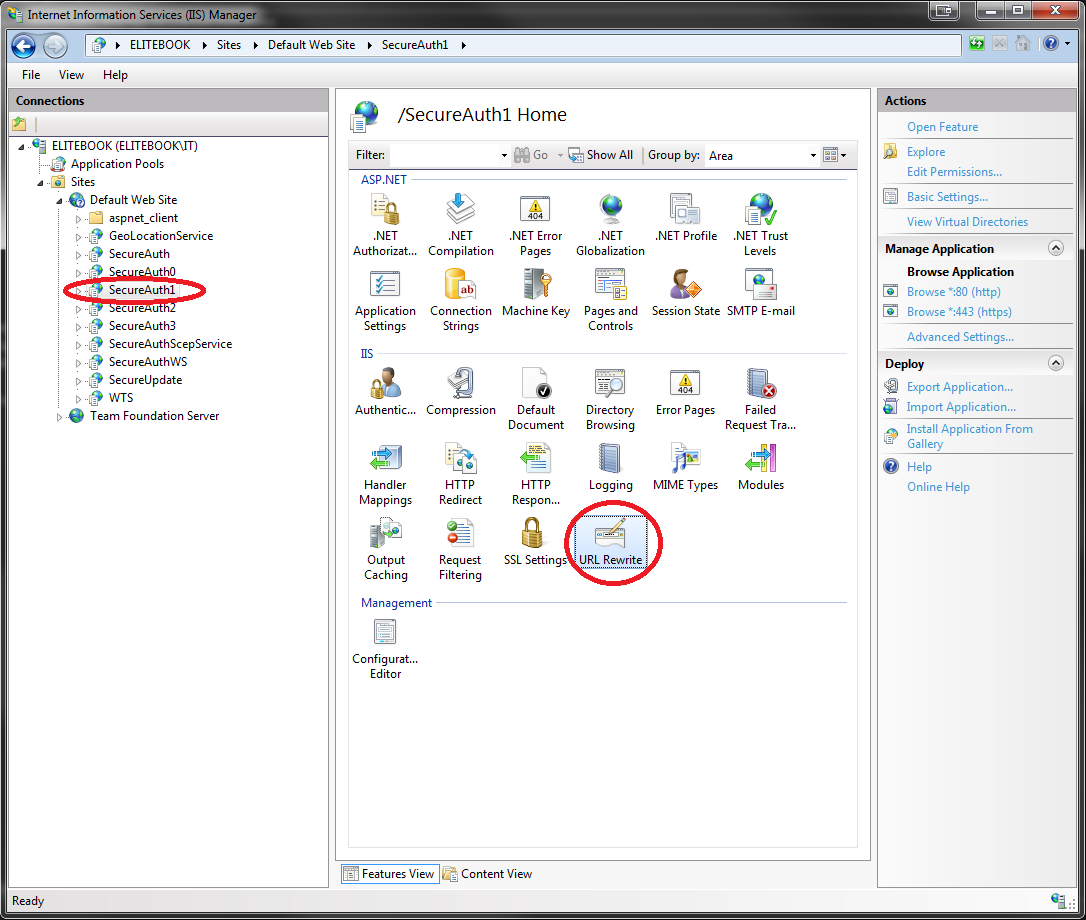 |
1. In the IIS window, select the SecureAuth IdP realm from the tree view pane
2. On the target pane, double-click the URL Rewrite icon
URL Rewrite
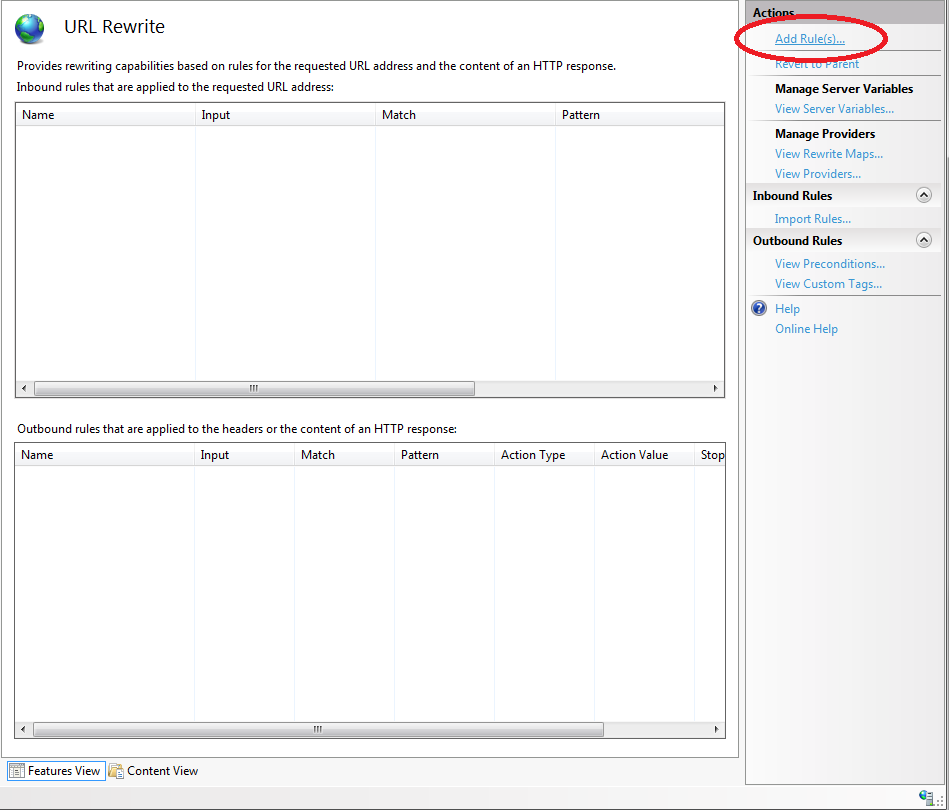 |
3. On the URL Rewrite pane, on the Actions section in the upper right corner, click Add Rule(s) to create the first rule (i.e. to allow internal access to remain on this realm)
Add Request Blocking Rule
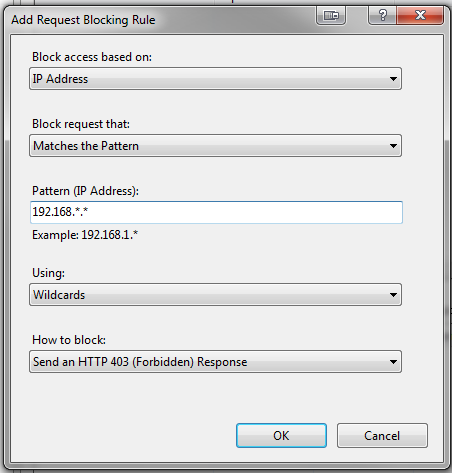 |
4. In the Add Request Blocking Rule dialog, select IP Address from the Block access based on dropdown
5. Select Matches the Pattern from the Block request that dropdown
6. Enter the first internal Pattern (IP Address) to allow, using " * " (dot asterisk) to enable a wildcard
7. Select Wildcards from the Using dropdown, if enabling wildcards
8. Click OK
Edit Inbound Rule
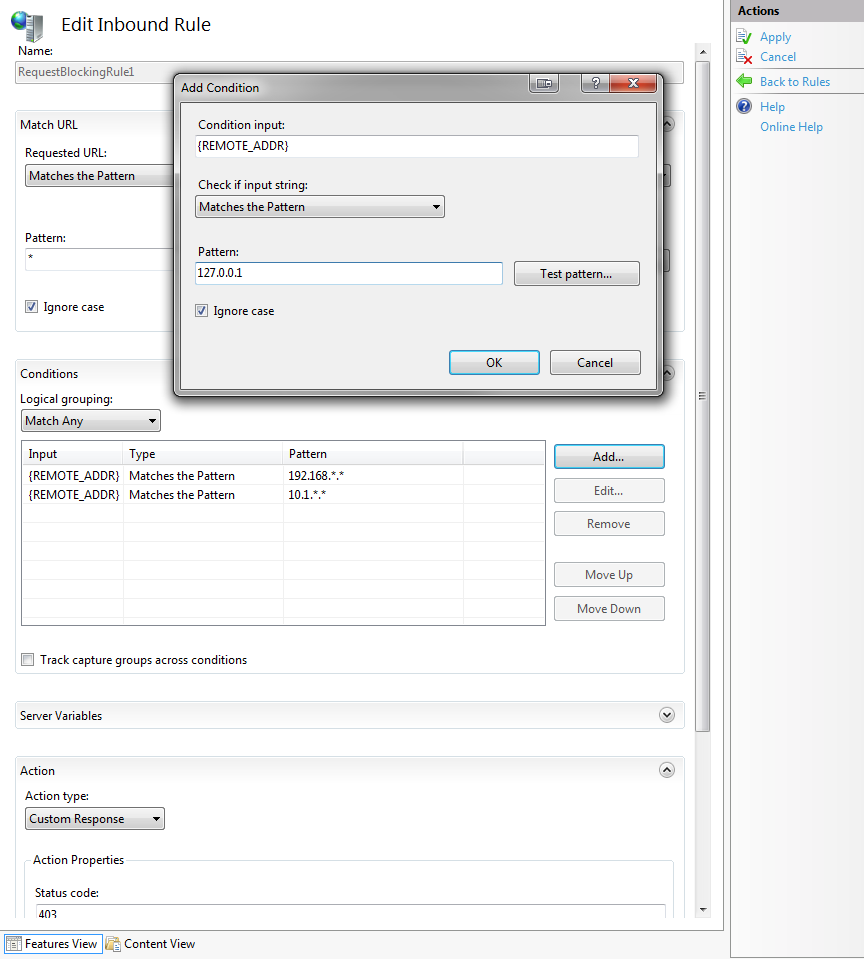 |
9. Double-click the newly created rule to edit the settings for that rule
10. On the Edit Inbound Rule pane, click Add to add another IP address to the internally allowed list
11. In the Add Condition dialog, specify {REMOTE_ADDR} as the Condition input
12. Select Matches the Pattern from the Check if input string dropdown
13. Enter the Pattern and test it to verify it works
14. Click OK
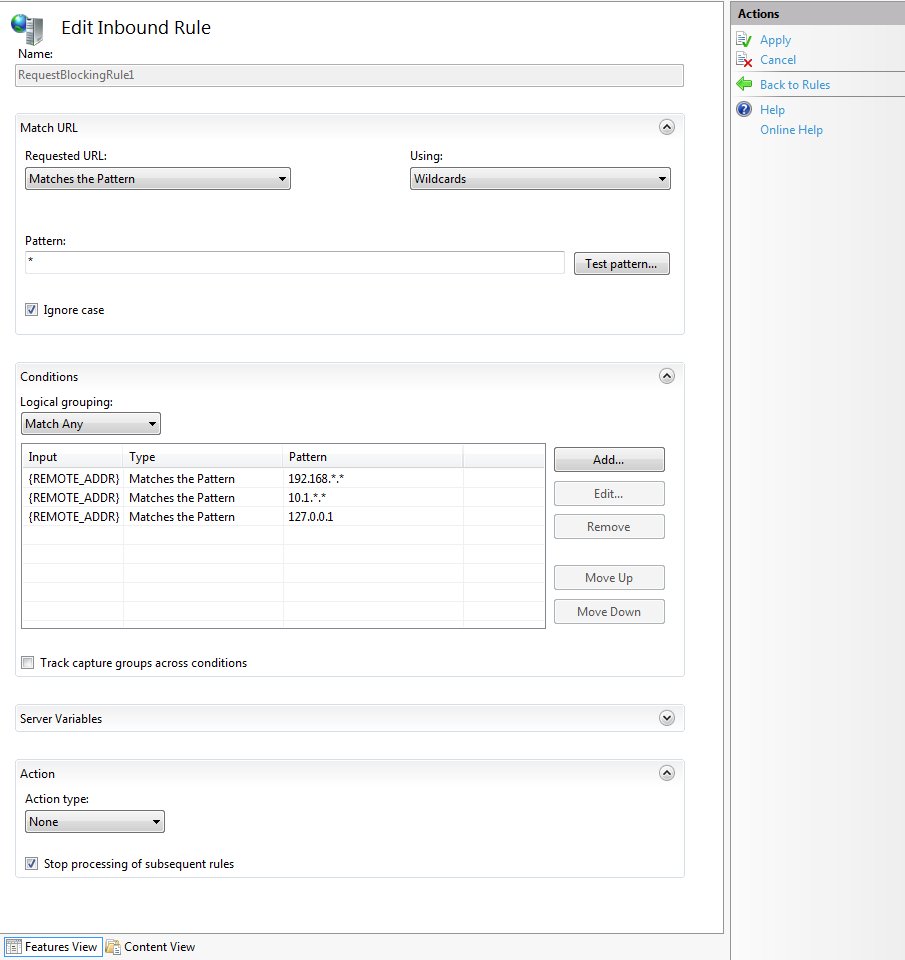 |
15. After adding all the internally allowed IP Addresses to the Conditions list, select Match Any from the Logical grouping dropdown
16. In the Action section, select None from the Action type dropdown
17. Enable Stop processing of subsequent rules
18. On the Actions section in the upper right corner, clickApply
19. Click Back to Rules
20. On the rules pane, click Add Rule(s) to add the next rule (to redirect external traffic)
Add Blocking Request Rule
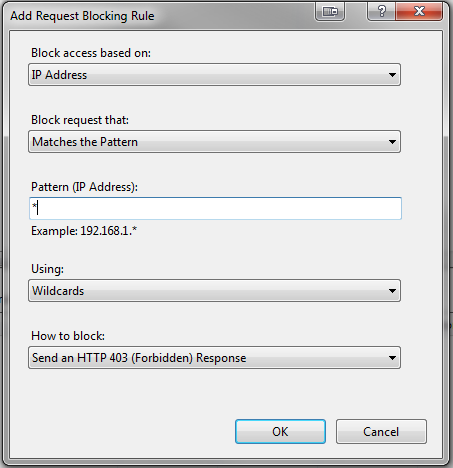 |
21. In the Add Request Blocking Rule dialog, select IP Address from the Block access based on dropdown
22. Select Matches the Pattern from the Block request that dropdown
23. Enter the first internal Pattern (IP Address) to allow, using " * " (asterisk) to enable a wildcard
24. Select Wildcards from the Using dropdown, if enabling wildcards
25. Click OK
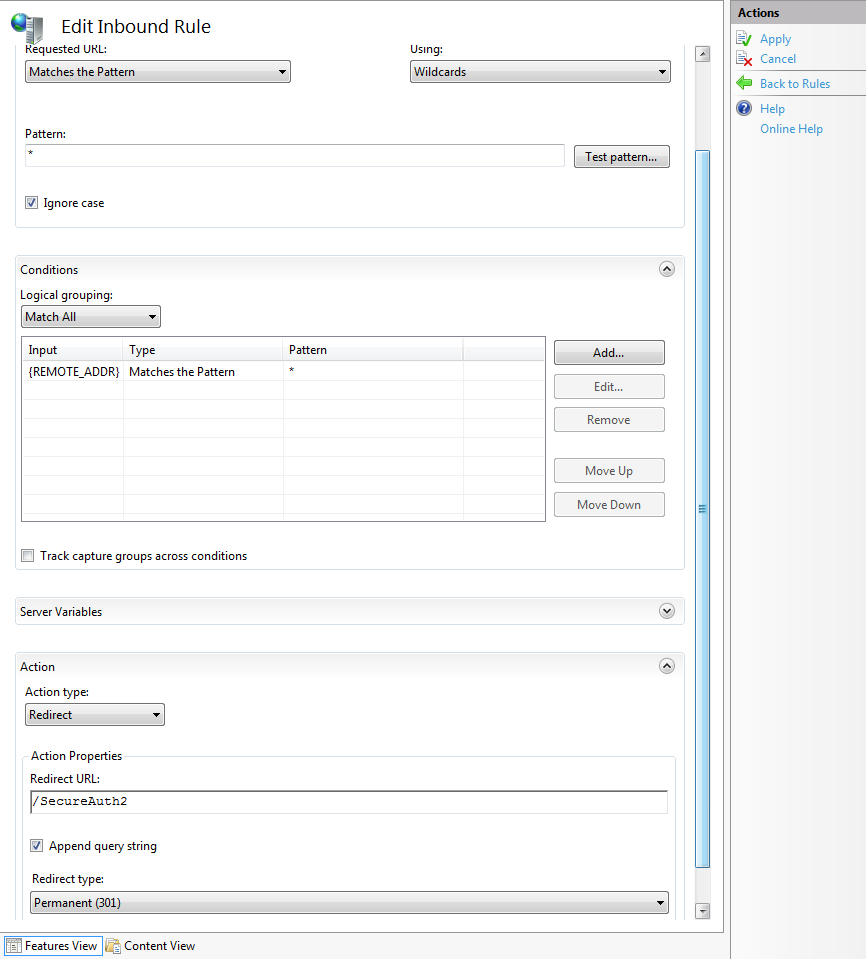 |
26. Double-click the newly created rule to edit the settings for that rule
27. On the Edit Inbound Rule pane, in the Action Properties frame, enter the Redirect URL (external realm)
28. If this realm is set for SAML 2.0 SP Initiated by POST, then select Temporary (307) from the Redirect type dropdown – this setting must be made in order to preserve the POST data
29. On the Actions section, click Apply
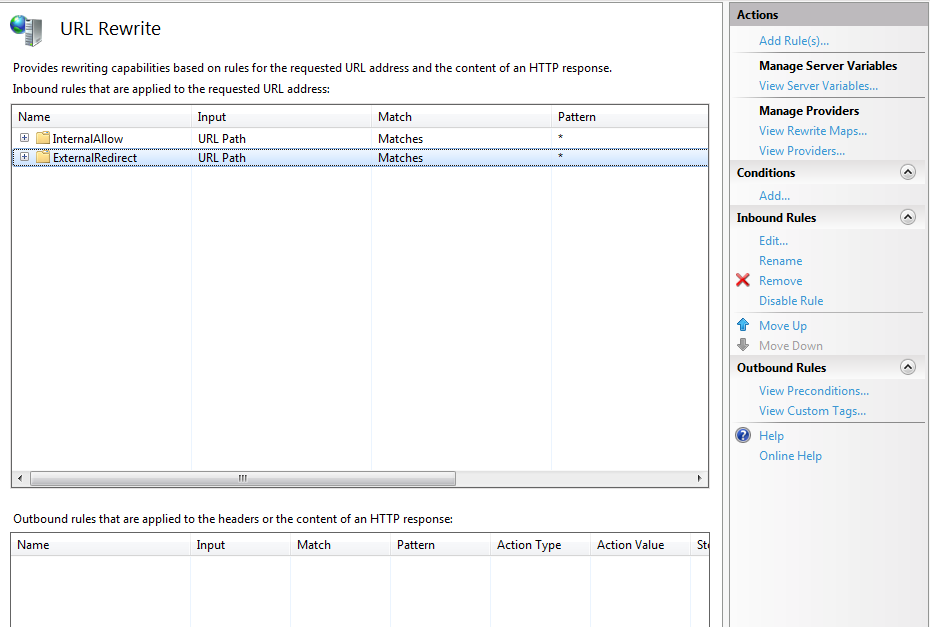 |
30. Click Back to Rules to view the newly-created rule – there should now be two rules created, each of which can be given a more descriptive name for better identification
Sample Web.Config Section for URL Rewrite to Redirect Based on Host Header Field (i.e. X-Forwarded-For)
<rewrite>
        <rules>
        <rule name="RequestBlockingRule1" patternSyntax="Wildcard" stopProcessing="true">
             <match url="*" />
             <conditions>
             <add input="{HTTP_X_Forwarded_For}" pattern="98.190.212.132" />
             </conditions>
             <action type="None" />
         </rule>
         <rule name="RequestBlockingRule2" patternSyntax="Wildcard" stopProcessing="true">
             <match url="*" />
             <conditions>
             <add input="{HTTP_X_Forwarded_For}" pattern="*.*" />
             </conditions>
             <action type="Redirect" url="/SecureAuth66" />
         </rule>
     </rules>
</rewrite>